
Revell 1/92 B-24J Liberator
| KIT #: | H-237 |
| PRICE: | ~$21 |
| DECALS: | One option (Jolly Rogers) |
| REVIEWER: | Chris Mikesh |
| NOTES: | 1965 release |
| HISTORY |
 (From
Instruction sheet ) Among the truly great aircraft of World War II, few achieved
the status of the famous B-24 Liberator. This aircraft participated in most of
the mass raids in Europe, and when the scene shifted to the Pacific Theater,
they were on hand to carry the war to the Japanese homeland. This durable heavy
bomber was seen in all fighting zones in a variety of roles, ranging from
bomber, transport, and tanker to photo reconnaissance and trainer. These 4
engine giants established new distance records and were the most widely used
heavy bombers in the war. (Atlantis-models.com and Revell)
(From
Instruction sheet ) Among the truly great aircraft of World War II, few achieved
the status of the famous B-24 Liberator. This aircraft participated in most of
the mass raids in Europe, and when the scene shifted to the Pacific Theater,
they were on hand to carry the war to the Japanese homeland. This durable heavy
bomber was seen in all fighting zones in a variety of roles, ranging from
bomber, transport, and tanker to photo reconnaissance and trainer. These 4
engine giants established new distance records and were the most widely used
heavy bombers in the war. (Atlantis-models.com and Revell)
| THE KIT |
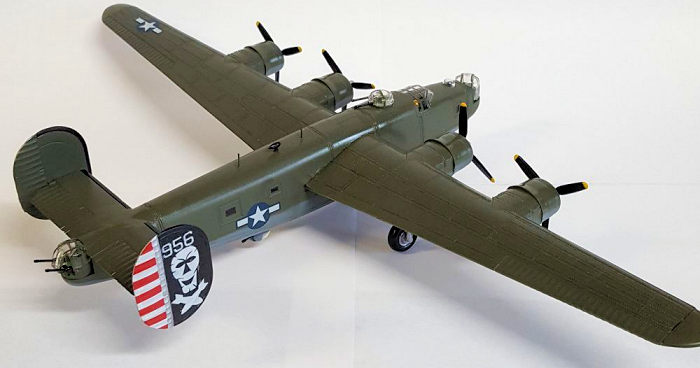
The B-24J kit was originally produced in 1955 by Revell. The plastic is a dark green with a combination of raised and engraved panel lines. Although most of the kit is reasonably accurate, the raised rivet lines are gigantic in scale. This B-24 is from the 90th bombardment Squadron (Jolly Rogers) serving in the Pacific. It has the usual basics including 2 fuselage halves, upper and lower wing halves, a solid elevator, and solid rudders.
| CONSTRUCTION |
 As with most
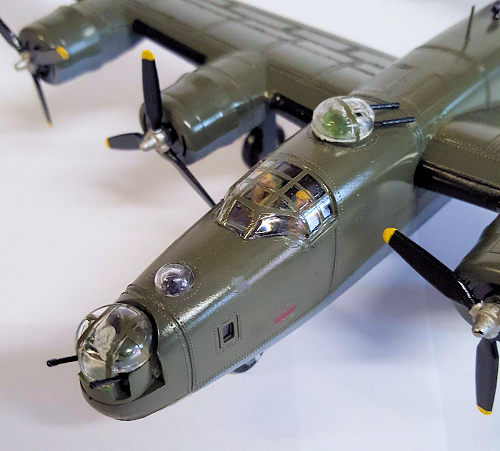
kits, the cockpit is built and detailed first. Oddly, considering the size of
the model, you can actually see into the cockpit through the canopy. The builder
will want to take a few extra minutes to highlight or drybrush the detail of the
console between the pilots. Although the pilots have a helmet, in the Pacific
Theater they were seldom used. The instructions call for a yellow baseball cap
for the pilots. Even at a distance, you can pick out that yellow. There is no
further interior detail in the turrets or in the fuselage.
As with most
kits, the cockpit is built and detailed first. Oddly, considering the size of
the model, you can actually see into the cockpit through the canopy. The builder
will want to take a few extra minutes to highlight or drybrush the detail of the
console between the pilots. Although the pilots have a helmet, in the Pacific
Theater they were seldom used. The instructions call for a yellow baseball cap
for the pilots. Even at a distance, you can pick out that yellow. There is no
further interior detail in the turrets or in the fuselage.
I recommend not adding the clear parts or ‘break-off parts until closer to later. This saved me a lot of clumsy masking. The framing of both the canopy, and the turrets, is on the inside leaving the external surfaces smooth. This causes a complication with masking, as there is no demarcation to cut away the masking to be exposed.
Fuselage assembly consists of all four turret hubs and the cockpit. It is highly recommended that you use more weight in the nose then you think you will need. In the end, I came up short and added additional BBs in all four engines just to keep it on its nose, barely. (Add engine cowlings later in case you need to add weight.)
The fuselage on my example required additional attention. My example had a slightly warped fuselage and needed clamps to close the gaps. Be patient as the newer issues may have fit and warpage problems too. Dry-Fit, Dry-Fit, Dry-Fit!
 In the
process of sanding and shaping the fuselage at the seams, the builder will
inevitably remove the details. Once those surfaces are smooth, use the point of
an X-Acto #11 blade to make artificial rivets at the areas that were sanded off.
Gently poke the surface and bend the blade down a little to raise the surface.
Paint usually fills the hole. This can be done easily with a lot of time and
patience.
In the
process of sanding and shaping the fuselage at the seams, the builder will
inevitably remove the details. Once those surfaces are smooth, use the point of
an X-Acto #11 blade to make artificial rivets at the areas that were sanded off.
Gently poke the surface and bend the blade down a little to raise the surface.
Paint usually fills the hole. This can be done easily with a lot of time and
patience.
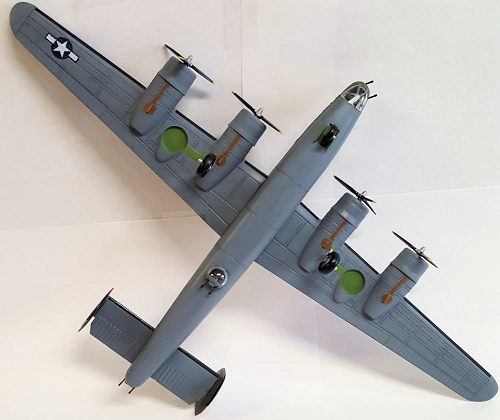
My process was that I painted the upper wings, elevator, rudders, engine cowlings, and the top portion of the fuselage olive green. The neutral grey was done separately before gluing the two Wing halves together. The fuselage was masked and painted separately. Silver and black for the outside of the rudders and olive on the inside. In other words, everything was pre painted before final assembly but was Dry-Fit prior to assembly. Surprisingly, the model fit together quite well. (I understand later issues did not fit as well.)
This is your final chance to get the weight on the nose correct. If you did not add enough nose wait, add the weight in the engine cowling before final assembly.
Landing gear was straightforward, except the kit is missing the nose gear doors. These are simply added using cardstock or other material. Additional radio antennas were added with stretched sprue as there were none provided in the kit.
| COLORS & MARKINGS |
 My revision
of the B-24 is a 1965 issue. The decals were yellowed, but I had a partial built
bagged kit that had better decals. A simple coating of Future floor finish, then
adding all of the clear parts completed the kit. This is one of those models
that brings you back to childhood memories.
My revision
of the B-24 is a 1965 issue. The decals were yellowed, but I had a partial built
bagged kit that had better decals. A simple coating of Future floor finish, then
adding all of the clear parts completed the kit. This is one of those models
that brings you back to childhood memories.
Tamiya neutral Grey XF-53 for the bottom. Tamiya dark green RAF Green XF 81 on the top. Tamiya TS-14 spray black (propellers and wheels), and a black Sharpie for touch-up and molded windows on fuselage was used.
Atlantis Reissues: The Pacific Raiders series consists of the B-24J Liberator, B-25B Mitchell (Jimmy Doolittle) and a B-29 Super Fortress. Classic builders will delight in knowing that Atlantis has reissued these kits. Their version of the B-24J includes both “Buffalo Bill” and the “Jolly Rogers” Pacific Raiders decal sheet.
| CONCLUSIONS |
I still recommend this kit, because it is very solid, and brings back a lot of good memories. Even a younger generation will appreciate its simplicity and quality.
Kind comments and memories are encouraged. Please feel free to write: ChrisMikesh@Gmail.com
26 April 2022
Copyright ModelingMadness.com. All rights reserved. No reproduction in part or in whole without express permission.
If you would like your product reviewed fairly and fairly quickly, please contact the editor or see other details in the Note to Contributors.