Monogram 1/48 B-17G Flying Fortress
| KIT #: | 5600 |
| PRICE: | @$20-60.00 on the used market |
| DECALS: | Two options |
| REVIEWER: | Scott Lyle |
| NOTES: | Kits-World Decals #48037, “Outhouse Mouse” & “Miami Clipper” |
| HISTORY |
There’s not much I can add to the history of the B-17 Flying Fortress. Despite several pre-war cancellation attempts, Boeing’s four-engine behemoth went on to become the workhorse of the 8th Air Force and the iconic US bomber of the war. Renowned for its toughness, the “Fort” proved to be the plane that could brave the clouds of flak, weather the vicious fighter attacks, absorb the damage, drop the bombs, and bring the men home. Today the B-17 remains a beloved symbol of America’s war effort and one of the most popular aircraft of all time.
| THE KIT |
 It’s
somewhat surprising that after all these years we still have only two 1/48 B-17
kits, the 1975 vintage Monogram B-17G and the 1978 Revell B-17F, (supposedly a
near-copy of the Monogram kit). Rumors have abounded for years of new tooled
kits coming from any and all of the big names, but so far nothing has come to
fruition.
It’s
somewhat surprising that after all these years we still have only two 1/48 B-17
kits, the 1975 vintage Monogram B-17G and the 1978 Revell B-17F, (supposedly a
near-copy of the Monogram kit). Rumors have abounded for years of new tooled
kits coming from any and all of the big names, but so far nothing has come to
fruition.
Monogram’s B-17G was an instant classic when it was released. A beautifully molded, highly accurate kit, it won fans with its impressive size (the wingspan is 26”) and also its high level of interior detail that allowed builders to recreate almost every crew station inside the bomber.
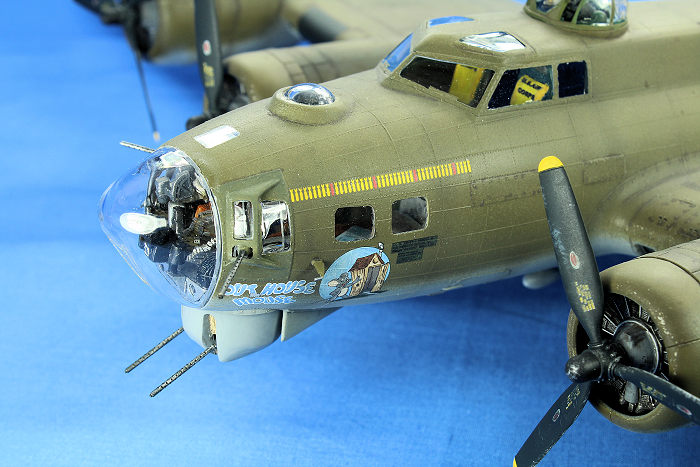
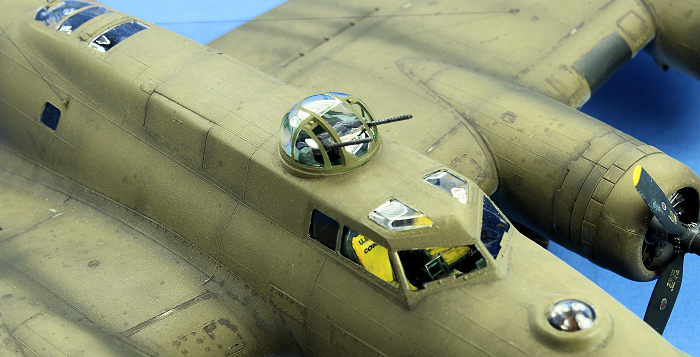
So which B-17G variant is it? In short it’s an early G version, without the staggered waist gun positions or the Cheyenne tail turret. It does feature the bulged “cheek” windows on the nose which some of the very early G aircraft did not have, but those were often retrofitted in depots anyway, so pictures of the actual aircraft you’re going to build will be needed if you’re after absolute accuracy.
I remember building one of these in the ‘70s when I was kid (didn’t we all?), and it hung from the ceiling in my bedroom for years. A few years ago I picked this one up on eBay, the original boxing, still sealed, and I’ve kept it unopened in my stash all this time - until now. Now holding the vintage box in my hands; looking at the cover artwork – I’m feeling some serious nostalgia. What will be inside? One of those great Shep Paine diorama inserts? Slowly tearing off the old plastic wrap, I feel like Indiana Jones opening some kind of ancient chest. Finally I lift off the cover to find…
 A huge
tarantula! No, a large cardboard insert…used to keep the box top from collapsing
onto the parts. Lifting off that I find…a huge tarantula! No, the original
instructions, the original decals, three sprues of some very large steel colored
parts, one sprue of black parts, and yes, there at the bottom, the Shep Paine
guide “Tips on Building Dioramas” in full color. Depicting an amazing diorama of
a damaged olive drab B-17 that crash-landed on an airfield, today’s best diorama
builders have nothing on Mr. Paine – and he did it all without the benefit of
today’s aftermarket goodies.
A huge
tarantula! No, a large cardboard insert…used to keep the box top from collapsing
onto the parts. Lifting off that I find…a huge tarantula! No, the original
instructions, the original decals, three sprues of some very large steel colored
parts, one sprue of black parts, and yes, there at the bottom, the Shep Paine
guide “Tips on Building Dioramas” in full color. Depicting an amazing diorama of
a damaged olive drab B-17 that crash-landed on an airfield, today’s best diorama
builders have nothing on Mr. Paine – and he did it all without the benefit of
today’s aftermarket goodies.
Some things have of course improved with time. The sprue of clear parts was a little beat up by virtue of not being bagged, and there is flash here and there. But there are real strengths here as well. The panel lines are raised but are fine, and there is subtle raised rivet detail in the appropriate places. The control surfaces have a neat fabric texture, and then there is all that interior detail. Five crew figures set in realistic poses and a bomb trailer help with the diorama possibilities.
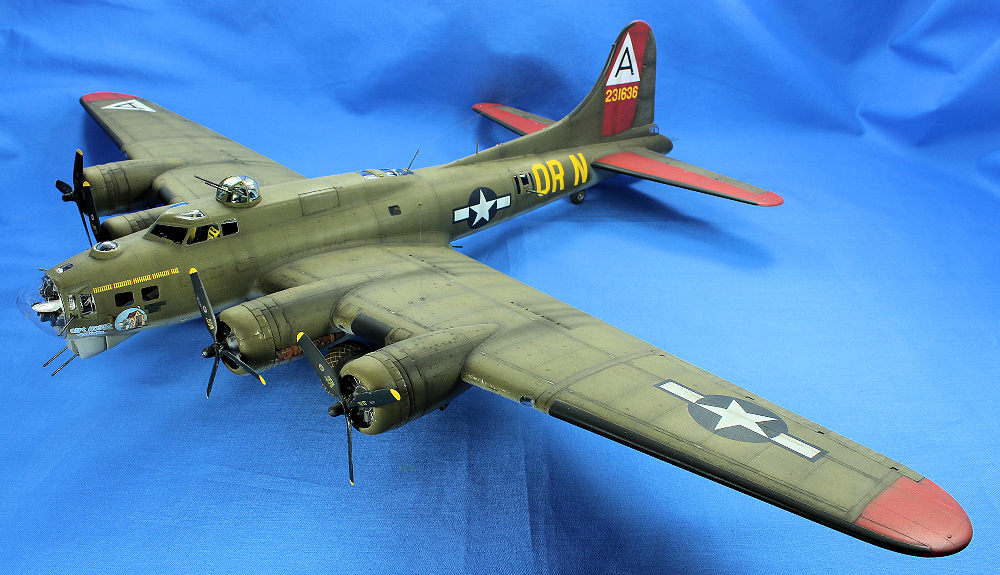
To do this kit justice I’m going to have to dip into my wallet. Mr. Eduard, I hope you’re reading – I bought your photo etch sets for the nose interior, cockpit interior, and radio compartment interior, as well as your resin (Brassin) wheels and your mask set (you’re welcome). I also added metal machine gun barrels from Master Models and topped it all off with decals from Kits-World Decals. I always liked the look of the olive drab Fortresses with the red tails and wingtips so I decided to portray “Outhouse Mouse”, a long-serving early B-17G from the 91st Bomb Group. Armed with such goodies and fresh off building Tamiya’s 1/48 Lancaster, I’m ready to disco my way back to the 70s yet again.
| CONSTRUCTION |
So I bought a riveting wheel - and I have
acquired a taste for it. Before gluing anything together, I printed some line
drawings from the internet, cleaned up the main parts of the airframe, and began
riveting. I was
 impressed by
the rows of rivets Tamiya molded into their Lancaster, so I resolved to achieve
the same effect here. The fresh rivets can look a little deep at first, but
after the 6 coats of paint they’ll receive (primer, pre-shading, main color,
Future coat #1, Future coat #2, Flat coat), I’m confident they’ll be toned down.
impressed by
the rows of rivets Tamiya molded into their Lancaster, so I resolved to achieve
the same effect here. The fresh rivets can look a little deep at first, but
after the 6 coats of paint they’ll receive (primer, pre-shading, main color,
Future coat #1, Future coat #2, Flat coat), I’m confident they’ll be toned down.
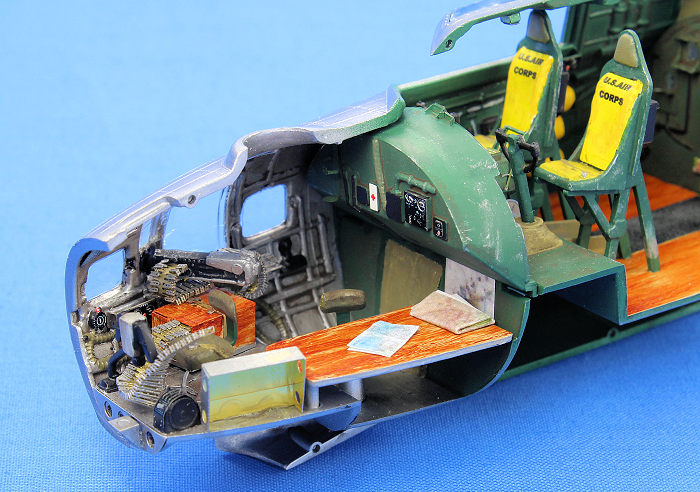
With that done I started on the interior. There are many opinions online as to what the proper interior colors of the B-17 were, but distilling it all down as best I could (and I’m in no way 100% sure of this) it seems as though the entire interior was basically left in unfinished aluminum except for the cockpit area, which was most likely painted dull dark green or bronze green. Confusion reigns with this statement I know as everything from various kit instructions to modern B-17 restorations all show interiors painted in US Interior Green, Zinc Chromate or other colors, but there are WW2 pictures out there of B-17s with natural metal interiors. To be sure various objects, bulkheads, frame members, etc were often painted, but the sheet metal skin of the aircraft seems to have been left unpainted (except for the cockpit area, which often had quilted padding placed on the painted walls, something not provided by the kit). There is some logic to this as painting the inside of an aircraft of this size and complexity would have been very expensive in man-hours, materials, and even weight. The bottom line is we’ll probably never know for sure, and with so many different vendors making so many different parts for so many different aircraft you could probably paint the whole interior Royal Blue and make a case for it…
 I thus
proceeded by adding as many parts from the kit and the Eduard sets as I could
that would be painted in their respective base coat (either Aluminum or Bronze
Green) to the fuselage walls and bulkheads. I then sprayed Tamiya TS-17 Gloss
Aluminum straight from the can on the areas to be aluminum, and used Testors
Acrylic European I Dark Green for the Bronze Green areas. After applying Mig
Productions Dark Wash to those areas I began adding the remaining details from
the kit and the Eduard sets, working from the nose to the tail on each fuselage
half and painting by hand as I went.
I thus
proceeded by adding as many parts from the kit and the Eduard sets as I could
that would be painted in their respective base coat (either Aluminum or Bronze
Green) to the fuselage walls and bulkheads. I then sprayed Tamiya TS-17 Gloss
Aluminum straight from the can on the areas to be aluminum, and used Testors
Acrylic European I Dark Green for the Bronze Green areas. After applying Mig
Productions Dark Wash to those areas I began adding the remaining details from
the kit and the Eduard sets, working from the nose to the tail on each fuselage
half and painting by hand as I went.
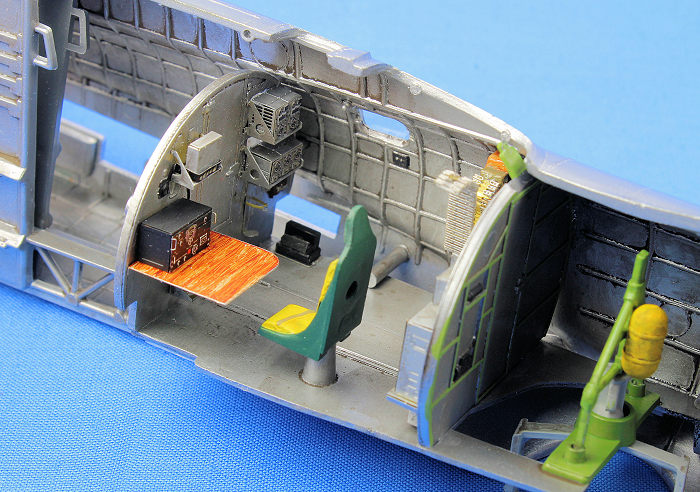
My next step was to begin building up the crew stations. Once you start cleaning up the kit parts you realize the detail is a bit soft, but that’s where the Eduard sets really help out by adding some nice, crisp detail. Starting with the nose I replaced the kit’s ammo boxes with boxes from the Eduard set. I then painted them to look like wood by coating them with Vallejo Iraqi Sand and then dragging some Burnt Sienna oil paint across them with a stiff brush to create a wood grain look. The same technique was applied to the navigators table, which helped break up the monotony of the aluminum walls and floor (which may or may not have been plywood – I left it aluminum).
I
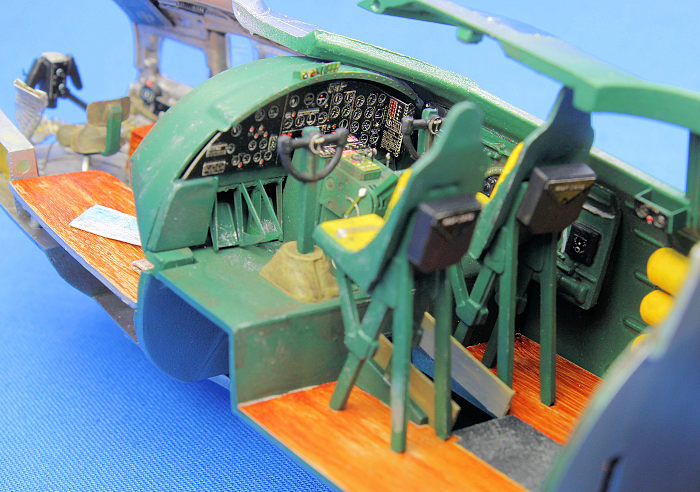
performed some surgery in the cockpit area – the closed doors between the
pilots’ seats that lead to the nose area were dremeled away and replaced with
open doors cut from plastic card. I also dremeled away the passage that opens to
the nose and replaced it with a curtain made of tissue paper brushed with water
and white glue. To get the color-printed Eduard instrument panel to fit properly
I dremeled off the raised details of the kit-supplied instrument panel and also
widened the area where the Eduard rudder pedals go. The cockpit floor was given
the same wood treatment as described above and then I added a strip of 400 grit
black sandpaper to simulate the non-skid surface. The pilots’ seats received
Eduard’s yellow cushion covers with some putty added around the edges to give
them a softer look. Per Eduard’s
 instructions
I made some homemade oxygen tanks out of sprue for the photo etch racks they
supply, and then finished the front of the aircraft up by giving the bronze
green areas a light dry-brushing of Testors Aluminum to add some wear and tear.
instructions
I made some homemade oxygen tanks out of sprue for the photo etch racks they
supply, and then finished the front of the aircraft up by giving the bronze
green areas a light dry-brushing of Testors Aluminum to add some wear and tear.
The radio compartment required some surgery as well. Monogram supplies the radio operator’s table as a solid block of plastic. I dremeled that off, replaced it with Eduard’s photo table, and then gave it the wood treatment. Up next were the various small windows that dot the fuselage, and here’s where I encountered the first real flaw in the build. Two tabs on each window mount into recessed pockets on either side of the window frame, but the tabs are quite large and really show on the window from the outside. I replaced the windows with ones cut from clear acetate sheet.
Once all of the other details had been picked out I test fitted the two fuselage halves together. The fit wasn’t terrible, but I could tell there was going to be some seam work in my future! I glued the crew compartments into the right fuselage half and then snapped a few pictures of my work. The fuselage halves were then closed up using both ProWeld glue and Gorilla Glue’s Superglue.
Before tackling those seams I began gluing the remaining windows in place and to be honest, their fit is very poor. On many of the windows I had to add small strips of plastic to the frame edges to get the windows to sit reasonably flush. On virtually all of them there were gaps to fill. It took a couple of nights to get them to where I could live with them.
Once
the windows were set I masked them with the Eduard mask set and then masked over
any remaining holes to prevent any sanding dust from getting inside (some always
finds a way in…) Using sanding sticks and a Flexi-File I bega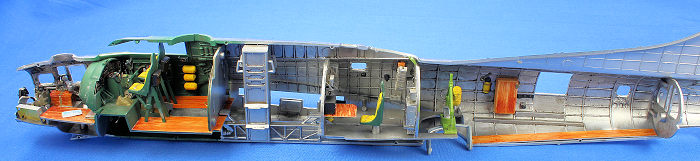 n
sanding the fuselage seams, filling the gaps with Perfect Plastic Putty as I
went. Once the seams looked reasonable I gave the entire fuselage a coat of Mr.
Surfacer 1000 primer, which highlighted how much more work I needed to do on the
seams and windows! After a second sanding session I resprayed the seams with
primer again, and this time got better results. A third sanding session was
needed before I could move on from the fuselage to the wings however.
n
sanding the fuselage seams, filling the gaps with Perfect Plastic Putty as I
went. Once the seams looked reasonable I gave the entire fuselage a coat of Mr.
Surfacer 1000 primer, which highlighted how much more work I needed to do on the
seams and windows! After a second sanding session I resprayed the seams with
primer again, and this time got better results. A third sanding session was
needed before I could move on from the fuselage to the wings however.
Following along with the instructions I assembled the landing gear to the lower wing halves, flooding the joint with Superglue to create some strength. After that the top wings were glued to the bottom wings and set aside to dry. Sanding and filling the wings’ seams was not too terrible. The fit of the engine nacelles was not great, but certainly a lot better than that of the Tamiya Lancaster. I primed the wings and checked their seams for flaws before gluing them to the fuselage, but not before making another alteration. Monogram molded raised “nubs” onto each wing root so that the wings would lock securely into the fuselage, but this system has a couple of disadvantages. First, they create an extremely tight fit when sliding the wing onto the fuselage, so much so that I was afraid that if I really pushed it I would split a seam in either the wing or fuselage - or both. Second, they didn’t really locate the wing as accurately as I wanted. I ended up dremeling the nubs off and using Gorilla CA glue to create a secure and accurate joint. By doing that I only needed a little bit of filler to take care of the wing root seams.
The horizontal stabilizers went together just fine, and once I glued them to the fuselage I was finally able to make some bombing runs at the dog with my big, bad B-17.
| COLORS & MARKINGS |
With the aircraft already primed I pre-shaded the model with Tamiya XF-69 NATO Black, a task that took me three nights (and got incredibly boring) because of all of the rivet lines I made. I then sprayed the red tail and wingtips with Testors Acrylic Insignia Red, letting some of the pre-shading show through.
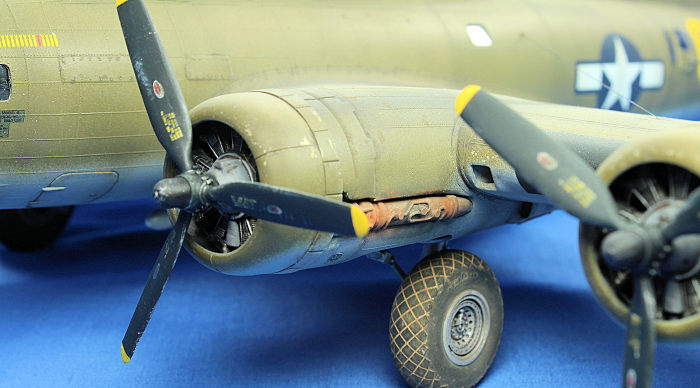
Since
Outhouse Mouse served for a long time I figured it would be pretty beat up. To
create a paint chipping effect around the engines I first sprayed some Tamiya
TS-17 Gloss Aluminum onto the four engine nacelles and onc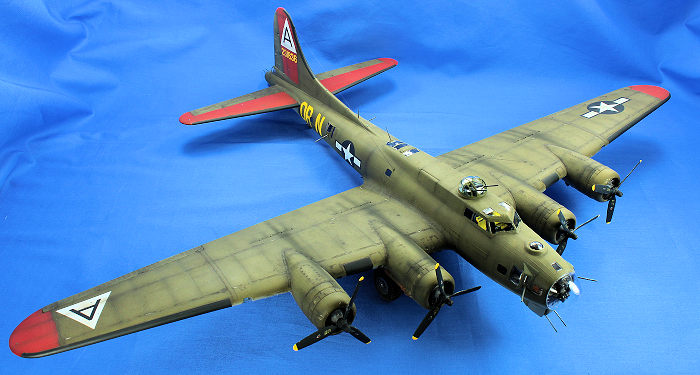 e
dry, sprayed some AK Interactive Worn Effects chipping fluid on them. I sprayed
Testors Acrylic Neutral Gray (lightened with a couple drops of white) onto the
lower surfaces next and then created a homemade Olive Drab mix of 5 parts Tamiya
XF-67 NATO Green/3 parts Tamiya XF-64 Red Brown/1 part Tamiya XF-10 Flat Brown
for the upper surfaces. Once it was dry I used some water and an old brush to
reveal some aluminum paint chips on the engine nacelles.
e
dry, sprayed some AK Interactive Worn Effects chipping fluid on them. I sprayed
Testors Acrylic Neutral Gray (lightened with a couple drops of white) onto the
lower surfaces next and then created a homemade Olive Drab mix of 5 parts Tamiya
XF-67 NATO Green/3 parts Tamiya XF-64 Red Brown/1 part Tamiya XF-10 Flat Brown
for the upper surfaces. Once it was dry I used some water and an old brush to
reveal some aluminum paint chips on the engine nacelles.
Pictures show the fabric control surfaces of the B-17 to often be a different shade of olive drab then the rest of the airframe, so those were sprayed with some Testors Acrylic Olive Drab.
The next step was a coat of Future sprayed onto the entire model. After it cured for a couple of days I applied the decals. I relied on the kit’s decals for the stars and bars and though they were thick, they held together. The Kits-World decals performed perfectly with Walthers Solvaset. Once they had all set I sealed them with another coat of Future.
To create more random surface discoloration I next applied the salt technique. A coat of water was sprayed onto the upper surfaces and then sea salt was sprinkled on to those areas, creating a very random, splotchy mask. I then over sprayed the area lightly with my OD mix that had been lightened with some Tamiya XF-57 Buff.
Up next I applied Mig Productions Dark Wash to the engine nacelles, access covers, ailerons, and any other recessed panel lines. This was followed by airbrushing a very thin mix of 50/50 Tamiya XF-69 NATO Black/Tamiya XF-64 Red Brown onto the panel lines and around the engine nacelles, a step that always adds a worn look to the model.
 Testors
Lacquer Flat Finish was used to give the aircraft its flat finish. I’m finding
that two separate sessions usually work best for this step. It covers better
when sprayed twice, plus I usually miss some spots the first time around.
Testors
Lacquer Flat Finish was used to give the aircraft its flat finish. I’m finding
that two separate sessions usually work best for this step. It covers better
when sprayed twice, plus I usually miss some spots the first time around.
The airplane was starting to look pretty aged after all of these techniques so for the final weathering step I added some Tamiya NATO Black to the 50/50 mix and sprayed some sooty exhaust streaks coming from the engines and across the wings.
Is that light at the end of the tunnel I see? All that was left to do was to add on the fragile details. I assembled the Brassin resin wheels and painted their hubs Testors Aluminum and their tires Tamiya NATO Black. Some pastels were dusted on to fill up the diamond treads with dust.
Up next was to remove all the window masks, a nerve-wracking step. I was worried that a window would pop out or worse, pop in, but thankfully no problems were encountered. I added two antenna wires using EZ Line and then started adding all of the metal machine gun barrels. I was now almost finished, though at this point it was virtually impossible to pick the model up without knocking something off!
The last step was the props. I first painted the tips Testors Insignia Yellow, then masked them off and sprayed the rest with Tamiya NATO Black. This was followed with a light dry brushing of Testors Steel and then some Testors Gloss on the blades to prepare for the decals. The kit’s decals were applied, and then Testors Flat Finish and some dry brushing with Tamiya NATO Black brought them back to dirty reality. And once I glued the four of them into place, my B-17 was finally finished.
| CONCLUSIONS |
 I love the
nostalgia of building one of these old kits every now and again. If someone had
told 10 year old me that forty years later I’d be building the very same kit,
only it would take me four months longer and cost me many dollars more, well,
I’m not sure what I would have thought.
I love the
nostalgia of building one of these old kits every now and again. If someone had
told 10 year old me that forty years later I’d be building the very same kit,
only it would take me four months longer and cost me many dollars more, well,
I’m not sure what I would have thought.
The kit is a classic, even if it did put me through my paces a little bit (those windows are bad). It wouldn’t have taken me so long either if I hadn’t added in some time (and money) consuming steps.
Monogram’s B-17 isn’t a shake –n-bake kit and it does show its age in a number of places, but I gave up on my dream of Tamiya issuing an all-new 1/48 B-17 a long time ago. With a little work you’ll have a fine replica of one of history’s most iconic aircraft. It is a testament to the Monogram so many of us grew up with that after all of these years, few companies have tried to rival their famous line of big bombers.
| REFERENCES |
- Squadron/Signal Publications, Aircraft in Action #63, “B-17 in Action”
- Squadron/Signal Publications, Aircraft in Action #219, “B-17 Flying Fortress in Action”
- Squadron/Signal Publications, Aircraft Walk Around #16, “Walk Around, B-17 Flying Fortress”
12 February 2018
Copyright ModelingMadness.com
If you would like your product reviewed fairly and fairly quickly, please contact the editor or see other details in the Note to Contributors.
Back to the Main Page Back to the Review Index Page Back to the Previews Index Page