
Matchbox 1/72 B-17G Flying Fortress
| KIT #: | PK-603 |
| PRICE: | $ |
| DECALS: | Three options |
| REVIEWER: | Dan Lee |
| NOTES: | 1979 Boxing |
| HISTORY |
The B-17 Flying Fortress is one of the iconic aircraft of World War 2 and easily one of the most recognizable bomber type in the world (although fans of the Lancaster might have something to say about that.) When it first flew in combat with the RAF in 1941, it was shown it didn’t have enough guns, armor, and fuel. This forced a major redesign of the Flying Fortress into the form most people recognize.
The B-17G was the last and ultimate version of the B-17 which was equipped with 13 .50 caliber machine guns and a typical bomb load of around 4,500 pounds. Despite the pre war fantasies of the bomber generals and the best efforts of its gunners, the B-17 needed escorts to help protect it in daylight bomb missions over Europe against fighter attack. The addition of fighter escort helped grind down the Luftwaffe to a shell of its former self and “reduced” the dangers to “just” heavy flak.
One of the main strengths of the B-17 was its ability to take a horrific amount of damage and still bring its crew back home. The stories became legends and even affected the morale of B-24 Liberator crews who did not have the faith in their plane as much as B-17 crews did in theirs.
 The
B-17 mostly served in the European and Mediterranean Theater of Operations as
it’s shorter range and smaller payload relative to the B-24 and B-29 proved to
be a hinderance in the much larger Pacific Theater of Operations. After the war,
the now obsolete B-17 was quickly removed from military service. Most were sold
into scrap and the survivors became target tugs, drones, firebombers and/or VIP
aircraft.
The
B-17 mostly served in the European and Mediterranean Theater of Operations as
it’s shorter range and smaller payload relative to the B-24 and B-29 proved to
be a hinderance in the much larger Pacific Theater of Operations. After the war,
the now obsolete B-17 was quickly removed from military service. Most were sold
into scrap and the survivors became target tugs, drones, firebombers and/or VIP
aircraft.
The 100th BG was activated in June of 1942 and assigned to the 8th AF a year later. It earned the nickname “Bloody 100” due to the fact it took a lot of losses and was a marked outfit by the Luftwaffe. The story of how the 100BG earned Luftwaffe wrath was that a damaged B-17 indicated it was surrendering to the Luftwaffe and was escorted by three Bf-109s to a nearby airfield. Apparently, the pilot changed his mind and the gunners on the B-17 opened up and shot down all three Bf-109s. This enraged the Luftwaffe enough that they went after any B-17 that had the unit Square D emblem on their tails. The Bloody 100 made its last combat mission on April 20, 1945 and was deactivated December of 1945.
Later it was resurrected during the Cold War and eventually became the 100 Air Refuelling Wing. It is one of the few USAF units that is allowed to wear the badge (square D) it had during WW2. (Since the 100 ARW is based in the UK, this may well be the reason for maintaining the fin marking. Ed)
| THE KIT |
See my preview of this kit.
| CONSTRUCTION |
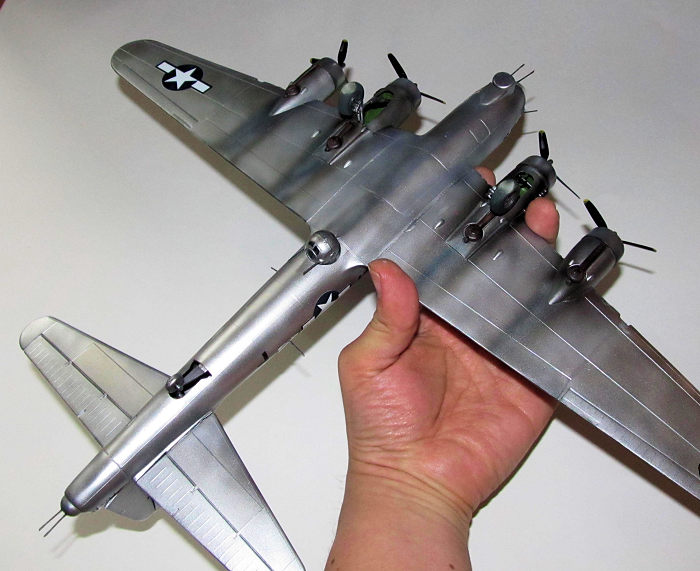
Let's go back to 2011/2012 when I began with the interior. I had a delusional idea to turn this simple kit into a mega detailed build. I started by adding various compartments/detail to improve the interior and went about using gauges to draw and cut out plastic card in the shapes of the bulkheads I was going to add. Next I added stringers in the waist gunners area by gluing strips of plastic half rod and strip. I sprayed the interior with Talon Acrylic to see how they would look from the inside. That is when I noticed the clear parts weren't as clear as they could be and that all my work would have been worthless and pointless. Disappointed, I threw the parts in the box and let it sit on what would be a literal shelf of doom.
 Fast forward
to April 2018 when I spent some time cleaning my basement and threw out a bunch
of broken/ruined kits. I decided to open the box to see what I could salvage
from my misguided attempt. I realized that this kit could be finished rather
quickly if I wasn't going to turn it into a mega detailed wonder (which it is
not.) The recent Airfix B-17G kit is a much better updated example of the model
design and is a better saner choice to mega detail if I so chose. Thanks a
return to sanity, I decided I would build it as is.
Fast forward
to April 2018 when I spent some time cleaning my basement and threw out a bunch
of broken/ruined kits. I decided to open the box to see what I could salvage
from my misguided attempt. I realized that this kit could be finished rather
quickly if I wasn't going to turn it into a mega detailed wonder (which it is
not.) The recent Airfix B-17G kit is a much better updated example of the model
design and is a better saner choice to mega detail if I so chose. Thanks a
return to sanity, I decided I would build it as is.
I followed the Matchbox instructions and added the various “clear” window inserts and plastic rods that were the closest things to detailed .50 caliber machine guns during the early 80s using Tamiya extra thin glue. The pilots were hand painted to the best of my ability.
The aluminum interior was masked off and the rest of the interior was painted dark green to represent the B-17G's dark dull green color. The efforts from cutting out bulkheads from plastic card were not wasted as they were glued in place to provide some reinforcement of the waist area.
 The extremely
plain cockpit parts were glued together, hand painted and the figures added
before being glued in place. I assembled the ball turret and it was placed loose
in its mounting. The two main fuselage halves were added together using CA glue
(to eliminate the phantom seam that shows up when using liquid glue) and there
were a lot of gaps that needed to be fixed.
The extremely
plain cockpit parts were glued together, hand painted and the figures added
before being glued in place. I assembled the ball turret and it was placed loose
in its mounting. The two main fuselage halves were added together using CA glue
(to eliminate the phantom seam that shows up when using liquid glue) and there
were a lot of gaps that needed to be fixed.
I worked on the nose and chin turret next. It was proved to be more of a challenge than the fuselage. It popped apart several times when I was trying to hold it together while the glue took hold. After a few attempts, the damn thing finally held together. I glued the nose in place to the front on the main fuselage and there were some notable gaps to be dealt with.
It turned out that I had glued the wings and elevators together seven years earlier so I started on dealing with all those seams. It took about 3 hours of wet sanding with various grades of wet/dry sandpaper before I got something smooth and polished. One of the benefits I've found with the Vallejo Metal Color is that you don't need the super polished plastic surface that other metal paints demand. I just polish down to 4000 grit and that's good enough (for me.)
The Cheynne turret was glued in place. There was a bit of a seam there too, but I only filled it with Vallejo plastic putty and didn't sand it smooth as I wasn't fond of filling sanding at that point. Certain panes of the clear parts were taped up while the rest were masked using Micromask because I feared the pressure needed to apply tape would pop out the windows I glued in.
| COLORS & MARKINGS |
 I primed the
main parts with two coats of Tamiya flat black and then one coat of Vallejo
Black Primer-the reason why I did it this way was due to the poor stick of
Vallejo Black Primer. I gently polished the primer coat with 4000 grit.
I primed the
main parts with two coats of Tamiya flat black and then one coat of Vallejo
Black Primer-the reason why I did it this way was due to the poor stick of
Vallejo Black Primer. I gently polished the primer coat with 4000 grit.
When the primer coat was dry I glued the wings and elevators on, but due to the poor fit and the limited mating surfaces I used two part epoxy to secure them. Once the epoxy cured, the gaps were filled into Vallejo plastic putty with the excess removed with Q-Tips. I ended up reapplying the primer coat. Lastly, I sprayed the interior of the wheel wells Zinc Chromate Green.
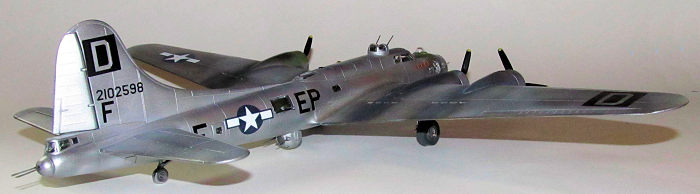
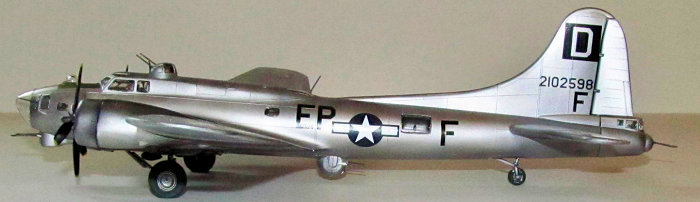
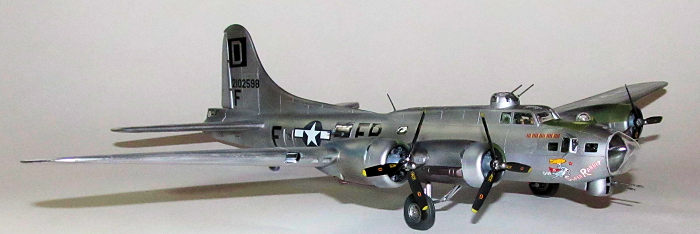
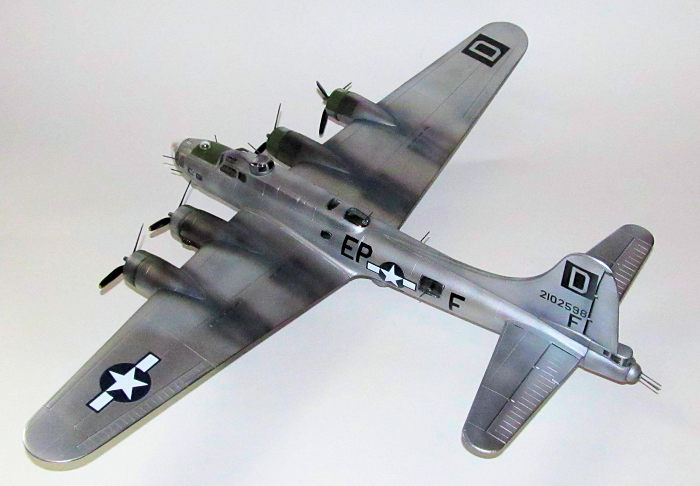
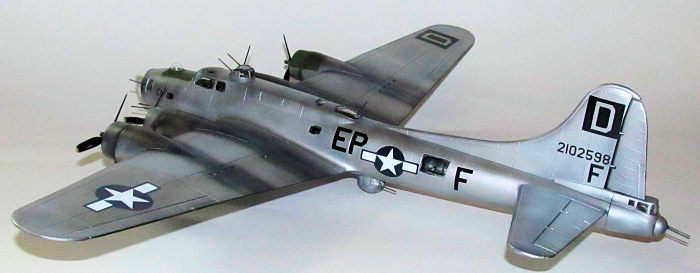
The markings I chose were of an all metal B-17 so I went with a white aluminum base coat. I sprayed on that particular Metal Color in a fine mist and let the color build up on the main body of the model and the cowlings. I do it this way as I found that the paint runs when I spray it on thick so I have to be really careful with the paint amount and not to let it spray on thick.
Once there was enough paint, I changed colors and went with Dark Aluminum. I sprayed in certain areas around the wings where there would be some slight metal discoloration from the heat of the engines and the exhaust. The tail and other fabric surfaces were painted using Tamiya X-11 Chrome Silver.
I masked off the glare panels on the fuselage, cowlings and engines. These areas were sprayed with a mix of Tamiya XF-62 olive drab and XF-82 RAF Green. The landing wheels were painted using XF-69 NATO Black and when dry I masked off the tires so the hubs were painted white aluminum. The landing gear were painted using Chrome Silver. The propellers were sprayed with gloss black and the prop hubs and tips were hand painted with silver and Model Master Reefer Yellow respectively.
 The decals
for this kit were in bad shape so I threw them out. I chose Aeromaster's Decal
sheet 72-212 which had a 389th BG
and 100BG B-17. I was reminded of a back and forth commentary I had with someone
about over used units like the 91st
BG or other red tailed B-17 Bomber Groups, the 244th
Sentai and the 357th FG so I opted
for the less common 100BG.
The decals
for this kit were in bad shape so I threw them out. I chose Aeromaster's Decal
sheet 72-212 which had a 389th BG
and 100BG B-17. I was reminded of a back and forth commentary I had with someone
about over used units like the 91st
BG or other red tailed B-17 Bomber Groups, the 244th
Sentai and the 357th FG so I opted
for the less common 100BG.
The B-17 and props were first gloss coated then when dry, I added the decals. The almost 20 year old decals went on well using MicroSol, but they had a few areas of touchup that required Solvaset. Once they were dry. I wiped down the model for weathering. At this point I glued the props and engine cowlings in place.
The well known soot areas were sprayed on using a combination of Tamiya NATO Black, Dark Grey and Smoke. I tried to make the area around the engines and exhausts look dirty (partially to hide the rather filled in, but obvious gaps around the engine nacelles.) I varied the soot so that one engine (starboard inboard engine) seemed dirtier than the rest (as with everything, not all things are created equally.) Lastly, I flat coated the props and gloss coated the rest.
| FINAL CONSTRUCTION |
I added the landing gear
and the damn things wouldn't hold because Matchbox used simple open tabs to hold
the landing on but they were open at the top (to allow the landing to be added)
but nothing to hold the rest of the plane in place so it sank. An attempt with
CA glue proved to be even more fragile so I ended up using two part epoxy to
hold it in place. I let it cure for a couple of days, but then I discovered that
the port landing gear didn't like up as well. It took a couple of attempts to
wiggle the port landing gear to my
 satisfaction.
It is still wonky, but not much I can do about it. This is the one area where
the Matchbox kit is really weak. I cut off most of the wheel mounting pegs and
glued on the painted Quickboost resin wheels.
satisfaction.
It is still wonky, but not much I can do about it. This is the one area where
the Matchbox kit is really weak. I cut off most of the wheel mounting pegs and
glued on the painted Quickboost resin wheels.
During the sanding and handling process I broke off a number of the guns. I didn't have any thin plastic rod to replace it, but I did have a 1/72 resin gun barrel set from Quickboost. I cut off the remaining plastic barrels and glued the painted resin guns in place. I had some issues with the glue holding so the alignment of the guns (especially the dual gun turrets) is questionable.
I removed the masking material from the windows, glued on the remaining clear parts and now I had a finished B-17G. When I took the first photos I didn't notice I had not painted the tail wheel and forgot the RDF football. Oops.
| CONCLUSIONS |
The B-17G was started for what turned out to be a silly reason, but ended up to be a fun build. This build showed that if you treat the older kits for what they are and not obsess over the need to fix everything “wrong” with them then you can have a lot of fun. I didn't really want to add any aftermarket parts, but I ended up using them after I broke the guns and looked at the poor wheels.
28 May 2018
Copyright ModelingMadness.com
If you would like your product reviewed fairly and fairly quickly, please contact the editor or see other details in the Note to Contributors.
Back to the Main Page Back to the Review Index Page Back to the Previews Index Page