Italeri 1/72 A-26B Invader
| KIT #: | 1274 |
| PRICE: | $52.00 |
| DECALS: | Six options |
| REVIEWER: | Lee Kolosna |
| NOTES: | Basic kit build |
| HISTORY |
 The
Douglas A-26 was a light bomber intended to replace the extremely successful
A-20 Havoc. Taking to the air in 1942, a gun-nose B model was produced at
the same time as the glass-nosed C model. The first operational deployment
of the new aircraft occurred in October 1943 in the Pacific. Initial
feedback to Douglas was not positive as the position of the cockpit between
the two large nacelles containing Pratt &Whitney R-2800 radial engines
limited downward visibility, particularly compared to the less-intrusive
design of the A-20. Deployments to the European theater began a year later,
in September 1944, with units operating from bases in Europe. Some of the
concerns about pilot visibility were addressed with a larger “clamshell”
canopy with a bulged top, but downwards sightlines remained an issue.
The
Douglas A-26 was a light bomber intended to replace the extremely successful
A-20 Havoc. Taking to the air in 1942, a gun-nose B model was produced at
the same time as the glass-nosed C model. The first operational deployment
of the new aircraft occurred in October 1943 in the Pacific. Initial
feedback to Douglas was not positive as the position of the cockpit between
the two large nacelles containing Pratt &Whitney R-2800 radial engines
limited downward visibility, particularly compared to the less-intrusive
design of the A-20. Deployments to the European theater began a year later,
in September 1944, with units operating from bases in Europe. Some of the
concerns about pilot visibility were addressed with a larger “clamshell”
canopy with a bulged top, but downwards sightlines remained an issue.
In general, the airplane was a delight to fly and these characteristics allowed it to remain in the US Air Force’s inventory for another twenty-five years. Confusingly, the aircraft was re-designated the B-26 (not to be confused with the Martin B-26 Marauder, which left the service almost immediately during the drawdown after the war) as it served during the Korean and Vietnam conflicts. The versatile design allowed the Invader to serve as a medium altitude bomber, ground attack strafer, night fighter, reconnaissance, and in an interdiction role with the final variant of the airframe, the B-26K.
| THE KIT |
 Italeri
outsourced the design of this kit to Czech manufacturer MPM, but pressed their
own copies for release under the Italeri brand. Included are both types of
canopy: the early style and the later clamshell configuration. Douglas
introduced the clamshell canopy starting the A-26B-30-DL production block
(Douglas’ Long Beach, California plant), and with the A-26C-30-DT production
block (Douglas’ Tulsa, Oklahoma plant), so it is important for the modeler to
use a serial number reference website to determine which canopy is correct for
the aircraft they wish to depict.
Italeri
outsourced the design of this kit to Czech manufacturer MPM, but pressed their
own copies for release under the Italeri brand. Included are both types of
canopy: the early style and the later clamshell configuration. Douglas
introduced the clamshell canopy starting the A-26B-30-DL production block
(Douglas’ Long Beach, California plant), and with the A-26C-30-DT production
block (Douglas’ Tulsa, Oklahoma plant), so it is important for the modeler to
use a serial number reference website to determine which canopy is correct for
the aircraft they wish to depict.
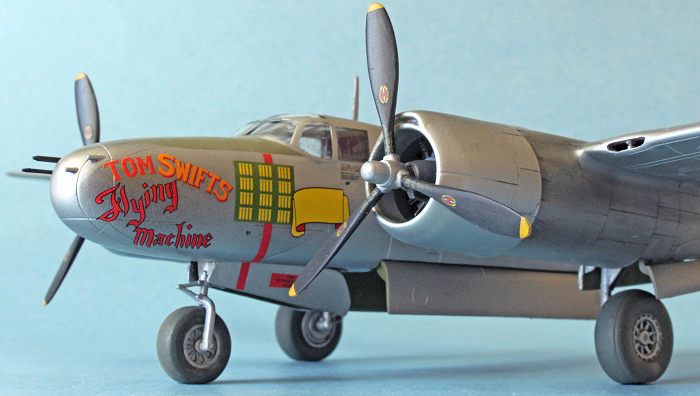
The gun nose is the early six-gun arrangement, appropriate for most early European World War II era Invaders, and underwing gun packs are also provided. The later eight-gun configuration nose is not provided. This was the factory arrangement starting with the A-26B-50-DL production block so again you’ll need to refer to a serial number cross-reference to see if the A-26 matches the markings you intend to use. Also note that some earlier six-gun Invaders had the eight-gun nose upgrade installed, which would have to be confirmed in period photographs.
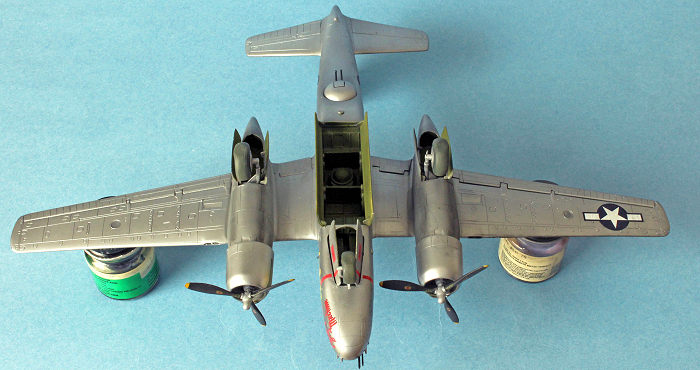
The bomb bay is detailed with eight 250 LB bombs provided. The bomb bay doors can be posed open or closed. Some features from the initial 2004 release of this kit as a B-26K variant have to be removed, such as the wing leading-edge wing machine gun barrels. Also, vortex generators on the right side of the vertical stabilizer need to be sliced off.
Six choices are provided by the excellent Cartograf-printed decal sheet. Five are in natural metal while the Korean War subject is gloss black overall. There is a decal provided for the instrument panel. The first four choices are -15 or -20 production block aircraft, meaning they had the early-style canopy, six-gun nose, and both top and bottom turrets. The Pacific Theater aircraft is from the -50 production block, meaning a clamshell canopy, eight-gun nose, with only the top turret present. The Korean War aircraft is from the -35 production block, so it would have the clamshell canopy, no lower turret, and almost certainly had the eight-gun nose retrofitted. The kit provides both ventral and dorsal turrets, including an early design alternative for the top turret. There is no blanking plate provided if your model requires the bottom turret to be left out.
The kit has finely engraved panel lines, thin and clear transparencies, and rudimentary representations of the Pratt & Whitney R-2800 radial engines.
There are several mostly minor issues that I encountered when building this model. This is by no means a definitive list, but are the ones that I devoted attention to:
· The cowling flaps are much too thick. I didn’t bother thinning them, but one could sand them down from the inside to reduce the effect.
· The nose wheel is about a millimeter too wide. Not enough for me to bother finding an aftermarket replacement.
 · The
engines are buried inside the nacelles a bit too far back. I didn’t do anything
about this as that would entail a lot of work for very little reward.
· The
engines are buried inside the nacelles a bit too far back. I didn’t do anything
about this as that would entail a lot of work for very little reward.
· The carburetor air intakes on the leading edges of the wings are undersized. This is hard to fix, and probably not worth the time and effort to do so.
· An ADF football antenna is provided for the space aft of the gunner’s canopy. Early A-26s had an exposed loop that is not provided in the kit. I dug into my spares box to find a replacement.
· The remote gun-sighting periscope extends through the top and the bottom of the fuselage. It is a little too long so I lopped off a couple of millimeters from the top of the shaft.
· The propeller blades are a bit too wide with an exaggerated teardrop shape. I sanded the trailing edge of my model’s blades a little bit but I think they’re still off.
· There is an antenna that extends at a 45-degree angle upwards from the side of the cockpit that is not included in the kit. I found a suitably-sized piece of plastic in my spares box for this.
· Fit of the internal bulkheads is a little imprecise. I had to break them away and reposition a couple of times before I was satisfied with the bomb bay alignment.
· There is little to no detail inside the main wheel wells.
· The clear parts are nice and thin but the fit is not precise, requiring filling of fairly substantial gaps around both the cockpit and the rear gunner’s canopies.
· The pitot tube on the top edge of the vertical stabilizer is not provided. I fashioned one from a piece of wire.
· The main landing struts have to be inserted between the nacelle halves before gluing the nacelle assembly to the bottom wing. It might be just me, but the resulting angle was leaning way too much inward. I simply bent the plastic struts back into proper alignment. As usually the case with such an arrangement, I managed to snap off one (amazingly, not both!) of the struts during construction and had to glue it back on with a pin for strength.
It might seem like these are a lot of issues, but in reality some are not worth fixing (cowlings, carburetor air intakes) or in other cases they can be easily dealt with. In this scale, this is the most modern A-26 Invader kit available and it builds up to a decent representation of an important subject.
| CONSTRUCTION |
US Interior Green A/NA 611 fans, rejoice! The interior sections (fuselage, bomb bay, wheel well) were all painted with Vallejo US Light Green FS34151. Instruments and consoles were painted with Vallejo Model Air Flat Black. The kit instrument panel decal was used, and thin strips of paper painted a light gray were used to depict the pilot’s harness. The interior detail for the clear nose canopy variants (A-26C) are still present, but I sawed that part off to leave enough space to put a large zinc fishing sinker into the nose cone to ensure that my model would sit properly in the tricycle landing gear.
The interior bulkheads were glued into one fuselage half. I chose not to arm my aircraft with bombs, but I did want to depict the bomb bay doors open. As mentioned above, when the fuselage halves were glued together, I found the alignment of the bulkheads askew so I broke them off and repositioned after the fuselage halves were together. I used thick CA glue for the joint to prevent the appearance of ghost seams later. The seams were filled and sanded smooth.
 I
added the turret mounting pieces and filled the seams around each. The gunner’s
seat with periscope post was inserted in the opening and the clear canopy glued
on top. I filled the gaps around the canopy to blend the clear parts with the
surrounding fuselage. The same was done for the canopy glazing. The aircraft I
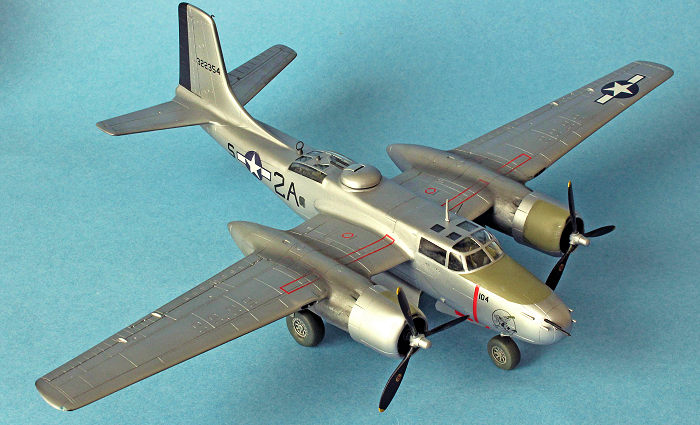
chose to depict had the early style canopy hatch configuration.
I
added the turret mounting pieces and filled the seams around each. The gunner’s
seat with periscope post was inserted in the opening and the clear canopy glued
on top. I filled the gaps around the canopy to blend the clear parts with the
surrounding fuselage. The same was done for the canopy glazing. The aircraft I
chose to depict had the early style canopy hatch configuration.
The landing struts were glued into the nacelle halves and glued to the bottom of the wing. As mentioned above, the angle of the struts was way too knock-kneed, so I gently bent them back to the proper position. I filled the resultant seams around each nacelle. The wing bottoms were glued to the top pieces and the seams were filled. I cut notches in the wingtip fronts and glued in small pieces of scrap clear plastic sprue with a tiny drop of red paint on the port side and blue on the starboard side to depict the colored light bulbs for the navigation lights. The clear sprue was then sanded down to match the profile of the wingtip and polished back to clarity with a nail buffer. I added the clear cover for the rear position light and it too had the seams filled and sanded smooth and polished.
The horizontal stabilizers went on and the seams filled. The wings were glued into their respective slots on the fuselage sides. There were quite large gaps here, so CA glue was used to fill the space and sanded down with another course of Mr. Surfacer 500 used to fill any tiny pits and scratches.
The engines were painted with Alclad II Lacquer Jet Exhaust with dark grey crankcase housings. A dark wash was applied to the engine cylinders to bring out the detail. The interior of the cowlings was painted with Alclad Aluminum. As written above, the engines are mounted too far back in the cowlings when compared to photos of the actual aircraft. I just left it alone, not feeling overly inclined to add more work for little reward. I glued the engines inside the cowlings and glued the cowlings to the front of the nacelles. Again, the cowling flaps are ridiculously too thick but I chose to just let it go.
In preparation for the painting step, I went over the model with a fine-toothed comb and sanded and polished every stray scratch or scuff I could find knowing that if I didn’t it would show up like sore thumb under the aluminum paint. The model was washed, the clear canopies were masked with small pieces of Tamiya tape cut to the proper shape, and it was ready for paint.
| COLORS & MARKINGS |
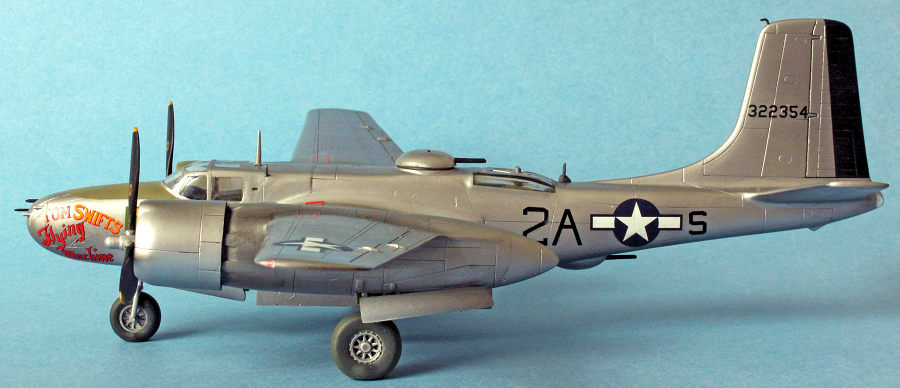
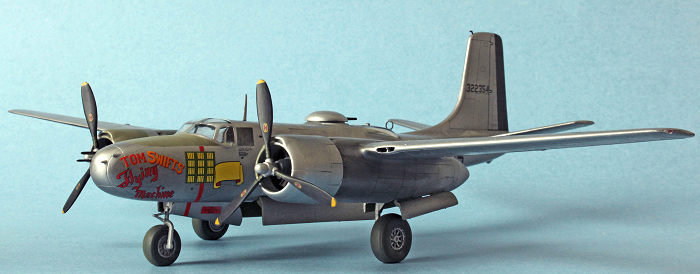
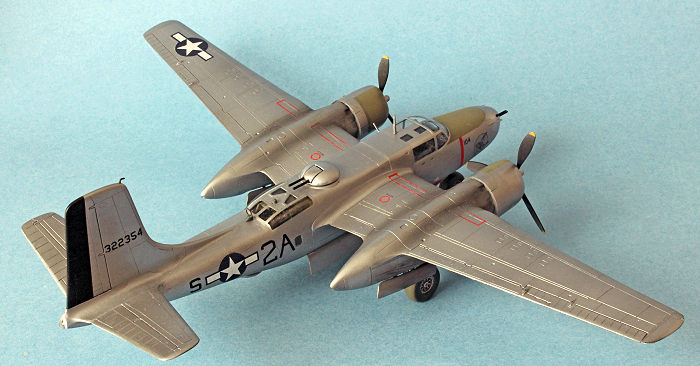
I primed the model with Vallejo Black Surface Primer to provide the Alclad Aluminum lacquer with a good solid base. Studying many period photos, it appears that the A-26 in operational conditions did not have a lot of panel shade variation, so just the Aluminum was sufficient. I masked off the black rear edge of the rudder and painted that rather than use the kit decals, as was also done for the anti-glare panels.
The landing struts and wheels were painted with Alclad Aluminum. The wheels were painted with Vallejo Tire Black and weathered with a thin spray of Polly Scale Mud (which I’m going to sorely miss when my last bottle is used up) around the circumference. A dark gray acrylic wash was mixed and applied to all the interior sections of the wheel wells and every panel line.
 The props
were painted black with yellow tips (4 scale inches!) with an aluminum hub.
The props
were painted black with yellow tips (4 scale inches!) with an aluminum hub.
The kit decals were used for a 416th Bomb Group aircraft based at Laon, France in Spring 1945. Cartograf decals feature almost no clear carrier film surrounding each marking, which I think is wonderful, but it did lead to some curling of the red walkway stripes. I applied a tiny bit of Quick Shine Mulitpurpose Floor Polish under the stripe and held it down with a Q-tip for a few minutes to make it lie flat on the wing surface.
I made a mask of the US national insignia by cutting out an appropriately-shaped piece from a 3”x5” index card and used it to spray Testors Acryl clear flat over of the decal only.
Weathering was next. Period photos of A-26s show a filthy layer of engine exhaust all over the sides of the nacelles and over the tops of the wings. I replicated this by using highly-thinned spray of dark gray, built up with repeated passes, and then augmented with some chalk pastel dust applied with a brush. Abrasion on the back side of the propeller blades was made with a quick pass of Alclad Aluminum, with a silver color pencil used to depict wear on the leading edges. A few more stray silver pencil marks were made on the anti-glare panels for paint chipping.
| FINAL ASSEMBLY |
The landing gear doors were glued on, as were the bomb bay doors. Turrets were popped into their respective openings. The aircraft I depicted had an open ADF loop antenna on the spine, rather than the later football style. I dug into my spares box and found an appropriately-sized loop. The antenna mast went on. There were no aerial wires present on 9th Air Force A-26s as far as I can tell from period photographs. The main antenna over the cockpit was glued in, and I found an appropriately-size mast for the antenna that comes out from the cockpit side at a 45-degree upwards angle. The machine guns were carefully installed in the nose and I fashioned the missing pitot tube on top of the tail fin from a piece of wire. Wheels and propeller went on last, completing the build.
| CONCLUSIONS |
Italeri’s 1/72 scale A-26 Invader isn’t a state-of-the-art kit and has some areas that need attention, but it does build up pretty nicely with some effort. With a warning to be careful about matching the decals to the configuration (canopy, turrets, armament) of the appropriate production block, a modeler can end up with a decent model of a handsome airplane that saw a long service life.
13 April 2026
Copyright ModelingMadness.com. All rights reserved. No reproduction in part or in whole without express permission.
If you would like your product reviewed fairly and fairly quickly, please contact the editor or see other details in the Note to Contributors.