Airfix 1/72 B-17G Flying Fortress
| KIT #: | A08017 |
| PRICE: | $58.00 |
| DECALS: | Two options |
| REVIEWER: | Lee Kolosna |
| NOTES: | Basic kit build (OOB) |
| HISTORY |
The Boeing B-17 Flying Fortress was the United States Army Air Force’s primary heavy bomber at the beginning of the US’s entry in World War II and served throughout the entirety of the war. Replaced by the B-24 Liberator after sporadic operations in the first days of hostilities in the Pacific, the aircraft was deployed to Europe in mid-1942 to embark on a three-year campaign of daylight bombing from bases in England and Italy.
 The
B-17F model carried the load during the first year and a half of operations,
suffering an alarming casualty rate that prompted modifications to the
aircraft with the intent to improve defensive capabilities. German fighter
tactics emphasized head-on attacks against the bomber formations to exploit
the weaker defensive fire provided by a manually-operated single machine gun
mounted in the nose canopy. With the introduction of the B-17G, this
weakness was addressed by the addition of a chin-mounted powered turret with
two machine guns, first tested in combat in the YB-40 escort gunship. Later
production variants of the G model saw staggered waist gun positions to give
the two gunners more room to maneuver, and a newly-designed “Cheyenne” tail
turret configuration provided the gunner greater visibility and an extended
field of fire.
The
B-17F model carried the load during the first year and a half of operations,
suffering an alarming casualty rate that prompted modifications to the
aircraft with the intent to improve defensive capabilities. German fighter
tactics emphasized head-on attacks against the bomber formations to exploit
the weaker defensive fire provided by a manually-operated single machine gun
mounted in the nose canopy. With the introduction of the B-17G, this
weakness was addressed by the addition of a chin-mounted powered turret with
two machine guns, first tested in combat in the YB-40 escort gunship. Later
production variants of the G model saw staggered waist gun positions to give
the two gunners more room to maneuver, and a newly-designed “Cheyenne” tail
turret configuration provided the gunner greater visibility and an extended
field of fire.
Thousands of B-17s served with the 8th and 15th Air Forces, going out on missions week after week until the final surrender of Germany in May 1945. Historians continue to debate the impact of strategic bombing and whether it made a significant difference in the timing of the outcome of the war. That topic is beyond the scope of this model kit review, but nothing can diminish the bravery of the men who flew those missions who suffered from sub-zero temperatures, were subjected to the threat of an instant death from a well-placed flak burst, or being riddled with machine gun and cannon fire from enemy fighters, or becoming a casualty from navigation errors, or being in the wrong place at the wrong time when mechanical failures occurred. All of it contributed to the well-deserved legendary status of this amazing Boeing airplane.
| THE KIT |
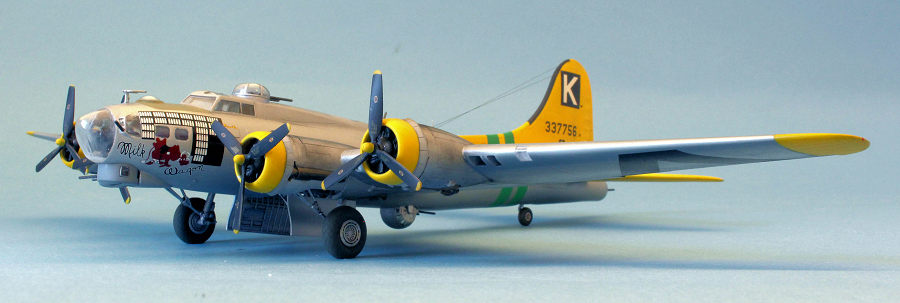
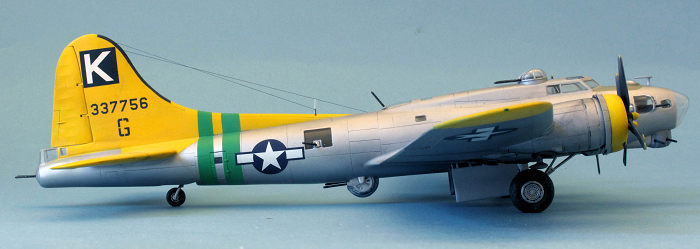
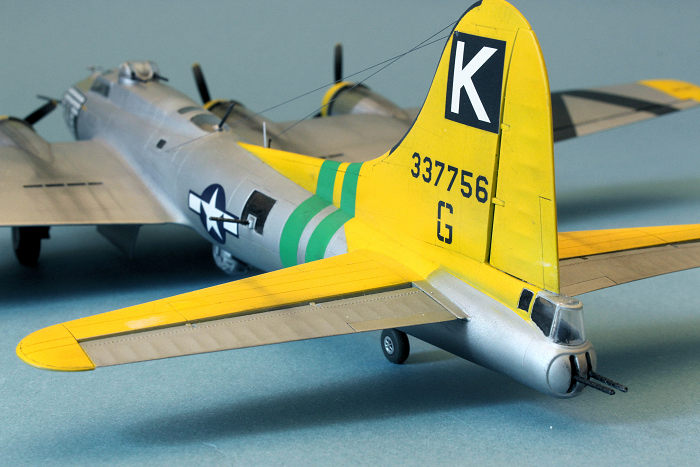
The Airfix 1/72 scale B-17G represents a late G model configuration with staggered enclosed waist gun positions, “High hat” Type 4 top turret, and the Cheyenne tail turret. The kit provides open or closed cowling flaps, open or closed bomb bay doors, and the ability to depict the landing gear either extended or retracted. 245 parts make up the kit with two decal options provided: Milk Wagon with the 447th Bomb Group, and $5 with Breakfast (the going rate in London for a romantic night with a, um, Lady of the Evening, who provided a cooked breakfast for the customer in the morning) with the 490th Bomb Group. Both were based in the UK and are finished in unpainted aluminum, as nearly all late-model B-17Gs were. Decals are printed by Cartograf and are of excellent quality.
The detail provided for the interior, like Revell’s new-tool early B-17G kit, is quite impressive, particularly in this scale. The Wright R-1820 engines are not quite as finely rendered as they are by Revell. There are no wiring harnesses provided in either kit. The wheel wells have decent representations of the internal structure. The nose, cockpit, radio room, bomb bay, waist and tail gun positions are all sufficiently outfitted. There is a decal provided for the instrument panel. As with Revell, the bright yellow breathing oxygen tanks located behind the pilot seats and in the rear fuselage are missing.
There have been many model kits released of this iconic aircraft over the years in this scale from Revell, Airfix, Hasegawa, FROG, Matchbox, Academy, and the disappointing Revell kit released in 2010. This new-tool Airfix kit came out in 2016 and in my opinion, is the best B-17 model kit on the market, regardless of scale. Yes, I know there are huge fans of Monogram’s classic 1/48 scale kit and it is indeed dimensionally close to perfect, but this four-decades newer Airfix kit features better internal detail than the Monogram kit (which has no bomb bay or wheel well structure whatsoever), and modeler-preferred recessed panel lines.
I could only find three minor issues with the kit:
· The machine guns are a little oversized for the scale.
· There is no pitot tube provided.
· The above-mentioned lack of oxygen tanks.
· The Cheyenne tail turret assembly is a tiny bit wider than the fuselage cross section.
This is the model we fans of the B-17 have been waiting for. It lives up to expectations, has the right amount of detail for 1/72 scale, and builds easily with very few problems.
| CONSTRUCTION |
The interior of a late production B-17 was mostly unpainted, including the cowls and wheel wells. I used Alclad II Lacquer Aluminum for this and applied a dark gray wash. Some accents like the seats, instrument panel coaming, and control columns were painted with Vallejo Model Air USAF Green FS34092, which is my reasonable substitute for Bronze Green. As I wrote in previous build articles of B-17s, there was no use of Interior Green ANA 611 (FS34151) paint in any Flying Fortress, ever. Warbirds are painted this color to prevent corrosion, but it isn’t historically accurate. Airfix correctly instructs the modeler to paint all of the interior sections with aluminum.
The plywood floors in the radio room and nose section were painted with a light tan and dry-brushed with brown to simulate wood grain. Consoles, the instrument panel, and radio equipment were painted with flat black. Thin strips of paper were painted medium gray and glued into the seats to simulate the lap belts for the pilot and co-pilot. There was a rubber mat installed on the floor behind the pilot seats and in the rear fuselage for the waist gunners to traverse, which I painted a very dark gray.
 I
discarded the four 500 lb. pounds as I detest painting those yellow stripes on
the noses, even more aggravating in 1/72 scale. The bomb bay was assembled
first, with additional assemblies for the rear fuselage, radio room, cockpit,
and nose sections added one-by-one until the entire interior was built up. This
was inserted between the two fuselage halves, which I glued together with CA
glue to avoid the appearance of ghost seams later.
I
discarded the four 500 lb. pounds as I detest painting those yellow stripes on
the noses, even more aggravating in 1/72 scale. The bomb bay was assembled
first, with additional assemblies for the rear fuselage, radio room, cockpit,
and nose sections added one-by-one until the entire interior was built up. This
was inserted between the two fuselage halves, which I glued together with CA
glue to avoid the appearance of ghost seams later.
I snipped off the gun barrels from the two cheek machine guns and installed the remaining breeches on the inside of in their respective mounts. This way, I could avoid breaking the barrels off for the rest of the building process and add them at the very end with the other fiddly bits.
At the rear section of the fuselage, the tail gunner’s interior parts are inserted between two halves and then attached to the back of the airplane. The assembly is a little bit wider than the fuselage opening, which resulted in a step between the tail cone and the rear fuselage. I had to sand that transition down a little more aggressively than usual. I filled the resulting seams and then turned my attention to blending in the cockpit canopy, radio room glazing, nose window inserts, and nose cone to the surrounding fuselage. These seams were carefully filled with CA glue and sanded smooth.
The wings were next, as I glued in the structural pieces and oil tanks in the wheel wells, as well as the intake trunking for each of the carburetor air intakes on the leading edges of the wings. The engines were painted with Alaclad Jet Exhaust and a dark gray wash applied to bring out the raised details. The crankcases were painted with Vallejo Model Air Gunship Gray, followed by a coat of Future Floor Polish that gave a glossy finish to them. The engines are a bit tricky to get lined up with the exhaust collector ring and glued to the front of the nacelles. It’s the only step in building this model that I had to spend more time than expected to insure proper alignment.
 The wings
and horizontal stabilizers were attached to the fuselage and those seams filled
with thick CA glue followed by Mr. Surfacer 500. Two sets of wing spars insure
the correcxt dihedral for the wings.
The wings
and horizontal stabilizers were attached to the fuselage and those seams filled
with thick CA glue followed by Mr. Surfacer 500. Two sets of wing spars insure
the correcxt dihedral for the wings.
The ball turret is a multi-piece assembly that required some filling of the resulting seams. I painted the interior of it and the top turret Vallejo Model Air USAF Green. The exterior was painted with the very last of my Floquil Old Silver paint and I quickly scraped the still-curing paint from each of the tiny windows with a sharpened toothpick. This avoided some really tedious masking.
I restored the panel lines lost in the seam-filling process with a scriber. Since this is a natural metal finish, I carefully inspected the entire model and made sure that every stray sanding mark and scuff was polished out to a mirror shine. I washed the model to remove sanding dust and fingerprints, and masked all of the clear parts with Tamiya tape in preparation for paint.
| COLORS & MARKINGS |
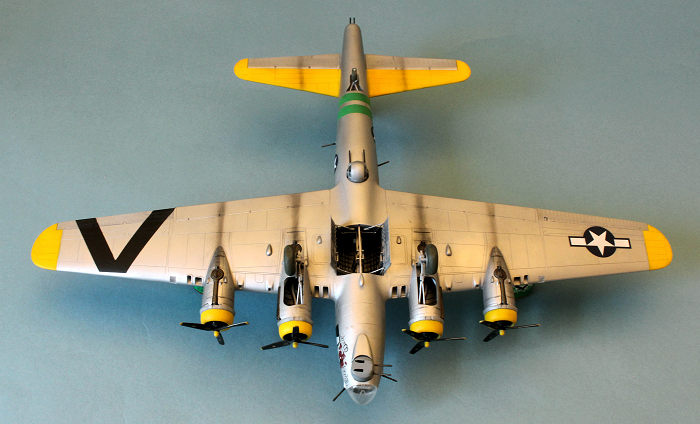
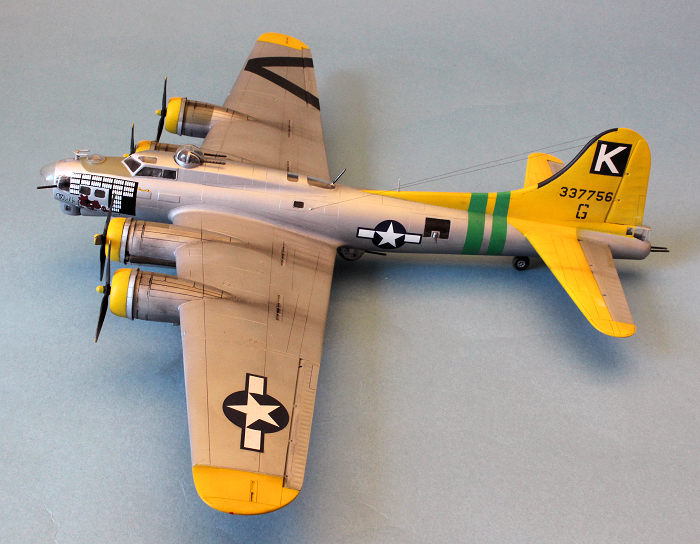
I started by priming the entire model with Vallejo Grey Surface Primer. I used Alclad Aluminum for the base finish. The accents on the horizontal and vertical stabilizers, rudder, wing tips, cowlings, and propeller hubs were masked off and primed with Vallejo White Surface Primer, followed by Vallejo Model Air Medium Yellow. The green fuselage stripes were masked and painted with Tamiya X-28 Park Green. The anti-glare panels in front of the windscreen and the inner faces of the nacelles were painted with Vallejo Model Air Olive Drab that had been lightened with 40% flat white and 10% USAF Brown. I masked off the V-shaped wing markings and painted them flat black. The only de-icer boot present on the aircraft was on the leading edge of the vertical stabilizer, which I painted a slightly lightened flat black.
The propellers had yellow hub bosses, flat black blades, and yellow tips (4 scale inches only boys!). The backsides of the blades were weathered with a translucent spray of Aluminum, and a silver color pencil was used to depict paint chipping on the leading edges.
The turbosuperchargers and related ducting were painted with Alclad Jet Exhaust and dry-brushed with Polly Scale Rust. A dark wash was applied to the recessed areas.
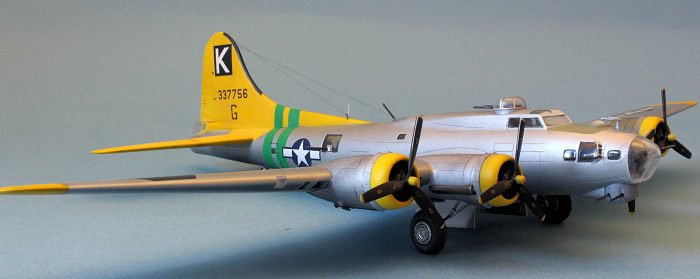 I
elected to build my aircraft using the kit decals for Milk Wagon, which is a
B-17G-70-BO serving with the 708th Bomb Squadron based at RAF Rattlesden in
Suffolk, England as it appeared in 1945. I used Future Floor Polish to assist
in applying the decals in order to prevent silvering and to insure a solid bond
with the surface of the model. A small drop of Future was placed on the desired
location and the wet decal placed on top. As the Future dried, the decal
settled down nicely into the panel lines. I didn’t add any of the stencil
decals as I think they look too stark and unnatural for models in 1/72 scale.
I
elected to build my aircraft using the kit decals for Milk Wagon, which is a
B-17G-70-BO serving with the 708th Bomb Squadron based at RAF Rattlesden in
Suffolk, England as it appeared in 1945. I used Future Floor Polish to assist
in applying the decals in order to prevent silvering and to insure a solid bond
with the surface of the model. A small drop of Future was placed on the desired
location and the wet decal placed on top. As the Future dried, the decal
settled down nicely into the panel lines. I didn’t add any of the stencil
decals as I think they look too stark and unnatural for models in 1/72 scale.
Weathering consisted of a pre-mixed enamel dark wash made by MIG Productions in all the panel lines and wheel wells, dark gray and black pastel chalk for the exhaust staining coming out of the turbosupercharger ports underneath each nacelle, and a thin line of oil staining coming from the one o’clock position (when viewed from the front) starting from behind the cowl flaps. As mentioned in my other B-17 kit reviews, this stain pattern travels back across the top of the wings and fans out wider before it goes between the four hot air vents.
The tires were painted with Vallejo Model Air Tire Black with a thin spray of light tan to reflect operations on an often times wet and muddy airfield.
The wingtip position lights were added with a dab of clear blue (starboard) and clear red (port) paint on the ends of the wings.
A coat of Testors Acryl flat clear was applied to the non-aluminum sections, as well as on the ailerons, elevators, and the national insignia on the wings and fuselage.
| FINAL CONSTRUCTION |
 The
main landing gear struts were glued in and the wheels attached. I snapped
off the tail wheel strut while handling the model, so that was repaired with
a pin cut from a paper clip. The chin turret, which period photos indicated
was painted in Neutral Gray, went on and rotated 90 degrees to starboard, as
frequently seen on B-17Gs while parked. The gun barrels should be pointing
slightly upward, but the pre-drilled holes in the turret didn’t allow for
this stance. In retrospect, I should have filled the holes and drilled new
ones higher up to allow the guns to be displayed in the proper stance.
The
main landing gear struts were glued in and the wheels attached. I snapped
off the tail wheel strut while handling the model, so that was repaired with
a pin cut from a paper clip. The chin turret, which period photos indicated
was painted in Neutral Gray, went on and rotated 90 degrees to starboard, as
frequently seen on B-17Gs while parked. The gun barrels should be pointing
slightly upward, but the pre-drilled holes in the turret didn’t allow for
this stance. In retrospect, I should have filled the holes and drilled new
ones higher up to allow the guns to be displayed in the proper stance.
The top turret was dropped down into its place in the fuselage. The cheek gun barrels that I had cut off were glued back onto the outside of the windows. The waist and radio room guns can be inserted through their openings from the outside. The ball turret was slipped into its cradle underneath. The bomb bay doors were carefully glued onto the retraction mechanisms. The antenna mast, ADF football, and ILS antenna on the front of the nose were glued on, leaving only one more step, which was to add two aerial wires emanating from the front of the tail fin to a spot on the port side of the radio room and on a small post made from brass rod next to the antenna mast on the tail fillet. I used nylon invisible thread for this and painted the two wires dark gray.
| CONCLUSIONS |
This is the best B-17 kit on the market, in my opinion. It is dimensionally accurate, has a reasonable amount of interior detail, goes together without drama, and is fairly priced. What’s not to like? I do hope Airfix returns to this subject with more model variations of the Flying Fortress. They already have released kits for the aircraft that served with the RAF. I’d love to see an E, an F, and an early G.
| REFERENCES |
· Freeman, Roger: The Mighty Eighth in Colour
· Ethell, Jeffrey and Warren Bodie: WWII War Eagles: Global Air War in Original Color
Lee Kolosna
15 December 2025
Copyright ModelingMadness.com. All rights reserved. No reproduction in part or in whole without express permission from the editor.
If you would like your product reviewed fairly and fairly quickly, please contact the editor or see other details in the Note to Contributors.