Academy 1/72 B-29 Superfortress
| KIT #: | 12828 |
| PRICE: | $38.00 |
| DECALS: | Two options |
| REVIEWER: | Lee Kolosna |
| NOTES: | Basic Kit Build |
| HISTORY |
The Boeing B-29 Superfortress was the premier “super-bomber” of World War II, with features such as remotely-controlled defensive gun turrets aimed with calculating gunsights, a pressurized crew compartment, and an operational range and payload capacity that exceeded any other bomber in the world. Three manufacturers, Boeing, Martin, and Bell, built the bomber in four facilities around the US. Its debut was troublesome, with frequent engine fires and mechanical failures. The first squadrons of B-29s were deployed to India in 1944, where bombing operations began on targets in Asia. Forward bases in China were constructed with the intention of launching raids on mainland Japan, but the logistics involved were immense as fuel, bombs, spare parts, and crew amenities had to be flown from India over the Himalayas to the rudimentary airfields in China for weeks in order to just mount one mission. With the capture of islands in the Marianas (Saipan, Tinian, Guam), the US finally had locations in which to base the B-29s which could be resupplied via naval ships and was within operating range of southern Japan. Units based in India and China were gradually withdrawn as airfields were built on the three Marianas islands.
With the
Manhattan Project, which was the super-secret and most expensive government
program ever executed, one issue to solve was how to deliver an atomic device to
enemy territory via the air. The B-17 and B-24 bombers currently in service did
not have the load capacity or bomb bay clearance to contain either the proposed
“Fat Man” or “Thin Man” designs. Scientists at Los Alamos, Ne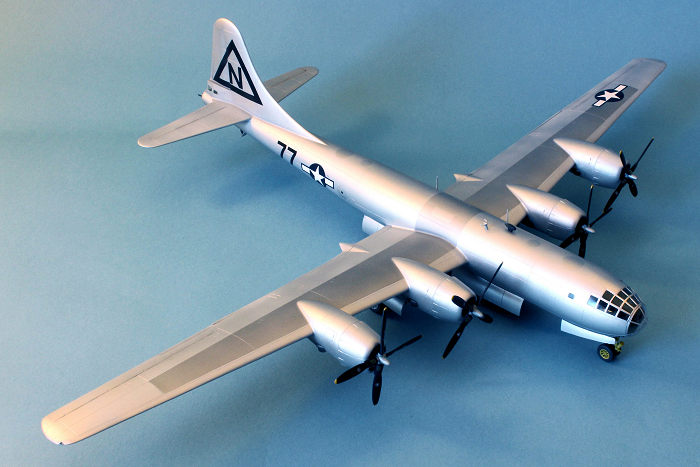 w Mexico
determined that the Thin Man design wasn’t going to work, so a newer design,
using a howitzer gun barrel to shoot two masses of enriched uranium towards each
other to achieve critical mass was designed and dubbed “Little Boy”. This
device weighed 9,000 pounds and was 10 feet long (3.3 meters). The plutonium
implosion device Fat Man weighed 10,000 pounds and was 10 ½ feet long (3.5
meters) with a 5-foot (1.8 meters) diameter. One idea was to use the Avro
Lancaster which could (barely) accommodate these bombs, but it didn’t have the
range to do so from the existing bases in China. The B-29 was just coming on
line, albeit with numerous operational issues to be addressed, but it possessed
the necessary attributes to carry either of the two devices then being
developed.
w Mexico
determined that the Thin Man design wasn’t going to work, so a newer design,
using a howitzer gun barrel to shoot two masses of enriched uranium towards each
other to achieve critical mass was designed and dubbed “Little Boy”. This
device weighed 9,000 pounds and was 10 feet long (3.3 meters). The plutonium
implosion device Fat Man weighed 10,000 pounds and was 10 ½ feet long (3.5
meters) with a 5-foot (1.8 meters) diameter. One idea was to use the Avro
Lancaster which could (barely) accommodate these bombs, but it didn’t have the
range to do so from the existing bases in China. The B-29 was just coming on
line, albeit with numerous operational issues to be addressed, but it possessed
the necessary attributes to carry either of the two devices then being
developed.
Project Silverplate took 46 B-29s manufactured at the Martin Aircraft facility in Omaha, Nebraska and modified them for the secret atomic missions. The four remote gun turrets were removed leaving only the tail machine gun emplacement, a special set of bomb cradles for each of the two bomb designs were installed, and Curtiss Electric reversible propellers were mated to upgraded Wright R-3350 engines. The bombers were delivered to the 509th Composite Bomb Group, based in Wendover, Utah before being deployed to Tinian island in May, 1945. It is from here that the first atomic bomb, the uranium gun design Little Boy, was loaded aboard B-29 Enola Gay and dropped on Hiroshima, Japan on August 6. Three days later, the plutonium implosion design Fat Man was loaded aboard B-29-36-MO Bockscar, commanded by Major Charles Sweeny. The intended target was the arsenal at Kokura, but smoke from a recent nearby bombing raid obscured the aiming target and after three unsuccessful attempts, Bockscar diverted to its secondary target, Nagasaki. Poor weather conditions were also present at Nagasaki and the crew were prepared to drop the bomb by radar, but a last-minute opening in the clouds allowed an opportunity to drop the weapon visually. This decision lessened the impact of the more-powerful Fat Man bomb and somewhat reduced the number of casualties that were seen in the Hiroshima attack.
The United States, as of this writing (and I sure hope it stays that way), is the only nation to have used nuclear weapons in armed combat. The decision to drop these two terrible weapons is one that will be debated by historians, politicians, and ethicists for centuries. For some, it brought a quicker end to a vicious war that would have certainly led to more killed and wounded soldiers and civilians during the upcoming Allied invasion of the Japanese home islands. For others, it was a pure war crime of epic proportions. This issue is certainly beyond the scope of a model airplane kit review, but no one can deny that the results of the use of these two weapons was nothing short of horrific.
| THE KIT |
Academy/Minicraft first issued this kit in 1990 as a conventional B-29 bomber. Later boxings gave modelers the opportunity to depict one of the Silverplate bombers with appropriate decal markings for either Enola Gay or Bockscar, blanking plates for the turrets that were removed, flush windows to replace the gunner bubble observation windows, cuffed Curtiss Electric propellers, and special cradles for mounting the two simplified models of the Fat Man and Little Boy atomic bombs.
This kit features recessed panel lines, an open bomb bay, cockpit and rear compartment interior detail, a radome positioned underneath the fuselage, and the decal sheet has been printed by Cartograf, which is of very high quality.
The kit has a few issues. This is not a definitive list, just the ones that I gave attention to during my build:
· Both Enola Gay and Bockscar did not have an observation dome on the top of the fuselage. You will need to fit a circular piece of sheet styrene in this position.
· The rear bomb bay was fitted with a large gasoline tank for the
Japan missions. These are not provided in the kit.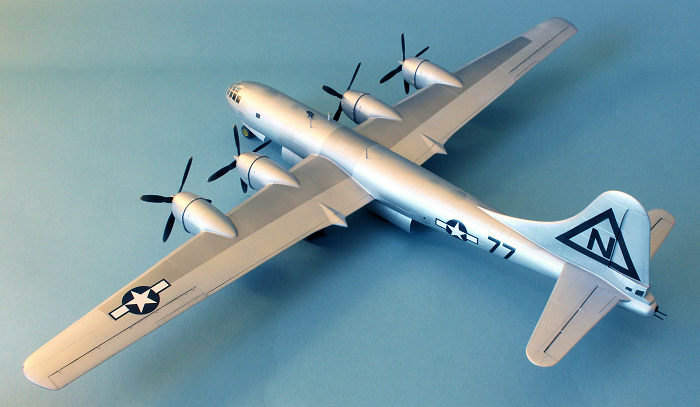
· The cooling louvres on the side of each nacelle for the upgraded engines are not present in the kit. Academy offers decals for this feature instead – a half-hearted solution.
· Massive amounts of nose weight are required to keep this model from being a tail-sitter. One will need to be creative to find enough space around the nose wheel well to pack enough metal weights.
· The engineering of the wings is unconventional. Instead of molding the nacelles integral with each top and bottom wing pieces like most kits do, the model provides a blank wing with separate nacelles to assemble and then add to the wing, sliding in from the leading edge. This results in seams that need to be filled all around the attachment of the nacelle to the wing surfaces. I’m sure Academy did this so they could use the same wing pieces and just mold new nacelles for the B-50 kit.
I wanted to have a B-29 in my growing collection of 1/72 scale World War II bombers. The only two choices are from Airfix, which is now fifty years old and covered with rivets and raised panel lines, and this kit from Academy. I would have preferred a conventional variant of the B-29 as there are many more interesting marking schemes, but at the time of purchase none were available from my usual on-line outlets.
| CONSTRUCTION |
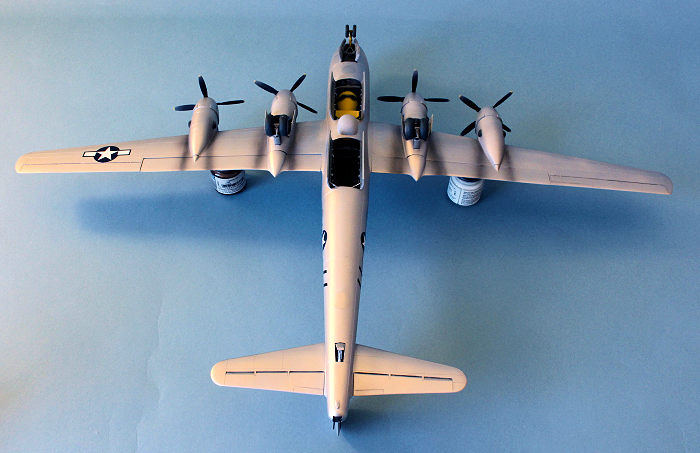
The interior parts were assembled and the crew compartments were painted with Testors Acryl Interior Green. The bomb bay, wheel wells, and main landing struts were painted with Alclad II Lacquer Aluminum. Color period photos of Enola Gay, Bockscar, and The Great Artiste confirm that the nose landing gear strut and wheel were painted chromate yellow.
The cockpit and rear crew compartments were assembled. I painted the radio equipment and other assorted consoles flat black, and added thin strips of paper painted a medium gray to the seat to replicate harnesses for the pilots and crew. In this scale, when the fuselage is buttoned up, there is very little one can see through the canopy greenhouse inside. In the rear compartment, with the tiny circular windows, absolutely nothing can be seen so it doesn’t really pay to spend any time other than gluing the basic structures together.
 The tunnel
that connects the front with the rear crew compartment was painted a dark gray
as it was insulated from the freezing temperatures in the bomb bay. This was
inserted between the two pressurized bulkheads. I then stuffed every single
nook and cranny around the nose wheel well with zinc fishing sinkers and prayed
that I had enough in there to prevent tail sitting. The fuselage halves were
glued together with thick CA glue. This prevents the appearance of ghost seams
months later, and it allows the seams to be made completely smooth for the
natural metal finish.
The tunnel
that connects the front with the rear crew compartment was painted a dark gray
as it was insulated from the freezing temperatures in the bomb bay. This was
inserted between the two pressurized bulkheads. I then stuffed every single
nook and cranny around the nose wheel well with zinc fishing sinkers and prayed
that I had enough in there to prevent tail sitting. The fuselage halves were
glued together with thick CA glue. This prevents the appearance of ghost seams
months later, and it allows the seams to be made completely smooth for the
natural metal finish.
The kit instructs you to cut off the mounting rings for the four turrets and insert a blanking plate in the opening. This was done and the seams were filled.
I fashioned a circular piece of sheet styrene, curved it slightly over the top of the handle of an appropriately-sized X-acto knife, and placed it in the location where Academy incorrectly directs the modeler to insert an observation dome. The Silverplate B-29s did not have this feature. I also inserted the replacement windows for the gun-sighting domes and filled the resulting seams around them.
I turned my attention to the wings next. The tops and bottom parts were glued together, and then the nacelles were assembled and added to their respective locations on the front of the wings. As I wrote above, this is a very non-standard way of kit design, and it frankly was a pain in the rear as I had to fill the resulting seams around each nacelle – a not insignificant task. Also, there are no cooling louvres on the sides of the nacelles. I’ve read of one company called Metallic Details that offer a photo-etch brass solution for this detail, but they are long out of production. Academy’s decal offering of black stripes is inadequate, in my opinion. I chose to do nothing, even though I know it’s not accurate.
 The wings
were added to the fuselage, careful to ensure that the proper dihedral was
maintained throughout. There were seams to fill at the wing roots, again with
thick CA glue. The vertical stabilizer (again, to economize on parts needed to
create a B-50 model kit) was glued on, as were the two horizontal
stabilizers. The resultant seams were filled here.
The wings
were added to the fuselage, careful to ensure that the proper dihedral was
maintained throughout. There were seams to fill at the wing roots, again with
thick CA glue. The vertical stabilizer (again, to economize on parts needed to
create a B-50 model kit) was glued on, as were the two horizontal
stabilizers. The resultant seams were filled here.
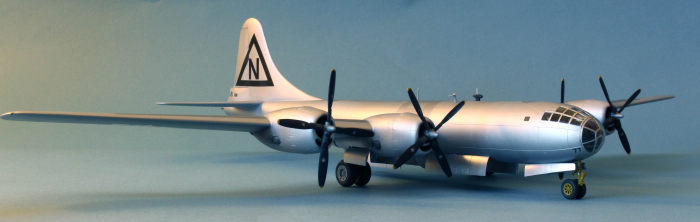
The tail gunner windows were inserted and blended into the surrounding fuselage sides. I did the same with the expansive canopy greenhouse and nose blisters, which required careful filling of the resulting gaps to make a smooth transition between glass panes and aluminum fuselage contours.
A radome existed on the Silverplate B-29s, located between the two bomb bays. That was glued on and the seams around it filled. I restored the panel lines that were destroyed in the seam-filling process and then carefully inspected every square millimeter of the model for stray scratches or sanding marks, sanding them smooth. The surfaces were then polished to a mirror shine using Novus Plastic Polish #3 and #2. The model was prepared for painting by washing it with a solution of liquid dish soap, rinsing with clear water, and allowed to air-dry.
| COLORS & MARKINGS |
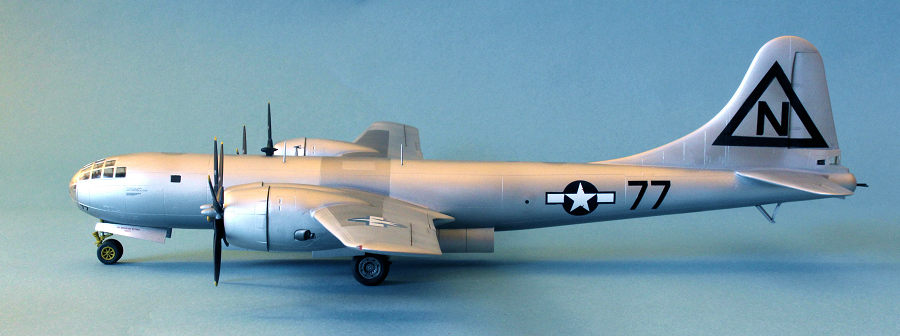
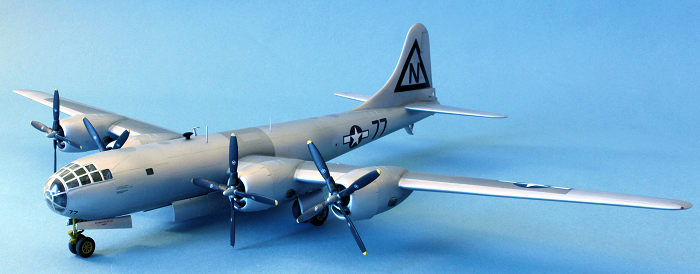
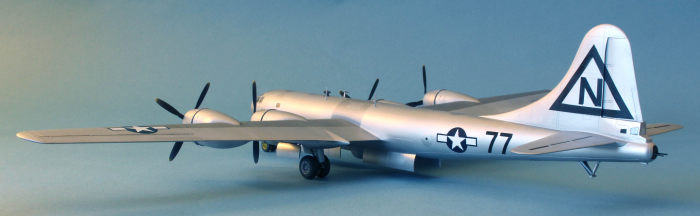
The Silverplate aircraft were very shiny in period photographs, so I wanted to make my model as bright a silver as possible. I started to paint the model with Tamiya Gloss Aluminum spray lacquer. Like an idiot, I thought I could save a little effort by painting it straight out of the spray can, but my paint was several years old and it spit and glopped and made just a general mess of things. Doh!
Resisting the urge to throw the model away, I sanded off all the gloppy silver paint and repeated the tedious task of polishing the plastic to a mirror shine. For a second attempt, I used Vallejo Grey Surface Primer, followed by a coat of Alclad Polished Aluminum. It wasn’t as shiny as I had hoped, probably because I didn’t use a gloss black primer instead of the flat gray. Oh well. I painted the prominent wing spar sections of the wings and central fuselage with Alclad Duraluminum, and made circular masks for the observation bubble areas that were replaced with sheet aluminum on the aircraft, which were painted with Alclad White Aluminum.
 The turbo-superchargers
were painted with Alclad Jet Exhaust. Exhaust stains were added coming out of
the turbo-supercharger ports with a thin spray of dark gray that extended over
the bottom of the wing and flaps.
The turbo-superchargers
were painted with Alclad Jet Exhaust. Exhaust stains were added coming out of
the turbo-supercharger ports with a thin spray of dark gray that extended over
the bottom of the wing and flaps.
The propeller tips were primed, painted yellow, and masked off for black blades. The prop hubs were painted with Alcald Duraluminum. A reminder to modelers: 4 scale inches for the yellow tips! The effects of sand abrasion on the back of the propeller blades was replicated with a very light spray of Aluminum, followed by random marks made with a silver color pencil on the leading edges of each blade (but not the rubber cuffs!). These aircraft were pretty well maintained and didn’t have a lot of dust and grime on them. An acrylic dark gray wash was applied to the panel lines and in the bomb bays and wheel wells.
I removed the masking from the canopy and nose glazing and painted the frames with my East-West, North-South technique of masking and airbrushing the frames in each direction. The radome underneath the belly was masked and painted Testors Acryl Light Ghost Gray.
The kit decals were used for Bockscar, but they depict the way the aircraft looked some days after the Kokura/Nagasaki mission with nose art added commemorating the milestone. I wanted to depict it how it appeared the early morning of August 9, 1945. At the time of takeoff, it was very plainly marked with the Triangle-N of the 444th Bomb Group (deceptively, to throw off Japanese aircraft spotters), with nothing else except aircraft number and national insignia. Some sources indicate that it had a red stripe that encircled the fuselage just behind the wings, but I couldn’t find a photograph that confirmed this. The dark blue of the national insignia is too dark, almost black. The decals were applied to the model with little resistance, though I did cut out the clear areas inside the large triangles and added the N separate from the triangle, which required a little paint touch-up with flat black. The model received a finish coat of Testors Sealer for Metalizer.
| FINAL CONSTRUCTION |
 The main landing gear were glued into their location in the wheel wells
and the model miraculously balanced on all three struts. The wheels were added,
as were the fiddly bits such as the antenna, ADF football, and ILS antenna. The
landing gear doors and bomb bay doors were glued on, as were the tail machine
guns. I left off the pitot tubes on the nose, feeling that they were too large
for the scale and by then I was sick of dealing with the model and just wanted
it done. I did not find any evidence in photographs of the presence of aerial
wires for radio communications, but this could be simply because they are so
hard to resolve in the photos. At any rate, I did not add any aerial wires.
The main landing gear were glued into their location in the wheel wells
and the model miraculously balanced on all three struts. The wheels were added,
as were the fiddly bits such as the antenna, ADF football, and ILS antenna. The
landing gear doors and bomb bay doors were glued on, as were the tail machine
guns. I left off the pitot tubes on the nose, feeling that they were too large
for the scale and by then I was sick of dealing with the model and just wanted
it done. I did not find any evidence in photographs of the presence of aerial
wires for radio communications, but this could be simply because they are so
hard to resolve in the photos. At any rate, I did not add any aerial wires.
Lastly, I assembled the Fat Man bomb, painted it Chromate Yellow with black sealant around the nose, and tried to insert it into the forward bomb bay, but it wouldn’t fit. I cut off the mounting tabs on the top of the bomb and finally managed to wrestle it into location with significant amounts of CA glue to insure it would stay there.
| CONCLUSIONS |
I didn’t particularly enjoy building this model at all. The unnecessary complication of the engineering of the engine nacelles, and the need to fill every seam around the turret and gun observation window blanking plates were compounded by the need for plastic perfection for the natural metal finish made this project more of a slog than a pleasant exercise. My goof of using a spray can instead of decanting the paint into an airbrush cup is on me, but it certainly didn’t endear me to this model at all.
This is pretty much the only solution for a modeler wanting a modern-tool kit of this important bomber aircraft in 1/72 scale. In 1/48 scale, we still have the fairly decent raised-panel line Monogram kit. They both can be built up to be very impressive models, but be prepared for a lot of sanding, filling, and polishing.
Lee Kolosna
6 February 2026 Copyright ModelingMadness.com. All rights reserved. No
reproduction in part or in whole without express permission. If you would like your product reviewed fairly and fairly quickly, please
contact the editor or see other details in the
Note to
Contributors.