Eduard 1/72 B-26F/G Marauder
| KIT #: | 2146 |
| PRICE: | $52.00 |
| DECALS: | Eight options |
| REVIEWER: | Lee Kolosna |
| NOTES: | Hasegawa kit with Eduard additions |
| HISTORY |
The Martin B-26 Marauder was a pre-war design for a United States Army Air Corps specification for a high-speed medium bomber. Both Martin’s design and North American’s submission (which became the B-25 Mitchell) were approved for production. The first Marauders served briefly in the opening months of the war in the Pacific, based in Australia and Midway Island. The aircraft served reasonably well in combat, but was eventually replaced by the B-25. The Mitchell had a shorter take-off and landing distance, was easier to maintain, and allowed for consolidation of the supply chain for spare part in the Pacific theater. The B-26 was deployed to North Africa on 1943 for the first actions on the ground by US forces, and then onto Europe for the remainder of the war.
The
airplane had a high landing speed and also stalled at higher speeds than
other multi-engine aircraft in the inventory. Combined with propeller
feathering failures, this earned the bomber a negative reputation for being
a “hot” airplane that had a propensity to kill its crew if the slightest
thing went
 wrong. Brigadier
General Jimmy Doolittle was sent to MacDill Army Air Field in Tampa, Florida
to demonstrate the airplane’s flying characteristics, particularly in
single-engine outage situations. He felt the B-26 was inherently safe, and
could be operated as such with proper training of pilots and maintenance
crew. The accident rate did decrease after this focus, but the Marauder was
never as forgiving as the B-25 and suffered a higher loss rate overall in
combat operations.
wrong. Brigadier
General Jimmy Doolittle was sent to MacDill Army Air Field in Tampa, Florida
to demonstrate the airplane’s flying characteristics, particularly in
single-engine outage situations. He felt the B-26 was inherently safe, and
could be operated as such with proper training of pilots and maintenance
crew. The accident rate did decrease after this focus, but the Marauder was
never as forgiving as the B-25 and suffered a higher loss rate overall in
combat operations.
The B-26F/G models were the final production versions, differing from the earlier A and B variants in that the wing had a higher incidence of 3.5 degrees, with the purpose of shortening the longish take-off and landing distances.
The B-26 became operational in May, 1943 in England with the 8th Air Force, but all were soon transferred to the newly-formed 9th Air Force with the task of medium altitude (around 10,000 feet) bombing of strategic targets. In this role the Marauder performed fairly well. After the D-Day invasion, units of B-26s were deployed to the continent for continued operations against transportation hubs and supply depots.
The B-26 was more expensive than the B-25, suffered twice the loss rate and twice the mission abort rate, and was more difficult to fly. For that reason, it was immediately retired at the end of the war. Martin’s post-war designs were marginally successful with some flying boats (Marlin, Seamaster) and the license-built B-57 obtaining modest contracts with the US Navy and Air Force. A shift towards aerospace products like the Vanguard and Titan rockets marked the end of Martin’s run in the aircraft business as it was eventually merged into the Martin-Marietta, and finally the Lockheed Martin defense conglomerates.
| THE KIT |
Hasegawa issued a series of B-26s in 1/72 scale, starting in 2006 with a B/C, then an F/G a year later. The kit contains all that is good about modern Hasegawa products: finely engraved panel lines, decent interior detail, overall accuracy in shape, and ease of assembly. Eduard contracted with Hasegawa to issue special editions of the kit in 2020 (B/C) and 2024 (F/G). These Eduard issues feature resin wheels, a color photo-etched cockpit detail set, a brass photo-etched detail set, painting masks, and an extensive set of decal options for eight aircraft, one of them with the Free French Air Force and the rest with the USAAF.
 The kit --
almost shockingly -- has virtually no issues. These are the only two minor
things to keep in mind:
The kit --
almost shockingly -- has virtually no issues. These are the only two minor
things to keep in mind:
· Massive amounts of nose weight are required to keep this model from being a tail-sitter. The compartment behind the cockpit bulkhead is empty and a good candidate for stuffing to the gills with fishing weights.
· There is no provided bombsight. Strange for a bomber, but there is nothing in the kit. You will need to source one from another model kit or scratch-build one.
Scott Van Aken described his build of the Hasegawa issue of the B-26F/G kit when it first came out in 2007 and I encourage everyone to read that excellent review here. For me, the question was which of the extra goodies that Eduard includes in their special edition would be utilized in my project.
| CONSTRUCTION |
Time for a rant: once again we have a kit manufacturer instructing the modeler to paint all of the interior surfaces of a World War II-era US aircraft with ANA 611 Interior Green (FS34151). No, no, no! Martin requested and was granted approval from the War Production Board to not prime their aircraft with any paint whatsoever. Flak Bait, the most famous of all B-26s, is mostly unpainted inside with flat black above the cockpit sills for glare suppression, Olive Drab or Dull Dark Green (now faded so badly it’s hard to definitively determine which color it originally was dyed) cloth insulation pads hung on the sides, and a flat black floor. The cockpit bulkheads had a transparent blue tint to them, most likely Lionoil. I began painting the forward sections of the fuselage with Vallejo Model Air USAF Medium Green FS34092, my reasonable substitute for the Dull Dark Green fabric walls, and everything from the bomb bay aft with Alclad II Lacquer Aluminum. The floors and various instrument boxes were painted Vallejo Flat Black. I assembled the pieces for the bomb bay, cockpit, nose compartment, and rear gunner stations. I used the color photo-etch items provided by Eduard for the instrument panel, throttle console, and the seat harnesses. There’s a lot more detail in photo-etch brass that Eduard provides, but I made the decision to keep my sanity and not deal with the fussy metal pieces any more than I needed to. The Hasegawa kit’s original plastic detail is sufficient for my needs.
I painted the waist machine guns and added them to the interior in the stowed position. I used the largest zinc fishing weight I could find that would fit inside the radio compartment behind the cockpit bulkhead. The fuselage halves were glued together with CA glue to prevent ghost seams from appearing months later.
 The
wings were next, with the nacelles assembled, the engines painted with Alclad
Jet Exhaust with Vallejo Gunship Gray used for the crankcase. A dark wash was
applied to bring out the details. The way the kit is designed gives the
opportunity to add the landing gear struts after the model is assembled and
painted. The landing gear struts and wheels were painted with Alclad Aluminum,
and the tires were painted with Vallejo Tire Black. I chose to use the
beautifully-rendered resin wheels.
The
wings were next, with the nacelles assembled, the engines painted with Alclad
Jet Exhaust with Vallejo Gunship Gray used for the crankcase. A dark wash was
applied to bring out the details. The way the kit is designed gives the
opportunity to add the landing gear struts after the model is assembled and
painted. The landing gear struts and wheels were painted with Alclad Aluminum,
and the tires were painted with Vallejo Tire Black. I chose to use the
beautifully-rendered resin wheels.
I filled all the seams around the nacelles and the wing halves. The wings were glued to the fuselage and the seams at the roots were filled with CA glue followed by Mr. Surfacer 500. Hasegawa molded the rear empennage in clear styrene in order to seamlessly depict the rear gunner’s windows without having to create separate parts. These parts were assembled and glued to the fuselage, with more seams to be filled at the joints.
I painted the nose machine gun, broke off the barrel, and inserted the breach into the hole on the inside of the nose canopy. This allowed me to complete building and painting the model and then add the barrel at the very end, because I have painfully learned from experience that it was going to be broken anyway. I also glued on the nose and cockpit canopy pieces and filled the seams in order to have a smooth transition to the surrounding fuselage.
The panel lines obliterated during the seam-filling process were restored with a scriber. I then went on an extensive search for stray sanding marks and scratches to eliminate. I polished the plastic to a mirror shine using sanding sticks of increasingly fine grit, followed by Novus Plastic Polish #2. I do this for any model that will be painted with metallic paints in order to depict a natural metal finish as flawlessly as I can.
The model was washed with a mild solution of liquid dish soap and rinsed with water and allowed to air dry in preparation of the painting process. The painting masks provided in the kit were applied to the canopies and windows.
| COLORS & MARKINGS |
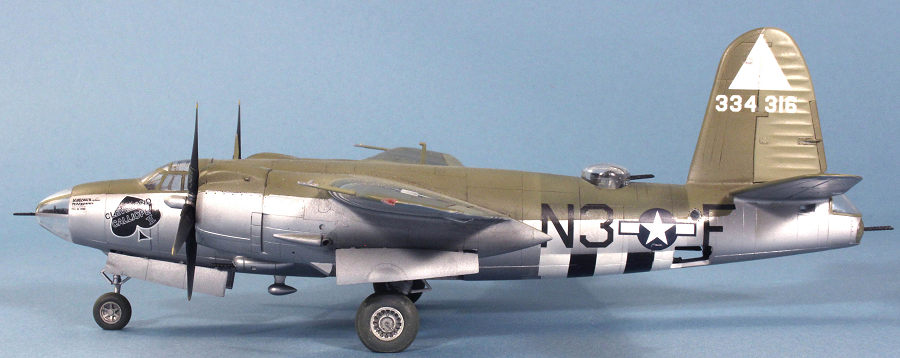
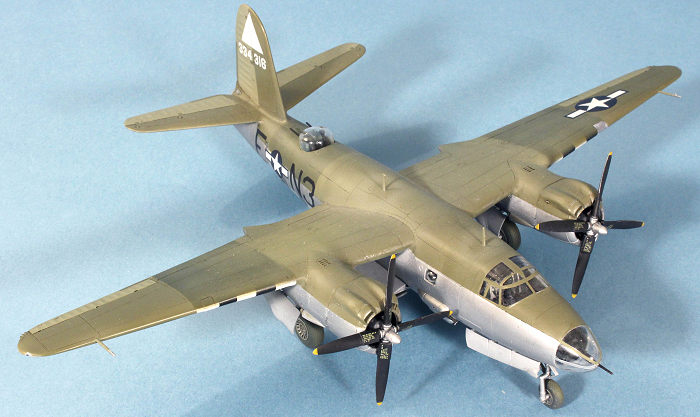
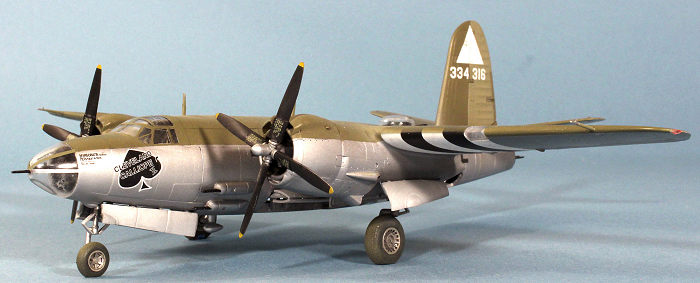
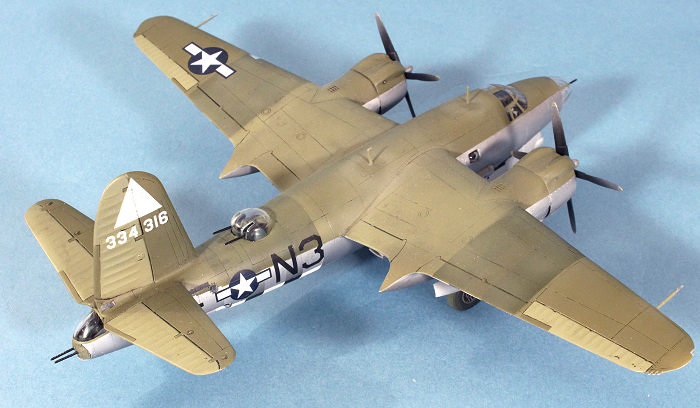
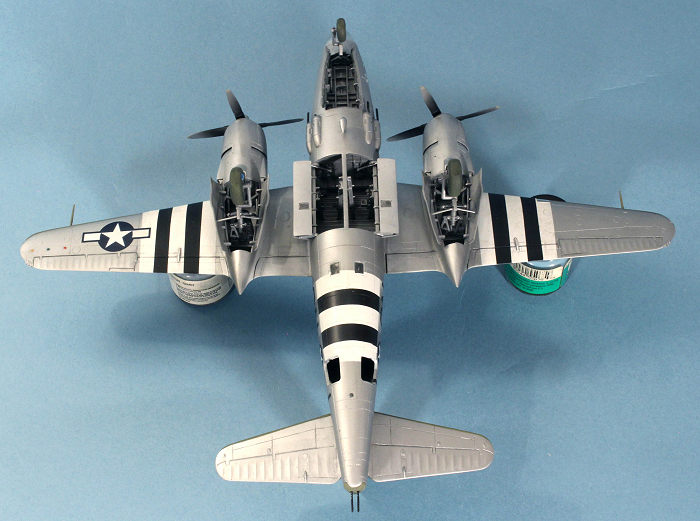
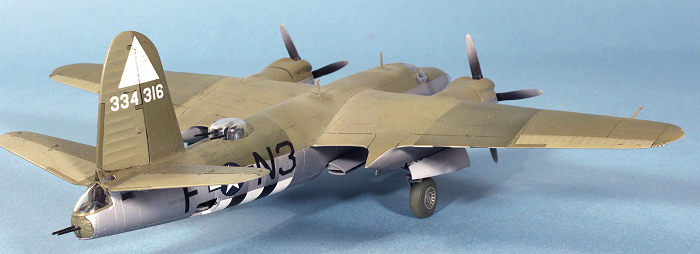
I first primed the entire model with Vallejo Gray Surface Primer. I chose to depict Cleveland Calliope, a B-26G-5 from the 344th Bomb Group as seen deployed on the continent at an airfield in Cormeilles-en-Vexin, France in September 1944. It had Olive drab topsides with natural aluminum undersides and sported D-Day striping on the bottoms of the wings and fuselage.
I used Alclad Aluminum for the undersides, masked a sharp demarcation line with Tamiya tape, and sprayed the topsides with a custom mix of Vallejo Olive Drab with 30% flat white and 10% Neutral Gray added to give the worn look of an operational aircraft. The fabric control surfaces faded at a faster rate than the paint on the metal surfaces, so they were masked off and painted with Vallejo Olive Drab lightened with 60% flat white.
D-Day stripes went all on 9th Air Force Marauders on the evening of June 4, 1944, and were ordered removed from the topsides by the end of August. For B-26s in overall aluminum, the paint for the stripes was removed with aviation gas and a lot of elbow grease from the ground crews. For those aircraft with camouflage paint on the topsides, it appears that the stripes were just sprayed over with fresh Olive Drab or RAF Dark Green paint, depending on the squadron. I masked off the stripes for both top and bottom surfaces, using Testors Acryl Flat White and Vallejo Flat Black, then went back over the stripes on the top of the wings and the fuselage with Olive Drab straight from the bottle but sprayed thinly enough to let some of the underlying stripe definition to show through.
 I sprayed
Quick Shine Multipurpose Floor Finish on the topside only in preparation for
decal application. The Eduard decals behaved very well as I laid them down on
the model surface with a drop or two of Quick Shine to assist in
adhesion. Another coat of Quick Shine went over the decals.
I sprayed
Quick Shine Multipurpose Floor Finish on the topside only in preparation for
decal application. The Eduard decals behaved very well as I laid them down on
the model surface with a drop or two of Quick Shine to assist in
adhesion. Another coat of Quick Shine went over the decals.
I applied a pre-mixed dark wash made my MIG Productions on the topside panel lines. I’ve painfully learned that this mixture is too hot for using on the Alclad painted surfaces, so I mixed up a dark wash with acrylic paints for the undersides and inside the wheel wells, bomb bay, landing gear struts, and wheels. Exhaust stains were added to the sides of the cowlings with a thin spray of medium gray. I added paint chips on the fronts of the cowlings and leading edge of the wings using a silver color pencil.
The propellers were painted with Alclad Aluminum hubs, Vallejo Black Surface Primer blades, and Vallejo Yellow tips (four inches, which is 1.5 mm in 1/72 scale!). I sprayed Alclad Aluminum on the rear surfaces of the props to depict the sand-blasted abrasion seen on aircraft operating from crude forward air bases, with a silver pencil again used to show paint chipping on the leading edges of the props.
A coat of Testors Acryl Flat Clear was sprayed on the topsides, as well as on the national insignia on the fuselage sides and underneath the starboard wing to seal the weathering and to eliminate the glossiness of the decals. The tires got a thin spray of Polly Scale Mud around their circumference.
I removed the canopy masks and was very pleased with the results. They do make everything so much more pleasant and crisp-looking.
| FINAL CONSTRUCTION |
 The
landing gear struts were glued into their respective locations in the wheel
wells. I was relieved to see that the amount of weight I added to the model
was sufficient to allow the model to sit on its tricycle landing gear
without tail-sitting. I glued on the wheels and added the wheel well doors,
which have a really nice set of hinges that allow for ease of attachment.
The
landing gear struts were glued into their respective locations in the wheel
wells. I was relieved to see that the amount of weight I added to the model
was sufficient to allow the model to sit on its tricycle landing gear
without tail-sitting. I glued on the wheels and added the wheel well doors,
which have a really nice set of hinges that allow for ease of attachment.
The bomb bay doors are a bit tricky to get aligned and glued securely. It took a couple of tries before I was satisfied with the arrangement. The props were slipped into the crankcase fronts but the shafts didn’t quite fill the holes, so they sagged downward. I used CA glue to augment the joint and insure that the props were aligned with the cowling fronts. The final fiddly bits were added: ADF football, pitot tubes, antenna mast, and the top turret was placed into its opening without the need for any glue. Note that the turret was frameless, so don’t apply any paint. I glued on the side-pack machine guns on either side of the fuselage. The machine gun barrels for the tail guns and the nose gun were glued in and with that I was done.
| CONCLUSIONS |
This is just a great model kit, made even better with Eduard’s additional detail. While I didn’t use most of the interior photo-etch pieces, it can’t be seen anyway in the completed model. I really appreciated the paint masks, resin wheels, and the variety of decal options that Eduard provided. The B-26 Marauder is an airplane that I have a deep fondness for and this Hasegawa kit does that subject proud in 1/72 scale. The extra bits from Eduard proved to be icing on the cake.
| REFERENCES |
Freeman, Roger: Ninth Air Force in Colour
Lee Kolosna
27 February 2026
Copyright ModelingMadness.com. All rights reserved. No reproduction in part or in whole without express permission of the editor.
If you would like your product reviewed fairly and fairly quickly, please contact the editor or see other details in the Note to Contributors.
Back to the Main Page Back to the Review Index Page Back to the Previews Index Page