Hasegawa 1/72 B-24J Liberator
| KIT #: | 01559 |
| PRICE: | $63.00 |
| DECALS: | Two options |
| REVIEWER: | Lee Kolosna |
| NOTES: | Basic kit build |
| HISTORY |
The Consolidated B-24 Liberator is the most-produced United States military aircraft in history, with nearly 18,500 manufactured by four different firms (Consolidated-Vultee, Douglas, North American Aviation, and Ford Motor Company). It served in all theaters of operation during World War II, was the primary heavy bomber in the Pacific until the B-29 arrived, and was a significant contributor to the strategic bombing campaign against Germany.
The G
(built by North American), H (built by Ford), and J (built by Consolidated
at their Fort Worth and San Diego facilities, as well by Ford and Douglas)
models of the Liberator incorporated the same upgrades in defensive
capabilities from lessons learned in combat with the B-24D. A man ned Sperry
ball turret was added to the ventral position, either a Consolidated A-6A or
Emerson A-15 turret was placed in the nose, and an upgraded Consolidated
A-6B turret was installed in the tail position. Note: this can become very
confusing due to the multiple production blocks produced by these four
facilities, and there was a myriad of window and turret configurations, with
A-6B turrets installed in the nose when supplies of Emerson turrets were not
keeping up with production. (Editor's Note: I recommend Alan Griffith's book
'Consolidated Mess' which clears up the myriad of differences in this
regard).
ned Sperry
ball turret was added to the ventral position, either a Consolidated A-6A or
Emerson A-15 turret was placed in the nose, and an upgraded Consolidated
A-6B turret was installed in the tail position. Note: this can become very
confusing due to the multiple production blocks produced by these four
facilities, and there was a myriad of window and turret configurations, with
A-6B turrets installed in the nose when supplies of Emerson turrets were not
keeping up with production. (Editor's Note: I recommend Alan Griffith's book
'Consolidated Mess' which clears up the myriad of differences in this
regard).
The H and J were the most numerous of the B-24 variants produced. The additional weight of the two new turrets made the airplane even more difficult to fly than the B-24D, with freezing cold drafts whipping through the fuselage, very heavy flight controls for the pilots, and less performance as the Pratt & Whitney R-1830 engines had not been appreciably upgraded. In the Pacific theater, many B-24Js had their ball turrets removed to save weight starting in September 1943, a move also adopted by Europe-based Liberators beginning in spring 1944.
The daylight bombing campaign against Germany by aircraft from the 8th and 15th Air Forces has garnered the lion’s share of attention from aviation enthusiasts and historians. B-17s outnumbered B-24s in the ETO by a ratio of 4 to 1. B-24 operations in the Pacific, Southeast Asia, with the RAF, over the Atlantic, and in the Americas aren’t generally well-known or romanticized like the tales written about the titanic air battles over Germany, but that doesn’t diminish from the essential support that the B-24 provided in the armed conflict that consumed nearly the entire world from 1939 to 1945.
| THE KIT |
Hasegawa’s B-24J in 1/72 scale was released in 2008, one year after the debut of the D model. It features finely recessed panel lines, an interior that is best described as sparse, and generally accurate shape. As with the B-24D kit, the entire nose section is molded in clear styrene, which allows for smooth window transitions to the fuselage contours. It does however restrict the modeler in what markings are appropriate for the aircraft provided in the kit as window configurations on B-24s of all variants is a subject of dizzying confusion.
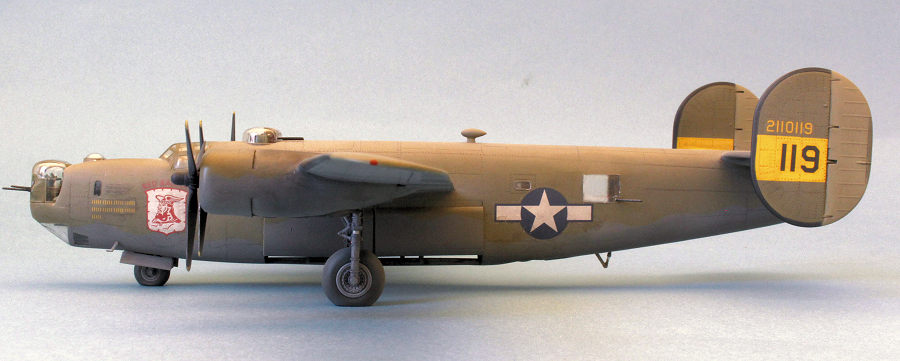
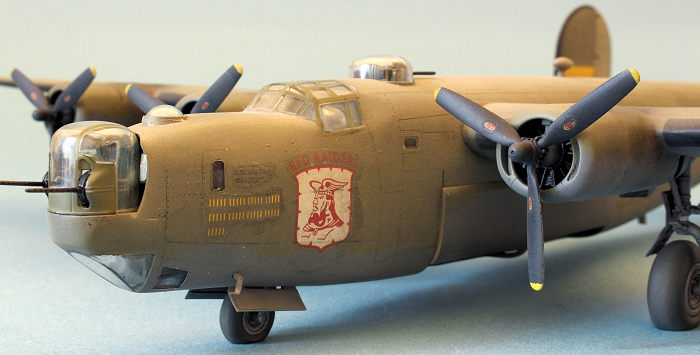
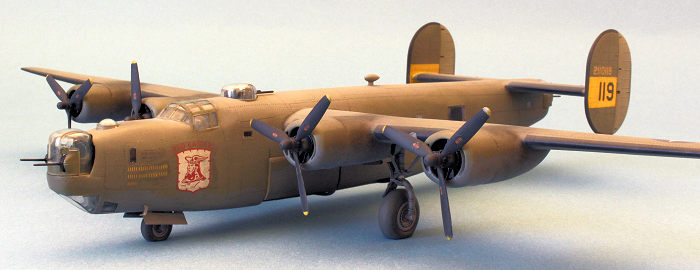
Two sets of markings are provided in the decal sheet, both from the Pacific Theater: the extravagant nose artwork of Cocktail Hour with the 43rd Bomb Group in natural metal, and Red Raiders from the 22ndBomb Group in Olive Drab over Neutral Gray.
The kit has a few minor issues. This is not a definitive list, just the ones that I gave attention to during my build:
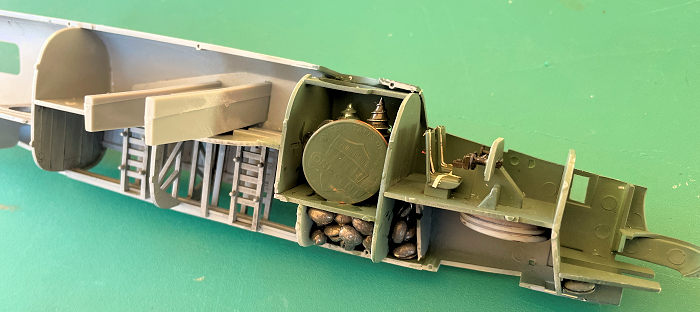
· Detail in the cockpit area is rudimentary even for this scale – seats, console, and a decal provided for the instrument panel. It is almost non-existent in the bombardier’s station, with not even a Norden bombsight provided. The bomb bay has a reasonable amount of detail with two sets of doors provided for either an open or a closed configuration.
 · Massive amounts of nose weight are required to keep this
model from being a tail-sitter. I was prepared this time after my
experience building the B-24D kit and loaded the radio compartment with zinc
fishing sinkers and pennies until I filled it to the brim.
· Massive amounts of nose weight are required to keep this
model from being a tail-sitter. I was prepared this time after my
experience building the B-24D kit and loaded the radio compartment with zinc
fishing sinkers and pennies until I filled it to the brim.
· The bottoms of the tires are flattened but are a bit too deflated in appearance, in my opinion. Aftermarket resin replacements are readily available if one wishes.
· Post-type vents on the top of both wings just above the inner nacelles were introduced with production block B-24J-20-CF. The kit does not provide these.
· There is a landing light under each wing, as well as one in the leading edge of the port wing between the two nacelles. I haven’t been able to determine which configuration is correct as I don’t think both types were present at the same time.
· There is a fuselage window underneath both horizontal stabilizers. Only the port side is correct. The starboard window opening should be filled and painted over.
Prior to the recent release of the Airfix B-24D and H kits, this was the most accurate B-24 kit of any scale on the market. Academy’s B-24 series in 1/72 scale suffers from nacelles and cowlings that are undersized, with even less interior detail. I haven’t yet had the opportunity to build either of the Airfix Liberator kits, but photos of the sprues lead me to believe that they will be the new champions in regards to detail and accuracy. That takes nothing away from the Hasegawa kits, which are still extremely competitive in this scale.
| CONSTRUCTION |
B-24s are confusing as all get out, and knowing exactly what specific variant has been engineered and whether that is appropriate for the markings one chooses for their model is an exercise in extreme frustration. I decided to use the kit decals for the camouflaged Red Raiders. 22nd Bomb Group records indicate that this aircraft was named Queen Anne, but that name wasn’t painted on the side of the nose. 42-110119 was a B-24J-135-CO, which meant it had an Emerson front turret, enclosed frameless waist gun windows, and the belly turret was most likely removed. Also, the front landing gear bay doors opened outwards. It probably did not have the small rectangular waist gun sighting windows on either side of the lower fuselage, but I didn’t have a photo to confirm this.
 Interior painting was first. In general, B-24Js had Dull Dark
Green forward sections (nose, cockpit, radio compartment, turret interiors),
a Neutral Gray bomb bay (if camouflaged, otherwise unpainted aluminum), and
unpainted aluminum in the rear sections. I used Vallejo Model Air paint for
the green (USAF Green FS34092 is a reasonably good match for Dull Dark
Green). The bomb bay was painted with Vallejo Model Air Neutral Gray,
darkened with 20% flat black. The rear sections were painted with Alclad II
Lacquer Aluminum. Note that Hasegawa instructs the modeler to paint all
interior sections with ANA 611 Interior Green (FS34151). As with the B-17
and B-24 kit instructions from other manufacturers, this is simply wrong. Warbirds
are frequently painted with Interior Green to prevent corrosion, which
probably adds to the common myth that all World War II era US aircraft were
painted with Interior Green. Some were, but most weren’t.
Interior painting was first. In general, B-24Js had Dull Dark
Green forward sections (nose, cockpit, radio compartment, turret interiors),
a Neutral Gray bomb bay (if camouflaged, otherwise unpainted aluminum), and
unpainted aluminum in the rear sections. I used Vallejo Model Air paint for
the green (USAF Green FS34092 is a reasonably good match for Dull Dark
Green). The bomb bay was painted with Vallejo Model Air Neutral Gray,
darkened with 20% flat black. The rear sections were painted with Alclad II
Lacquer Aluminum. Note that Hasegawa instructs the modeler to paint all
interior sections with ANA 611 Interior Green (FS34151). As with the B-17
and B-24 kit instructions from other manufacturers, this is simply wrong. Warbirds
are frequently painted with Interior Green to prevent corrosion, which
probably adds to the common myth that all World War II era US aircraft were
painted with Interior Green. Some were, but most weren’t.
The kit does not provide frameless waist gun windows, so I cut out squares from an old Compact Disc case (anyone remember those?) and glued them into the openings. I drilled a hole for the guns to pass through, and broke off the barrel from the gun breach in order to glue them on later after the model was painted and weathered. The breaches were glued to the inside surface of the window. The seams around each window were filled and sanded smooth with the surrounding fuselage sides, and polished back to clarity with increasingly finer grit sanding pads, followed by Novus Plastic Polish #2.
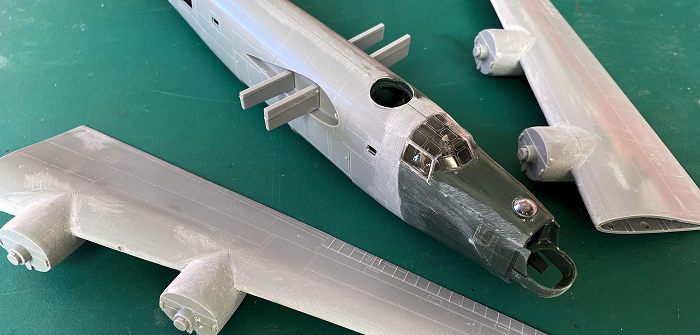
With that initial painting done, I quickly assembled the few interior pieces. A decal is provided for the instrument panel, and I added harnesses to each of the seats made from thin strips of paper painted a medium gray. I chose not to use the 500 lb. bombs as I hate painting those darn yellow stripes on the nose of the bombs. The entire nose section is molded in clear styrene plastic. The kit requires you to install the nose wheel strut at this time and I advise you to do just this as there is almost no way to install it securely after the model is built and painted. This does introduce a not-insignificant risk of breaking the strut as the model is handled for the rest of the construction and painting process, which is exactly what happened to me. I repaired the strut by inserting a pin made from a cut length from a paper clip.
 I
crammed every bit of weight that I could in the radio compartment and
sprayed the pennies and sinkers Dull Dark Green. The windows are so small
that nothing really can be seen inside this compartment anyway. I was
successful with my weights this time, as my model balanced nicely on its
tricycle landing gear.
I
crammed every bit of weight that I could in the radio compartment and
sprayed the pennies and sinkers Dull Dark Green. The windows are so small
that nothing really can be seen inside this compartment anyway. I was
successful with my weights this time, as my model balanced nicely on its
tricycle landing gear.
When I built the Hasegawa B-24D kit a couple of years earlier, I had problems with the fit of the clear nose section to the assembled fuselage. I took a different approach this time and first glued the front nose half to the rear fuselage half, resulting in a better fit with a more traditional arrangement as the then-combined right and left fuselage halves were glued together. That still left the top section of the nose to be glued on and the seams filled, but it resulted in far less work and frustration.
I glued on the canopy and carefully filled the resulting seams with CA glue and then Mr. Surfacer 500 to insure a smooth blending of the clear parts with the surrounding fuselage. The incorrect starboard side fuselage window opening just under the horizontal stabilizer was filled, as were the waist gun sighting windows.
The wings and stabilizers were assembled and seams filled. The engines have pretty good detail (no wiring harnesses provided, though) and are trapped between three-piece cowling assemblies. The interior of the cowlings were painted with Alclad II Lacquer Aluminum. The Pratt & Whitney R-1830 engines were painted with Alclad Jet Exhaust and the crankcases were painted with Testors Acryl Gunship Gray FS36118. The wings were then mated to the fuselage with an excellent joint with perfect dihedral provided by the two wing spars.
The seams were filled at the attachment joints of the horizontal stabilizer to the fuselage. All the panel lines obliterated by the seam-filling process were re-scribed, and the construction dust and grime was washed off with a solution of dish soap and rinsed with clean water. The canopies and windows were masked off and the model was ready for paint.
| COLORS & MARKINGS |
I first primed the model with Vallejo Gray Surface Primer. I sprayed the bottom of the aircraft with darkened Vallejo Model Air Neutral Gray, including the wheel wells and landing gear struts. When dry, I masked the wavy camouflage demarcation line with Tamiya tape and sprayed Vallejo Model Air Olive Drab lightened with 30% flat white and 10% Neutral Gray. The de-icer boots on the wings and stabilizers were masked off and painted with a slightly lightened black. The control surfaces were masked off and painted an even lighter shade of Olive Drab, with 60% flat white added.
I removed the masking on the canopy greenhouse and painted the frames, as well as the frames those for the front and rear turrets. The Martin top turret did not have any metal frames so that was left unpainted. I also painted the ball turret and installed it into the opening in the retracted position. This probably isn’t correct, but Pacific B-24Js frequently had a downward-firing machine gun mounted in that location, and I didn’t feel like scratch-building that mechanism due to lack of a proper guide as to what it looked like.
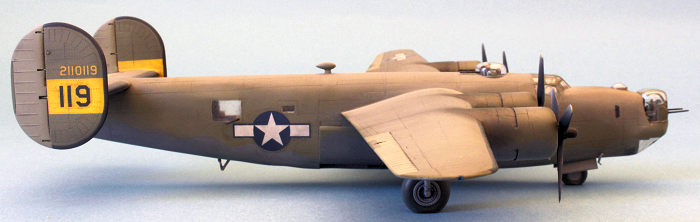 Rather than use the kit decals for the yellow stripes on the
twin vertical stabilizers, I masked them and painted them Vallejo Model
Air Yellow. Period photographs of other 22nd Bomb Group Liberators
indicate that this stripe existed on the inner surfaces of the
stabilizer, something the kit decals do not provide.
Rather than use the kit decals for the yellow stripes on the
twin vertical stabilizers, I masked them and painted them Vallejo Model
Air Yellow. Period photographs of other 22nd Bomb Group Liberators
indicate that this stripe existed on the inner surfaces of the
stabilizer, something the kit decals do not provide.
My supply of Future Floor polish exhausted (sniff), I used Quick Shine Multipurpose Floor Finish for the gloss coat. It sprayed through my airbrush as easily as Future did and will be my go-to acrylic gloss from now on. The kit decals were applied and did just fine. The blue surrounds for the bars on the national insignia are just a tiny bit too thin, but I didn’t have any replacements in my decal stash to use. Another coat of Quick Shine went on after the decals were dry. I used a pre-made dark enamel wash from MIG Productions to highlight the panel lines and to add dirt and grime in the wheel wells. The wheels themselves had Neutral Gray hubs with Vallejo Model Air Tire Black used for the tires. A spray of thinned light gray was used to weather the tires.
The turbo-superchargers were painted with Testors Metalizer Burnt Metal and dry-brushed with Polly Scale Rust. Exhaust stains were added coming from the turbosupercharger exhaust port under each nacelle using dark gray and black chalk pastel dust. I also added general grime on top of each nacelle with chalk pastel dust and in random spots all over the fuselage. This aircraft, operating from crude airstrips in New Guinea, was sun-bleached and very dusty. I sprayed a highly-thinned coat of a light gray and tan mixture all over the model, focusing mostly on the top surfaces which would have been most faded by the fierce tropical sun.
I sealed up all the weathering and decals with a final coat of Testors Acryl Flat Clear. I dabbed on a tiny drop of paint on the navigation lights on the end of each wingtip, using Clear Red and Clear Blue on the port and starboard wings, respectively.
The propeller tips were primed, painted yellow, and masked off for black blades and prop hubs. A reminder to modelers: 4 scale inches for the yellow tips! The effects of sand abrasion on the back of the propeller blades was replicated with a thin spray of Aluminum, followed by random marks made with a silver color pencil on the leading edges of each blade.
| FINAL CONSTRUCTION |
 The main landing gear were glued into their holes in the wheel
wells and the model placed on a level surface to check for the proper
stance: success! The propellers went onto their shafts, the turrets
installed in their respective locations, and the wheels glued onto the
gear struts. The previously cut-off gun barrels were added to the waist
positions. The pitot tubes, tail skid, and ADF football antenna were
attached. I could not find any evidence of 22nd Bomb Group Liberators
with aerial wires, so I did not add any. I suspect that they probably
did but this is really hard to see in most photographs.
The main landing gear were glued into their holes in the wheel
wells and the model placed on a level surface to check for the proper
stance: success! The propellers went onto their shafts, the turrets
installed in their respective locations, and the wheels glued onto the
gear struts. The previously cut-off gun barrels were added to the waist
positions. The pitot tubes, tail skid, and ADF football antenna were
attached. I could not find any evidence of 22nd Bomb Group Liberators
with aerial wires, so I did not add any. I suspect that they probably
did but this is really hard to see in most photographs.
| CONCLUSIONS |
The Hasegawa B-24D and J kits are quite good overall, if a little pricey. I think the Airfix B-24D and H kits are going to be even better, but that doesn’t diminish the Hasegawa kit’s overall quality. The lack of interior detail in this scale is not that big of an issue, as none of it can be seen other than inside the open bomb bay. I much prefer the look of the B-24D to the G/H/J series, as I think the nose turret gives a rather hideous look to an already ungainly airplane. But this is a machine meant for waging war, and having an example of one in my 1/72 bomber collection is a welcome thing.
| REFERENCES |
· Kinzey, Bert: B-24 Liberator in detail, volume 64
10 November 2025 Copyright ModelingMadness.com. All rights reserved. No
reproduction in part or in whole without express permission from the editor.
If you would like your product reviewed fairly and fairly quickly, please contact the editor or see other details in the Note to Contributors.