Hasegawa 1/72 B-24D Liberator
| KIT #: | 01558 |
| PRICE: | $70.00 SRP |
| DECALS: | Two options |
| REVIEWER: | Lee Kolosna |
| NOTES: | Kits-World Decals |
| HISTORY |
The Consolidated B-24 Liberator is the most-produced United States military aircraft in history, with nearly 18,500 manufactured by four different firms (Consolidated-Vultee, Douglas, North American Aviation, and Ford Motor Company). It served in all theaters of operation during World War II, was the primary heavy bomber in the Pacific until the B-29 arrived, and was a significant contributor to the strategic bombing campaign against Germany. Always second fiddle to the more photogenic B-17 Flying Fortress, the B-24 was able to carry a larger bombload a greater distance than the Boeing bomber. It was however more difficult to fly with heavy controls, tended to leak gasoline, and was particularly tricky to consistently maintain formation with other aircraft.
 The
D model of the Liberator was the first to see large-scale production and
featured a remotely-operated belly turret along with power-operated tail and
upper fuselage turrets. The belly turret arrangement was unsatisfactory and
most B-24Ds were deployed without any armament in that position until a
Sperry manned turret, like that on the B-17, was introduced late in the
production run. The majority of B-24Ds had no underside defensive armament.
The
D model of the Liberator was the first to see large-scale production and
featured a remotely-operated belly turret along with power-operated tail and
upper fuselage turrets. The belly turret arrangement was unsatisfactory and
most B-24Ds were deployed without any armament in that position until a
Sperry manned turret, like that on the B-17, was introduced late in the
production run. The majority of B-24Ds had no underside defensive armament.
B-24Ds participated in one of the most daring and disastrous bombing missions of the war on August 1, 1943, targeting the oil production facilities in Ploesti, Romania. It was named Operation Tidal Wave and featured an audacious plan for the bomber formation to approach the target from just a hundred feet off the ground to insure an element of surprise. Weather and scheduling mishaps threw the carefully-calculated arrival times off, giving the Romanian anti-aircraft forces time to prepare for the incoming bombers with deadly results. As the heavily-damaged Liberators withdrew after dropping their bombs, German and Romanian fighters pressed attacks with even more casualties ensuing. Of the 178 bombers deployed, only 88 returned to their bases in Libya, with 55 of those sustaining sufficient damage to be written off from further operations. It was one of the worst events in regards to casualties suffered by the USAAF during the entire war. Oil refinement and production was only marginally impacted. Ploesti was the target of multiple raids by the RAF and the USAAF throughout 1944, including a bizarre one consisting only of P-38 Lightnings. The targeting of strategic bombing resources against the production of Axis oil and fuel production is arguably the most significant success of the brutal Allied air campaign of World War II.
| THE KIT |
Hasegawa’s B-24D in 1/72 scale was initially released in 2007 and features finely recessed panel lines, an interior that is best described as sparse, and generally accurate shape. Amongst the 243 parts, the entire nose section is molded in clear styrene, which allows for smooth window transitions to the fuselage contours. It does however restrict the modeler in what markings are appropriate for the aircraft provided in the kit as window configurations on B-24s of all variants is a subject of dizzying confusion.
Two sets of markings are provided in the decal sheet, one from the 98th Bomb Group, The Squaw, in Desert Sand over Neutral Gray, and one from the 44th Bomb Group, Princess, in Olive Drab over Neutral Gray.
The kit has a few issues. This is not a definitive list, just the ones that I gave attention to during my build:
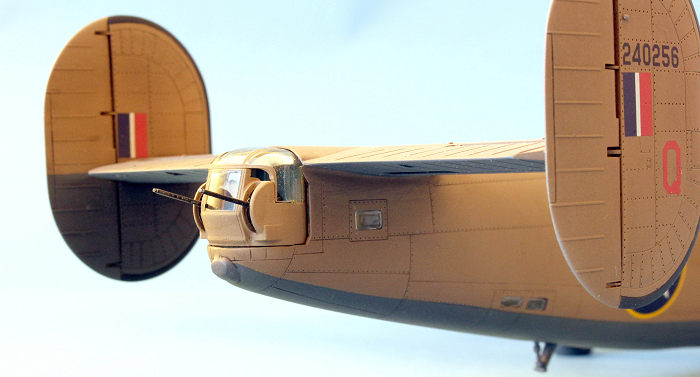
· The proper tail turret for a B-24D is the Consolidated A-6A unit with exposed machine gun breaches. The kit provides the later A-6B turret, appropriate for the B-24H and J, with enclosures around each of the twin guns along with a slight variation of the transparent sections. For me, the difference was not enough to bother with.
 · Detail
in the cockpit area is rudimentary even for this scale – seats, console, and
a decal for the instrument panel. It is almost non-existent in the
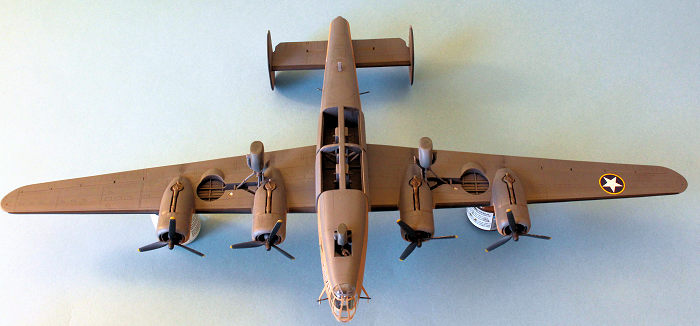
bombardier’s station, with not even a Norden bombsight provided. The bomb
bay has a reasonable amount of detail with two sets of doors provided for
either an open or a closed configuration.
· Detail
in the cockpit area is rudimentary even for this scale – seats, console, and
a decal for the instrument panel. It is almost non-existent in the
bombardier’s station, with not even a Norden bombsight provided. The bomb
bay has a reasonable amount of detail with two sets of doors provided for
either an open or a closed configuration.
· Fit of the lower waist gun sighting clear windows is very poor. I had so much trouble getting them to stay in place that one was launched from my tweezers into the Great Beyond, never to be found again. I had to make a replacement piece cut from clear sheet styrene.
· Massive amounts of nose weight are required to keep this model from being a tail-sitter. I put every bit of weight I could along the sides of the bombardier’s station, only to find that it still wasn’t enough so a number of fishing weights were finally stuffed into the nose landing gear bay after the model was assembled and painted.
· The kit instructions have the modeler position the nose landing gear doors open outside the fuselage, but the doors of a Consolidated-built B-24D retract inward into the wheel bay itself. On Hs and Js, it depends on what manufacturer built it and when.
· The bottoms of the tires are flattened but are a bit too deflated in appearance, in my opinion. Aftermarket resin replacements are readily available if one wishes.
I was in a hobby shop back in 2007 and spied the then brand-new Hasegawa B-24D kit on the shelf. As I inspected the box, the owner of the shop came up to me and said, “This is why the hobby is going to die!” I was puzzled by his statement until I looked at the price tag: $90. For a 1/72 scale kit!? The price has since come down quite a bit – I bought mine for a very reasonable $37 fifteen years later from an on-line retailer, but I do remember the initial sticker shock.
Price aside, this was the most accurate B-24 kit in any scale on the market up until Airfix released their B-24H and B-24D kits just last year. While I haven’t been able to obtain those kits yet, my experience with Airfix’s 1/72 scale B-17G kit leads me to believe that the new Liberators are most likely the new champions of accuracy and detail available. The Hasegawa 1/72 scale B-24 kits, both the D and the J models, are still decent overall and build up quite nicely with good-enough detail for the scale.
| CONSTRUCTION |
 To
start out on any B-24 project, the modeler needs to decide as to which
specific aircraft they are going to depict. B-24s are amazingly complicated
in regards to turrets fitted, fuselage window configurations, and even the
way the nose landing gear doors retracted. I knew I wanted to build an
aircraft in a Desert Sand over Neutral Gray scheme that participated in the
August 1, 1943 Ploesti raid. I didn’t care for the markings provided in the
kit as they depict a Ploesti aircraft when it was on a War Bond tour of the
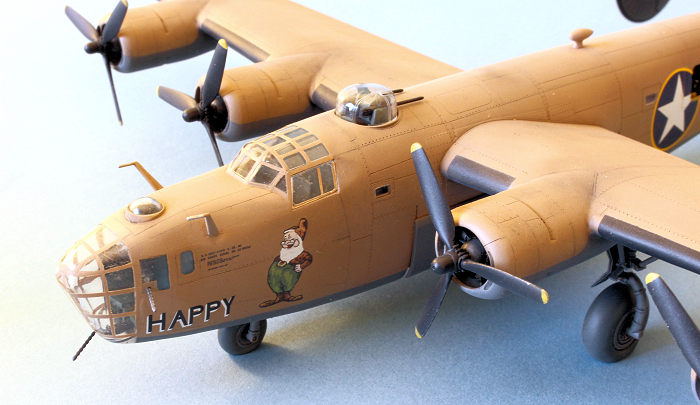
United States afterwards, so I obtained a Kits-World decal sheet for one of
the aircraft with nose art inspired by the 1937 Walt Disney movie Snow White
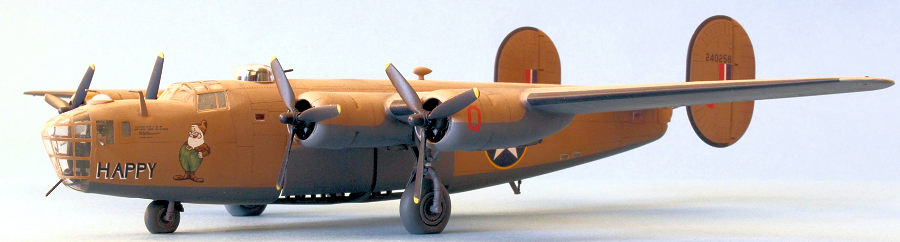
and Seven Dwarfs serving with the 343rd Bomb Squadron based in Libya. I
chose Happy, which was a B-24D-40-CO built by Consolidated Aircraft at their
San Diego facility.
To
start out on any B-24 project, the modeler needs to decide as to which
specific aircraft they are going to depict. B-24s are amazingly complicated
in regards to turrets fitted, fuselage window configurations, and even the
way the nose landing gear doors retracted. I knew I wanted to build an
aircraft in a Desert Sand over Neutral Gray scheme that participated in the
August 1, 1943 Ploesti raid. I didn’t care for the markings provided in the
kit as they depict a Ploesti aircraft when it was on a War Bond tour of the
United States afterwards, so I obtained a Kits-World decal sheet for one of
the aircraft with nose art inspired by the 1937 Walt Disney movie Snow White
and Seven Dwarfs serving with the 343rd Bomb Squadron based in Libya. I
chose Happy, which was a B-24D-40-CO built by Consolidated Aircraft at their
San Diego facility.
Interior painting was first. B-24Ds had Dull Dark Green forward sections (nose, cockpit, radio compartment), a Neutral Gray bomb bay, and un-tinted yellow zinc chromate primer in the rear sections. I used Vallejo Model Air paint for the green (USAF Green FS34092 is a reasonably good match for Dull Dark Green), the last of my supplies of Polly Scale paint (Neutral Gray ANA 603), and the last of my Testors Acryl paint for the rear fuselage (Yellow Zinc Chromate FS13627). The turret interiors were painted Dull Dark Green.
With that
initial painting done, I quickly assembled the few interior pieces. A decal
is provided for the instrument panel, and I added harnesses to each of the
seats made from thin strips of paper and painted a medium gray. I chose
not to use the 500 lb. bombs as I hate painting those
 darn
yellow stripes on the nose of the bombs. The entire nose section is molded
in clear styrene plastic to enable Hasegawa the flexibility in future kits
to depict the specific window configurations required by just designing and
molding a couple of new pieces. The kit requires you to install the nose
wheel strut at this time and I advise you to do just this as there is almost
no way to install it securely after the model is built and painted. This
does introduce a not insignificant risk of breaking the strut as the model
is handled for the rest of the construction and painting process, which is
exactly what happened to me. I repaired the strut by inserting a pin made
from a cut length from a paper clip.
darn
yellow stripes on the nose of the bombs. The entire nose section is molded
in clear styrene plastic to enable Hasegawa the flexibility in future kits
to depict the specific window configurations required by just designing and
molding a couple of new pieces. The kit requires you to install the nose
wheel strut at this time and I advise you to do just this as there is almost
no way to install it securely after the model is built and painted. This
does introduce a not insignificant risk of breaking the strut as the model
is handled for the rest of the construction and painting process, which is
exactly what happened to me. I repaired the strut by inserting a pin made
from a cut length from a paper clip.
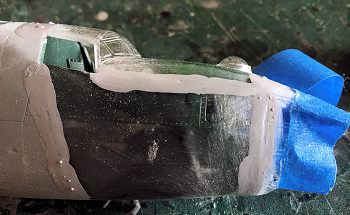
The fuselage halves were glued together with CA glue (to avoid the appearance of ghost seams months later, I have painfully learned) and then the assembled nose section was added. The fit here was not good at all and required a lot of sanding and filling to get a smooth transition between the nose and the rest of the fuselage. When I built the Hasegawa B-24J kit a couple of years later, I took a different approach and first glued the front nose half to the rear fuselage half, resulting in a better fit with a more traditional arrangement as the then-assembled right and left fuselage halves were glued together. That still left the top section of the nose to be glued on and the seams filled, but it resulted if far less work and frustration.
I cut the barrels off the three nose machine guns, one in the lower canopy greenhouse and two in the cheek positions, and glued the remaining gun breeches into position before I attached the nose and canopy pieces. This method avoids snapping off the gun barrels during the rest of the building and painting stages, and allows me to add them at the very end along with all the other fiddly bits. I carefully filled the seams for the canopy and nose pieces with CA glue and then Mr. Surfacer 500 to insure a smooth blending of the clear parts with the surrounding fuselage.
 The
wings and stabilizers were assembled and seams filled. The engines have
pretty good detail (no wiring harnesses provided, though) and are trapped
between three-piece cowling assemblies. The interior of the cowlings were
painted with Alclad II Lacquer Aluminum. The Pratt & Whitney R-1830 engines
were painted with Alclad II Lacquer Jet Exhaust and the crankcases were
painted with Testors Acryl Gunship Gray FS36118. The wings were then mated
to the fuselage with an excellent joint with perfect dihedral provided by
the two wing spars.
The
wings and stabilizers were assembled and seams filled. The engines have
pretty good detail (no wiring harnesses provided, though) and are trapped
between three-piece cowling assemblies. The interior of the cowlings were
painted with Alclad II Lacquer Aluminum. The Pratt & Whitney R-1830 engines
were painted with Alclad II Lacquer Jet Exhaust and the crankcases were
painted with Testors Acryl Gunship Gray FS36118. The wings were then mated
to the fuselage with an excellent joint with perfect dihedral provided by
the two wing spars.
Hasegawa engineered the model to have the various flat fuselage windows installed from the outside, which I did. As written above, the fit of the belly turret gun sighting windows is poor and I had to manufacture a new one that I had lost after that dreadful “ping” sound was heard as the kit part was launched by my tweezers to who knows where.
The seams were filled on the attachment joints of the horizontal stabilizer to the fuselage. All the panel lines obliterated by the seam-filling process were re-scribed, and the construction dust and grime was washed off with a solution of dish soap and rinsed with clean water. The canopies and windows were masked off and the model was ready for paint.
| COLORS & MARKINGS |
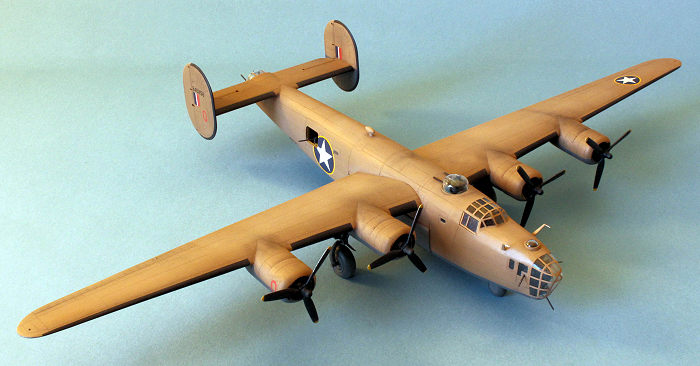
US Desert Sand A/NA 616 tended to fade quickly in the harsh African sun, with a distinct pinkish cast. I first sprayed the underside of the model with Polly Scale A/NA 603 Neutral Gray. Note that the wheel wells and landing struts of camouflaged B-24s were painted the same color as the underside of the airplane, not US Interior Green FS34151 as directed by the kit painting instructions. After the Neutral Gray areas were dry, I masked off the demarcation lines with drafting tape.
I mixed up a custom color of faded US Desert Sand by first lightening it by 25% with flat white and then adding about 10 drops of red in the bottle. It’s fairly close to the color seen in the few color photographs from that period, if maybe still a little too brown. This was sprayed over the topside of the aircraft. After that dried, I masked off the de-icer boots on the wings and stabilizers and painted them a slightly lightened black. The boots on the twin vertical stabilizers are tricky to mask with the large curved lines involved.
 I
removed the tape on the canopy and nose greenhouses and painted each frame,
first the ones north-south, waiting for that to dry, then masking the
east-west frames, followed by masking off and painting the few remaining
frames not painted in the initial passes. This method works best for me in
1/72 scale, as masking every individual clear panel is not only very labor
intensive, it tends to lead to an uneven look due to the variations in
placement of the tape in such tiny squares and rectangles.
I
removed the tape on the canopy and nose greenhouses and painted each frame,
first the ones north-south, waiting for that to dry, then masking the
east-west frames, followed by masking off and painting the few remaining
frames not painted in the initial passes. This method works best for me in
1/72 scale, as masking every individual clear panel is not only very labor
intensive, it tends to lead to an uneven look due to the variations in
placement of the tape in such tiny squares and rectangles.
A coat of Future Floor polish was used to prepare the model for decals. I used the Kits-World markings for Happy and they went down without trouble. Another coat of Future went on after the decals were dry. I used a pre-made dark enamel wash from MIG Productions to highlight the panel lines and to add dirt and grime in the wheel wells. The wheels themselves had Neutral Gray hubs with Vallejo Model Air Tire Black used for the tires. A spray of thinned Polly Scale Mud was used to weather the tires.
The turbo-superchargers were painted with Testors Metalizer Burnt Metal and dry-brushed with Polly Scale Rust. Exhaust stains were added coming from the turbosupercharger exhaust port under each nacelle using dark gray and black chalk pastel dust. Looking at hundreds of photos of B-24s to determine how they appeared during operations, I noticed that there is a thin leak of some fluid, probably oil, emanating from the top of each nacelle and flowing backwards across the entire top of the wing. It isn’t very heavy and not visible on all the photos I inspected, but it’s there on some so I replicated that with dark gray chalk pastel dust. I also added general grime on top of each nacelle with chalk pastel dust.
I sealed up all the weathering and decals with a final coat of Testors Acryl Flat Clear. I dabbed on a tiny drop of paint on the navigation lights on wingtips, using Clear Red and Clear Blue on the port and starboard wings, respectively.
 The
propeller tips were primed, painted yellow, and masked off for black blades
and prop hubs. A reminder to modelers: 4 scale inches for the yellow
tips! That equates to about 1.5 mm in 1/72 scale. Don’t over-do the width
of the tips! Even modern warbird propeller blades get this detail
incorrect. The effects of sand abrasion on the back of the propeller blades
was replicated with a thin spray of Aluminum, followed by random marks made
with a silver color pencil on the leading edges of each blade.
The
propeller tips were primed, painted yellow, and masked off for black blades
and prop hubs. A reminder to modelers: 4 scale inches for the yellow
tips! That equates to about 1.5 mm in 1/72 scale. Don’t over-do the width
of the tips! Even modern warbird propeller blades get this detail
incorrect. The effects of sand abrasion on the back of the propeller blades
was replicated with a thin spray of Aluminum, followed by random marks made
with a silver color pencil on the leading edges of each blade.
The main landing gear were glued into their holes in the wheel wells and the model placed on a level surface to check for the proper stance: FAIL! I didn’t add enough weight to the nose, so I stuffed several more zinc fishing weights into the nose wheel well opening. The propellers went onto their shafts, the turrets installed in their respective locations, and the wheels glued onto the gear struts. The previously cut-off gun barrels were added to the three nose positions. The pitot tubes, tail skid, and ADF football antenna were attached. I did not find any evidence in pictures of the Ploesti mission aircraft of the presence of aerial wires for radio communications, but this could be simply because they are so hard to resolve in the photos. At any rate, I did not add any aerial wires.
The final step was to glue in the sliding side cockpit windows. I struggled with this, having to sand down the edges of the pieces in varied ways in order to get them into their places in the open position. It still bugs me a little as it’s not nearly as crisp as it should be.
| CONCLUSIONS |
The Hasegawa kit was shockingly priced at the time of its introduction in 2007, but is more affordable now. It is a pretty good kit with an accurate shape (unlike the 1/48 scale Monogram kit, which has numerous issues or the even more disadvantaged 1/32 scale Hobby Boss kits), reasonable external detail, underwhelming interior detail, and a general ease of construction other than the fit issues I experienced with the nose section and the cockpit side windows.
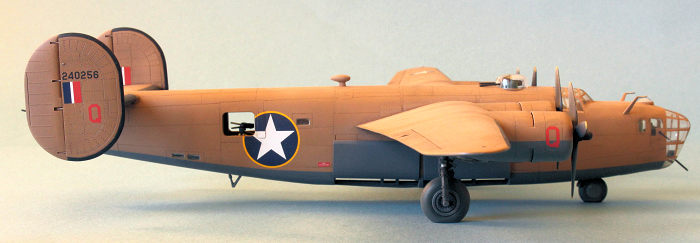
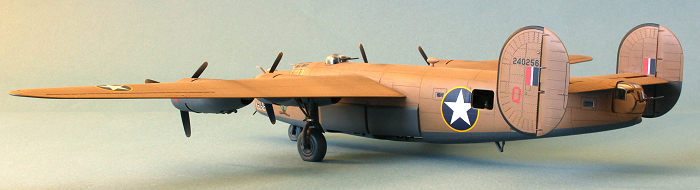
The finished model turned out fairly well and I’m pleased with it. The B-24 is one of my favorite aircraft and the story of the fateful Tidal Wave mission to the Ploesti oil refinement facilities is a tragic yet fascinating one.
| REFERENCES |
· Kinzey, Bert: B-24 Liberator in detail, volume 64
28 October 2025 Copyright ModelingMadness.com. All rights
reserved. No reproduction in part or in whole without express permission from
the editor. If you would like your product reviewed fairly and fairly quickly, please contact the editor or see other details in the
Note to
Contributors. Back to the Main Page
Back to the Review
Index Page
Back to the Previews Index Page