HK Models 1/32 B-17F Flying Fortress
| KIT #: | 01E05 |
| PRICE: | $336.00 |
| DECALS: | Three options |
| REVIEWER: | Lee Kolosna |
| NOTES: | Basic kit build |
| HISTORY |
The origin story of the Boeing B-17 is well known to any WWII aviation enthusiast. US Army Air Corps leadership committed to the concept of long-range bombing as a way to protect the US coasts from ships at sea, which later evolved to a belief that a bomber with enough defensive armament could fight its way to a target, deliver bombs with exceptional precision, and return to base with minimal loses. As is now also well-known, this conviction was flawed and aircrews of the United States’ European strategic bombing campaign suffered terribly, particularly in the early stage of operations when fighter escort was extremely limited in range.
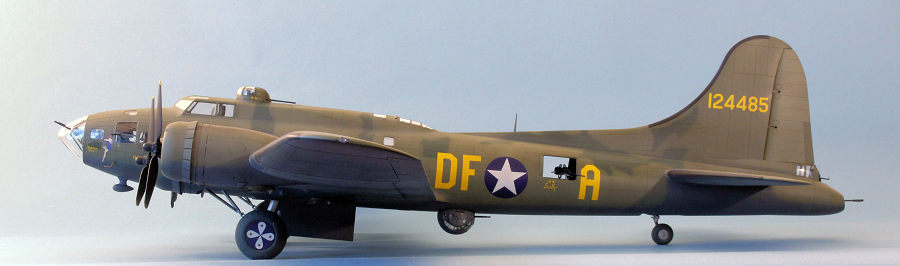
Memphis Belle was a B-17F-10-BO assigned to the 91st Bomb Group stationed at RAF Bassingbourn in the Cambridgeshire region of England. It began participating in combat missions in November 1942 and completed twenty-five in May of 1943. It was not the first B-17 to complete twenty-five missions (that milestone went to Hell’s Angels of the 303rd Bomb Group), but Hollywood film director William Wyler had flown aboard the Belle and other 91st Bomb Group bombers to make the wartime documentary film Memphis Belle: A Story of a Flying Fortress, which made the aircraft and its crew celebrities. A thirty-one city War Bond publicity tour of the United States commenced in June 1943, introducing the aircraft to tens of thousands of civilians throughout the country and adding to the legend of a brave crew who flew dangerous missions into the deepest parts of Germany.
 The
aircraft was used for training after the tour at MacDill Army Air field in
Tampa, Florida and eventually was sent to Altus Army Air Field in Oklahoma at
the end of hostilities for reclamation. The mayor of Memphis, Tennessee, Walter
Chandler, mounted a local campaign to purchase the bomber from the Army and
bring it back to Memphis for display as a war memorial. For a purchase price of
$350, the Memphis Belle was flown to Memphis and mounted on a concrete plinth at
the National Guard Amory near the city fairgrounds. The aircraft stood outside
in the weather for over three decades, suffering from vandalism and rotting away
in the humid environment. A campaign was started in the 1980s to restore the
aircraft and move it to a facility on Mud Island, on the Mississippi
River. The Belle remained there on display, but the facility was only protected
from the elements by a tarp roof and the aircraft’s deterioration continued.
The
aircraft was used for training after the tour at MacDill Army Air field in
Tampa, Florida and eventually was sent to Altus Army Air Field in Oklahoma at
the end of hostilities for reclamation. The mayor of Memphis, Tennessee, Walter
Chandler, mounted a local campaign to purchase the bomber from the Army and
bring it back to Memphis for display as a war memorial. For a purchase price of
$350, the Memphis Belle was flown to Memphis and mounted on a concrete plinth at
the National Guard Amory near the city fairgrounds. The aircraft stood outside
in the weather for over three decades, suffering from vandalism and rotting away
in the humid environment. A campaign was started in the 1980s to restore the
aircraft and move it to a facility on Mud Island, on the Mississippi
River. The Belle remained there on display, but the facility was only protected
from the elements by a tarp roof and the aircraft’s deterioration continued.
In 2003 the aircraft was moved to Naval Air Station Memphis for another restoration effort, but it was soon realized that private funds needed to do a proper from-the-ground-up restoration were not forthcoming. The National Museum of the United States Air Force stepped in and brought the Belle back to Wright-Patterson Air Force Base in Dayton, Ohio in 2004 for a complete overhaul by the museum’s archival restoration team. It took fourteen years of painstaking work to bring the aircraft back to museum quality, with formal dedication of the Memphis Belle into the permanent display collection in May, 2018.
| THE KIT |
Hong Kong Models surprised the modeling world when it came out with a 1/32 scale B-17G kit in 2013, followed by this F model three years later. The initial release had some accuracy issues, for which members of the modeling community with B-17 expertise were asked to assist in potential corrections with the B-17F. Some of the items were fixed, some were deemed too difficult or expensive to ameliorate, and this huge model will likely be the only version of the Flying Fortress in this scale, probably forever.
There are 565 parts, some in brass photo-etch (intake screens, harnesses), and some in resin (ammunition belts). Three decal selections are offered: B-17F Memphis Belle, B-17F Knock-out Dropper, and B-17E Chief Seattle. All are Olive Drab over Neutral Gray, with Medium Green blotching on the two F models. There are window and turret configurations provided to each of these specific models so one has to plan accordingly. The accuracy issues as I understand them from reading endless discussions on various fora can be summarized as such:
· The fuselage is a little chubby, being wider and deeper than reliable aircraft plans indicate.
· The landing struts are a bit too long and give the model a taller stance than a semi-loaded B-17 exhibits.
· The outer nacelles have a thrust line through the wing’s leading edge, whereas it should be a few scale inches lower. This gives a slightly more bulbous look to the outer nacelles.
· The B-17 was assembled with overlapping sheets of aluminum with rivets that stood proud of the surrounding fuselage, whereas the kit provides the modeler-preferred divots representing the rivets and recessed panel lines.
 · The
kit provides trim tabs on both the port and starboard ailerons, which is
incorrect for a B-17F. The trim tab should only be part of the port aileron. I
didn’t realize this until my model was already completed and I didn’t have the
energy to fix it, particularly since I would have had to carefully blend the
repair in with the paint and weathering already in place.
· The
kit provides trim tabs on both the port and starboard ailerons, which is
incorrect for a B-17F. The trim tab should only be part of the port aileron. I
didn’t realize this until my model was already completed and I didn’t have the
energy to fix it, particularly since I would have had to carefully blend the
repair in with the paint and weathering already in place.
· Lastly, there is a gentle flattening of the upper part of the nose just in front of the windscreen that isn’t captured on the 1/32 scale HK Models B-17s. Even knowing about it the appearance is subtle and very hard to fix as it would involve deepening the windscreen, chopping of the top of the bulkhead underneath, and recontouring the instrument panel coaming underneath.
All kits have accuracy errors. The question for the modeler is whether these are so outrageous that the modeler is disinclined to proceed with building the kit. For some, it is a challenge to do everything in their power to correct these errors. For others, the issues simply aren’t an impediment to building it as-is. It’s up to you as to which path to take.
As for me, I remember a conversation I had when I was thirteen years old with my modeling buddy David, who asked me what would be my dream kit. Without hesitation I replied, “a 1/32 scale B-17!” We both laughed at the preposterousness of the idea – who in their right mind would issue such a monstrosity? Well, HK Models has and I figured that it was going to be my only chance to experience something that I had dreamed about for over fifty years. Yes, it has a couple of issues but in my personal opinion they were not nearly bad enough to prevent me from the challenge. So, with a Christmas sale 20%-off coupon, I ordered the kit from an on-line retailer and marveled when it arrived. The stunning amount of pieces, the sheer size of some the parts, the huge amount of detail stuffed inside the interior – all of it was frankly quite intimidating. The model sat in my stash for three year before I screwed up the courage to tackle it, with more than a little help from the isolation imposed due to a worldwide pandemic.
| CONSTRUCTION |
 Before
I proceeded, I had to decide as to which aircraft I was going to model. The
B-17E scheme seemed a bit dull, so that was out. It was between Knock-out
Dropper and Memphis Belle. The latter airplane is so famous and has been done
to death in nearly every scale that I was hesitant to go with that scheme, but
what prompted me to choose it over Knock-out Dropper was the fact that there are
a huge number of reference photos available of the Belle and I really wanted to
do as good a job as I possibly could in regards to interior colors as well as to
accurately depict the distinct weathering patterns that I could discern from the
period photographs.
Before
I proceeded, I had to decide as to which aircraft I was going to model. The
B-17E scheme seemed a bit dull, so that was out. It was between Knock-out
Dropper and Memphis Belle. The latter airplane is so famous and has been done
to death in nearly every scale that I was hesitant to go with that scheme, but
what prompted me to choose it over Knock-out Dropper was the fact that there are
a huge number of reference photos available of the Belle and I really wanted to
do as good a job as I possibly could in regards to interior colors as well as to
accurately depict the distinct weathering patterns that I could discern from the
period photographs.
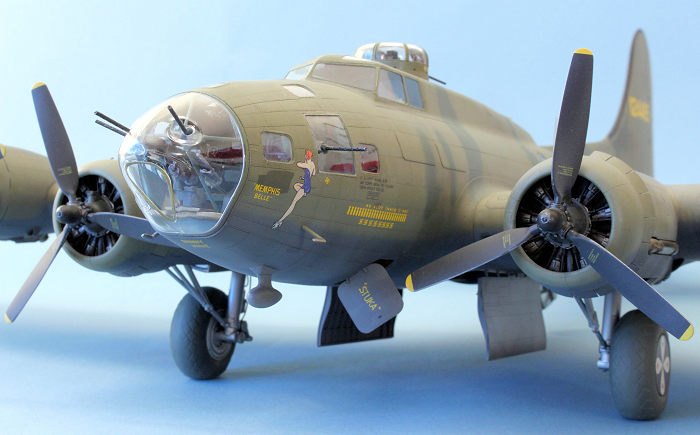
B-17 nose window configurations are varied, and Es and early Fs did not have an observation dome for use by the navigator. The flat cheek gun windows on the Belle were replaced in the field with larger ones that provided the operator with better visibility. The nose glazing varied with gun emplacements and the kit provides three, one for each of the appropriate aircraft provided in the decals.
Construction of this eleven-month project started with assembling and painting the 500-pound bombs. Painting the yellow stripe on the nose is always a challenge for me. I used thin strips of masking tape and was more or less successful. The finish on the explosive part of the bomb was frequently different from the fin assembly, with the bombs being stored outside in the mud and the often-frightful English weather. I tried to dirty up the bombs as much as I could with chalk pastels, but I’m not sure that I went far enough. One really can’t over-weather these bombs as they were often filthy.
The next step was to start constructing the turrets. I chose to do the ball turret first and the fit was unfortunately quite poor. I had to fill prominent seams that were very close to clear sections that I became discouraged by the amount of work required. I almost abandoned the entire project to the Shelf of Doom. But cooler heads prevailed and I managed to get the turret looking fairly decent before I moved onto the tail and top turret mechanisms. Once again, you need to determine early on which aircraft you are going to model as the top turrets had different designs specific to each aircraft. The interior parts were painted with Vallejo Model Air USAF Green FS34092, which is a reasonable match for Bronze Green. The clear sections of the top turret didn’t fit very well and I gave thought to filling the seams around each pane, but it wasn’t something I was willing to tackle.
Next up were the landing struts. As mentioned above, the struts are too long so I cut out a 3mm segment, inserted a pin made from a cut length from a paper clip, and glued everything back together. The struts and wheels were then painted with Alclad II Lacquer Aluminum.
 The
four Wright R-1820 engines went together without fuss and were painted with
Alclad II Lacquer Dark Aluminum with Engine Gray gear housings. A wash of grimy
black was applied to bring out the details. The kit does not provide wiring
harnesses for the engines. I chose not to pursue that odious task.
The
four Wright R-1820 engines went together without fuss and were painted with
Alclad II Lacquer Dark Aluminum with Engine Gray gear housings. A wash of grimy
black was applied to bring out the details. The kit does not provide wiring
harnesses for the engines. I chose not to pursue that odious task.
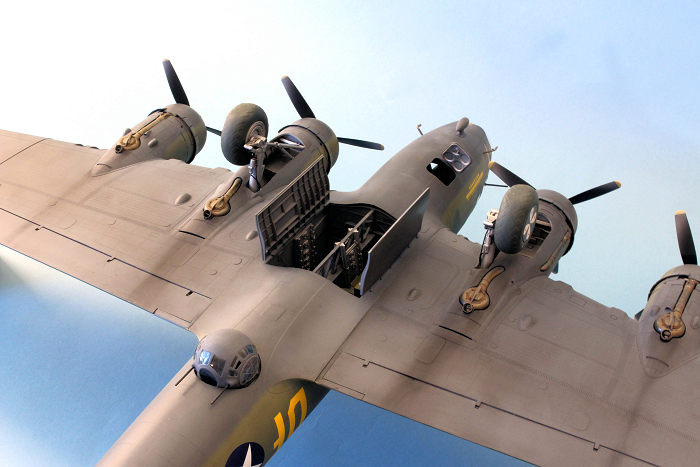
With the bombs, turrets, and landing gear done, I was ready to tackle the fuselage interior. Contrary to popular modeling wisdom, the B-17 did not have a single molecule of Interior Green A/NA 611 (roughly FS34151) paint inside. Warbirds are often painted with Interior Green due to the need for corrosion control on eighty-year-old airframes, but this is inaccurate. There are photos available of the complete restoration of the Memphis Belle when it was returned to the Museum of the US Air Force, which I found very helpful in determining how to paint my model. The fuselage interior was unpainted aluminum, with Bronze Green details in the nose compartment and the cockpit. The walls of the nose, cockpit, and radio room had fabric insulation attached, dyed to match the Bronze Green specs indicated in the Erection and Maintenance Manual. But this fabric faded very rapidly to a soft olive green, so I painted the forward sections of the interior walls with a custom mix of lightened USAF Green. The bomb bay of camouflaged Fs and Gs were painted in the same Neutral Gray as the underside of the airplane. The interior walls aft of the radio room were painted with Alclad II Lacquer Aluminum. The floors in a Flying Fortress were varnished plywood, as were the tops of the tables used by the navigator and the radio operator. For this, I mixed up a light sandy yellow color and dry-brushed the plywood grain with a medium brown. The area underneath the pilot’s rudder pedals was unpainted aluminum. Details such as the seats and their mounts, the control columns, the radio shelving, and all of the bulkheads were painted Bronze Green, so again I used USAF Green FS34092 for these pieces. I fashioned seat cushions from tissue paper soaked with white glue and painted them yellow. The kit provides photo-etch seat belts, which were painted a light gray and installed. Note that the pilots only had lap belts. The oxygen bottles were also painted yellow.
After all the painting, I assembled the bomb bay, painted it Neutral Gray, and added more and more of the other sections together until I had a complete interior to trap between the fuselage halves. I use thick Cyanoacrylate (CA or Super Glue) for this as it prevents the later appearance of ghost seams. The roof of the cockpit is also a separate piece that needs to be glued down, including the machine gun and its mount in the radio room. I chose to position my model’s machine gun in the stowed position, rather than have the hatch open.
The seams were sanded down, the surrounding detail restored with a scribing tool, and I moved onto the wings. The construction was straight-forward, with photo-etch pieces provided for air intake grates. The wheel wells and the interior of the cowlings of a B-17 were unpainted aluminum, so once again Alclad II Lacquer Aluminum was used with a dark gray wash applied to bring out the details.
The four radial engines were installed in the nacelles. The horizontal stabilizers, elevators, and rudder were assembled and installed. I glued the control surfaces in place, preferring not to have them move on the finished model.
As stated in the kit description above, the starboard aileron should not be there, but I missed that detail. It would have been a relatively simple task to fill in the lines and sand it smooth to match the surround surfaces before I had already painted, decaled, and weathered the model. Oh well.
The model was cleaned up, the clear parts masked with drafting tape, and I headed out to the garage for the task of painting this ginormous model.
| COLORS & MARKINGS |
 I mixed a
custom blend Vallejo Model Air Neutral Gray and black to get the proper shade of
the paint used on US aircraft during World War II. Note that Neutral Gray was
created by a mix of 50% pure white and 50% pure black, so it’s pretty dark. The
Neutral Gray that comes in a bottle from most model paint manufacturers is a
lighter, more modern color and does not properly capture how dark the actual
paint was. The undersides were painted with this mixture.
I mixed a
custom blend Vallejo Model Air Neutral Gray and black to get the proper shade of
the paint used on US aircraft during World War II. Note that Neutral Gray was
created by a mix of 50% pure white and 50% pure black, so it’s pretty dark. The
Neutral Gray that comes in a bottle from most model paint manufacturers is a
lighter, more modern color and does not properly capture how dark the actual
paint was. The undersides were painted with this mixture.
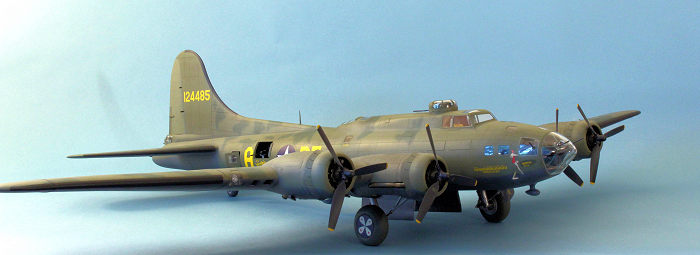
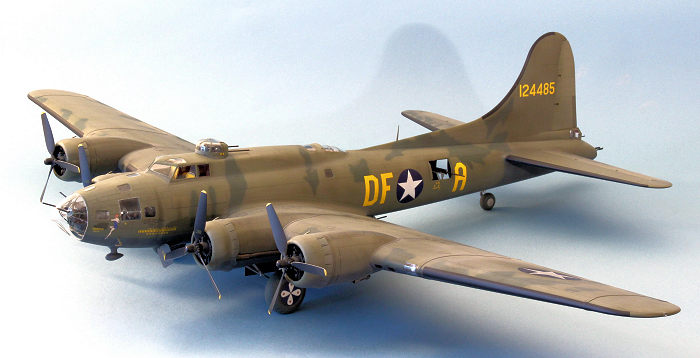
The topsides were painted with yet another custom mix of Vallejo Model Air Olive Drab, white, and Neutral Gray. US Olive Drab 41 faded pretty readily, particularly the fabric control surfaces. For these, I mixed an even lighter Olive Drab color and applied it to the ailerons, elevators, and rudder. The turbo-superchargers were painted with Testors Metalizer Burnt Metal and dry-brushed with Polly Scale Rust. The tires were painted with Vallejo Model Air Tire Black. I weathered them a thin spray of medium gray.
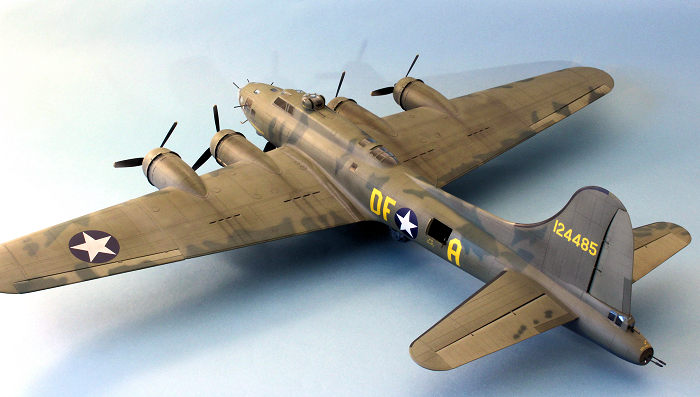
The counter-shading Medium Green camouflage splotches on the wings, fuselage, and horizontal stabilizer were carefully applied with an airbrush using the kit instructions as a guide and constantly checked against photographs of the actual aircraft. Since the Memphis Belle was made famous by William Wyler’s film, as well as during the War Bond tour of the US afterwards, there are many, many photos to refer to. What I found interesting is that the US insignia on the upper wing was painted over with a medium gray to tone down the stark white of the star. Also, there is very pronounced wear at the wing roots, with the bare aluminum showing on both sides. I used medium gray chalk pastel dust to depict the patchy appearance of the port wing’s national insignia star.
The Belle had several areas of fresh Olive Drab applied, prominently on the upgraded cheek gun installations, and spots on the both sides of the nose. Masks were made for these shapes and paint applied. After the painting was complete, the entire model received a coat of my nearly exhausted supply of Future Floor Polish.
The decals provided in the kit were of excellent quality and went down on the model surfaces with a small puddle of Future to aid in adhesion. After those were dry, another light coat of Future prepared the model for the next step, which to weather the model based on my interpretation of the period photos. A dark enamel wash was applied to all surfaces and allowed to dry before wiping off the high points, leaving wash residue in the panel lines and divots. The tires were painted with Vallejo Tire Black and then weathered with a thin spray of light gray. Dark gray chalk pastel dust was ground into the areas where ground crews would walk and leave dirty boot prints and fluid spills.
One of the mistakes often made by modelers is to create exhaust stains emanating from the four hot-air ducts behind each nacelle on the top of the wings. Period photos show that the oil stains start from roughly the one o’clock position (looking from the front of the engines) and stream down between the hot-air vents. I used dark gray and black chalk pastel dust to replicate this. Also, underneath the nacelles, the exhaust stains emanate from the rear of the turbosupercharger, frequently very heavy and black. Chalk pastel dust was utilized for this.
The propellers were made to look worn by lightly spraying aluminum on the back side of each blade to depict the sandblasted effect seen on operational aircraft. I noticed in photos of Memphis Belle that two of the four props had blades without the Hamilton Standard logos stickers. The leading edges of the blades were dabbed with a silver colored pencil in random spots to depict paint chipping.
The last bit of weathering I did was to replicate the worn-off paint on both wing roots with the silver colored pencil again, making hundreds of stabbing motions to build up the effect. The port wing root was more heavily worn than the starboard wing root. The cheek gun frames also had chipping of the paint, so the silver pencil was used here as well. A coat of Testors Acryl clear flat was sprayed over the whole model to seal in the weathering effects.
| FINAL CONSTRUCTION |
 First,
I delicately slipped the two cheek machine guns into their sockets using
tweezers. Then I mounted the two nose machine guns in the substantial mount
provided in the kit and promptly managed to break it. That assembly had to be
re-glued and repainted Bronze Green. Period photos of the Belle during
operations show that only one of the two machine guns was used, but during its
War Bond tour both guns were installed, probably to make the airplane appear
even more menacing. The guns were again carefully installed and the clear
Perspex nose cone slipped over them.
First,
I delicately slipped the two cheek machine guns into their sockets using
tweezers. Then I mounted the two nose machine guns in the substantial mount
provided in the kit and promptly managed to break it. That assembly had to be
re-glued and repainted Bronze Green. Period photos of the Belle during
operations show that only one of the two machine guns was used, but during its
War Bond tour both guns were installed, probably to make the airplane appear
even more menacing. The guns were again carefully installed and the clear
Perspex nose cone slipped over them.
The ball turret was nestled gently into its frame, and the top turret was installed without any glue. Then the waist machine guns were glued into their mounts in the open hatches. The tail machines guns were placed in their spot without glue so when the model is stored, they can be removed to avoid breakage. I’ve built a number of B-17 models over the years in a variety of scales, and this is the first thing in all of them that I manage to snap off. Finally, the two crew hatches were mounted to the fuselage with small pins made from stiff brass wire to provide a more secure attachment.
Most B-17s in the ETO had one or more aerial wires in place for radio communications, but I elected not to do this on my model as it will be kept in a large storage bin with the wings detached as the model is simply too big to display anywhere in my home. The wings attach very securely to the fuselage without glue, but there is a noticeable seam at the wing root as a result. It’s not terribly objectionable, but if were building this model for competition (which I no longer do), I would have glued them on and filled the seams just like any other model.
| CONCLUSIONS |
This B-17 in 1/32 scale is a dream come true, nearly fifty years after that conversation I had with my modeling buddy David. It has a number of accuracy issues, some of which are close to unfixable, but none so egregious as to prevent me from buying and building this expensive model. In fact, even with the 20%-off deal, it’s still the most money I’ve ever spent on a model kit. I don’t really care – it has a presence when displayed unlike any other model I’ve ever seen in my life. It’s big, it’s imposing, and it commands attention and reactions of amazement when I bring it out of storage to show people, both modelers and non-modelers alike.
Would I recommend it to others? Well, the chances of another manufacturer bringing out such an audacious model kit in this scale are remote. This is most likely the only chance in my lifetime of achieving that dream, and I felt that I had to take it. It’s not a particularly easy kit to build and paint, but the rewards are great if one wishes embark on such a project. It took me 140 hours over almost a year to bring it home, and I’m glad I did.
13 October
Copyright ModelingMadness.com. All rights reserved. No reproduction in part or in whole without express permission
If you would like your product reviewed fairly and fairly quickly, please contact the editor or see other details in the Note to Contributors.