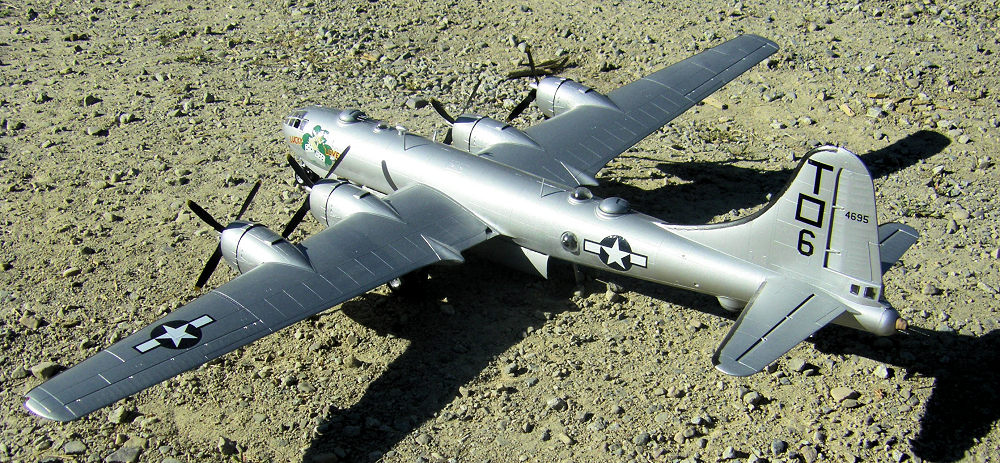
Monogram 1/48 B-29 Superfortress
| KIT #: | 5700 |
| PRICE: | @$50.00 or so |
| DECALS: | One option |
| REVIEWER: | Jacob Hendershott |
| NOTES: | Get your filler and sanding sticks out, this thing is terrible with gaps. |
| HISTORY |
The Boeing B-29
Superfortress is a four-engine propeller-driven heavy bomber designed by Boeing,
which was flown primarily by the United States during World War II and the
Korean War. It was one of the largest aircraft operational during World War II
and featured state-of-the-art technology. Including design and production, at
over $3 billion it was the single most expensive weapons project undertaken by
the United States in World War II, exceeding the cost of the Manhattan Project
by between $1 and 1.7 billion. Innovations introduced included a pressurized
cabin, dual-wheeled, tricycle landing gear, and an analog computer-controlled
fire-control system directing four remote machine gun turrets that could be
operated by a single gunner and a fire-control officer. A manned tail gun
installation was semi-remote. The name "Su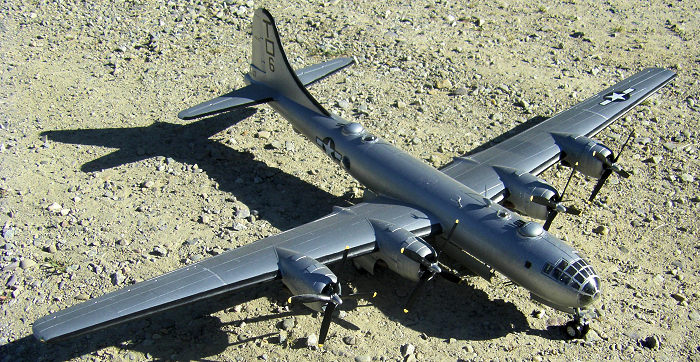 perfortress"
continued the pattern Boeing started with its well-known predecessor, the B-17
Flying Fortress. Designed for the high-altitude strategic bomber role, the B-29
also excelled in low-altitude nighttime incendiary bombing missions. One of the
B-29's final roles during World War II was carrying out the atomic bomb attacks
on Hiroshima and Nagasaki.
perfortress"
continued the pattern Boeing started with its well-known predecessor, the B-17
Flying Fortress. Designed for the high-altitude strategic bomber role, the B-29
also excelled in low-altitude nighttime incendiary bombing missions. One of the
B-29's final roles during World War II was carrying out the atomic bomb attacks
on Hiroshima and Nagasaki.
Because of the B-29's advanced design, unlike many other World War II-era bombers, the Superfortress remained in service long after the war ended, with a few even being employed as flying television transmitters for the Stratovision company. The B-29 served in various roles throughout the 1950s. The Royal Air Force flew the B-29 as the Washington until phasing out the type in 1954. The Soviet Union produced an unlicensed reverse-engineered copy as the Tupolev Tu-4. The B-29 was the progenitor of a series of Boeing-built bombers, transports, tankers, reconnaissance aircraft and trainers including the B-50 Superfortress (the first aircraft to fly around the world non-stop) which was essentially a re-engined B-29. The type was retired in the early 1960s. The B-29 production total was 3,970 aircraft. Dozens of B-29s remain as static displays, but only two examples, Fifi and Doc, have been restored to flying status, with Doc flying again for the first time from McConnell AFB on July 17, 2016.
| THE KIT |
This kit is yet another I had gotten from the same person who gave me the B-36 model from the earlier review, after I had finished the B-36 of course. This model had not been started yet, so yay there. It had in fact, not really been touched, with only a few parts removed from the sprues. Looking through the parts, there were 5 or 6, (Don’t really remember) sprues molded in a metallic silver, while one sprue was molded in black, and another for the clear parts. While I was looking over them, I took a look at the wing halves and noticed the top left was missing a small ½ inch chunk from the trailing edge of the wing that attaches to the plane. There was flash over many parts, which I’ll talk about in the building part. It also comes with parts for silverplate bombers, though, it only has the props for the silverplates, meaning that the props are wrong for my version of the plane. Some other parts that are included are two atom bombs, Fat Man and Little Boy, a bomb cart, and 5 crew members (Which I have yet to finish painting XD)
| CONSTRUCTION |
To start off, I began by gluing the windows into
the two fuselage halves. While the rear tail gunners went in fine, I was doing a
test fit with one of the front ones, and when I went to push it in, it got
stuck, resulting in my slightly pushing on it with an X-acto handle. That caused
it to shoot out of the plane never to be found again, so, I made another one out
of a window for a model cars removable top. Next I did the many smaller bombs
that fit in the bomb bay. These went together slightly iffy, which means that
there were steps between the halves, resulting in the use of emery boards and my
X-Acto, which STILL didn’t fix them the best. After they were assembled and
painted (Colors will be listed in Colors and Markings) I set them off to the
side for later. Next up was the wing halves and tail-plane halves. Doing the
wings, I first glued the wh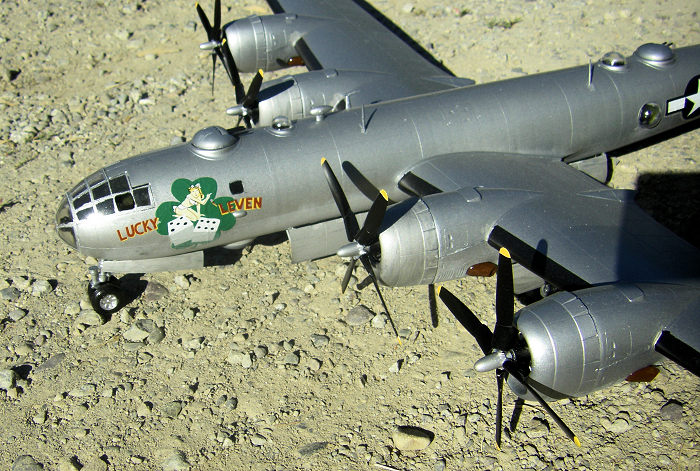 eel
wells into each lower part, and while waiting for those to dry, assembled the
tail-planes. These were nice with assembly, but they had excess flash on them,
which resulted again, in emery boards and the X-acto. To not get them confused
of which was which, I used a piece of masking tape with either ‘L’ or ‘R’ on
them to label the tail-planes. Back to the wings, after the wheel wells dried, I
glued the top halves on, using masking tape to hold them together. My way of
using it to hold them was wrapping the tape around them plentifully, using as
much pressure as I could to eliminate as many gaps as possible, cause with model
planes before, using this type of ‘technique’ didn’t really work due to never
having enough force.
eel
wells into each lower part, and while waiting for those to dry, assembled the
tail-planes. These were nice with assembly, but they had excess flash on them,
which resulted again, in emery boards and the X-acto. To not get them confused
of which was which, I used a piece of masking tape with either ‘L’ or ‘R’ on
them to label the tail-planes. Back to the wings, after the wheel wells dried, I
glued the top halves on, using masking tape to hold them together. My way of
using it to hold them was wrapping the tape around them plentifully, using as
much pressure as I could to eliminate as many gaps as possible, cause with model
planes before, using this type of ‘technique’ didn’t really work due to never
having enough force.
Now, some of you may be asking why I haven’t started on the cockpit yet, well, I was trying to do it last so I could detail it as much as I could. (Spoiler, I gave up trying to detail it after doing test fits and noticing half the stuff wouldn’t be seen) While the wings dried, I did start working on the cockpit, first assembling the wheel well on the bottom of the floor-piece, which later on reveals a flaw with the kit. Skip a few days and I get to work on the crew compartment where the crewmen for the plane would sleep during long missions. It assembled nicely, the seatbacks sitting snugly in their holes, while the bunk beds were first painted and then assembled so I wouldn’t be trying to squeeze a brush into there. The rear gunners spot was then worked on. This… was ‘interesting’ to do. The instructions said it assembled one way, but them when trying to build it, it didn’t match up whatsoever. So if you were to have X-ray vision and look inside, the gunners seat is slanted upwards, meaning if the plane were real, that would be rather uncomfortable. Anyways continuing on, I started to piece together the cockpit.
The pilots seats were molded in two different parts. One was the seat itself, the other had the armrests and framing. The first seat was assembled wrong, which I didn’t realize until it was put in the plane and I put together the other seat, so *insert sarcastic ‘whoohoo’ here*. After that incident with the seats, I glued the instrument panels together, painted them, and glued them in. Next was the bombers section, which after looking at the bomb camera, I realized it is exactly the same as the spare camera that came with a 1:48 Revell B-25 kit of mine. So after finding that out, I put the bombers area together, albeit, the levers for the doors got moved around a few times as I read the instructions wrong and put them in a completely off the wall spot. While that finished drying, it was on to the landing gear, mainly the tires. While they are nice and have a somewhat nice tread on them, I had to shave down steps on them as well, and since I don’t have filler for my models, I used the next best thing, Elmers craft glue. It worked slightly, though even after sitting for a week, when painting the tires, it dissolved the glue in some spots.
Up next were the remote control gun turrets (Now I’m
thinking with portals). These were weird trying to build, mainly because if you
pressed with just a little too much force, the part that inserts into the plane
w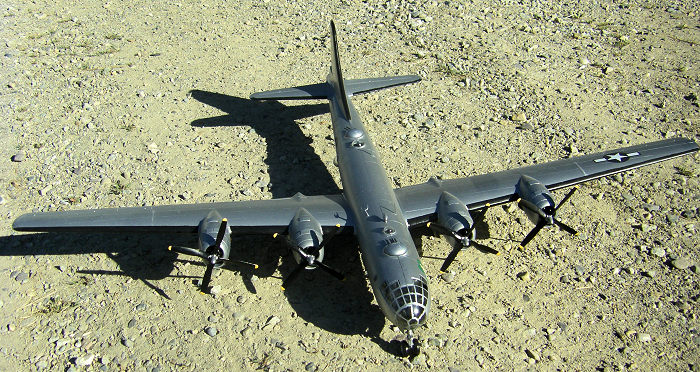 ould go
crooked. And while doing test fits, I had to trim some of the plastic on them
where the gun mounts would stick through, mainly because they were too tight.
After the fix on these, I glued them together, installing the gun barrels after
the turrets dried. Going on to main assembly now, I started off by gluing the
cockpit in first, using the instructions as much of a guide as possible. Don’t
do this though or else you’ll end up with it crooked like I did.
ould go
crooked. And while doing test fits, I had to trim some of the plastic on them
where the gun mounts would stick through, mainly because they were too tight.
After the fix on these, I glued them together, installing the gun barrels after
the turrets dried. Going on to main assembly now, I started off by gluing the
cockpit in first, using the instructions as much of a guide as possible. Don’t
do this though or else you’ll end up with it crooked like I did.
At first, I just glued it in without even thinking and after it had dried throughout the night and I checked on it the next morning, I realized I had glued it so if it were completely assembled, the front wheels would be totally off center. This was carefully pulled out and readjusted. Afterwards, I installed the bomb racks and the bombs themselves. One thing to note is that contrary to the instructions, you want to put the bomb racks in BEFORE you put the bulkheads in, or else you will have a bad time trying to get the racks in with the bulkheads in there.
After that little adventure with the racks, I mounted the bombs on them, which, I found out later that it would have been a wise idea to drill out the dimples for mounts on them. Once the bulkheads had dried into place, I glued the rest area for the crew in, not before gluing the sight bubbles for the turret cameras in. With those done, I glued the wing supports together and then slid them into place on the right fuselage half, with some glue to hold it there. After letting it set, not dry, I applied glue to the other side of the supports and to the right fuselage, and then closed the plane up, making sure to get as good of fit as I could. Once together, I took masking tape and wrapped it around the plane, with each strip about 5 inches apart. With the fuselage done, it was on to mounting the wings. One thing I forgot to mention was that with my kit, there was a chunk missing out of the top left wing half towards the root. From what I could tell, it was a miss-mold. Anyways, mounting the wings went fine and dandy, with just some little steps and gaps here and there. Tail planes went on next, just as well. Which, in my opinion, they didn’t need any sanding done whatsoever. When those dried, I assessed the gap and step problems with the plane itself. These were HORRIBLE. Using the X-acto, I had to shave almost an half an inch of plastic off in spots for it to be even with the other side. While it does show through on the pain job, at least it doesn’t remind me of the B-25. I have yet to fix that thing.
With most of the plane assembled, I attached the front windscreens and the rear gun mounts and it was off to be painted.
| COLORS & MARKINGS |
 Alright, and now the fun
begins. Before I painted, I took masking tape and after putting some strips over
the turret holes, I cut them into circles that just barely stayed up, but
managed to keep the paint out. I also masked the windscreens myself with just
Scotch Blue Painters Tape, but I did manage to get it small in some spots. Like
my last two planes, I primered the plane with Model Masters Primer, making sure
to cover as much of the plane as I could on the underside, and after letting it
cure, flipped it over and did the top. After the primer cured for a few days, I
painted the plane its main color, Duplicolor aluminum. This was in fact done
with two different aluminum colored paints. One was cast aluminum, while the
other was just aluminum. I had started with the plain jane aluminum on the
bottom, but then the can was wanting to be a pain and start squirting jets of
paint instead of a mist. So I moved on to the cast aluminum, which worked until
I JUST ABOUT finished the top half later on, when it started spraying jets. But
I was just doing fix ups at the time, so no worries there. So, mainly the colors
that I used inside the plane were at first olive drab, but then I ran out so the
only closest color was Model Masters Field green, which I used in the bomb bay.
Seats were painted brown and slightly drybrushed a silver on the metal parts.
The de-icing boots were painted flat black with masking tape used to keep from
overpainting.
Alright, and now the fun
begins. Before I painted, I took masking tape and after putting some strips over
the turret holes, I cut them into circles that just barely stayed up, but
managed to keep the paint out. I also masked the windscreens myself with just
Scotch Blue Painters Tape, but I did manage to get it small in some spots. Like
my last two planes, I primered the plane with Model Masters Primer, making sure
to cover as much of the plane as I could on the underside, and after letting it
cure, flipped it over and did the top. After the primer cured for a few days, I
painted the plane its main color, Duplicolor aluminum. This was in fact done
with two different aluminum colored paints. One was cast aluminum, while the
other was just aluminum. I had started with the plain jane aluminum on the
bottom, but then the can was wanting to be a pain and start squirting jets of
paint instead of a mist. So I moved on to the cast aluminum, which worked until
I JUST ABOUT finished the top half later on, when it started spraying jets. But
I was just doing fix ups at the time, so no worries there. So, mainly the colors
that I used inside the plane were at first olive drab, but then I ran out so the
only closest color was Model Masters Field green, which I used in the bomb bay.
Seats were painted brown and slightly drybrushed a silver on the metal parts.
The de-icing boots were painted flat black with masking tape used to keep from
overpainting.
Decals were pretty iffy. I ran into some of the same problems as the B-36, but they didn’t disintegrate when they hit water like the B-36. Rather, they would start losing chunks as I moved them into position on the plane.
| CONCLUSIONS |
After that little ‘venture with the paint, all that was left was to attach all the fiddly bits, bomb and gear doors, props and engines, turrets, and the landing gear. I starting with the doors (which was a mistake) and managed to get them on, albeit, I broke one off when I put the plane up for the night. When they were done, I mounted the landing gear. This went together without and problems, and the wheels attached with a sure-sounding click. Turrets were up next, these popping into their respective holes with some issues. The main ones being that if turned just right, they’ll fall out. When I finished with those, I started gluing the props onto the shafts for the plane when I noticed I was missing two of the four shafts. Looking everywhere, I couldn’t find them, so I ended up making some new ones out of clear sprue. It worked better than I thought, and even after two car rides, they are still on. The cowlings and props were then glued on and the fiddly bits were done next, gun barrels for the tail were glued on, and then the last things to be done were the antennas, and the tail support. One of the very last things done was, using a Dremel tool, I drilled out a window so when I finally finish the figures, I can put one in the window.
| CONCLUSIONS |
Okay. So in a nutshell, I probably won’t to too many older monogram kits after this. It was difficult to fix a lot of problems with this kit, but in the long run, it turned out alright. It wasn’t the simple ‘done in a week or two model’ for me, but rather a ‘I’ll maybe finish this in a few months’ type of one. If I were to recommend it, I’d say those with skill at taking care of gaps and rescribing would be better off than I was. If this were a modern kit, I’d say it’s rating of skill level three is pretty good. But with the struggles of this one, I’d say four or five would be better.
| REFERENCES |
https://en.wikipedia.org/wiki/Boeing_B-29_Superfortress
November 2017
Copyright ModelingMadness.com
If you would like your product reviewed fairly and fairly quickly, please contact the editor or see other details in the Note to Contributors.
Back to the Main Page Back to the Review Index Page Back to the Previews Index Page