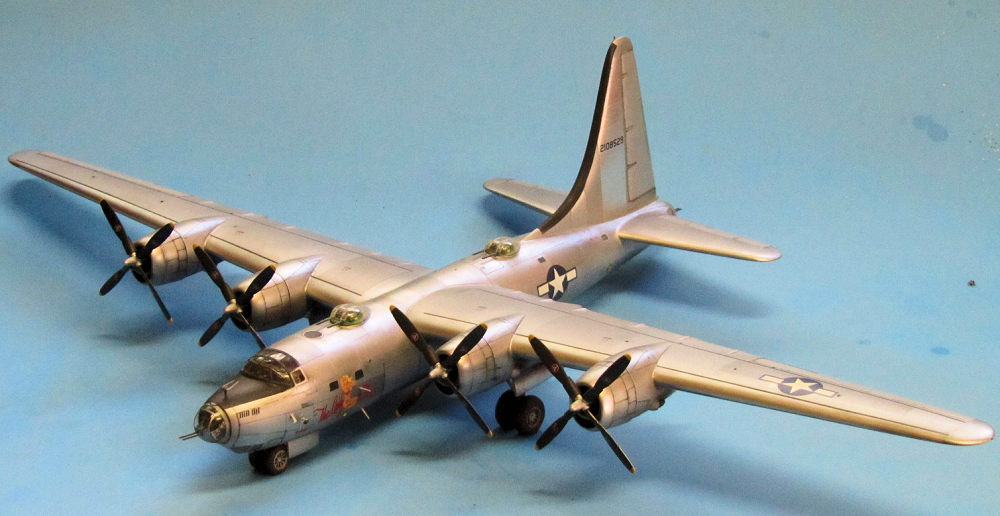
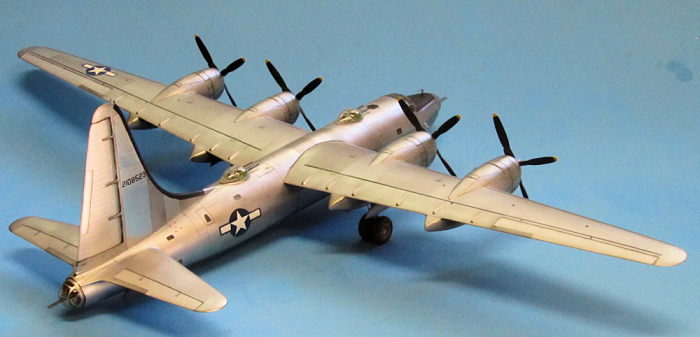
Aviation Usk 1/72 B-32 Dominator
| KIT #: | AV-1017 |
| PRICE: | $45,00 when new |
| DECALS: | Two options |
| REVIEWER: | Ryan Grosswiler |
| NOTES: | \acuum-formed, low-pressure injection and photoetched parts, decals. Needs a nose job. |
| HISTORY |
B-32 Dominator!!! Even when I put it in italics with triple exclamation points, it's not exactly one of those names that evokes anything much of anything in anyone's mind. This is one of those obscure WWII airplanes made more famous by modellers building it for its novelty, and the sensation THATcauses as we geek out over seeing yet another obscure, extinct warplane excavated from the dim mists of the past and immortalized 3-dimensionally in plastic.
Of course, it wasn't supposed to be that way. To
quote Bill Gunston, "The B-32 was late and disappointing, though still a
great performer." The B-32, though ultimately an excellent aircraft, had in
reality a topsy-turvy and seemingly pointless life.
Our story begins in the Depression-wracked United States of the late 1930s: Billy Mitchell's and Alexander de Seversky's outlandish ideas of strategic airpower--taking war beyond the frontlines deep into the enemy's heartland--were finally starting to gain traction among American military leadership. The B-17 was entering service, a major leap forward in speed, range, and bomb load from the Martin B-10 which preceded it. Pressed with producing B-17s under license, Consolidated Aircraft's notoriously skirt-chasing president Reuben Fleet had decided he could better the B-17's performance on all counts with his own product--this resulted in the B-24. Sensing this still wasn't enough, however, the Army's Project A and "Superbomber" studies had resulted in such experiments as the giant prototypes Boeing XB-15 and Douglas XB-19, useful laboratories, but neither one operational aircraft material.
Actual war changed this. In 1940 things in
Europe had now finally exploded and all this speculation was being
dramatically validated, shaking the shakers into action. Actual RFPs were
finally let: the Army Air Force put out requests for a "Hemisphere Defense
Weapon", an aircraft design that could use new pressurization and advanced
engine technology to project a far bigger bomb load far beyond the range
offered by what was then the current state-of-the-art, namely that B-17 and
B-24. Four companies submitted designs for this new super-bomber. Only two
reached hardware stage: Boeing's B-29 Superfortress, of course, and this
one. Though the Army informally preferred the B-29 as presented on paper,
Consolidated's B-32 was also ordered as a backup measure. The smaller B-32
actually flew for the first time in Sept 1942:
two weeks prior to its famous stablemate.
In an innovative move, to speed things along a few
early production blocks were produced of the TB-32, for crew training, with
all turrets omitted and openings faired over. For the first time a separate
variant of a combat aircraft was produced at the factory specifically for
the training role.
All this drama had put the B-32 one year behind the B-29, which should have
been the end of the story. The legendary Superfortress was by now mostly
past its developmental problems, a proven instrument of war, appearing in
increasing force over Japan itself, and had even prototyped as
a transport as well: the XC-97. Boeing had clearly thrown the best and
brightest of its resources into this project while Consolidated
had unimaginatively stayed
 Another twist was in the works. Owing to massive
wartime expansion and resulting mass influx of semi-skilled labor,
Consolidated began to suffer from what is now euphemistically referred to as
"quality escapes". When a PB4Y on its first flight test shed a wing
over San Diego and it was discovered in the wreckage that none of the 96
fasteners intended to keep that rather important airframe component in place
were ever installed, the gov't-oversight Truman Committee threw its baleful
eye on the company. The particular quality escapes they found haunting the
B-32 line again threatened the program. Wiring bundles for the right forward
bomb bay were too short, so the ends simply taped off and left hanging.
Rivet lines were random, and often done freehand. Engine exhaust + oil =
fire. The list went on and on: the aircraft was duly slapped with an
"Unfit For Service" label. It seemed that Truman's team of whistle-blowers
would spell trouble for Consolidated Aircraft, and curtains for George
Kenney getting the bombers he wanted.
Another twist was in the works. Owing to massive
wartime expansion and resulting mass influx of semi-skilled labor,
Consolidated began to suffer from what is now euphemistically referred to as
"quality escapes". When a PB4Y on its first flight test shed a wing
over San Diego and it was discovered in the wreckage that none of the 96
fasteners intended to keep that rather important airframe component in place
were ever installed, the gov't-oversight Truman Committee threw its baleful
eye on the company. The particular quality escapes they found haunting the
B-32 line again threatened the program. Wiring bundles for the right forward
bomb bay were too short, so the ends simply taped off and left hanging.
Rivet lines were random, and often done freehand. Engine exhaust + oil =
fire. The list went on and on: the aircraft was duly slapped with an
"Unfit For Service" label. It seemed that Truman's team of whistle-blowers
would spell trouble for Consolidated Aircraft, and curtains for George
Kenney getting the bombers he wanted.
Too much had been spent on the B-32. With everything hanging in the balance and a war going on, a combat evaluation for the B-32 was hurriedly arranged. In May 1945, three brand-new examples from the 6th production block were selected and matched with crews, loaded with a few boxes of spare parts, and sent to the Philippines via Hawaii and Guam. There would now be a field test of of an aircraft deemed unsuitable for combat--in combat! What resulted was a unique combat evaluation and training unit--the 386th Heavy Bombardment Squadron. Missions consisted of what were essentially experiments concerning best use of the new aircraft against different types of targets, and were a mix of tactical and strategic applications. Maintenance crews fought to resolve in the field the pesky 'quality escapes', those Sperry A-17 nose/tail turrets had the annoying tendency to jam on their ammunition belts, and spares were a chronic problem.
Against all odds, the design proved itself. Lack of pressurization comfort aside, it turned out every bit the equal of the B-29 in a smaller package. Crews liked the aircraft itself, ones who had flown the B-29 appreciating the '32's lightness of controls, short take off roll, and even shorter landing roll thanks to the reversible-pitch props, and they likened it to flying a medium bomber like a B-25. Crews coming off the B-24 appreciated the roomy crew accommodations (the navigator could fully unfold all his charts and spread his work out, and one pilot appreciated being able to stand straight up and pace about on the flight deck during long missions) compared to the more 'intimate' B-24 and comparative horsepower surplus. While the lack of pressurization made it naturally less comfortable than the 'other' big bomber, crews said noise levels weren't any worse than the B-24 while speed and range were greater.
The Dominator would have played a major role in Operation
Downfall had it occurred (and thank God it didn't--the Purple Hearts
produced in preparation were only just used up in 2007 in Iraq). The 386th
Bomb Squadron was destined to be the only unit to be equipped with the B-32
in the combat zone. With six more aircraft delivered, it had only just
arrived at approximate full squadron complement when the surprise
announcement of Japan's agreement to the cease-fire came down.
There was still a postscript to play out. Strangely, the 386th was to see its most intense aerial combat after the cease-fire, when this scrappy little unit actually began taking casualties. The squadron was ordered to monitor Japanese compliance to the cease-fire instructions with daily missions over the Home Islands. Japanese aircrew--probably just as shocked at their country's cease-fire announcement as were the Allies--proved to be in no mood to quit their weapons. For the remainder of the month, the B-32s were under near-constant air attack as they conducted this duty, one aircraft being so badly shot up (on its first mission!) that it was condemned to cannibalization for those badly-needed spares when it returned. Sadly, the last American to die in World War II combat was on one of these flights: Sgt. Tony Marchione, an aerial photographer, who bled out from his wounds following a fighter attack on his plane.
The US high command chose to disregard
these attacks, and the cease-fire held. The bloodiest conflict in human
history was well and truly over. Thus,
it would remain that only the one squadron was equipped to approximate full
strength with nine aircraft. The entire airframe combat record of the B-32
can ther fore be summarized as follows (drum roll):
42-108528 (no name): 9 combat missions, crashed following uncontrolled engine fire on return from a mission
42-108529 (The Lady Is Fresh): 11 combat missions, scrapped at Kingman
42-108530 (Direct From Tokyo): ? combat missions, used for postwar publicity tour, scrapped at Kingman
42-108531 (no name): 0 combat missions, scrapped at Kingman
42-108532 (Hobo Queen): 15 combat missions, scrapped at Okinawa following nose gear collapse
42-108539 (no name): 1 combat mission, cannibalized and scrapped at Okinawa following battle damage
42-108543 (Harriet's Chariot): 4 combat missions, scrapped at Kingman
42-108544 (no name): 3 combat missions, destroyed in takeoff crash at Okinawa
42-108578 (no name): 3 combat missions, scrapped at Kingman
So...about 50-odd offensive combat
More units were enroute and even more in training, but at that point only just over 100 production aircraft had been delivered to the USAAF. The design was thus caught in an awkward point of being in only the initial production run, few crews trained, few spares, and most to the point, totally surplus to anyone's needs with the far more established, proven, and refined B-29 by now available by the thousands. B-32 production contracts were ignominiously cancelled just seven days after V-J day, with remaining aircraft at a certain point on the production lines completed only for the convenience of being able to fly them straight to the scrapyards, ones previous to that being broken up on site. Consolidated test pilot Beryl Erikson would remember engines being yanked out to crash useless to the factory floor.
 One, tail # 42-108474 "Flaming
Mamie", was
specifically reserved for preservation in the USAF museum and survived as
late as 1949, when it too was mysteriously declared excess and shredded.
None of the sources explain why this happened, but keep in mind that this
was the era of mass scrappings (even the Smithsonian being a guilty party),
nor formal aircraft preservation program in place in the armed services, and
people just wanting to put the terrible war behind them. Yet another
warplane would be no more unique than say, another idle 727 is to us. If
you've ever worked in an administrative job, the critical moment isn't hard
to imagine...a weary clerk checkmarks the wrong box on his clipboard at the
end of a long shift...somebody whose brother was killed in a B-24 decides to
deliver a symbolic insult to Consolidated
Aircraft...a
forklift operator accidentally backs his vehicle into the museum piece and
gets buddies to erase the 'evidence'... however it happened, the result is
that the only tangible remains of this major American program are a few of
the unique Sperry A-17 ball turrets and a single aerodynamic test wing panel
in a park in San Diego, and the odd cockpit guage showing
up on eBay.
One, tail # 42-108474 "Flaming
Mamie", was
specifically reserved for preservation in the USAF museum and survived as
late as 1949, when it too was mysteriously declared excess and shredded.
None of the sources explain why this happened, but keep in mind that this
was the era of mass scrappings (even the Smithsonian being a guilty party),
nor formal aircraft preservation program in place in the armed services, and
people just wanting to put the terrible war behind them. Yet another
warplane would be no more unique than say, another idle 727 is to us. If
you've ever worked in an administrative job, the critical moment isn't hard
to imagine...a weary clerk checkmarks the wrong box on his clipboard at the
end of a long shift...somebody whose brother was killed in a B-24 decides to
deliver a symbolic insult to Consolidated
Aircraft...a
forklift operator accidentally backs his vehicle into the museum piece and
gets buddies to erase the 'evidence'... however it happened, the result is
that the only tangible remains of this major American program are a few of
the unique Sperry A-17 ball turrets and a single aerodynamic test wing panel
in a park in San Diego, and the odd cockpit guage showing
up on eBay.
It really didn't matter much. The USAAF--soon to be the
USAF--had finally fully grasped the problem of the "Hemisphere Defense
Weapon" and had issued in the meantime a much more ambitious set of
requirements for a new bomber. Consolidated Aircraft--by then Convair, soon
to be General Dynamics--was thus given a much bigger
fish to fry in the form of the B-36 Peacemaker, which had actually been
developed more or less in parallel with the Dominator. Not to mention a long
line of really pointy airplanes following that throughout the '50s.
What's in a name? The B-32's official moniker is actually Terminator. WhenDominator was initially selected, Assistant Secretary of State Archibald MacLeish felt it was poetically inappropriate for an American warplane, as the word implied imperialistic oppression. But the initial name stuck. For me, researching this project, it led to some truly embarrassing search results involving lots of leather and handcuffs before my engine figured out what I was really after.
| THE KIT |
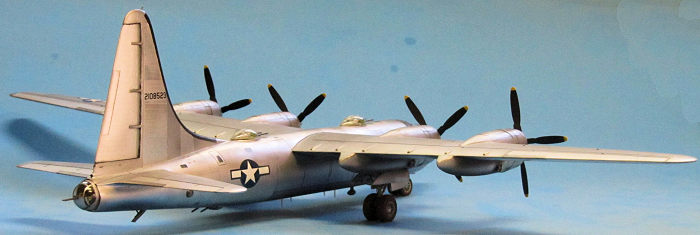
Aviation Usk's standard stout cardboard flip-lid box with a well-executed ink drawing of Hobo Queen pulling away from a burning target opens to reveal two big sheets of white vacuform and two identical grey low-pressure injection sprues of detail parts. Boxed by the defunct AvUsk, produced by the MPM group, as were all Usk's kits. Folded into the instructions underneath are the decals and photetch. This is one of those vacs molded in nice, thick plastic, sort of like an injected kit you have to cut out.
However, have you ever opened a new kit and immediately had that sinking sensation that something was amiss? This happened within moments of spilling these contents. Though I wasn't familiar with the aircraft and had only ever seen three or four pictures of it, the nose seemed much too fat and blunt, like a C-5's, even with the fuselage halves still trapped in their sheets. A look at the clear parts revealed the problem. On the real B-32, the nose and tail turrets were the same part #: Sperry A-17. In this kit, however, the two corresponding clear parts are almost three scale feet (1/2" !!!) different in diameter, with the nose turret being the too-large one. To make matters worse, a 6' gunner could lie down in it, but not up: they're not spheres, they're ovals. The reverberating effect gets worse: this 200% too-large front turret 'crowds' the prominent bombardier's glazing almost out of existence beneath it.
 Sharing the same DNA, the Anigrand and Contrail kits suffer
the same problems. Look at photos of the front ends of models built from
these kits and compare them to wartime photographs taken from the same angle
and you'll see what I mean. Discovered later, the kit's upper rear engine
nacelles also stop too quickly behind the leading edge rather than smoothly
tapering back most of the way along the wing chord.
Sharing the same DNA, the Anigrand and Contrail kits suffer
the same problems. Look at photos of the front ends of models built from
these kits and compare them to wartime photographs taken from the same angle
and you'll see what I mean. Discovered later, the kit's upper rear engine
nacelles also stop too quickly behind the leading edge rather than smoothly
tapering back most of the way along the wing chord.
Too bad this, as the kit has a lot of good points. Nice surface detail, including beautifully-rendered fabric-over-frame control surfaces and recessed panel lines that were to crisp up marvelously with a few passes of 600 grit wet-or-dry. That sturdy plastic--no need to fill this one with foam. The telltale MPM radial sprues of low-pressure injected parts, some of which would prove useful.
I never go looking for problems of this sort in my model kits, but I do like seeing approximately correct shapes. This one was just too much, mistakes that noticeably throw off the 'character' of the subject and will take a whole lot of work to fix. I started sanding a few parts, then tossed the kit back in the box in disgust, and the box into my parents' attic. There it stayed for a decade and a half.
There are two ways you can look at this. You can a) go on and on lamenting, or b) view it as an opportunity. Also, in the intervening years an impetuous longhaired twenty-something turned into a more circumspect Bic-headed forty-something. Plus a better B-32 kit has yet to appear! Always fancying myself the craftsman, I found myself once again staring at the box while visiting my folks on my way out for my first Afghanistan deployment. On a whim, I took out the contents and threw them in my sea bag, neatly encapsulated by my body armor. Upon arrival at FOB Kunduz a week later, out they came again.
| CONSTRUCTION |
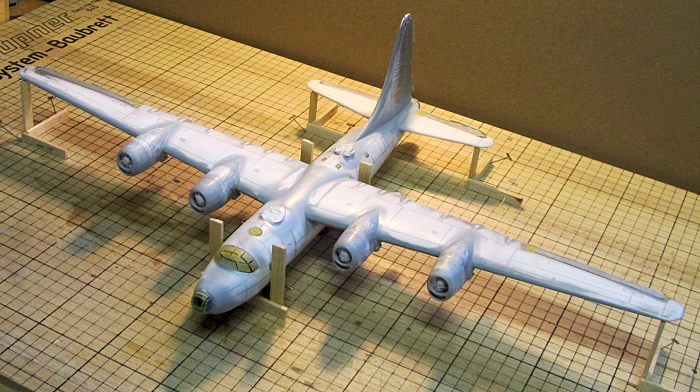
So, here you have a 1) vacuum-formed 2) 4-engine bomber in 3) natural metal with 4) lots of gun turrets. With each factor the construction difficulty multiplies upon itself, and even a 'basic build' is going to involve many, many hours of intensive effort. There's little point to starting this one at all unless you're going to push yourself and do the best job you can with the information at hand. Interestingly, all the improvements and extra detail I put in probably only pushed up construction time by about 15%.
I absolutely hate giving an excruciating, blow-by-blow account of how I put a model kit together. But this can't be treated as a "assemble this model as any other" like an ordinary kit, because it isn't. Somehow I want to leave a record of how all these hundreds of little sub-tasks got done to fulfill the end goal. This is the K-2 ascent of model kit building. Not the biggest, but the most technically challenging. You begin the same way as any vac: spend a few sessions cutting out all those parts and sanding them down, all the while working out a construction sequence in your head--and gather your research materials/drawings/and historical photographs. This is your base camp.
New nose/tail turrets plus bombardier glazing would obviously have to be made, and I put this off for my CONUS return and access to my vacuforming machine.
The injected and photo-etched parts were next sorted for those to keep and those to replace, sort of like Willem Dafoe helpfully 'processing' Charlie Sheen's Army-issue gear at the beginning of Platoon before the unit sets off into the jungle. Seats and control yokes are accurate to 1/48th, so were rejected. Propellers are three scale feet too narrow, also binned. 50 caliber guns are a combination of plastic sticks wrapped with a photo-etched cooling jacket, neato-mosquito in theory, but yield you a gun about the same scale as a 75mm cannon, so were also ditched. Engine faces seem to be based on Hasegawa's B-17 engines; not only the wrong shape but wrong number of cylinders. Discard. All the wheels suffered from unfixable mold corruption in the hubs. Toss. I happened to have a set of white-metal landing gear struts produced by Pend-Oreille Models for this kit at the time, but the kit's injected struts appear adequate. The photo-etched ILS and VHF arrays and landing gear oleo forks were kept, and in the end, the only injected parts I used were the engine cowl fronts, the exhaust stubs, the pilot instrument panel, DF football, and the landing gear doors. More on the doors later.
I will describe my construction sequence in the same manner I broke it down in my usual divide-and-conquer approach to monster projects such as this. Now equipped with my "gear", the climb begins!
1) Sand down and fit the main parts: Take the time to get those wing and tail trailing edges down sharp! Check for major fit problems, the only one in this case being a length difference in the fuselage halves of about 3/16", so the left half was shortened by this amount between the cockpit and wing leading edge. I then sanded the extreme aft end of the fuselage parts to get the rear turret mount corrected to a more or less perfect circle--and to a diameter that would be my target measurement for the much more involved correction up front later. Fuselage halves were divided into a "clean" side and a "dirty" side: the one into which was mounted the flight deck bulkheads, detail and alignment tabs. The clean side was would be used to mount the vertical stabilizer shortly.
I then cut out and fit all the little windows and skylights--take care to note which particular tail # you intend to model as the number and configuration of these varied between B-32 production blocks and were not all symmetrical on the left vs. right fuselage sides. Deleted from later production, and not supplied in the kit, all three aircraft of the initial test group featured clear scanning domes under the leading edge of the horizontal stabilizer.These were crash-molded on a paintbrush tip. One minor hiccup: the kit depicts two flight deck windows on the right side aft of the cockpit when there should only be one. A super easy correction early on, near-impossible later. The is why you proceed into a build like this as though you're crossing a minefield!
2) Internal bulkheads and cockpit: the kit thoughtfully includes drawings of all of these, plus equivalencies for the wheel wells. All were cut out of thick styrene sheet, glued in, test-fitting along the way, shaving and shimming where needed. Cockpit detail was then added--only to just aft of the pilots' seats. The pilot's area was detailed referencing period photos of this area. Seats and control wheels themselves were left out owing mainly to their vulnerability to the fairly violent modelling processes lying still ahead. Bombardier's compartment was left entirely blank at this time for the same reason. I epoxy'ed lead ballast around the nose wheel well, cut from the various wrecked Soviet vehicles on my forward base. There's a lot of airplane behind the main wheels and it's wise to start building up weight forward here and there early on if you don't want a mean tail-sitter.
3) Wings and horizontal stabilizer: The test-fit in (1) revealed
that the mainplanes were slightly too thin for the molded opening outline in
the fuselage (this might have been a by-product of my overzealous sanding).
A shim was therefore made for the wing leading edge which solved the
problem. Absolutely critical is the scratchbuilding of a main spar: the
model will not support its own weight without one. I made mine out of 1/8"
basswood into an I-beam form, getting the required dihedral angle set into
it and ensuring that it extended all the way out to near the main landing
gear location. The stabilizers were similarly supported by a much simpler
tongue of 1/8" x 1/4" basswood.
4) That ginormous vertical stabilizer: a
separate part in the kit (probably for molding and packaging reasons) one
half of this character-defining component was mounted to the "clean"
fuselage side. The fuselage half was taped to a flat surface and the
corresponding stabilizer half glued to it, also taped to the same surface,
and allowed to thoroughly cure. This assured absolute vertical alignment.
When cured, the assembly was removed and the joint between the two
thoroughly reinforced from inside.
5) Fuselage assembly: the two halves were test-fit one last time,
glued, joined and taped, and left to set. Then the other half of the
vertical stabilizer was glued, taped, and also allowed to cure. All joints
were then given their initial fill-and sand treatment.
6) Engine nacelles: all four are made of three main parts: two vac halves and an injection-molded cowl face. While the above was curing, I glued the halves to each other. These were then sanded and the molded-over wing openings cut out. The injection-molded engine cowl faces were left off at this time to assure alignment later.
 7) Wing and stabilizer mounting: the molded lines representing these
in the fuselage were finally cut open. After an initial check revealed
an acceptable fit but quite a few gaps (remember--NMF!), I taped the
fuselage to a table surface and immobilized it dead level and vertical with
bits of wood, more tape, and a square borrowed from the aircraft maintainers
in the hangar next door. The basswood main spar was then glued into one
wing, and the wings slipped together in the fuselage. Two wood blocks of
equal height were slid under the wingtips. After correct dihedral and
approximate vertical perpendicular to fuselage centerline was verified,
these blocks and the wing were also thoroughly immobilized with more tape.
After one last check to make sure all was square and angles absolutely
correct, I then filled the fuselage gaps around the wing root with strips of
styrene, being careful to not glue them to the wing itself (!). The
horizontal stabilizer was dealt with in the same manner, less the tip
blocks. Shims thoroughly cured, the ersatz alignment jig was disassembled,
the model slipped apart, and the shimmed areas around the wing and
stabilizer openings filled and sanded flush to the surrounding fuselage
surface.
7) Wing and stabilizer mounting: the molded lines representing these
in the fuselage were finally cut open. After an initial check revealed
an acceptable fit but quite a few gaps (remember--NMF!), I taped the
fuselage to a table surface and immobilized it dead level and vertical with
bits of wood, more tape, and a square borrowed from the aircraft maintainers
in the hangar next door. The basswood main spar was then glued into one
wing, and the wings slipped together in the fuselage. Two wood blocks of
equal height were slid under the wingtips. After correct dihedral and
approximate vertical perpendicular to fuselage centerline was verified,
these blocks and the wing were also thoroughly immobilized with more tape.
After one last check to make sure all was square and angles absolutely
correct, I then filled the fuselage gaps around the wing root with strips of
styrene, being careful to not glue them to the wing itself (!). The
horizontal stabilizer was dealt with in the same manner, less the tip
blocks. Shims thoroughly cured, the ersatz alignment jig was disassembled,
the model slipped apart, and the shimmed areas around the wing and
stabilizer openings filled and sanded flush to the surrounding fuselage
surface.
As a snug fit with sufficient friction resulted, the wings and stabilizer were therefore left unglued for almost all of the rest of assembly. Being able to slip the model together and apart at will was enormously helpful not only for transport home, but for convenience during construction. This is a big model for 1/72, 22" span, and it was nice along the rest of the way just to work on one isolated component rather than the whole awkward thing!
8) Engine nacelles, continued: the wings were slipped on to the fuselage, check for square vertically, and then securely taped. The nacelles were slipped on for the first time and checked for fit, spacing, and alignment. The kit's engineers came through! To my enormous and pleasant surprise there were no major problems at all, just a teeny bit of shimming here and there to get all four nacelles in geometrical harmony with each other and the fuselage, everybody in one happy straight line. I ran some liquid cement into all the joints to secure them that way and allowed them to set for an hour or so.
The wing still taped in place, the cowl faces were only now dry-fit and glued on. In this manner, I could ensure all engine-related alignment problems were taken care of one at a time. The otherwise very likely cowl-face misalignment would be obvious on the finished model, and I spent at least 20 minutes prodding and twisting these glued-but-still-moveable parts, checking all three axes constantly, until no more alignment issues were visible. It was then all left to cure. Joint lines were filled, and the cowls were numbered 1 through 4 with a little black paint on the inside and cut loose from the nacelles for later engine fitment.
 9) Nose Job!!! I was now well over 150 hours into this project, but
my motivation picked up because a whole 4-Engine Airplane Shape was now
appearing and I could finally start attacking that overlarge-nose issue.
Plus the Navy intel types I was working with--history buffs
themselves--started noodling me to finish. I began with some coarse sanding,
reshaping the lower fuselage around the bombardier's glazing to better
represent the contours of that area. The plastic is thick enough to support
this work.
9) Nose Job!!! I was now well over 150 hours into this project, but
my motivation picked up because a whole 4-Engine Airplane Shape was now
appearing and I could finally start attacking that overlarge-nose issue.
Plus the Navy intel types I was working with--history buffs
themselves--started noodling me to finish. I began with some coarse sanding,
reshaping the lower fuselage around the bombardier's glazing to better
represent the contours of that area. The plastic is thick enough to support
this work.
Underneath, a new, larger outline for the bombardier's glazing was
scribed--with the wings in place to ensure correct horizontal alignment when
viewed from the front (remember--keep checking that alignment!) --and cut
open, the discarded piece being saved as a basis for a mold for a new
vacuum-molded part to be made later.
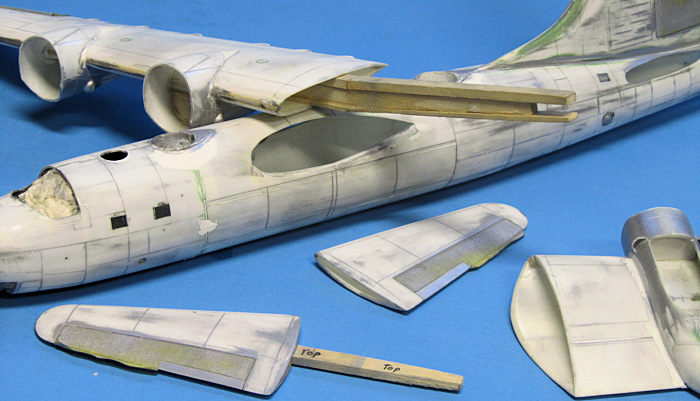
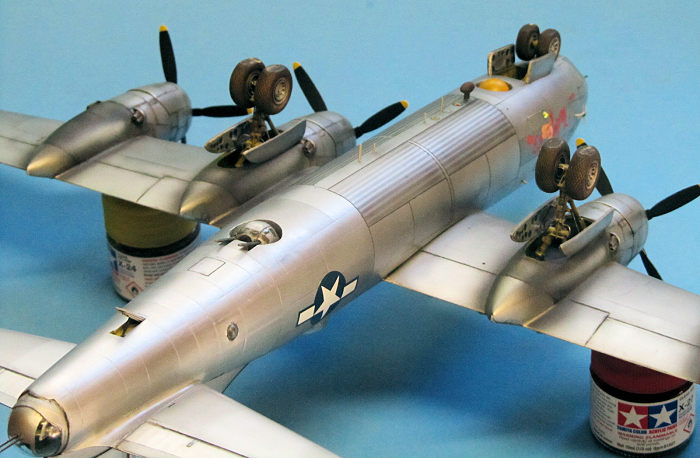
10) Dorsal and ventral turrets: these were built and mounted. Usk provided good clear parts for these, including the unique rear fairings for the dorsal units. The mountings are up to you. I cut circular openings for all three (plus the navigator's flat astro-nav window up top) and inserted/glued simple tubes rolled from thin styrene vertically down into them. The missing H2S retractable radar dome's well was made in the same way. The bottom turret could simply be slipped into its well after masking and painting, as it was always retracted on the ground. Dorsal turrets were equipped with a chassis made up from another set of rolled styrene tubes, telescoped into the others, on to which a platform was glued to mount the transparencies, guns, and other details. Blah, blah, blah. All three turrets, "armed" with my last six Aeroclub M2 .50 cals, were thus removable like the wings and horizontal tail. This was important, because I was now beginning to consider the daunting surface prep which lay ahead.
11) Remaining scribed details: all joints were filled and the entire
surface was given a coarse wet sanding of 600 grit. This had the pleasant
effect of making the molded recessed panel lines sharpen up and suddenly
come into crisp resolution. Missing hatches were scribed; the main crew
entrance on the left nose, another under the tail centerline, the emergency
escape ahead of the tail on the top right, and the life raft compartment
panels above the wing trailing edge. Holes for the many dipole antennas of
the B-32 were drilled: the Dominator was the first bomber to come standard
with an electronic warfare suite and such niceties as an ILS receiver on top
of the standard navigation and comms equipment, and the resulting antenna
farm will be very vulnerable unless you build it to survive!
With further work now waiting on those new nose and tail turrets, I
tucked the dismantled model back in with my body armor, clambered aboard a
C-130 bound for Bagram, and went out for home leave. I had to wait for my
deployment to finish and some career stabilization to occur over the next
two years before resuming the model. That's a real defining feature of model
projects this extensive as time and motivation (and opportunity) wane and
wax--they often extend over several distinct life chapters!
12) Sperry A-17, times two: New molds for these were finally spun from 5/8" dowel, surface finished with CA, and polished, all on a Dremel. The missing retractable H2S radar dome was made at the same time in the same way. All four turret halves were then vacuum-formed, along with a new bombardier's glazing from the bit of fuselage detached earlier. The newly-molded Sperry turrets were then built up and internal structure detailed in a process which would set a Swiss watchmaker to drinking bathtub gin from a cowbell. Randomly at this time I happened to notice that the tip of the vertical stabilizer was too shallow. I cut it off and made a new one out of sandwiched and shaped styrene.
 13)...and now....drum roll...the sheer
drudgery of the most menacing surface-prep
project of your entire life!!! No kidding, this is the NMF scenario of
nightmares with all that surface
area and so many joint lines. But having put the time into this model, it
makes no sense to cut corners at this stage. So, I poured myself a strong
IPA and spent a couple of hours out on my deck sanding with more 600 grit
wet-n-dry overall, then 800, then 1200. Next followed something I had never
done in my modeling life, ever: a guide coat. This is a thin, sacrificial
paint layer whose sole purpose is an early reveal of surface quality and
flaws. Mine was sprayed from an old bottle of Model Master Metalizer
Aluminum.
13)...and now....drum roll...the sheer
drudgery of the most menacing surface-prep
project of your entire life!!! No kidding, this is the NMF scenario of
nightmares with all that surface
area and so many joint lines. But having put the time into this model, it
makes no sense to cut corners at this stage. So, I poured myself a strong
IPA and spent a couple of hours out on my deck sanding with more 600 grit
wet-n-dry overall, then 800, then 1200. Next followed something I had never
done in my modeling life, ever: a guide coat. This is a thin, sacrificial
paint layer whose sole purpose is an early reveal of surface quality and
flaws. Mine was sprayed from an old bottle of Model Master Metalizer
Aluminum.
This revealed, of course, all sorts of 'problem' areas. There's no
other way to deal with it but to attack these with filler/primer/more
sanding, further guide coats, sanding, and repairing lost surface detail. I
repeated this mantra five times, each guide coat revealing fewer flaws. The
surface was taken gradually down along the way to a 4000 grit finish.
At this point I am--no kidding--300 HOURS INTO THE PROJECT.
That's 250 more than any total I have ever spent on any model. WHY
AM I DOING THIS TO MYSELF???? You
may have noticed the mountaineering metaphor at the beginning of this piece.
In my younger and more spry days I was quite the avid hiker/backpacker, once
even going to the bottom of the Grand Canyon with a female friend, taking a
moment to splash a little cold & silty Colorado River runoff water over
ourselves, and making it back up to the rim inside of eleven hours. The
point? There comes a time very late in the climb that everyone who's done
similar knows: the point at which all high-minded inspiration and sense of
purpose--indeed, much higher-consciousness activity--has vacated, and you're
just stubbornly, mechanically plodding forward, energy coming from
who-knows-where. I had reached the modelling equivalent of this threshold on
the B-32.
As an average modeler, I'd always wondered how the real wizards of styrene could pour hundreds (or even thousands) of hours into their masterpieces. Now I know! But with this realization comes a disturbing question: have I departed the ranks of the casual, doing-this-for-the-fun-of-it hobbyist to become one of "them"?
14) Canopies and doohickies: gluing, fairing, and masking the canopies, turrets, and glazing, plus installing the various little do-dads (such as formation and position lights) took fully two weekends. Those Sperry A-17 mounts are really complex upon close inspection.
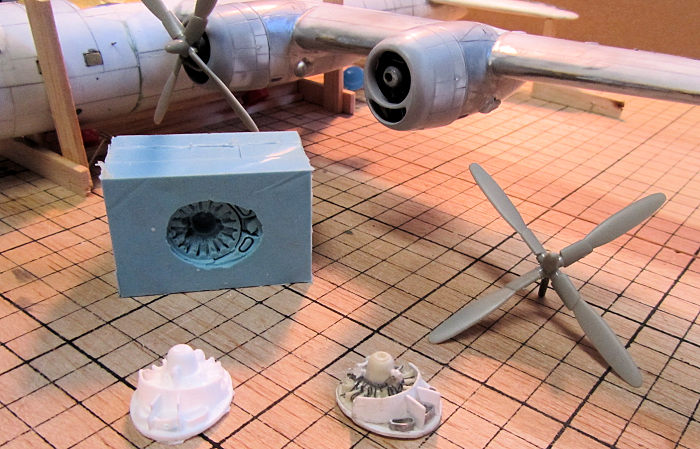 15) Engines: I made up a single engine assembly master starting with
a basic engine from my spares box, complete with ignition harness and
induction section detail to fill the void behind the engine cowl "smile".
Molding it and casting copies was one of the most gratifying parts of this
entire project. The cowls themselves were re-scribed, sanded, and polished,
then fitted with mounting tabs for easy assembly to the airframe in the
final stages. The engine castings were painted/weathered, and after fitting
carefully to each cowl, epoxyed into place. When cured, they were drilled in
series on my drill press for their brass propeller sleeves. These were
accepted into a set of correct Curtiss propellers pinched from an Academy
Silverplate B-29.
15) Engines: I made up a single engine assembly master starting with
a basic engine from my spares box, complete with ignition harness and
induction section detail to fill the void behind the engine cowl "smile".
Molding it and casting copies was one of the most gratifying parts of this
entire project. The cowls themselves were re-scribed, sanded, and polished,
then fitted with mounting tabs for easy assembly to the airframe in the
final stages. The engine castings were painted/weathered, and after fitting
carefully to each cowl, epoxyed into place. When cured, they were drilled in
series on my drill press for their brass propeller sleeves. These were
accepted into a set of correct Curtiss propellers pinched from an Academy
Silverplate B-29.
 16) Assembly Jig: I made up a simple jig from a Graupner
balsa gridded building board plus uprights of balsa to cradle the fuselage
and prop up the wings and stabilizer tips. I also built it to hold the
airframe the correct height off the surface so I could use it to glue the
landing gear correctly in place later.
16) Assembly Jig: I made up a simple jig from a Graupner
balsa gridded building board plus uprights of balsa to cradle the fuselage
and prop up the wings and stabilizer tips. I also built it to hold the
airframe the correct height off the surface so I could use it to glue the
landing gear correctly in place later.
17) Landing gear doors: I warned you about these earlier. Will these little scratchbuilding tasks never stop? The B-32 had complex patterns of lightening holes on the inside surfaces of the gear doors, which the mold-makers naturally neglected. After careful research (several photographs to build one complete picture) the patterns were determined, molds made in basswood, and inside-door-surface-parts vacuformed. Somebody pour me some Everclear.
Stabilizers went on first--there are a set of fairly complex fillets at their roots and I needed as much clearance as possible to shape, polish and sand them. After this was done the model went back into the jig for wing attachment, then back out again for a another fill-sand-polish process, this time much easier since there aren't any such fairings on the wings. Back into the jig one more time to attach the engines and check alignment against the grid pattern on the board. So far, so good. The model was pulled out yet again for an overall final polish and careful check before primer coat.
Landing Gear: The nose strut was simply 'rooted' into the 1/8" basswood I'd used for the well roof. Mains landing gear as kitted are designed to simply be butt-glued into the bottom surface of the wing within the gear well. I didn't trust their height dimension to be precise, however, and since any discrepancy there would throw off the sit of the model, I sleeved the gear bases into a set of aluminum tubing, glued with J&B Weld. A corresponding set of holes were drilled into the lower wing surface, and into the basswood wing spar. This created some adjustment room when I went to jig it all up as planned later, and a strong, continuous structure to hold the finished model's substantial weight. The gear was blocked up from the surface and left to cure, the wheels glued on in a separate operation the following day.
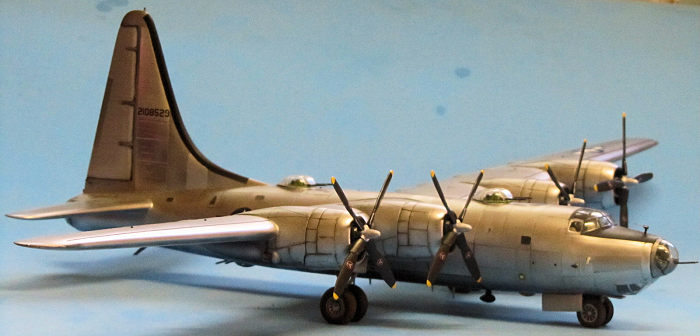
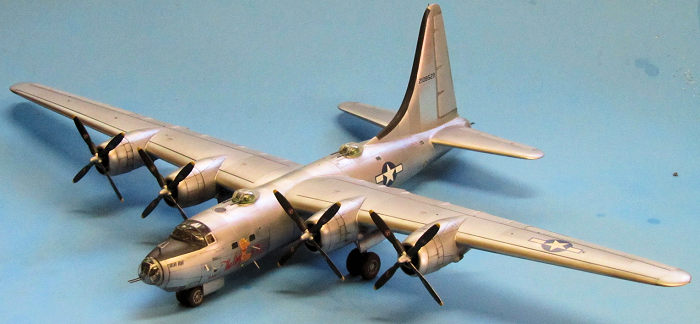
| COLORS & MARKINGS |
The surface prep and masking had been mostly dealt with during construction, so all that was left was a quick rub-down with alcohol and a lint-free cloth to prep for primer coat. This was in the form of Alclad II gloss black base, left to cure overnight.
I won't go into the details of the struggle that followed; suffice to say that the Alclad cracked all over the place repeatedly, despite being applied exactly per instructions. Several modeling sessions followed to sand this down and reapply.
 Wing walkway stripes were masked and airbrushed in a
lightened black. Decals were scrounged from other sources. The kit's
national markings were too big, so were taken from Hasegawa B-17 kits. The
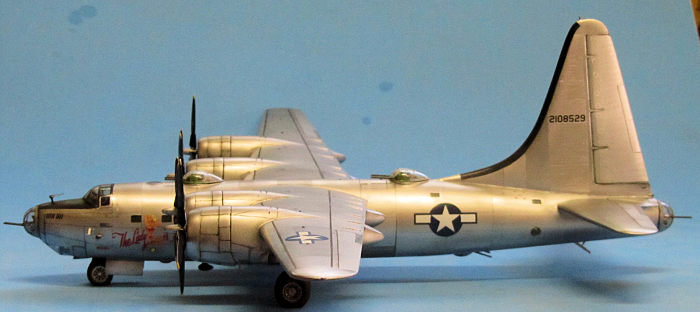
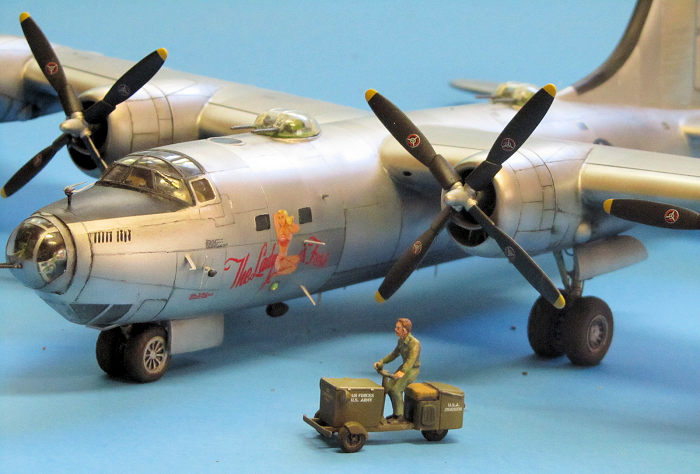
kit's nose art for "The Lady is Fresh" and "Hobo Queen" isn't bad, but
definitely shows the limitations of silk screen printing. A set for The Lady
is Fresh (including mission markings and tail #s) was instead ordered from a
talented Polish modeler, Slawomir Przymusiak. These went on well and look
fantastic. Stencils came from Aviaology/Skygrid's set for the B-24.
Wing walkway stripes were masked and airbrushed in a
lightened black. Decals were scrounged from other sources. The kit's
national markings were too big, so were taken from Hasegawa B-17 kits. The
kit's nose art for "The Lady is Fresh" and "Hobo Queen" isn't bad, but
definitely shows the limitations of silk screen printing. A set for The Lady
is Fresh (including mission markings and tail #s) was instead ordered from a
talented Polish modeler, Slawomir Przymusiak. These went on well and look
fantastic. Stencils came from Aviaology/Skygrid's set for the B-24.
Photos show that B-32s in service didn't sport much weathering, probably because of the short deployment interval and sunny theatre, so I restricted weathering to the heavy exhaust and oil staining on the aft cowls and nacelles and some minor panel line accentuation.
I was pleased with the finished product, but two days before I departed for the 2018 IPMS Nationals in Phoenix, the Alclad again opened up into widespread cracks, this time thankfully (but strangely) only on the underside. I'll probably wait a year or two for everything to totally stabilize, then pull the model out again for a spiff-up. Using an unfamiliar finishing product on a major project--a definite rookie move.
| CONCLUSIONS |
After projects like this, the next step in the model-building world is joining the ranks of those who scratch-build mold, vacuum-form parts, and whip up some impressive models, usually in 1/16th or similar. Those people are also usually retired and with time on their hands, not upper-middle-class schlubs like me who slave away at a day job 60 hours a week.
There's an obvious question: "why?"
That question was once asked of George Mallory as he plotted his fatal assault on Mt. Everest, and he responded with his immortal reply: "because it is there". It may well be there, but the route to that particular summit is notoriously strewn with the frozen corpses--hundreds of them--of those who didn't make it. I wonder how many of these kits got started but never finished.
I tell you, fellow modeler: finish it. It's worth it.
"Have I built the most accurate
1/72 B-32 Dominator in the world...?" The
poisonous thought was stopped dead in its tracks--with extreme prejudice. There
is no figure more pathetic than the Prima-Donna Modeler.
 I laughed at myself and
stuck the model among the others in the case. But I gazed at it at it for a
very long time--in the same way that younger and more spry version of myself
once gazed down at the Colorado River a mile below, marveling I'd just gone
down there and back. For
all the work and improvements I made, there are still all sorts of "issues"
with the kit's accuracy (even by vac-form standards) that the Red-Line Crowd
would have a field day with my finished product. I never said I'd be
graceful. But I nonetheless completed a B-32. Have you?
I laughed at myself and
stuck the model among the others in the case. But I gazed at it at it for a
very long time--in the same way that younger and more spry version of myself
once gazed down at the Colorado River a mile below, marveling I'd just gone
down there and back. For
all the work and improvements I made, there are still all sorts of "issues"
with the kit's accuracy (even by vac-form standards) that the Red-Line Crowd
would have a field day with my finished product. I never said I'd be
graceful. But I nonetheless completed a B-32. Have you?
If you simply want something that looks like a
Dominator in your lineup, build Anigrand's resin monolith and be cool with
it. If you need more fidelity, however, find a copy of the Usk kit--it's
your best shot. But be ready for a character-building exercise! I have never
in my life spent more than about 50 hours on a single model. The B-32
consumed more than six times that figure.
The kit's failings fade into irrelevance against the scale of the project. Now, all in modeling seems possible!
| REFERENCES |
As a truly extinct aircraft (keeping in mind that even the Douglas TBD Devastator--built in the same numbers--still has about a dozen documented surviving wrecks in the ocean depths), there have thankfully been several publications to immortalize this little footnote of an aerospace program. Notably, Benjamin Sinko has written a succinct yet complete 'human side' of the story of the aircraft, a very good read. There's also an out-of-print but still widely available Squadron-style book which gives a pretty good general technical overview. These two titles would make a great and inexpensive companion set for anyone setting out on this project. A bigger, hardcover, and far more exhaustive study can be found in the Schiffer book, which traces the aircraft's story back to the roots of its parent companies and American political motivations going into the conflict which spawned it.
Still, modelers wanting to tackle this project will be
frustrated by two things: the lack of details of certain nether regions of
the aircraft (mostly the wing top and bottom surfaces, bombardier's
compartment, and the main wheel wells), and no complete, accurate set of
drawings.
Sinko, Benjamin. Echoes
of the Dominator. Up
North Press, 2007
Wolf, William. Consolidated B-32 Dominator: the Ultimate Look, From Drawing Board to Scrapyard. Schiffer Pub Ltd., 2006
Harding, Steven. Dominator:
The Story of the Consolidated B-32 Bomber. Pictorial
Histories Publishing Co., 1984
Exhaustive searches for photos on the internet.
31 August 2018
Copyright ModelingMadness.com
If you would like your product reviewed fairly and fairly quickly, please
contact
the editor or see other details in the
Note to
Contributors.
Back to the Main Page
Back to the Review
Index Page
Back to the Previews Index Page