
| KIT #: | E 17 |
| PRICE: | $25-75.00 |
| DECALS: | Three options |
| REVIEWER: | Ryan Grosswiler |
| NOTES: | Airfix pilots’ canopy, Quickboost cowls, Squadron gunner’s canopy |
| HISTORY |
It's a myth that Claire Chennault's Flying Tigers were in action fighting the Japanese in China before Pearl Harbor. What isn't myth, however, is that this famous mercenary unit was in place and ready for action by the time war came. Far more more importantly, Chennault, knowledgable of the country and enamored with it, was boots-on-ground already and in place to direct the action.
He was keen enough to understand that China's war with Japan was an enormously confusing affair; one part foreign invasion, one part communist insurrection, and many parts anarchic local power-grab. Without ever having seen the movie, he was well aware of the first part of Wallace Shawn's crazed bit of advice in The Princess Bride: "You fell victim to one of the classic blunders—the most famous of which is 'never get involved in a land war in Asia’—but only slightly less well-known is this: 'Never go in against a Sicilian when death is on the line!' Ha ha ha ha ha ha ha.....(plunk)!"
 The
B-25 did both. Reflecting this was the difference in equipment of B-25s
operating in Asia versus those in other theatres. In the Mediterranean and with
non-US air forces north in Europe, Mitchells simply retained the forward-firing
armament as from the factory, even showing signs of its removal.
The
B-25 did both. Reflecting this was the difference in equipment of B-25s
operating in Asia versus those in other theatres. In the Mediterranean and with
non-US air forces north in Europe, Mitchells simply retained the forward-firing
armament as from the factory, even showing signs of its removal.
In the Pacific, on the other hand, they obviously couldn’t get enough guns in the nose. While not as heavily defended by flak, Japanese targets were well dispersed and camouflaged, so didn’t lend themselves at all to the medium-level attack by medium bombers common elsewhere. Instead, Allied aircraft most often had to go down in low in a more surgical manner, using the new tactics of skip bombing and parafrag bombs. Plus strafing: the bombardier now being without a job, his space was taken over quickly by a variety of experimental machine gun and cannon installations.
Data from these lash-ups was passed to North American, who quickly produced the B-25G, the first to have the specialized, shortened gun nose. This was succeeded on the lines by the H modeled here, nose armament increased by six more machine guns, dorsal turret moved forward, and the extreme rear fuselage deepened a little to accommodate the definitive tail gunner’s turret. When level bombing was required, the gun-nosed aircraft would pair up with a single glass-nosed airplane and its bombardier, releasing their bombs at the same time as the lead.
Back to The Princess Bride. If you do in fact find yourself involved in a land war in Asia, you’d really, really better be in it to win it.
| THE KIT |
 Standard, current Hasegawa fare here. Finely recessed panel lines in gray
plastic. A sprue to cover the differences between gun-nose "H" and glass-nose
"J" releases; gun packs, cockpit armor plate, and other odds and ends are
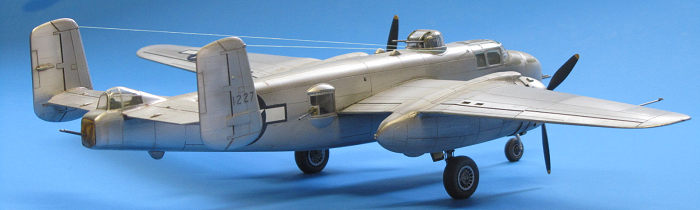
provided as options. Crew entry hatches may be posed open and a step-stool is
provided to stick under the rear one to prevent the model from sitting on its
tail. Three marking schemes with nose art, all in Olive Drab over Neutral Gray.
Standard, current Hasegawa fare here. Finely recessed panel lines in gray
plastic. A sprue to cover the differences between gun-nose "H" and glass-nose
"J" releases; gun packs, cockpit armor plate, and other odds and ends are
provided as options. Crew entry hatches may be posed open and a step-stool is
provided to stick under the rear one to prevent the model from sitting on its
tail. Three marking schemes with nose art, all in Olive Drab over Neutral Gray.
| CONSTRUCTION |
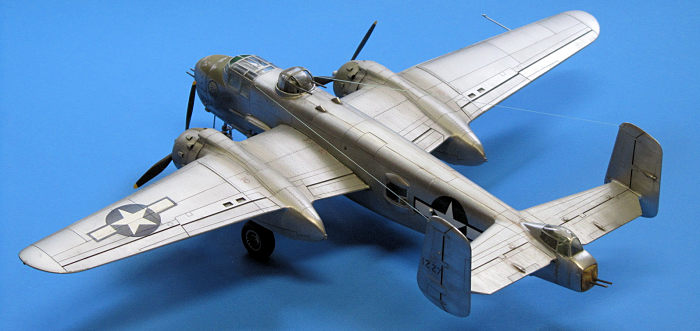
The kit is designed for bomb bay doors: open. Posing them shut isn't difficult, but should be done before any other work is started on the fuselage. Same goes for the crew hatches. I then modified the cockpit into the more correct single-pilot configuration of the H, and added detail to the sidewalls.
Other than that, this kit's been reviewed elsewhere and the basic takeaway is that it goes together really well, so for those who like to hunt down and fix such things I'm just going to go over the few minor boo-boos that Hasegawa made:
 1) The
tail gunner's canopy is very poorly shaped, being too short and rounded, like
it's been worn down by geological processes over the course of millennia. To fix
it, simply acquire the vacuformed Squadron canopy set for the Italerei kit, no
longer in production at this writing but still very easily found. Carefully saw
off the kit's molded-in fairing on the horizontal stabilizer following assembly
to the fuselage, glue the vacuum-formed replacement in its place, and move
ahead.
1) The
tail gunner's canopy is very poorly shaped, being too short and rounded, like
it's been worn down by geological processes over the course of millennia. To fix
it, simply acquire the vacuformed Squadron canopy set for the Italerei kit, no
longer in production at this writing but still very easily found. Carefully saw
off the kit's molded-in fairing on the horizontal stabilizer following assembly
to the fuselage, glue the vacuum-formed replacement in its place, and move
ahead.
2) Engine cowls. I once read a review of MPM's Tupolev SB which read: "propeller are thick paddle and must replace". Similar applies here: Cowling lip are thick donut and must replace. Either ream out the cowl with big drill bits from your shop, gradually working your way up to 1/2”, or acquire and apply QuickBoost's resin correction set for this kit.
3) The pilot’s canopy is, for lack of a better term, "weak". The windshield is too low and the proportions of the side windows aren't right. This won't be noticeable on an OD aircraft but the natural-metal finish with its high contrast framing would be another story. I discovered that the extra canopy included in the Airfix B-25C I was building in tandem with this kit fit very well after a 1mm reduction in height and sawing off the nose-top extension ahead of the windshield.
 Don't
forget to fill the nose with lead. If you build the glass-nosed "J" version of
this kit you'll need to stick this in the nose wheel well and bombardier's
tunnel.
Don't
forget to fill the nose with lead. If you build the glass-nosed "J" version of
this kit you'll need to stick this in the nose wheel well and bombardier's
tunnel.
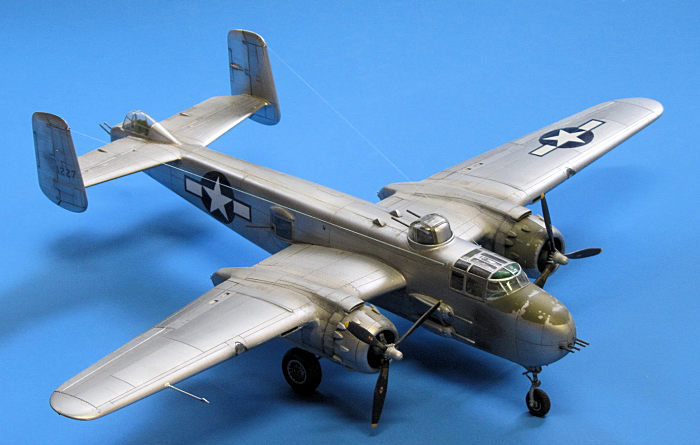
The odd wing dihedral is hard to nail on any Mitchell model, and the stub wing spars don't help much. Refer to drawings and photos and prop the wings up to your best ability when it comes time to glue them on.
Other nit-noids: wingtip position lights should be at wingtips, not on top and bottom. The ventral antennas near the nose gear are missing and were fabricated from brass rod. I also gave it a set of True Details resin wheels, mostly to better match the Airfix model. These were appropriately ‘re-inflated’ with a little sanding.
| COLORS & MARKINGS |
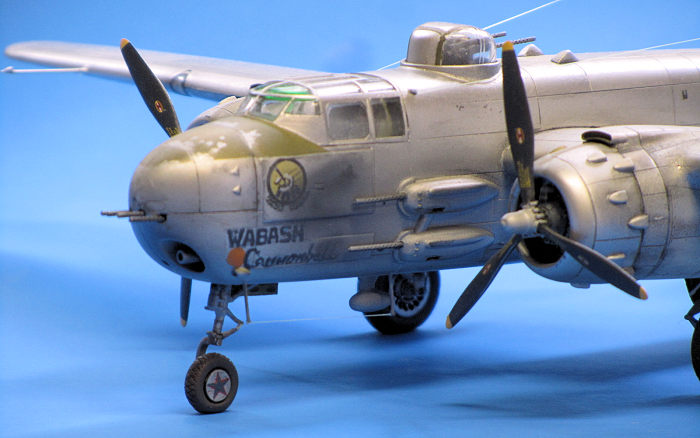
I had for years wanted to build a B-25H in the markings of "Wabash Cannonball" of the 491st BS/341st BG, as photographed in India with a heavily blast-stained nose at the end of the war. I haven't taken the time yet to learn how to make my own decals, so I was left to hand-paint the nose art.
The nose and nose-art area was pre-painted in Alclad White Aluminum before the model's wings were attached. Best to do this sort of work with maximum access. I started by airbrushing the orange circle and 'off-black' outline of the Ringer Squadron badge, then outlined both block and script lettering with a series of dots in the base color (dark blue) dabbed barely on with a 0000 round brush. This established orientation and size while still being easy to correct. The next step is to fill in the lettering with same 0000 brush, erasing mistakes and cleaning up the outlines with another tiny brush of thinner--or a toothpick after the paint has dried.
 Nose art
done, the area was masked off along panel lines to protect it. The wings,
vertical stabs, antennas, and landing gear were attached and a coat of Testor's
Gloss Black went on to provide the base coat for the rest of the Alclad paints.
All .50 cal gun barrels were replaced with brass items from Master Models; the
75mm cannon with a length of K&S aluminum tube.
Nose art
done, the area was masked off along panel lines to protect it. The wings,
vertical stabs, antennas, and landing gear were attached and a coat of Testor's
Gloss Black went on to provide the base coat for the rest of the Alclad paints.
All .50 cal gun barrels were replaced with brass items from Master Models; the
75mm cannon with a length of K&S aluminum tube.
My reference photos showed some very prominent blast marks around the cheek .50s on Wabash Cannonball, consisting of a dark semi-oval shockwave shape surrounded by a lighter 'cloud'. The first was achieved with a dark gray, shot through a little mask held about 1/8" off the surface, followed by a very, very light overspray which was augmented further with a bit of black pastel. It looked fantastic...and then...and then...I locked it in with a bit of clear flat enamel. This darkened the whole effect up a bit too much. Argh!!!
Catastrophe transformed quickly into discovery, however: I airbrushed a very thin layer of white over this, which not only toned down the dark, but gave the area a ‘powdery’ look and really made the muzzles of the cheek guns pop out.
| CONCLUSIONS |
A good kit. Build it straight from the box or correct and detail it per your warped tastes. The resin cowls combined with canopy and wheels coming from the same sources make Hasegawa's H match Airfix's C really nicely.
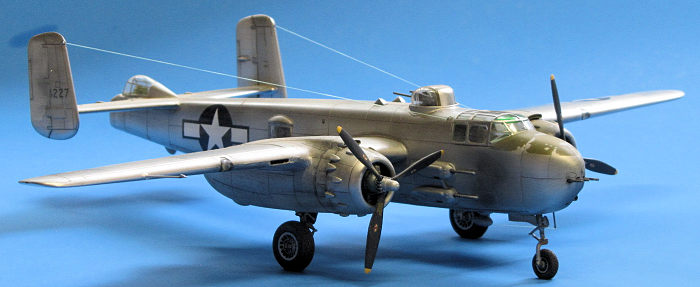
P.S.--In looking at these pictures, I noticed that the outer right wing panel had more anhedral than the left. This is one of the perils of continuing with someone else's kit. I held the joint in question under a stream of hot running water and gently bent back toward the positive. All good now.
| REFERENCES |
Young, Edward M. B-25 Mitchell Units of the CBI. Osprey Publishing, Oxford, UK. 2018
Bodie, Warren. WWII Pacific War Eagles in Original Color. Widewing Publications, 1998.
Kinzey, Bert. B-25 in Detail and Scale. Squadron-Signal Publications, TX. 1999
McDowell, Ernest. B-25 Mitchell in Action. Squadron-Signal Publications, TX. 1978
17 May 2022
Copyright ModelingMadness.com. All rights reserved. No reproduction in part or in whole without express permission.
If you would like your product reviewed fairly and fairly quickly, please contact the editor or see other details in the Note to Contributors.