
| KIT #: | A06015 |
| PRICE: | $25.00 |
| DECALS: | Two options |
| REVIEWER: | Ryan Grosswiler |
| NOTES: |
| HISTORY |
To honor the catastrophic career sacrifice of USAAC General Billy Mitchell, B-25 designer and future North American company president Lee Atwood pushed to name his new bomber prototype "Mitchell". A 1940 bull session among the company leadership settled the name, and the late officer's sister Ruth signed the prototype's left bomb bay door "For 'Fighting Billy': His Bomber". A more appropriate choice to bear the legacy of the father of American air power could not have been better chosen: the B-25 would go on to be the single most ubiquitous bomber in the massive war just starting to break out all over the world.
 As Allies
and Axis wrestled for control of North Africa for secondary reasons—the Germans
to rescue their Italian allies, then the British to maintain control of the Suez
Canal being threatened—the B-25 was a fairly late arrival in the Mediterranean
along with the rest of US forces who came to North Africa just in time for the
final actions.
As Allies
and Axis wrestled for control of North Africa for secondary reasons—the Germans
to rescue their Italian allies, then the British to maintain control of the Suez
Canal being threatened—the B-25 was a fairly late arrival in the Mediterranean
along with the rest of US forces who came to North Africa just in time for the
final actions.
The B-25 came to define the role of a ‘tactical’ bomber just as the the usefulness of such an aircraft was gradually recognized in situ. The 12th Bomb Group was the first unit to take the B-25 into action in the Mediterranean, arriving in Egypt late summer, 1942. They went to work immediately with the usual medium-bomber roles; attacking and causing mayhem in the enemy’s rear-echelon, also discovering along the way the usefulness of a medium bomber for close air support and maritime interdiction. The 12th was also to discover a problem of the early Mitchell variants: the single-pipe exhaust stack produced a bright point of light which at night made an easy aiming reference for enemy AAA gunners. Reporting this issue upwards, the crews were ordered to stand down from night ops while North American’s engineers came up with the solution: the engine’s cylinders were exhausted out of individual stacks which protruded circumferentially around the cowl. The exhaust flames now dispersed and toned down, this produced the distinctive ‘bumped’ cowl of remaining B-25 production.
Detached and reattached no less than three times, the 12th would fight not only throughout the Mediterranean theatre but also for the last year of the war in China-Burma-India.
| THE KIT |
Airfix’s
characteristic cheery red box packed with light grey sprues reveals some
innovative engineering with lots of configuration options. Two different
canopies are included, one with the later, more extensive windshield framing. I
would end up using this on the Hasegawa "H" that I was building around the same
time. You may pose the landing gear and flaps up or down. Ventral turret
likewise. Crew hatches and bomb bay doors open or shut. Control surfaces except
the ailerons can
 be posed
deflected. All this is very clearly outlined, Choose Your Own Adventure-style,
in the instructions. Though not used in this release nor mentioned in the
instructions, sets of parts to cover the single-exhaust smooth cowl version are
included in the sprues along with that more common ‘bumped’ cowl.
be posed
deflected. All this is very clearly outlined, Choose Your Own Adventure-style,
in the instructions. Though not used in this release nor mentioned in the
instructions, sets of parts to cover the single-exhaust smooth cowl version are
included in the sprues along with that more common ‘bumped’ cowl.
An excellent set of decals cover two aircraft with this later cowl, one commemorative example that returned to the USA from North Africa for a tour during the war, and another that stayed home and hunted submarines from the east coast. These are documented in color on a separate sheet, with stenciling placement provided as a guide on another, separate sheet.
Panel lines are a tad heavy for my tastes, but end up looking fine under a few coats of paint.
In a sinister touch, there's a coded hologram sticker advertising the kit to be a licensed property of the Boeing corporation. While this is an old discussion, it's hard not to imagine all that corporate energy spent chasing down a dubious line of passive income that could be better used with creative thinking for a better current line of product.
| CONSTRUCTION |
Back to the fun stuff. New Airfix's instructions have quickly become an entity of themselves for their clarity and usefulness, but in this case it pays to do things a little out of order here and there. Specifically, watch out for three things:
1) The
clear fuselage side panels. These are done presumably to accommodate different
window configurations at the waist. If you are not careful they will end up on a
different plane than the surrounding fuselage surface. I therefore skipped ahead
to Steps 29 and 30, attaching the clear side panels, checking them carefully in
the light to make sure they were flush with the surrounding
 fuselage.
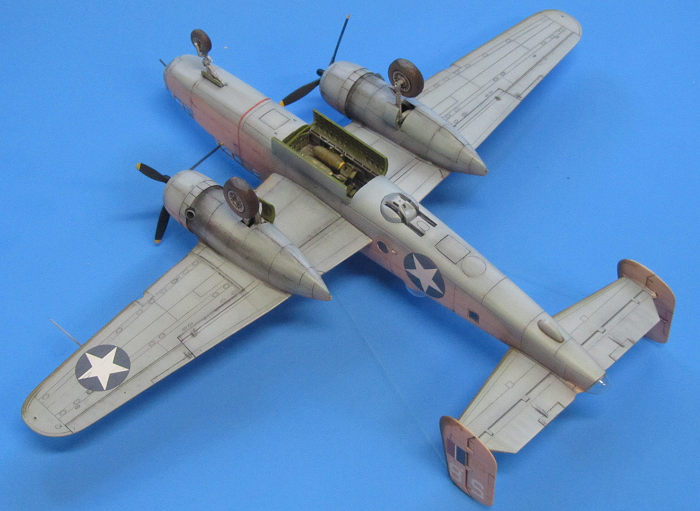
The open bomb bay doors/sidewalls were attached while I was at it. With the
fuselage sides lying flat on the bench, gravity worked in my favor to keep them
in place as they were set aside to cure overnight. I then went back to the
beginning and built up the cockpit, bomb bay bulkheads, and bombs. For the sake
of this review, I dry-tested the closed bomb bay part (A3) before this. It fits
fine.
fuselage.
The open bomb bay doors/sidewalls were attached while I was at it. With the
fuselage sides lying flat on the bench, gravity worked in my favor to keep them
in place as they were set aside to cure overnight. I then went back to the
beginning and built up the cockpit, bomb bay bulkheads, and bombs. For the sake
of this review, I dry-tested the closed bomb bay part (A3) before this. It fits
fine.
2) Nose weight. The instructions advise you to put 25 grams in the nose wheel well, but don't mention the little factoid that this much weight won't fit there! ...unless you happen to have some excess gold bullion or other such superdense element lying around. Therefore, take the time to fit ballast everywhere up front you can at this stage: this model needs it! I didn't get the model (temporarily taped together) to sit on all three until I had 1) filled the nose wheel bay and 2) the little void ahead of the instrument panel full of Size 9 Black Diamond lead shot and saturated it with cyanoacrylate glue, then 3) folded up half a piece of lead wine foil tightly and glued it out of sight to the ceiling of the bombardier's crawlway. Scale Aircraft Conversions offers their landing gear for this kit with the cockpit floor, instrument panel, and associated bulkheads also reproduced in white metal to provide this mass forward. It may well be worth 13 beans to acquire and use these.
A few more thoughts on the fuselage:
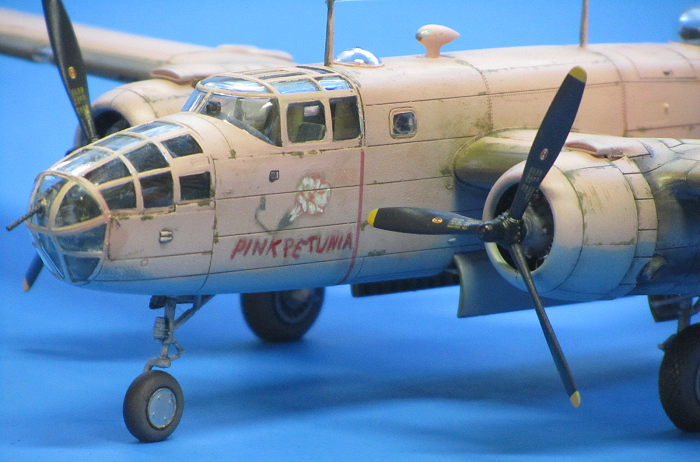
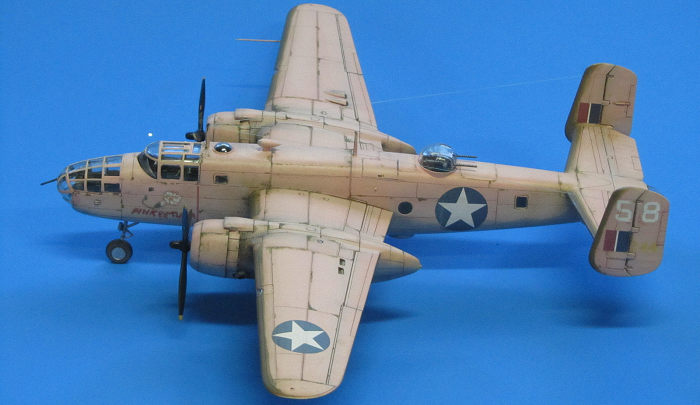
With the fuselage still in two halves, I decided to develop my skills a bit by hand-painting the nose art. Having selected "Pink Petunia" of the 83rd BS/12th BG, I gathered the main markings from the decal dungeon and then went to work on the nose art itself. This is much easier if you do so before wings and engines get in the way, and even more ideal if it's done on one fuselage half sitting flat and stable on your workbench! I started by spraying a patch of Desert Pink from some lightened Testor's square-bottle Flat Light Tan, allowed this to cure for a week, then painted on the nose art itself with a Winsor and Newton #0000 brush. The image was then masked off with tiny bits of Tamiya tape. Some imperfectly matched touchups were left for later fix when general painting occurred.
Before closing the fuselage, a few other items are worthy of note. The first is that the instructions have you painting the entire interior Green Zinc Chromate from nose to tail. Check your references here. To supplement the base color, I went back with a heavy dry-brush of Testor's Silver for the bomb bay, producing a nicely shaded and tarnished effect of unpainted aluminum, and bits of a darker, bluer green to represent the 'Bronze Green' of the forward crew areas.
 Second,
Airfix omitted the upper, manned part of the retractable Bendix ventral turret.
Most modelers will probably ignore this, but I found that it bothered me that
there was an empty void visible through the waist windows, so I put together a
top end. Nothing too intense; just a simplified representation from bits of
sprue and styrene of the chest support, rotation, and sighting mechanisms from
manual photos available online which would look good enough silhouetted inside.
I later painted this a dark gray, and it fills the space nicely.
Second,
Airfix omitted the upper, manned part of the retractable Bendix ventral turret.
Most modelers will probably ignore this, but I found that it bothered me that
there was an empty void visible through the waist windows, so I put together a
top end. Nothing too intense; just a simplified representation from bits of
sprue and styrene of the chest support, rotation, and sighting mechanisms from
manual photos available online which would look good enough silhouetted inside.
I later painted this a dark gray, and it fills the space nicely.
After closing the fuselage, I found that it needed a little filler around its entire perimeter: some of this may be user error. Finally, the dorsal turret's "cuff" is missing, though the fix is easy: after the fuselage was closed, sanded, and rescribed, I cut a 1/4" x 3" strip of Evergreen’s thinnest (.005”, I think) sheet plastic, rolled it around the interior circumference within the turret opening, cut it precisely to length, and attached it with just a wee dash of liquid cement—not too much or you'll melt the thin styrene. After a few minutes the turret was then slipped in to push the plastic tight against the turret race, and allowed to cure.
Finally, the third thing: 3) Wing assembly! The instructions have you assemble the wing panels, one at a time, on to the spars protruding from the completed fuselage. This leaves the modeller having to clean up all those seams while awkwardly working around a largely completed model. Annoyingly, the landing light covers are slightly thinner in section than the surrounding wing. This isn't an easy fix, as flexing the brittle clear plastic will probably only break it. Instead, line the parts up when you attach them so the discrepancy comes out on the underside. This done, the wings can then be threaded on to the spars and liquid cement flooded into the roots and multiple access points along their length: be careful that the spars are in the right place and the wing roots are seated correctly.
I also found it helpful to sand and shave the stabilizer's fuselage saddle down about half a millimeter to make it the stabilizer assembly sit more flush with the fuselage.
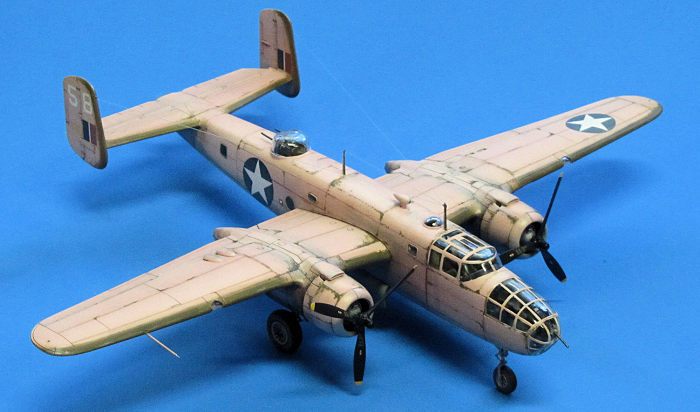
Pink Petunia was an early production airframe with the 'smooth' cowls, and the unused parts included in the kit I mentioned earlier make the conversion really easy. This required that I swap Parts E1 and E2 for C16 and C17, and E9 and E10 for C29 and C30. Also, all illustrations (I couldn't find an actual photograph) of this airframe also showed the pilot's fixed .50 absent from the nose, so I left this out and filled the now-empty bombardier's sidewall space with bits of plastic using glimpses of the Lake Murray B-25 interior snapped when the wreck was first brought to shore.
| COLORS & MARKINGS |
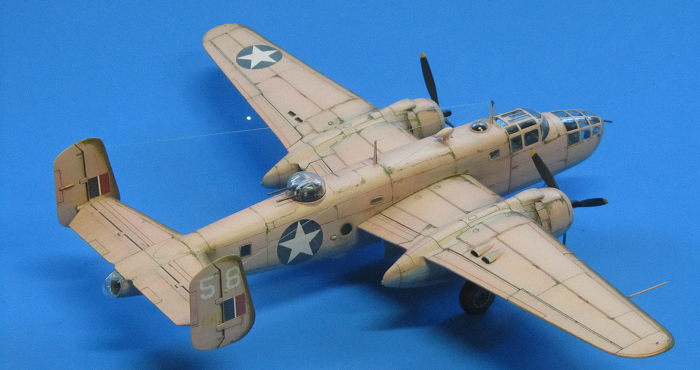
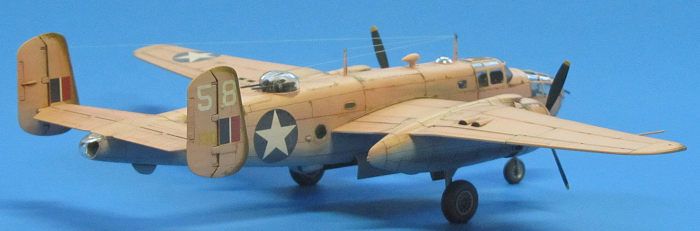 Azure
undersides and Desert Pink topside. I intentionally leaned the hue more on the
pink side for a bit of fun. A coat of Future sealed the base colors before the
variously-sourced decals went on, followed by another Future coat to protect
them. A dark gray wash followed along with weathering with Olive Drab dappled
around selected panel lines with a fine brush. Exhaust staining was depicted
with a combination of airbrush and pastel effects. I applied a 1970s modeling
technique of spraying a very, very thin layer of pure white over all upper
surfaces to ‘fade’ the various decals and base hue and make them look more
consistent.
Azure
undersides and Desert Pink topside. I intentionally leaned the hue more on the
pink side for a bit of fun. A coat of Future sealed the base colors before the
variously-sourced decals went on, followed by another Future coat to protect
them. A dark gray wash followed along with weathering with Olive Drab dappled
around selected panel lines with a fine brush. Exhaust staining was depicted
with a combination of airbrush and pastel effects. I applied a 1970s modeling
technique of spraying a very, very thin layer of pure white over all upper
surfaces to ‘fade’ the various decals and base hue and make them look more
consistent.
Propeller holes were too small for their corresponding shafts, and needed to be drilled out before gluing. Previously finished resin True Details wheels were glued in place, and masking came off both clear areas and the nose art. The dorsal turret was fitted, wire antennas depicted with EZ line, a few final dashes of paint here and there, and that was it.
| CONCLUSIONS |
 What a
great kit. The (very minor) annoyances I've warned you about cause this product
to just miss being exceptional, and I'll be building more.
What a
great kit. The (very minor) annoyances I've warned you about cause this product
to just miss being exceptional, and I'll be building more.
Start to finish across four weekends. As I work my way through a backlog of incomplete models, I needed this...boy, did I ever need this! It's great to see how Airfix has risen in the past decade from near-oblivion into one of the real contenders of the modeling world—they are poised to give Tamiya and Hasegawa a real run for their money if they keep this trend up.
I’ve come to really appreciate kits like this. The onset of COVID measures has brought massive negative impacts to available modelling time, as my household suddenly had the responsibility of educating our late elementary-age children thrust upon it—and we discovered in the process just how terribly lacking that education had been to this point (in brief: the sudden fixation with STEM subjects has left the arts, humanities, and language tossed aside...and a curriculum to produce a generation of mindless automatons could not have been better designed). The new, forced homeschool regimen is now the primary household activity dawn to dusk, and I often spend another hour or two after a twelve-hour workday helping with some cleanup items. Don't get me wrong—I’m happy to arrest and reverse the 'averagization' process that was being done to my children—but a kit which went together in the course of several weekends in the midst of all this was refreshing diversion!
| REFERENCES |
McDowell, Ernest. B-25 Mitchell in Action. Squadron-Signal Publications, TX. 1978
Kinzey, Bert. B-25 in Detail and Scale. Squadron-Signal Publications, TX. 1999
Pace, Steve. B-25 Mitchell Units of the MTO. Osprey Publishing, Oxford, UK. 2002
29 April 2022
Copyright ModelingMadness.com. All rights reserved. No reproduction in part or in whole without express permission.
If you would like your product reviewed fairly and fairly quickly, please contact the editor or see other details in the Note to Contributors.