HK Models 1/48 B-25J Mitchell
| KIT #: | 01F008 |
| PRICE: | $99.00 |
| DECALS: | Two options |
| REVIEWER: | Otis Goodin |
| NOTES: | Great kit. Foxbot stencils and pinup set. |
| HISTORY |
The B-25 Mitchell is a twin-engine medium bomber that played a significant role during World War II. Developed by North American Aviation, the aircraft was named in honor of General Billy Mitchell, a controversial pioneer of U.S. military aviation. Its versatility, durability, and impressive performance made it a favorite among Allied forces, and it completed numerous missions across various theaters of the war.
Development and Design
The development of the B-25 Mitchell began in the late 1930s, driven by the need for a more modern and capable bomber. The first prototype, designated the NA-40, took to the skies in 1939. Although it did not win the initial competition, North American Aviation continued to refine the design, resulting in the improved NA-62 model. This version caught the attention of the U.S. Army Air Corps, which placed a substantial order, officially designating it the B-25.
The B-25 featured a high-wing monoplane design with a twin-tail configuration. It was powered by two Wright R-2600 Cyclone engines, each producing up to 1,700 horsepower. The aircraft's robust construction and retractable landing gear made it well-suited for a variety of mission types, from bombing and strafing runs to reconnaissance and transport operations.
Operational History
 The B-25 Mitchell saw extensive service during
World War II, participating in numerous key operations. One of its most
famous missions was the Doolittle Raid on April 18, 1942. Led by Lieutenant
Colonel James H. Doolittle, sixteen B-25s launched from the aircraft carrier
USS Hornet in a daring raid on Tokyo and other Japanese cities. Although the
raid caused relatively minor physical damage, it had a tremendous
psychological impact, boosting Allied morale and demonstrating that Japan
was vulnerable to air attacks.
The B-25 Mitchell saw extensive service during
World War II, participating in numerous key operations. One of its most
famous missions was the Doolittle Raid on April 18, 1942. Led by Lieutenant
Colonel James H. Doolittle, sixteen B-25s launched from the aircraft carrier
USS Hornet in a daring raid on Tokyo and other Japanese cities. Although the
raid caused relatively minor physical damage, it had a tremendous
psychological impact, boosting Allied morale and demonstrating that Japan
was vulnerable to air attacks.
In the European Theater, the B-25 Mitchell was used for a variety of roles, including bombing missions, close air support, and anti-shipping strikes. It was particularly effective in the Mediterranean and North African campaigns, where its ability to operate from small, improvised airfields proved invaluable.
The B-25 also played a crucial role in the Pacific Theater, where it conducted bombing runs against Japanese installations, shipping, and troop concentrations. The aircraft's versatility allowed it to adapt to the challenging conditions of jungle warfare, making it a vital asset for Allied forces in the region.
Variants
Over the course of its production, numerous variants of the B-25 Mitchell were developed to meet specific operational needs. Some of the most notable versions include:
B-25B: The initial production model, featuring a fully glazed nose and a dorsal turret.
B-25C/D: Improved versions with upgraded engines, increased armament, and better defensive capabilities.
B-25G: A ground-attack variant equipped with a 75mm cannon in the nose, designed for anti-shipping and anti-armor missions. Based on the B-25C/D airframe
B-25H: Same as the B-25G but based on the B-25J airframe.
B-25J: The final production model, featuring a standardized nose design that could be configured for either bombing or strafing missions.
 Post-War Service and Legacy
After World War II, the B-25 Mitchell continued to serve in various air forces around the world. It was used for training, transport, and even firefighting missions. Some aircraft were modified for civilian use, including executive transport and aerial survey operations.
Today, the B-25 Mitchell remains an iconic symbol of World War II aviation. Numerous examples are preserved in museums and private collections, and several are still airworthy, participating in airshows and commemorative events. The aircraft's enduring legacy is a testament to its exceptional design and the pivotal role it played in securing Allied victory during the war.
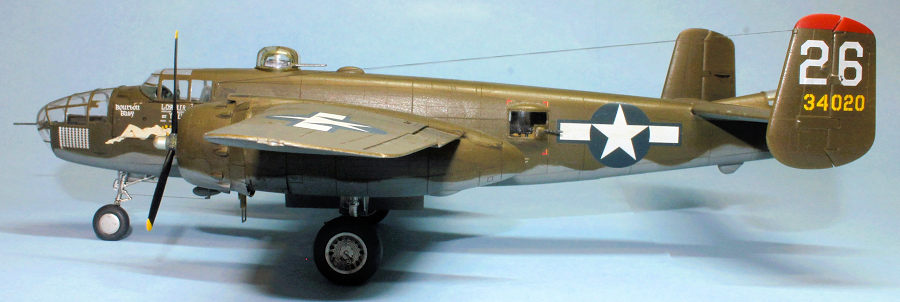
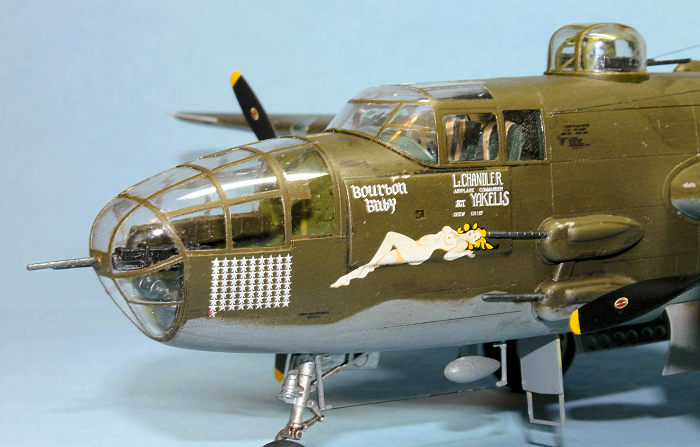
The model depicted here is a B25J that belonged to the 446th bomber squadron, 321st Bomb Group of the 12th Air Force. Nicknamed “Bourbon Baby,” the aircraft features a pinup painting on the side, a common feature of many combat aircraft of the USAAF. Despite being technically “banned,” it was tolerated (maybe even enjoyed) by commanders who saw it as a way to boost morale. While other nations displayed pinup art to a small degree, the USAAF took it to new heights.
| THE KIT |
The kit is the HK Models 1/48 scale B-25J Mitchell with glazed nose, featuring a fully windowed nose area. HK offers other versions in both 1/48 and 1/32 scales. For display purposes, I chose the 1/48 scale kit since it would fit on my shelves better. The kit features around 185 parts molded in light gray plastic on 14 sprues, plus a couple of photo-etch frets. There are decals for two versions, an olive drab, neutral gray aircraft of the 345th Bombing Group in 1945, and a bare-metal aluminum version of the 310th Bomb Group located in Italy, also in 1945. There’s an elaborate glossy printed instruction manual of 20 pages, along with a frameable print of the box cover art.
| CONSTRUCTION |
 Construction begins on the interior with the seat
and mount for the top turret gunner. From there, it moves to the cockpit,
assembling the pilot and co-pilot seats, floorboard, control columns, and
instrument panel. Once installed, the instrument panel is difficult to see
so I didn’t spend a lot of time detailing it, deciding to focus on cockpit
details that were more visible. I applied 3D seatbelts from KitsWorld, along
with yellow cushions for the seats. Once the cockpit basics were done, I
moved on to the bomb bay, assembling and attaching six bombs to fit in the
bomb bay. The bomb bay was completed by adding a top and two end pieces.
Construction begins on the interior with the seat
and mount for the top turret gunner. From there, it moves to the cockpit,
assembling the pilot and co-pilot seats, floorboard, control columns, and
instrument panel. Once installed, the instrument panel is difficult to see
so I didn’t spend a lot of time detailing it, deciding to focus on cockpit
details that were more visible. I applied 3D seatbelts from KitsWorld, along
with yellow cushions for the seats. Once the cockpit basics were done, I
moved on to the bomb bay, assembling and attaching six bombs to fit in the
bomb bay. The bomb bay was completed by adding a top and two end pieces.
The fuselage halves were detailed some by adding a radio unit and ammo boxes in various locations. The waist guns were added in the windows, and the tail gun section was assembled and added to the rear interior, although I left off all the gun barrels until later. Windows were added to the waist gun sections, and the windows were masked with the ScaleMask B-25 set. The kit provided nose weight was added just below the cockpit section, as well as the nose landing gear leg before gluing the fuselage halves together. The fuselage halves required some puttying and sanding to get a clean fit. In fact, it took me three separate attempts to eliminate all seams and gaps. I’ve read that others didn’t have such issues, so the problem is obviously with the builder.
While the fuselage was setting up, I worked on the tail section, assembling the stabilizer, two tail fins with rudders, and the flaps. Again, some putty and sanding were required, but not too bad. Mr. Surfacer 500 took care of a lot of it. I attached the completed tail section to the fuselage and topped it off with the window unit for the rear gunner, as well as adding the rear canvas cover for the rear guns.
The front canopy piece was added over the cockpit, and the top gun turret assembly was attached to the mount behind the cockpit area. The clear turret canopy was added after masking. The side gun pods were attached on each side of the fuselage, but the gun barrels left off until later.
The engines were a simple assembly, then they were added to the engine cowlings. I left the propellers off until later. I then turned to the wings.
 The top and bottom halves of each wing were
assembled, then a wing light and air vents added to each wing. Various flaps
were added as indicated, along with the engine nacelles. Assuming you want
the landing gear down, glue the landing gear struts to the bottom of the
wing before gluing the engine nacelle in place. When attaching the nacelle,
you will place it over the landing gear strut, then turn it to get the strut
fitted through the nacelle, then turn the nacelle back into place and glue
it beneath the wing. The instructions are quite clear on this so it’s hard
to mess up. Some other strut arms are added, as well as a hatch in the open
position for the extended strut. The wing light lens fit well, although I
apparently missed a spot when attaching one of mine as it ended up getting a
bit of primer on the inside of the lens. I had to remove the lens and clean
it up, then reattach it. I applied some Tamiya polish to get a clear finish.
The top and bottom halves of each wing were
assembled, then a wing light and air vents added to each wing. Various flaps
were added as indicated, along with the engine nacelles. Assuming you want
the landing gear down, glue the landing gear struts to the bottom of the
wing before gluing the engine nacelle in place. When attaching the nacelle,
you will place it over the landing gear strut, then turn it to get the strut
fitted through the nacelle, then turn the nacelle back into place and glue
it beneath the wing. The instructions are quite clear on this so it’s hard
to mess up. Some other strut arms are added, as well as a hatch in the open
position for the extended strut. The wing light lens fit well, although I
apparently missed a spot when attaching one of mine as it ended up getting a
bit of primer on the inside of the lens. I had to remove the lens and clean
it up, then reattach it. I applied some Tamiya polish to get a clear finish.
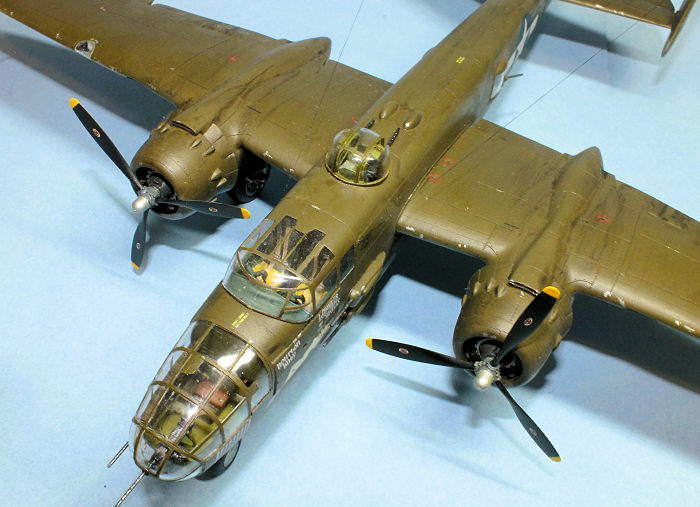
The nose section has a lot of detail in it, and most of it shows so work carefully here. Machine guns and ammo boxes take up most of the space. Again, I installed the guns but left off the barrels so I wouldn’t break them. There is a top canopy and nose canopy installed, then the assembly is attached to the front of the fuselage. Final details are added including the engine cowlings, tires, bomb bay doors, flaps on the short section of wing between the fuselage and engine nacelles, escape hatch doors, and an antenna on the bottom front section of the fuselage. I added the two propellers and the various machine gun barrels, then attached antenna wires from the rear fins to the side of the fuselage just behind the cockpit window.
| COLORS & MARKINGS |
Painting began on the interior. All paints are Vallejo Model Air unless otherwise noted. The cockpit interior was painted Dark Dull Green, Vallejo AV71124. The instrument panel was painted Night Black, as were control column handles. The gun turret mount was painted Zinc Chromate Green and the floor Aluminum. The bomb bay interior was painted Aluminum, and the bombs were painted Light Olive Drab. All was given a thin wash of Black Oil Paint to highlight the details.
The fuselage walls were painted Aluminum over a Black base. Truthfully, not much of it shows. The rear gun area was painted Zinc Chromate Yellow, Vallejo AV71107, and the canvas cover for the rear guns was painted Dark Olive Drab and highlighted with Light Olive Drab. The top turret interior was painted Zinc Chromate Green, AV71094. The engines were painted Metallic Black, then highlighted with Medium Gunship Gray. The cowling interiors were painted Aluminum but weathered heavily with a wash of Black and Burnt Umber oil paints. All wheel struts were painted Aluminum, then weathered with an oil wash.
The nose section interior was painted Zinc Chromate Green then highlighted in spots. The ammo boxes and other interior structures were painted Olive Drab. The machine guns were painted Metallic Black and lightly dry brushed with Aluminum. The seat for the bombardier was painted Leather.
 After masking, the nose windows were painted Zinc
Chromate Green, the cockpit windows Dull Dark Green, and the rear gunner
windows Zinc Chromate Yellow, all to match the interior colors of their
respective sections.
After masking, the nose windows were painted Zinc
Chromate Green, the cockpit windows Dull Dark Green, and the rear gunner
windows Zinc Chromate Yellow, all to match the interior colors of their
respective sections.
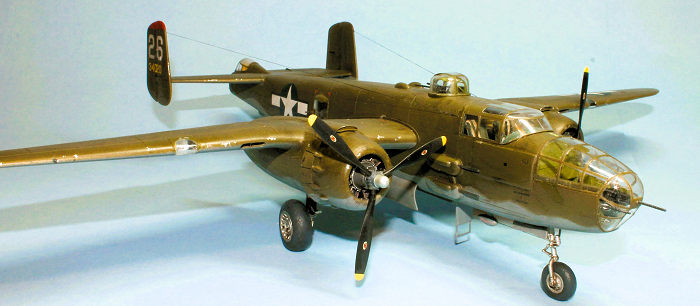
Overall, the aircraft was painted Neutral Gray, AV 71051, on the bottom and sides. Once dry, this area was masked off with Tamiya tape but applied to leave a soft edge between the top and bottom colors. The top portion of the aircraft was painted in Dark Olive Drab, AV 71316, then spottily sprayed in various shades of Olive Drab to represent some fading of the finish.
The wheel struts and hubs were all painted Aluminum then given an oil wash to highlight the detail. The tires were painted Dark Gray, then drybrushed a lighter Gray for wear. The propellers were painted Night Black, with Medium Gray for the hubs, and Tamiya Yellow for the tips. The tips of the rudders were painted with Model Master Red.
Before applying the decals, I applied several coats of Future to give an overall glossy finish. I used kit decals for the insignias, and Foxbot set 48-012 for the stencils. For “Bourbon Baby” I used the Foxbot pinup set 48-043.
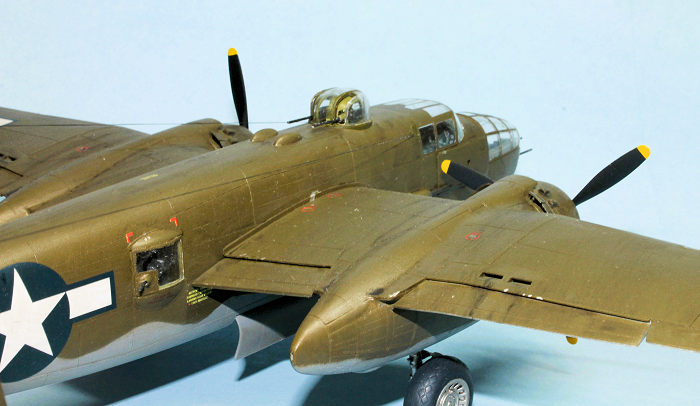
I then applied some thinned Black and Burnt Umber for oil stains in various spots, especially around the engines and tops of the wings. Once dry, I applied a few coats of Polly S Satin finish to eliminate the gloss. Once dry, I then carefully removed the numerous window masks. After some further cleanup, I added the various gun barrels and my B25 was finally finished.
| CONCLUSIONS |
I haven’t built a B25 in several decades, but based on my experience I can highly recommend this HK kit. The parts are clean and fit well, and the detail is certainly sufficient for a complete model. You could add more, but I’m not sure it would really improve the overall result.
| REFERENCES |
HK Kit instructions
Wikipedia “The B-25”
The Digital Collections of the National WWII Museum
5 May 2025
Copyright ModelingMadness.com. All rights
reserved. No reproduction in part or in whole without express permission from
the editor.
Review kit courtesy of my wallet If you would like your product reviewed fairly and fairly quickly, please contact the editor
or see other details in the
Note to
Contributors. Back to the Main Page
Back to the Review
Index Page
Back to the Previews Index Page