Minicraft 1/72 B-24D – Ploesti Raiders
| KIT #: | 11658 |
| PRICE: | $25.00 'used' |
| DECALS: | Three options |
| REVIEWER: | Dave Cummings |
| NOTES: | . |
| HISTORY |
As America geared up for the coming war, Consolidated Aircraft was approached by the Air Corps to build B-17s. Instead, they claimed they could build a better bomber with newer technology and were given the go ahead to do so. The biggest technology edge they incorporated into the new design was a new airfoil, the Davis wing, which was optimal for the performance envelope of a heavy bomber. The new bomber could carry a heavier load, faster, and farther than its Boeing counterpart. Priority was given for production and the new B-24 was produced in larger numbers than any other U.S. warplane. As a weapon of war, it outperformed its rivals in most respects. As an airplane, pilots preferred the B-17 which had better handling qualities as well as its legendary ruggedness. They say that if an airplane looks right, it will fly right, and the B-24 was butt ugly.
Ploesti: This great Romanian oil center was home
to 10 major refineries and produced 60% of Germany’s crude oil. In planning its
air campaign, the Army Air Force considered it Europe’s main strategic target.
Planning began a month after Pearl Harbor for taking it out, code name Operation
Soapsuds. The great distance from English bases over enemy held territory
forestalled any chance of conducting an attack early in the war. The eventual
success of Operation Torch in gaining a foothold in North Africa now made
prosecuting the attack feasible, though risky. Bases in Africa were still near
the range limits of the B-24 and much too far for fighter escort. However, much
of this distance w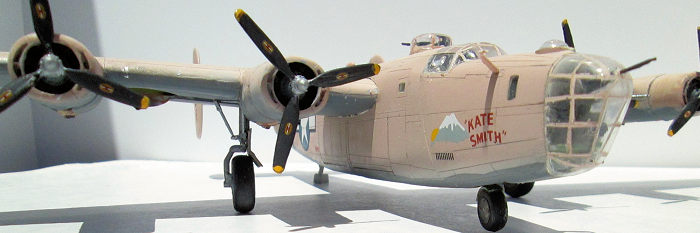 as over open water, not German AA and fighter bases. High
command determined it worth the risk. Operation Tidal Wave was a very complex
plan that called for the five bomber groups to fly separate routes and converge
on the target from different directions at precise times to disperse and confuse
enemy defenses. The mission would be flown at low level to avoid radar detection
and give the bombers less exposure time over the target. It all looked good on
paper, as most overly complex operation orders do, but in reality introduces too
many variables for things to go wrong.
as over open water, not German AA and fighter bases. High
command determined it worth the risk. Operation Tidal Wave was a very complex
plan that called for the five bomber groups to fly separate routes and converge
on the target from different directions at precise times to disperse and confuse
enemy defenses. The mission would be flown at low level to avoid radar detection
and give the bombers less exposure time over the target. It all looked good on
paper, as most overly complex operation orders do, but in reality introduces too
many variables for things to go wrong.
At dawn on August 1, 1943, 177 B-24s took off from bases in Bengasi. The separated groups traveled different routes, with differing environmental conditions. Navigation was difficult with most of it over open ocean and at low level Navigators did not get the high altitude look down to compare the terrain with the map. Some of the groups were detected. The result was that the planned simultaneous coordinated attack did not happen. The first group came out relatively unscathed. But following groups arrived much later, one at a time, allowing the alerted defenses to concentrate on each in turn.
The groups courageously bored in at treetop height through intense AA fire, fighters, balloon cables, and dodging high chimney stacks. Losses were staggering. 54 of the 177 planes were lost along with 532 airmen. Nearly one of every three. Results were indecisive. 40% of refining capacity was damaged. But due to losses there would be no follow up raids for some time. This allowed the damage to be repaired and production resume. Following the invasion of Italy distances were shortened enough to allow fighter escort and the Allied bombing campaign would eventually decimate the refineries and strangle German fuel production. But that first raid lives on as a testament to the bravery and sacrifice of our fighting men in the struggle for freedom.
| THE KIT |
The Minicraft / Academy kits are now a bit of
an oldie, circa 1990s. They have earned a good reputation for engineering,
general accuracy, adequate detail, good quality, an extensive line of aircraft
types, and value. Much of the value part is due to producing kits that are
modular in concept. A basic airframe is produced, then a sprue added with the
parts needed to make the various sub-types of that aircraft. Their B-24D
consists of 112 parts on six sprues of light gray plastic and one clear. It
appears dimensionally accurate and offers decent surface detail with recessed
panel lines. Interior is adequate for the scale though many will find it a bit
sparse. Engines are simple faces on a back plate but work well since they are
closely cowled. Clear parts are Ok with some distortion. Rare for 1/72 kits the
machineguns are right and not oversized as is common in this scale. However,
there is an issue with guns I will cover later. The bomb bay can be open or
closed and two sets of doors are included for this along with bay details and a
full bomb load. The waist gun positions can be open or closed with parts for
each option. I like the
 wing attachment concept of being inserted into deep
wells in the fuselage eliminating that gap. This facilitates painting wings and
fuselage separately and assembling later which should ease that process. Now
there were some issues with my kit. I don’t know if they are peculiar to my kit
or endemic to the lot. Some are fit issues I will cover later and a couple
molding issues. The tail turret consists of two clear parts and two gun barrels.
On mine the point where the barrels attach were mismatched so that one barrel
stuck out farther than the other. One fix is to cut one barrel to be shorter.
Easiest but not an accurate depiction. Or build up the attachment point which is
what I did.
wing attachment concept of being inserted into deep
wells in the fuselage eliminating that gap. This facilitates painting wings and
fuselage separately and assembling later which should ease that process. Now
there were some issues with my kit. I don’t know if they are peculiar to my kit
or endemic to the lot. Some are fit issues I will cover later and a couple
molding issues. The tail turret consists of two clear parts and two gun barrels.
On mine the point where the barrels attach were mismatched so that one barrel
stuck out farther than the other. One fix is to cut one barrel to be shorter.
Easiest but not an accurate depiction. Or build up the attachment point which is
what I did.
Decals are by Cartograph and are the star of the show. There are three options all participants in the August Ploesti raid:
B-24D “Suzie Q” 67th BS 44th BG in OD over Neutral Gray.
B-24D “Timba-a-ah” 506th BS 44th BG in OD over Neutral Gray.
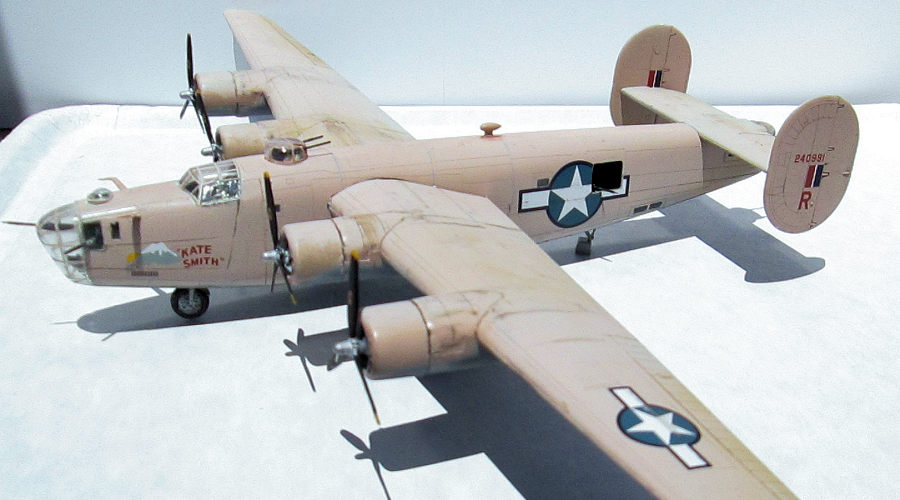
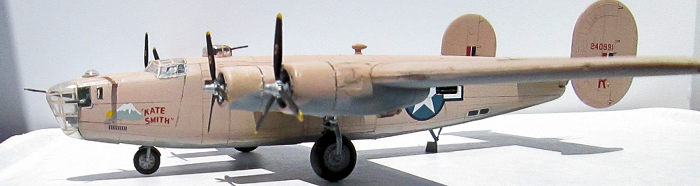
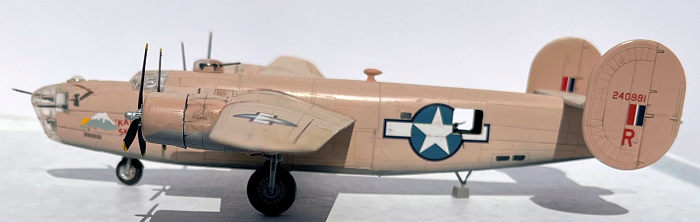
B-24D “Kate Smith” 343rd BS 98th BG in US Sand over Neutral Gray.
Cartograph is well known for quality and this sheet doesn’t disappoint. It includes the appropriate sun-faded national insignia for each option, seat belts, instrument panel, and prop logos.
Instructions are a 6-page booklet. A bit vague in a couple places but they will get you there. There are color call outs for detail parts and b&w three view painting and decal guides for each option.
| CONSTRUCTION |
The first thing you will confront is that which enabled you to purchase this kit at a reasonable price, that modularity thing. The fuselage is in four parts. The main part ending at the cockpit area, and separate forward fuselage parts specific to the D model. These are cemented in place to form the fuselage halves. Fit is decent and they attach along a panel line, but mine did need a little filler in places. Care must be taken to ensure the halves will mate together properly when set.
Next the innards were assembled and painted Model
Master Green Zinc Chromate 1734 per the instructions. I know this is subject to
debate. But the clear parts are not the greatest and have extensive framing you
ain’t going to see a whole lot of it so I did minimal detailing. I did add a
seat behind the co-pilot and yellow oxygen bottles behind the pilot seat. But
you can’t see them. I also added a Navigator’s table and seat and an oxygen
bottle to the nose compartment from the big box of junk. I painted the plywood
floors for the bombardier’s station and the waist gun positions wood tan. I
didn’t bother with the bomb racks as I would be doing the doors closed option.
The little side windows are attached from the inside. They are small windows
suitable for filling with clear parts glue later. This avoids having to mask
these for painting. Step 5 has you glue the nose wheel strut to that bulkhead at
this point. But you can put it in later no problem avoiding another masking
chore. The upper turret ring is trapped between the fuselage halves, but you
don’t have to cement the clear part on yet if you don’t want to. The rest of the
innards were glued in place and w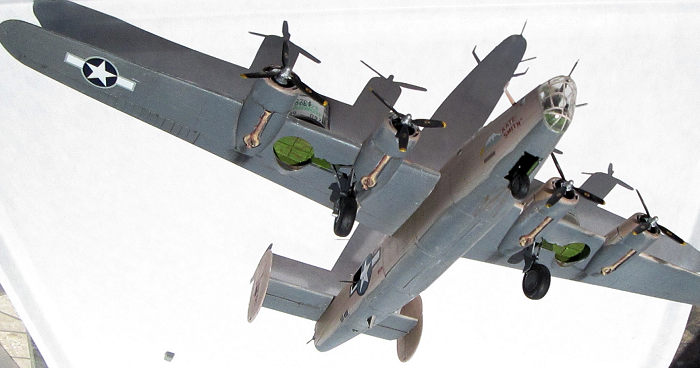 hen set the fuselage halves were mated and
wrapped with rubber bands to set. Fit was good and required minimal seam
scraping. Some filler was needed where those nose pieces joined together. Next
is assemble the bomb bay doors. Make sure you use the right ones. Fit was a
little off needing a bit of filing and sanding. Then underside fairing, a hatch,
and tail skid.
hen set the fuselage halves were mated and
wrapped with rubber bands to set. Fit was good and required minimal seam
scraping. Some filler was needed where those nose pieces joined together. Next
is assemble the bomb bay doors. Make sure you use the right ones. Fit was a
little off needing a bit of filing and sanding. Then underside fairing, a hatch,
and tail skid.
The wing and tail plane halves were put together with no issues and no filler required. The engines were painted up and cemented to their cowls. The instructions have you assemble the props at this point and secure them with caps glued to the shaft ends so they will turn. This is not conducive to painting so I opted to stick the props on later and hope one doesn’t fall off. The cowls were then assembled to the wing. It was at this point I decided to paint these sub-assemblies. This means also preparing the clear parts for painting by masking the quite extensive frameworks. I used 6mm Tamiya Masking Tape for this and cut out the frameworks with a surgical blade.
Next was to tackle that tail turret glitch. This is the early Consolidated turret and the mis-matched barrel mount mentioned previously is actually the gun receiver. Guns were mounted outside the turret on these. I fished a .50 out of the box of junk and cut off part of that receiver and glued in place. Then drilled a hole to take the barrel. I added a seat inside just because, then glued the halves together.
| COLORS AND MARKINGS |
Painting and Decals – All openings were stuffed
with moistened tissue. I started by pre-shading some of the panel lines with
flat black. I chose to do “Kate Smith” as it was the only desert pink scheme and
thought it would jazz up my line of OD over gray bombers. I used Vallejo AV
Model Color acrylics because they are good paints, and more and more, seem to be
the only ones available at local hobby stores here. The undersides were spayed
AV Neutral Gray. Uppers were sprayed Model Color US Desert Sand to which I added
some red a few drops at a time until it got that slight pinkish tone this paint
scheme is known to have faded to. The red darkened the paint
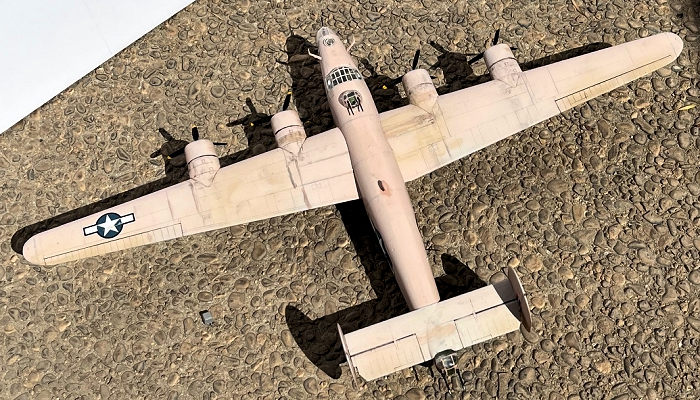 so I lightened it
up with a couple squirts of Model Color Ivory until I was happy with it. I
sprayed the masked clear parts first. The concoction was then thinned at 4 parts
paint 1 part thinner. A 3X5 card was held along the demarcation line to mask as
I painted. I applied light coats, building up until I was happy with the
coverage. When dry I sprayed a highly thinned straight Desert Sand under the
wings and shadow areas where I surmised paint fade would be less. Also, on a
couple panel lines and the ailerons for some contrast. Subtle was the word. Next
was clear coating with Testor’s rattle can Glosscoat to seal the paint and ready
for decaling.
so I lightened it
up with a couple squirts of Model Color Ivory until I was happy with it. I
sprayed the masked clear parts first. The concoction was then thinned at 4 parts
paint 1 part thinner. A 3X5 card was held along the demarcation line to mask as
I painted. I applied light coats, building up until I was happy with the
coverage. When dry I sprayed a highly thinned straight Desert Sand under the
wings and shadow areas where I surmised paint fade would be less. Also, on a
couple panel lines and the ailerons for some contrast. Subtle was the word. Next
was clear coating with Testor’s rattle can Glosscoat to seal the paint and ready
for decaling.
The Cartograph decals were easy to work with. Microscale Micro-Sol was slathered on to settle them into panel lines and the decals reacted well to this. Decaling complete I applied a black acrylic wash to all panel lines. When dry I wiped it down and finished with a coat of AV Matt Varnish.
| FINAL BITS |
Final Assembly – After allowing the paint to cure overnight it was time to slap everything together. The clear parts were attached with Microscale Micro Krystal Klear which also served to fill any gaps. The cockpit canopy is somewhat fiddly to assemble. It is 3 pieces with separate side windows. That and the fit of the forward fuselage sections introduces a lot of variables. But it worked out by filling several small gaps with Krystal Klear. I then made all the small windows with the Krystal Klear (great stuff). You dip a toothpick in the bottle to get a glob of it on the end. You then swish the glob around the window opening filling it much like one of those kids bubble blowers. The Navigators gun window was next then the nose canopy.
Now, wait a minute. The instructions show
installing 3 MGs parts 54. Two in the nose and one in the gun window. With two
more in the waist that is five flex mounted guns. But my parts 54 consisted of
two guns with the mounting shafts for the waist installation and only one flex
mount without that shaft. I did a re-look o f step 1 which is the waist gun
assembly and shows two MGs parts 61. OK, there you go. However. the parts 61 in
my kit (photo attached) consist of two .50 receivers, no barrels and no mounting
shafts. OK, look at the parts tree diagrams in the instructions. This shows two
parts 61 with barrels and mounting shafts and three parts 54 without mounting
shafts (Twilight Zone theme). I can’t explain it. Obviously the two parts 54
with shafts go to the waist. I mounted the other gun in the upper mount in the
nose canopy. You can’t use the lower mounting hole anyway as it will interfere
with the nose canopy attachment. I fished a .50 out of the big box of junk for
the gun window. So, there you go, you have been warned.
f step 1 which is the waist gun
assembly and shows two MGs parts 61. OK, there you go. However. the parts 61 in
my kit (photo attached) consist of two .50 receivers, no barrels and no mounting
shafts. OK, look at the parts tree diagrams in the instructions. This shows two
parts 61 with barrels and mounting shafts and three parts 54 without mounting
shafts (Twilight Zone theme). I can’t explain it. Obviously the two parts 54
with shafts go to the waist. I mounted the other gun in the upper mount in the
nose canopy. You can’t use the lower mounting hole anyway as it will interfere
with the nose canopy attachment. I fished a .50 out of the big box of junk for
the gun window. So, there you go, you have been warned.
Following a large Scotch, the landing gear was next. The wells were painted Zinc Chromate and the wheels and struts painted appropriately. The main wheels would not fit the struts which have a wheel drum that the wheel fits over. This drum had to be filed down and the axles cut off to get the wheels over it. The struts fit good and form a solid assembly. The issue there is the main gear doors. I wasn’t an expert on B-24 landing gear when I started, but I am now. The doors are flat, but instructions show the bottom edge lining up just outside the top of the wheel. Much research showed the bottom portion of the doors are hinged to fold outward over the wheel. There is a deeply recessed panel line on the parts that allow you bend that part of the door outward to fit. Would have been nice if the instructions would have mentioned that……ahummm. Another thing I learned from my research of the subject is that some pictures show nose wheel doors retracted into the nose and some show the doors hanging down. So, the doors are held retracted by hydraulic pressure while the bird is running and will slowly slide down as the pressure bleeds off after shutdown (ala P-51). So there, you learned something.
So now to plug the wings into those big recesses and………rats, they don’t go in, too tight. Just too tight. Tried to scrunch it in holding tightly to the fuselage until a bay door popped off. Wound up filing, sanding, and scraping the wing roots until they slid in. No fun. Then the tail plane wouldn’t fit right. It sets too high in the front forming a step. More filing and scraping until the step wasn’t so pronounced, but still there a little bit. Now to finish by plugging the props in. Rats, they fit too loose and droop so have to be glued in one at a time and held in proper position until set. Finished.
| CONCLUSIONS |
 So it isn’t Hasegawa and we know that
going in. I thought Minicraft and Academy were the same line. This is my first
kit under the Minicraft brand and the quality doesn’t seem to be quite as good
as the Academy kits I have built. Or I may of just gotten an off kit, I really
don’t know. That said, the finished model does look great, and I am satisfied
with the result. And truthfully, many of the problems I encountered may have
been self-inflicted. If I were to do it over again, I would try this new
modeling technique I heard about called Test Fitting. None of the fit issues
were really major. But I wouldn’t recommend this kit for beginners.
So it isn’t Hasegawa and we know that
going in. I thought Minicraft and Academy were the same line. This is my first
kit under the Minicraft brand and the quality doesn’t seem to be quite as good
as the Academy kits I have built. Or I may of just gotten an off kit, I really
don’t know. That said, the finished model does look great, and I am satisfied
with the result. And truthfully, many of the problems I encountered may have
been self-inflicted. If I were to do it over again, I would try this new
modeling technique I heard about called Test Fitting. None of the fit issues
were really major. But I wouldn’t recommend this kit for beginners.
| REFERENCES |
Bomber Command, Jeffrey L Ethell, Crestline, 1994 (a collection of color photos). The internet.
21 November 2022
Copyright ModelingMadness.com. All rights reserved. No reproduction in part or in whole without express permission.
If you would like your product reviewed fairly and fairly quickly, please contact the editor or see other details in the Note to Contributors.