
Academy 1/72 Fortress Mk.I
| KIT #: | 1666 |
| PRICE: | $20.00 'used' |
| DECALS: | One option |
| REVIEWER: | Christopher Campbell |
| NOTES: | Fairly easy build |
| HISTORY |
The history of the Boeing B-17 has been thoroughly documented, though usually with a focus on the E, F, & G models that were the backbone of the bomber offensive over Nazi Germany and occupied Europe. However, they were not the first of the line to see combat in that theater or that role. Those would be the Fortress Mk.I’s of the British Royal Air Force attacking Wilhelmshaven on July 8, 1941, albeit unsuccessfully.
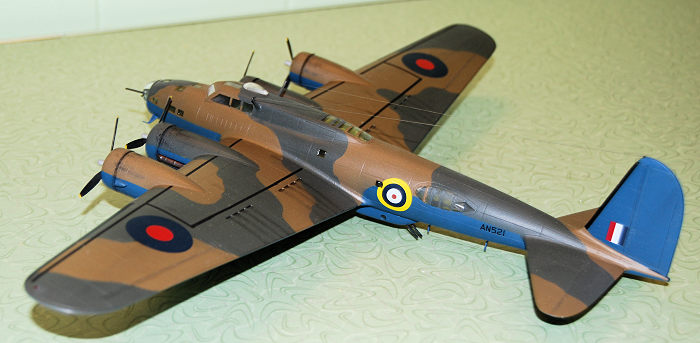
However, at this point the B-17 was far from the unstoppable aerial juggernaut that it would morph into with lessons hard learned in combat. These were what in U.S. service were known as B-17C models. Looking almost like a different aircraft, these had the earlier, narrow tail (offering less lateral stability) and were sorely lacking in defensive armament. There was no defensive tail gun or turret mounted armament. The ventral defensive position was in a gondola style mount, open to the elements and with a very limited rearward and downward arc of fire. Dorsal armament was nonexistent.
This was in part because the Flying Fortress had been intended to operate at altitudes over thirty-thousand feet. This combined with its top speed of just over 300 mph would make it difficult to intercept, at least in theory. That was the plan in 1936 as initial production commenced. However, fighter technology was advancing by leaps and bounds as the war clouds gathered. By the time the first shots of W.W.II were fired in 1939, even the fastest bombers of any nation could no longer outpace the newest generation of fighters.
This was not the only problem with the design, though. There were delays with developing and delivering the turbochargers for the Wright Cyclone R-1820 engines that would power the aircraft. This significantly slowed the pace of early production.
There were other engine troubles as well, including a tendency to leak or actually blow oil at high altitudes. This, of course, led to damaged or failed engines and occasionally fires, even.
It was a beautiful design and cutting edge for its day. Yet it was hardly the weapon of war that it would become. However, it along with marginally improved D variant as well as newly introduced and radically redesigned E models were what we had to work with when war came.
In 1940, the R.A.F. was desperate for heavy bombers. Production of the Shorts Stirling and Handley Page Halifax was just beginning. The Avro Manchester was proving a disappointment, and the Lancaster had not yet flown. The Vickers Wellington was the best bomber available in numbers, though it was truly a medium bomber rather than a heavy one.
To this end, the R.A.F. acquired twenty out of the thirty-eight B-17C’s built to bolster their forces. Designated Fortress Mk.I in R.A.F. service, they would be used in small, largely ineffective daylight raids. Sometimes these would consist of as few as three aircraft, such as in a diversionary attack against the warships Prinz Eugen and Gneisenau at anchor in the port of Brest in July of the same year.
Far from proving itself in combat, nearly half had been lost by the end of 1941. Others were down with mechanical trouble, and all on both sides of the Atlantic agreed that the aircraft was not combat ready. This lackluster experience played a key part in the R.A.F. Bomber Command’s decision to completely abandon daylight raids.
It is somewhat ironic that the vastly improved B-17E through G models would go on to prove the effectiveness of daytime operations. Without discovering and improving upon the failings of the earlier design, the quintessential Flying Fortress that all think of when they hear “B-17” would never have been.
The remaining Fortress I’s would be relegated to Coastal Command where they would be joined by later Fortress Mks, derived from B-17E-G models. These would later be augmented by Consolidated Liberators as they became available.
Interestingly, there is even a movie about these early B-17 raids. This is the highly fictionalized British film Flying Fortress From 1942. Depicting a high altitude raid against Berlin itself in Fortress Mk.I’s (Something that never happened so far as I am aware), it is anything but accurate. However, it does provide some of the only movie footage around of the early, skinny tail, B-17.
I watched this one Turner Classic Movies, I think, around 1990. I even taped it and kept it for some years. I attempted to find it on streaming while I was writing this, though could not. I may have to seek out a DVD, if one exists. While not a great or even a particularly good movie by any standards, it is fun for an aircraft, and in particular, a B-17 fan to see.
| THE KIT |
Released by Academy-Minicraft in 1988, this was the first injection molded kit of an early B-17. It was also the first of what would essentially be the entire Flying Fortress family tree from Academy. Panel detail is recessed and very well done for its day with all parts themselves well molded. It still holds up quite well today.
 The kit
includes nicely rendered engines and propellers, as well as positionable bomb
bay doors and a full payload of bombs. (More on that later) Cockpit and interior
detail are adequate, with the former being as good or better than most
comparable models of its era. Clear parts are well molded and nicely
transparent, though mine could and did benefit from a Future dunk.
The kit
includes nicely rendered engines and propellers, as well as positionable bomb
bay doors and a full payload of bombs. (More on that later) Cockpit and interior
detail are adequate, with the former being as good or better than most
comparable models of its era. Clear parts are well molded and nicely
transparent, though mine could and did benefit from a Future dunk.
Decals provided are for a rather generic, natural metal U.S.A.A.F. C model. A D model has been offered over the years, mainly differing in its decals and cowls. However, in 1991 a B variant was issued with bulbous fuselage gun blisters. I have never actually owned one of these, though would like to build it sometime.
Aside from these minor details and decals, most releases of this kit are essentially the same. They are nice, well molded kits without a plethora of parts as you might find in some more modern offerings. Yet, I suspect most modelers will find it generally sufficient. Italeri offered the most recent incarnation of this mold, released in 2011 as an R.A.F. Fortress Mk.I.
I bought this kit when it first hit the shelves, though never got around to building it and traded it off, only to do the same thing with a few more before finally building one in 2021. This is the story of that build.
| CONSTRUCTION |
I believe that I picked this kit up at the Anniston I.P.M.S. show. in 2021. As noted, I have always been intrigued by the idea of an early B-17. I still plan to build one a U.S.A.A.F. aircraft, though am now considering a 1/48 conversion when I do so. At the time, I had recently acquired Rising Decals sheet # RD 72025, Royal Fortress, featuring five different R.A.F. Fortress I schemes. I also had a burning desire to build one at last.
I started out with the interior, naturally. The instructions indicate to paint it in Chromate Green, though I opted to mix up my own interpretation Boeing Bronze Green, as the early interior paint is noted in some references. This was a concoction of Model Master Chromate Green and Testor’s Chromate Yellow, though I think mine is a shade or two too yellow. Live and learn, which we all do through every build.
I painted everything in this accordingly, including what would be the landing gear bays and cowl interiors. These latter two points may or may not have been accurate. Given that there are only two early B-17’s in the world, to my knowledge, one of which is in storage and the other a crashed landed, unrecovered hulk, good luck determining that. For me it was gut instinct, right or wrong. This I will admit was probably wrong, too a degree at least.
Interior panels and other details were painted in Tamiya Flat Black. There is no instrument panel detail, raised, recessed or otherwise. This is provided by a decal. However, since little can be seen through the windows, I found this sufficient enough.
 No real weathering was done on the interior,
as these were essentially factory fresh aircraft at the time of their deployment
with the R.A.F. With this in mind, I assembled it per the instructions, mostly.
No real weathering was done on the interior,
as these were essentially factory fresh aircraft at the time of their deployment
with the R.A.F. With this in mind, I assembled it per the instructions, mostly.
The painted bomb bay components were assembled, though I did not fit the bombs at the time. This I would learn, was a mistake. However, this was the first time that I was putting together a bomber with the bay doors open and a rack full of bombs. Most of my work to date has been on aircraft with externally mounted ordinance where the general rule is: these go on last. You can fit them later, as I did, though I now council against it.
With the cockpit and nose compartment complete along with the bomb bay ready, I fitted them to the port fuselage without any glue and closed the fuselage up for a test fit. Everything looked good, so I decided to proceed with gluing them into place.
Worth noting, I did not fit the tail wheel strut as the instructions would have you do at this point. I always presume, usually correctly, that if I fit such a part during assembly that I will inevitably break it before I am done. This would not cause any problem in the final assembly, though.
Additionally, there are a plethora of small windows in the nose compartment and some along the waist. These are provided as little square or squarish transparencies that looked as though they would be far too easy to haze with glue or simply knock out and lose to the interior rattle monster. I elected to leave these out and fill them with MircoScale Kristal Clear. This worked out well, for the most part.
The fuselage was closed up using gap filling CA glue and the joints were very clean. Once dry, sanding was accomplished with 400 grit paper followed by 0000 steel wool. Then I moved on to the wings.
This assembly went by “the book” mostly as well. However, again, as with the tail wheel, the landing gear was not attached at this point for the same reasons. Likewise, it would not prove to be a problem. The turbo chargers and exhausts were left off as well, saving them for the final assembly. If anything, I found the seams of the wings to be even cleaner and requiring even less sanding than expected, even on the engine nacelles.
However, now I began to stray father from the instructions. As with many kits, the instructions would have you install a number of delicate and/or transparent parts sooner than is practical to do so. I always relegate these parts until the final stages, if I can.
Thus, I now joined the wings to the fuselage using the same CA glue. I found the fit to be mostly good, with less sanding or filling needed than on many comparable kits. The horizontal stabilizers proved simple to glue up, fit, and sand as well. Wow! This thing was really starting to look like an early B-17.
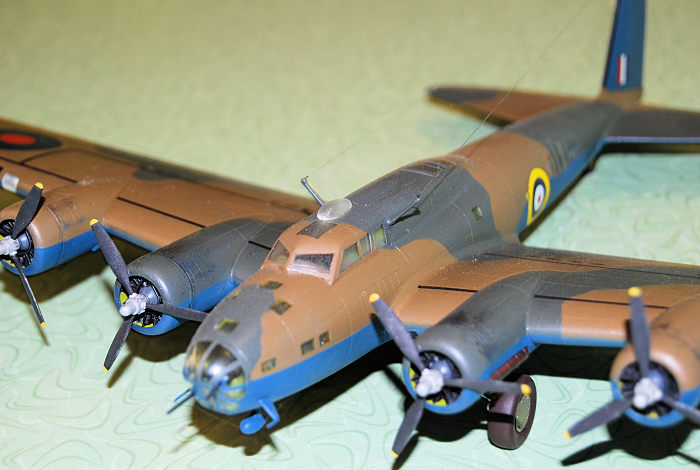 I needed to add the ventral gondola, though
there was something to address first. One thing to note on the gunner’s gondola
is that there is a small circular window on each side just over halfway down its
length. These are indicated by two scribings on the part, though they are solid.
I drilled them out with a pinvise, as this would look far better than painting
the windows on. These would later be filled with Kristal Clear.
I needed to add the ventral gondola, though
there was something to address first. One thing to note on the gunner’s gondola
is that there is a small circular window on each side just over halfway down its
length. These are indicated by two scribings on the part, though they are solid.
I drilled them out with a pinvise, as this would look far better than painting
the windows on. These would later be filled with Kristal Clear.
I now added the gunner’s gondola after having painted it on the inside with the same interior color. This was glued in place with CA glue and a little more was used as filler at the edges. Be careful here, as there is no positive attachment point. Eyeball it as carefully as you can and you should be alright, though.
Still, the joins cleaned up nicely with the same grits used for sanding. (I can only imagine the misery of laying in this thing at thirty-thousand feet with the very noticeably sub-zero wind whipping in constantly. I can think of worse things, though not many in an aircraft, aside from actual fire.)
With this complete, I added a few of the clear parts. In this case, it was the waist gunner windows along with the dorsal window and the cockpit glazing and dorsal blister. This last part is a bit tricky, being slightly offset and having no positive alignment indicated. Be careful here, as it would be easy to make a mess of things. I used G & S Hypo Watch Crystal Cement for this, as it does not fog clear parts.
I then dipped my parts in Future. They were subsequently glued in place with CA glue applied with a toothpick. Some sanding was required where the cabin glazing joined the fuselage, though this proved easier than one might expect, as the attachment points are well aft of any transparent areas.
The engines were painted in Tamiya Flat Black with the hubs in Testor’s Flat Grey. Details were then picked out by drybrushing with Testor’s Silver and Model Master Dark Anodonic Grey. This was augmented with a wash of Tamiya smoke, diluted with denatured alcohol. These were glued in place after installing the propeller shafts that had previously been painted in Testor’s Silver. Then the cowls were glued in place with CA glue, and everything went together without a hitch. Now it was time to paint.
| COLORS & MARKINGS |
Before painting, all clear parts yet installed were masked off so that their framing could be painted as well. This was done with Tamiya tape, trimmed with the good old #11 X-Acto.
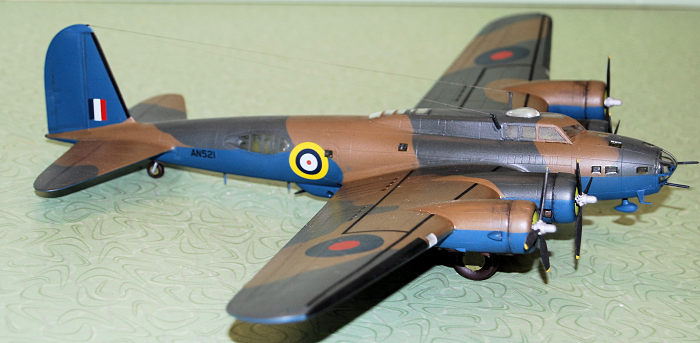
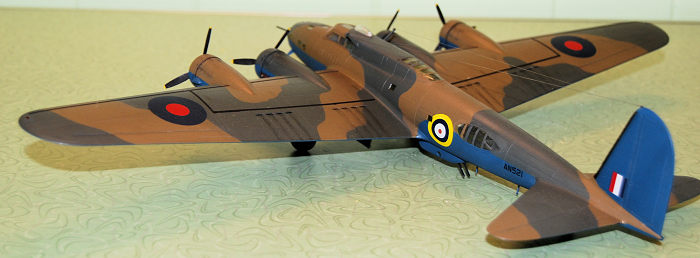
The aircraft that I had chosen to model was painted in a color called Fortress Blue or Deep Sky in its ventral areas, halfway up the fuselage, and up the length of the vertical tail. So far as I have been able to determine, this color does not exist as a modeler’s paint. More so, there even seems to be some argument as to whether or not Fortress Blue and Deep Sky are even the same color. To my knowledge, it was only used on a handful of aircraft.
One thing that I am certain of is that it was not the same as PRU Blue/Cosmic Blue as has sometimes been noted. It is distinctly darker by any credible sources. This was definitely a roll your own time, and I did.
Starting with Model Master PRU blue as a base, I added some Model Master Flat Sea Blue. Then I kept tweaking it with various blues until I was satisfied with the color after test swatches had dried. Concoctions like this usually last a few days or weeks at best before they degenerate into some useless, rubbery paint blob in the jar where they have been stored. Strangely, my Fortress Blue is just a good as the day I concocted it. However, as yet, I have never found anything else to use it on.
I first pre-shaded the panel lines with Tamiya Flat Black as well as painting the deicer boots. These were sprayed solidly. The latter were masked off with Tamiya Tape. Then all the holes in the model and the cowls were plugged with damp paper towel bits and everything was given a coat of my Fortress Blue witches’ brew. I have to say that I was quite pleased with color and tonality. To my eyes, it looked just as it should. As to whether or not this is exactly right, who really knows. I suspect that there are few, if any remaining who actually saw the color in use. That is another sad reminder that those who lived this history are increasingly no longer with us as time marches on.
Once this as dry, all of the Fortress Blue areas were masked off with a mix of Tamiya Tape and rather generic blue, low tack painter’s tape from Home Depot. Then everything was now sprayed with Model Master R.A.F. Dark Green and once again set aside to dry.
 While I was waiting on this, I painted the
propellers in Tamiya Flat Black. The hubs and spinners were then painted in
Testor’s Aluminum. This was followed by Testor’s Flat Yellow for the propeller
tips.
While I was waiting on this, I painted the
propellers in Tamiya Flat Black. The hubs and spinners were then painted in
Testor’s Aluminum. This was followed by Testor’s Flat Yellow for the propeller
tips.
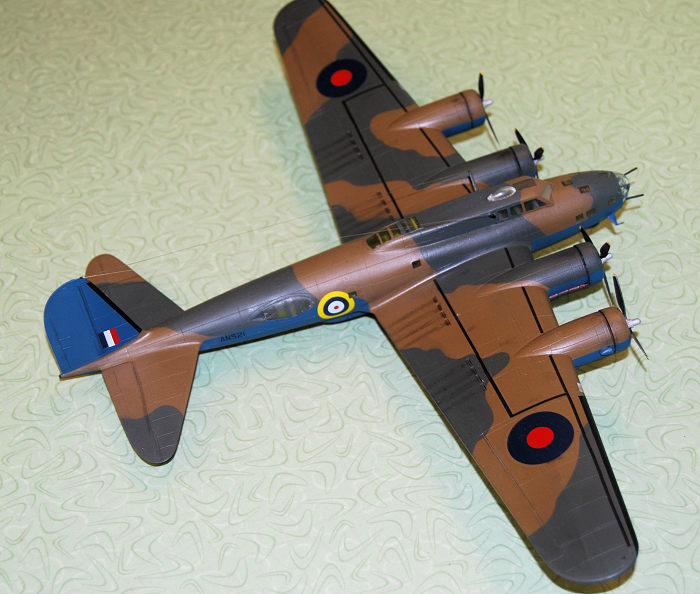
The upper surface camo pattern was now masked off with a mix of Tamiya tape and low tack painter’s tape. Then, everything was given a coat of Model Master Dark Earth. Satisfied that everything was painted as it should be, masking was removed as soon as the model could be handled in order to avoid pesky paint ridges. The exception to this was any over the clear areas which was retained to avoid fogging with clearcoat.
While it continued to dry, I worked on the wheels and landing gear. All gear components were painted in Model Master Dark Anodonic Grey with Model Master Chrome being used for the oleos.
The wheels were glued up and the seams scraped and sanded until smooth. These were then painted in Testor’s Rubber. Testor’s Rust was used for the brake drums, accented by some drybrushing with more Dark Anodonic Grey. The wheel hubs were painted in the same interior green color used throughout the aircraft, though this was mostly a guess.
The bombs themselves were assembled at this point. Then these were painted in Humbrol #80 Green that I have used on British ordinance before, as it seems to match the color that I have seen in some period color photos. The detonator pins at the tips were picked out with Testor’s Aluminum. I then turned my attention back to the landing gear.
These were glued in place using CA glue. Only the tail gear required a little trimming and tweaking to install at this point in the assembly rather than as the instructions indicated. Everything was then sprayed in Model Master Gloss and set aside while I prepared for decaling.
As previously mentioned, the decals came from Rising Decals sheet # RD 72025. This sheet features markings for one aircraft in overall natural metal. Three feature the standard Dark Earth/Dark Green upper surface camo, though each with different underside colors: Fortress Blue (the one that I chose), R.A.F. Sky, and R.A.F. Sky Blue; something akin to Duck Egg.
Lastly there is one with upper surfaces that are a mix of Dark Green & Dark Slate Grey where Dark Earth would usually be. In the “green” areas, Extra Dark Sea Grey is indicated. This is over an undersurface color of Cosmic Blue (the early/prewar name for what would become PRU blue.) I was quite torn between this one and the aircraft that I modeled, and I think that I will have to build myself another just so that I can depict this striking aircraft.
These decals went on with no difficulties at all using Solvaset. The only kit decals used were the wingwalks, which also went on with no issues. Once they had dried and cured the entire model was sprayed with Model Master Dullcote.
| FINAL CONSTRUCTION |
There are a fair number of fiddly bits to add on at the end, though none that proved very troublesome. I started with the exhausts and turbochargers. These were painted in Testor’s Rust and drybrushed with Dark Anodonic Grey. They went on without any trouble at all using a small amount of CA glue.
 I decided to
add the bombs to the bomb bay at this point and soon found that I wished I had
done so during assembly. There are indented attachment points for them, which
should make this easy if you do it when the rack is outside of the fuselage.
Attaching each one with a drop of CA glue while holding it in place with
Tweezers and then shooting it with accelerator proved a very frustrating task,
and one that I do not plan to repeat again.
I decided to
add the bombs to the bomb bay at this point and soon found that I wished I had
done so during assembly. There are indented attachment points for them, which
should make this easy if you do it when the rack is outside of the fuselage.
Attaching each one with a drop of CA glue while holding it in place with
Tweezers and then shooting it with accelerator proved a very frustrating task,
and one that I do not plan to repeat again.
Once they were finally in place, the bay doors were added in the open position. Then the RDF football was fitted along with antenna’s and pitots. Rigging was done with Fine E-Z line. The canvas boot around the tail gear was created with a bit of tissue soaked in Elmer’s School Glue. Once this had dried, it was painted in a mix of Model Master Dark Earth and Middlestone.
Masks were removed from the clear areas after which all of the smaller window openings were filled with Micro Kristal Clear using a toothpick. This worked out fairly nicely. Guns were painted in Testor’s gun metal and glued in place in the gondola and the nose glazing. This last piece was then attached with more G & S Hypo Watch Crystal Cement.
Some light weathering was added. This mainly consisted of some exhaust streaking and exhaust staining by drybrushing Tamiya Flat Black around the upper wing ports and the turbocharger vents. More was added around the engine nacelles aft of the cowls, since, as noted, these early types were known for blowing oil. Some Tamiya Clear Red and Clear Green for the running lights finished the job. Low and behold, it looked like a Fortress Mk.I!
| CONCLUSIONS |
This is a very nice kit. Fit is good throughout, and it is easier to assemble than many multi-engine aircraft or B-17’s in general, save those in the same kit family. I would recommend it to any modeler with a little experience who would like and early B-17 in their collection. My build time ran around 24-26 hours, start to finish.
I will definitely build at least one more, as I really want to build the one in that other, very striking scheme that I mentioned. I would also love to do a B-17D in the equally striking, though very different Hawaiian Air Depot scheme applied to some B-17’s used in the early stages of the Pacific Theater Campaign.
There is very little that I can fault this kit for, and I wholeheartedly endorse it. Now, if someone would only give us a mainstream kit in 1/48. I, and I suspect many other modelers would veritably lap that up.
| REFERENCES |
https://www.scalemates.com/kits/academy-minicraft-1666-b-17c-flying-fortress--203915
https://en.wikipedia.org/wiki/Boeing_B-17_Flying_Fortress
B-17 Flying Fortress in Action by David Doyle, Squadron Signal Publications # 10129, 2015
B-17 in Action by Steve Birdsall, Squadron Signal Publications Aircraft #12, 1973
B-17 in Action by Larry Davis, Squadron Signal Publications Aircraft # 63, 1984
Flying Fortress, the B-17 by Ernest R. McDowell, Squadron Signal Publication #6045, 1987
B-17 Flying Fortress at War by Roger R. Freeman, Charles Scribner’s Sons, 1977
10 February 2025
Copyright ModelingMadness.com. All rights
reserved. No reproduction in part or in whole without express permission from
the editor.
If you would like your product reviewed fairly and fairly quickly, please contact the editor
or see other details in the
Note to
Contributors. Back to the Main Page
Back to the Review
Index Page
Back to the Previews Index Page