| HISTORY |
Revell 1/48 B-17F Flying Fortress
| KIT #: | 4701 |
| PRICE: | $ |
| DECALS: | |
| REVIEWER: | Pablo Calcaterra |
| NOTES: | Carpena 48-31 decals |
| HISTORY |
I believe that the story of the Memphis Belle has been told ad nauseum so I want to focus on some aspects that I find very interesting: Her last mission (25th) took place actually 2 days after Capt. Morgan did his 25th. That is to say on May 19th 1943 (with a different crew). Morgan did not ask or designed the Petty girl but was actually published in the April 1941 issue of Esquire and then copied on the Belle. To this date the Dayton team and Memphis Belle Association don’t understand what the red stars on the bomb markings mean as they don’t match any Group or Wing lead during missions.
I have always thought about the coincidence that on the day that Morgan and crew finished their 25th mission – May 17th 1943 - the Dambusters raid took place…arguably two landmarks on the air war over Europe happened on the same day.
Crew:
Pilot: Captain Robert K. Morgan
Co-pilot: Captain James A. Verinis
Navigator: Captain Charles B. Leighton
Bombardier: Captain Vincent B. Evans
The First Engineer/Top Turret Gunner: Leviticus "Levy" Dillon
The Second Engineer/Top Turret Gunner: Eugene Adkins
The Third Engineer/Top Turret Gunner: Harold P. Loch
Radio Operator: Robert Hanson
Ball Turret Gunner: Cecil Scott
Right Waist Gunner: E. Scott Miller
Right Waist Gunner: Casmer A "Tony" Nastal
Left Waist Gunner: Clarence E. "Bill" Winchell
Tail Gunner: John P. Quinlan
Crew Chief: Joe Giambrone
 She had the tail replaced
twice, both wings, both landing gear, 9 engines…in other words…the only
original part that flew back to the US was the fuselage! This was caused by
multiple damage sustained during the missions. These were as follows (in
bold missions flown by Capt. Morgan on ships other than the Belle, in
italics missions flown by the Belle with a captain other than Morgan)
She had the tail replaced
twice, both wings, both landing gear, 9 engines…in other words…the only
original part that flew back to the US was the fuselage! This was caused by
multiple damage sustained during the missions. These were as follows (in
bold missions flown by Capt. Morgan on ships other than the Belle, in
italics missions flown by the Belle with a captain other than Morgan)
1942:
November 7: Brest. No damage
November 9: St. Nazaire. The Belle received 63 flak holes
November 17: St. Nazaire. One wing and engine 3 hit by flak, Quinlan in the tail shot down a FW190
December 6: Lille. No damage
December 20: Romilly-sur-Seine. Worst air battle to-date. Vince Evans claims a German fighter
(Out of the original 36 planes of the 91st Group only 8 were still flying by Christmas)
December 30: Lorient (Morgan did not fly this missions as he had a cold. Jim Verinis flew the Belle in what was to be his last mission with the crew. He got his own B-17 after this day)
1943:
January 3: St. Nazaire. Damage by flak again. First mission where the bombardiers flew the plane level for the bomb run instead of having the pilot moving the plane around to dodge the flak. It dramatically increased bombing accuracy and it was the brainchild of the recently arrived Curtis LeMay
January 13: Lille. No damage
January 23: Lorient. Several German fighters attacked from 12 o’clock. Trying to evade them Morgan made the plane climb. Belle hit in rudder, tail and right elevator by exploding cannon shells from the fighters. With the rudder on fire Morgan went to the radio operator’s office to assess the damage. Rudder pedals haywire and difficult to control the plane. Flak damage to tail and fuselage around co-pilot area.
January 27: Emden. Memphis Belle aborted with oil pressure issues
February 4: Emden. Crew flew on Jersey Bounce. Damage by flak. Top gunner Eugene Adkins suffered fingers frostbite; his last mission with the Belle’s crew but once he recovered went on to fly 2 tours of operations
February 14: Emden and then Hamm. Targets obscured by fog.
February 16: St. Nazaire. Right wingtip shot off, engine #4 out of action and tall and engine #2 damaged.
February 26: while the Belle was still being repaired the crew flew with William Wyler on board to Wilhemshaven on Jersey Bounce
February 27: Brest. No damage
March 6: Lorient. Slightly damaged by flak
March 12: Rouen. No damage
March 13: Abbeville. No damage
March 17: Rouen. Mission recalled midway over the Channel.
March 22: Wilhemshaven. Mission recalled
March 28: Rouen. Quinlan shot down a fighter. Pete and Repeat damaged. Quinlan injured by shrapnel (awarded Purple Heart). Tail damaged. Waist gunners almost died when oxygen system failed. Saved by Bob Hanson (radio operator) who was sent by Morgan to check on the strangely silent gunners.
March 31: Rotterdam. One engine shot by flak. Did not bomb due to weather. Belle got credit, crew did not
April 5: Antwerp. Belle in the shop, crew flew Bad Penny. Winschel got his first fighter
April 16: Lorient. No damage
April 17: Bremen. Extremely tough mission. Belle received 81 holes and had another engine shot off. Repeat (one of the 2 tail guns) out of action. Once fixed Quinlan shot down his second fighter. A fighter attacking head on would have crashed against the Belle had not it been for the urgent warning of Evans that made Morgan climb. Evans claims another fighter. Invasion II, ahead on count of missions and piloted by a childhood friend of Morgan, shot down.
May 1: St. Nazaire. Another engine shot off
May 4: Antwerp. Belle in the shop. Crew flew The Great Speckled Bird.
While the crew was in London resting the Belle flew two missions
May 13: Meaulte. Lt Col Anderson as Captain. Jim Verinis completed his 25th mission on his own Connecticut Yankee.
May 14: Kiel. Lt. Miller. No damage
May 15: Wilhemshaven. Overcast. Bombed Helgoland. No damage
May 17: Lorient. Final mission for the crew of the Belle. No damage.
May 19: Kiel. Final mission of the Memphis Belle.(flown by Lt. Anderson)
Mission 26: Bond tour around the US hitting 30 cities.
My personal connection with the Belle:
 The Memphis Belle and I go
back more than 40 years. I built my first model kit, the Pucara by Puky when
I was 8. My grandad was travelling to the US on a business trip and I asked
him to bring me a model plane. To my surprise and delight he brought me a
kit with many more parts than I had ever seen: the 1972 issue of the Revell
Memphis Belle in 1/72. Needless to say I rushed to build it, painted her in
the wrong colours, the fuselage halves were so badly glued that there was a
gap between them…Thus in 1982 and after more kits under my belt I “restored
her” by overpainting the kit with a more accurate colour using a brush
around the decals…you can image the results…
The Memphis Belle and I go
back more than 40 years. I built my first model kit, the Pucara by Puky when
I was 8. My grandad was travelling to the US on a business trip and I asked
him to bring me a model plane. To my surprise and delight he brought me a
kit with many more parts than I had ever seen: the 1972 issue of the Revell
Memphis Belle in 1/72. Needless to say I rushed to build it, painted her in
the wrong colours, the fuselage halves were so badly glued that there was a
gap between them…Thus in 1982 and after more kits under my belt I “restored
her” by overpainting the kit with a more accurate colour using a brush
around the decals…you can image the results…
Fast forward to 1995 and having moved to 1/48 scale I purchased the Belle from Revell. I followed the instructions almost to the dot but at that time I was barely mastering putty and it was poorly sanded, had no idea about gloss coat for the decals (they all silvered) with the main green being too dark, the undersides too light and the only correct thing was the dark green tone but not the shape of the “blotches’. This plane along with the rest came to Canada and suffered heavily during transportation. Because I had glued the windows over the interior paint these fell inside the fuselage. Years later I had learnt about the use of the gloss coat for the decals and therefore I purchased the Carpena set in 1/48 for the Memphis Belle thinking that one day I was going to fix the kit. It was not until 2018 that I finally started the “restoration” project and thus engaging in what we can argue was my 4th Memphis Belle.
| THE KIT |
Molded in dark green and clear there are approximately 107 parts, a set of
decals with several errors. These allow you build either the plane when it
finished the 25th mission or inaccurately the scheme when she flew the Bond
Tour (i.e. list of missions and crew on the tail are missing). Lines are
raised and interior detail is very Spartan.
| CONSTRUCTION |
First the plane was given a nice shower with water and detergent to remove the decals, all the dust and grime it had collected in more than 10 years and then I carefully proceeded to try to disassemble it. The glue over paint was so endemic that the only things I was not able to undo were the wings to fuselage and the landing gear. All the rest was easily disassembled. And with this a more accurate process to build the Belle started.
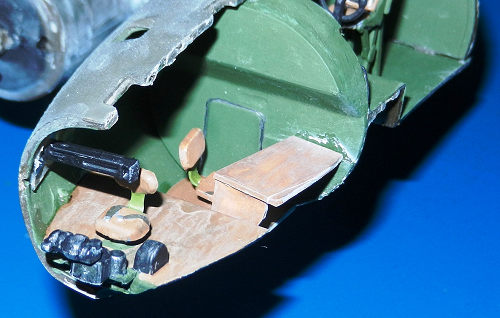
Due to the fact that I realized that there is a lot to be seen thru the fuselage waist gunners and radio operator windows I decided to scratch-build these areas. Not as super detailed as some guys have done but decently enough for my liking.
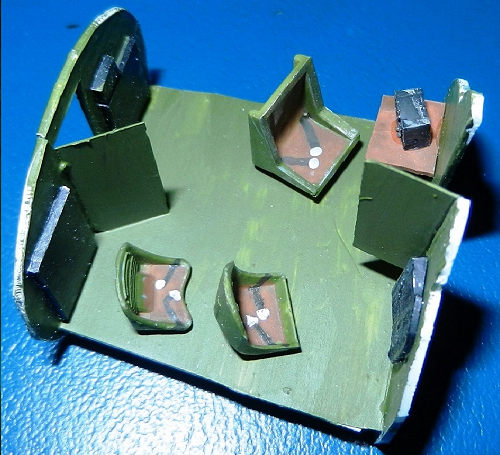 Radio operator compartment:
I made the two bulkheads by preparing a template using a flat piece of blue tack that I pressed against the internal fuselage walls where the bulkheads sit. These profiles were then transferred onto a piece of white plasticard which was then cut. Lots of trimming, sanding and shaping ensured that the two bulkheads fit in place. The doors were opened up and the floor was cut from plasticard and glued in place. Doors were made with a thinner gauge plasticard (and placed ajar), all the area was painted interior green, and seats and radios were taken from the spares box. Plasticard was also used for the different tables in the area.
Fuselage positions:
With very thin Evergreen
plasticard I made the rails for the fuselage waist gunners’ windows. These
were glued in place between the rails and painted (I had not attached them
previously and were luckily stored in the spares box!). Plasticard was used
for the main floor, painted in brown. The “steps” and supports for the
machine 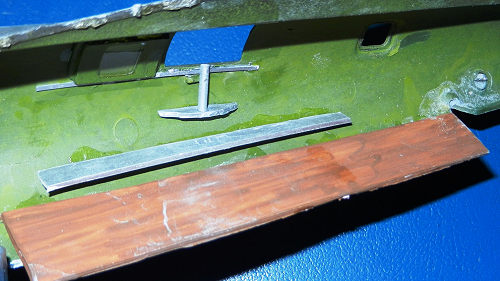 guns were cut from plasticard and painted in aluminum. The poles for
the machines guns were made with round plastic rod and glued in place after
being painted in aluminum.
guns were cut from plasticard and painted in aluminum. The poles for
the machines guns were made with round plastic rod and glued in place after
being painted in aluminum.
Navigator position:
The kit is missing the navigator table, floor and seat. These I made with different bits of plastic and then painted. I glued a square piece of white decal on the table to represent a map.
After painting, gluing the rest of the main components (pilots area, bombardier position, and multiple windows) and after a significant amount of juggling and fighting with the radio operator compartment the fuselage halves were glued firmly together.
Wings and horizontal tail
planes were sanded and puttied as originally I had not glued them properly
aligned and I had not been able to separate into top and bottom parts.
Engine cowlings flaps were thinned out with sanding paper. Top turret
 was
installed in the cockpit and with the windows in place the pilot’s roof was
glued in place. Some putty was required to get a more decent fit and close
some gaps.
was
installed in the cockpit and with the windows in place the pilot’s roof was
glued in place. Some putty was required to get a more decent fit and close
some gaps.
There are two inspection doors close to the border of attack next to the fuselage. These are slightly raised in the real thing so I did this with thin plasticard. Same goes for what I believe is a thin reinforcement strip located on the fuselage between the tail gunner back window and his machine guns. The panel line on the forward section of the vertical tail surface was made with a couple of thin strips of plastic as the kits represents these incorrectly as a pair of raised lines
Putty was used to fill the gaps I had left around the wing roots and the engines. Needless to say putty was also needed along the fuselage halves. And the windshield union to the fuselage also required a lot of putty and sanding. I put back the tail wheel after struggling a lot because the supports had been damaged during the restoration process and finally I had to secure them in place using 2 part epoxy as the normal instant glue or normal plastic glue would not hold it in place.
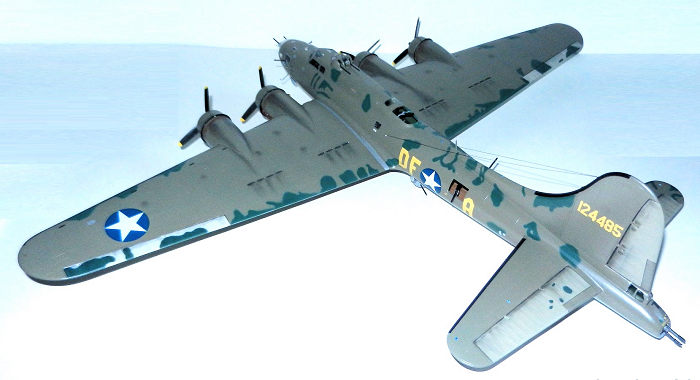
| COLORS & MARKINGS |
After so much sanding and handling a very nice wash was given to the plane to remove all the putty dust and start to check for imperfections. Several panel lines were engraved as they had been lost during construction. The unions were given a coat of white primer followed with Vallejo Aluminum including some spots (fixed battle damage?) around the cockpit, below and above the left wing and back of fuselage opposite to the crew access door that are evident in pictures and movie.
With a very little retouches
needed I moved to the main colours: ModelMaster Acryl 4757 for the
undersides, followed by 4729 MM Acryl for the dark cammo. Then this green
and the silver repairs were carefully covered with blue tac following
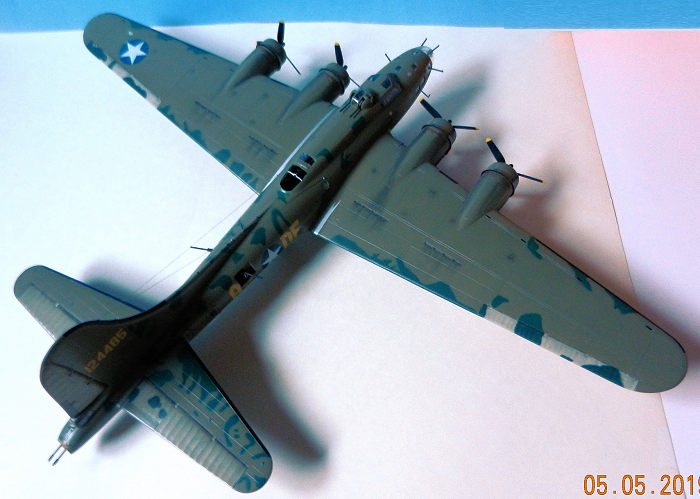 the
pattern found in numerous pictures, videos and the beautifully restored
Belle. These included some of the green paint repairs on the fuselage close
to the tail guns after the plane was hit by flak. With blue tac in place MM
Acryl 4728 with 5% of white was used to cover the entire top and fuselage
sides. A slightly lighter shade (more white added) was used for the main
vertical tailplane which was a replacement one. An even lighter version was
used for the tail moveable surfaces as the paint on the fabric wears out
faster. Using an almost 50:50 white:4728 the ailerons were painted. The
contrast or difference between the ailerons and horizontal moveable surfaces
on the tail can clearly be seen in the pictures of the Belle in flight
departing for the US.
the
pattern found in numerous pictures, videos and the beautifully restored
Belle. These included some of the green paint repairs on the fuselage close
to the tail guns after the plane was hit by flak. With blue tac in place MM
Acryl 4728 with 5% of white was used to cover the entire top and fuselage
sides. A slightly lighter shade (more white added) was used for the main
vertical tailplane which was a replacement one. An even lighter version was
used for the tail moveable surfaces as the paint on the fabric wears out
faster. Using an almost 50:50 white:4728 the ailerons were painted. The
contrast or difference between the ailerons and horizontal moveable surfaces
on the tail can clearly be seen in the pictures of the Belle in flight
departing for the US.
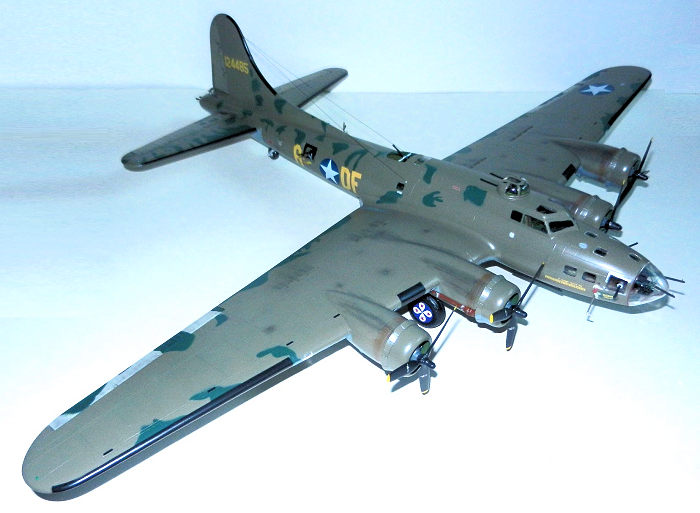
The de icing boots and front of the firewall were painted in black. Supercharger and other engine pipes were painted in rust with some touches of aluminum. The holes of the different exhausts and pipes were painted using a black pencil.
Some drybrushing was required to fix some of the cammo markings but nothing serious. With the paint ready I moved on to weathering the Belle. I used my preferred technique which consists in sanding dry pastels and applying the dust first with a very short bristle brush and then making the stains smooth using a dry Q tip swiping in the direction of the air. Lots of smoke and oil stains were applied around the engines, under the wings, the moveable surfaces and also around the fuel caps and the doors (crew access and bomb bay). Clips from the William Wyler movie show that there was a rusted color around the engines cowlings almost behind the cooling flaps. This I reproduced using a brown/red pastel. Moveable surfaces, doors and engine flaps were highlighted with a very thin black pencil.
Two or three light layers of Future sealed the pastels and the paint while creating a smooth surface for the decals.
Due to the fact that the decals were breaking up after a few seconds in the water I was forced to use Microscale Liquid Decal to keep the Carpena decals together. The only accurate ones I was able to use were the serial number for the tail (probably 1 to 2 mm too large though…), the DF-A code for the Belle and the “Memphis Belle” words along with the 25 bombs on each side of the nose. The national insignias were placed with some interesting tips: the left fuselage one is a bit rotated (not straight with the line of flight) and the one on the top of the wing is very close to the aileron which makes it not centered. The only other decals I was able to use were the swastikas for the kill and “Dinny” under the nose thought it is a bit overscaled. One of the things that really pleased me is that once in place most of the decals matched perfectly their position in relation to the cammo dark green pattern. This means that I had done a good job at shaping and positioning the blobs of blue tac.
But there were many decals from Carpena that were wrong in size, colour or shape. So with the use of pictures of the real thing, PowerPoint and white decal paper I designed and printed the following decals:
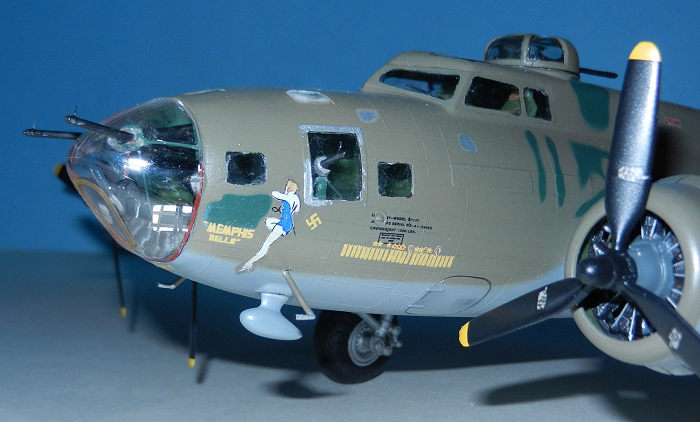 Petty girl: Carpena
representes them with a handkerchief on her head (!?), the arm holding the
phone looking like a wrestler’s and the black lines around the shoes being
too thick. I used pictures of the restored girl by the guys in Dayton. After
several tests I achieved one of the each side that I was happy with. The
telephone cords were the only thing I was able to use from Carpena. I drew
the black lines on the spine and legs using Powerpoint.
Petty girl: Carpena
representes them with a handkerchief on her head (!?), the arm holding the
phone looking like a wrestler’s and the black lines around the shoes being
too thick. I used pictures of the restored girl by the guys in Dayton. After
several tests I achieved one of the each side that I was happy with. The
telephone cords were the only thing I was able to use from Carpena. I drew
the black lines on the spine and legs using Powerpoint.
Pete and Repeat are missing. I typed the text and printed it on a green background. These fonts are clearly not as bright as the swastikas representing the 2 kills by Quinlan. Pictures show this. “Sally” was not Sally during the war but an odd swirly shape that probably represented the hand signs that denoted a kill. You can see in the movie how Tony Nastal makes this hand sign upon returning from their 25th mission. Virginia is too large in the Carpena set and the fonts and not exactly right. I made this word using a picture from the restored plane. Some of the red stars over the bombs were too small or lacking red so I made these stars with Powerpoint and applied them on top of the corresponding bombs. “Irene” under both radio operator windows are painted in white and are very small compared to the incorrect large yellow fonts done by Carpena
Propeller blade stencils: Were also taken from pics of the actual plane. Notice that there were none on Engine #1. The clovers on the wheels have a blue blackground (Revell and Carpena have these in red but this is wrong). I made these backgrounds with the printer and while decal paper. The edge of clover leafs were printed as a very light grey line on white decal paper with the red stars in position. I then cut along the lines and placed on top of the blue wheel covers. “Life raft” in red fonts and a green background
The 4 lights signals used only by the 91st group and the round white tail light were made by printing a picture of them to scale on white paper. The last stencil I made was the one for the fire extinguisher close the crew access door. From the spares box I cut some black strips and put them on the wings close to the border of attack.
Needless to say it took a lot of tests and failures till I got the correct colours and size. Especially difficult was to achieve a matching green colour for the background of the decals. I wasted lots of ink and decal paper…but the results are quite good.
There are 2 black information plates on the front of the engines. These I made with pieces of black decal cut to shape. The engines faces were attached to the cowlings and then the propellers were added. The finished engines were then glued to the wings.
Decals were sealed with a couple of very thin layers of MM Acryl Semi Gloss clear varnish.
| FINAL CONSTRUCTION |
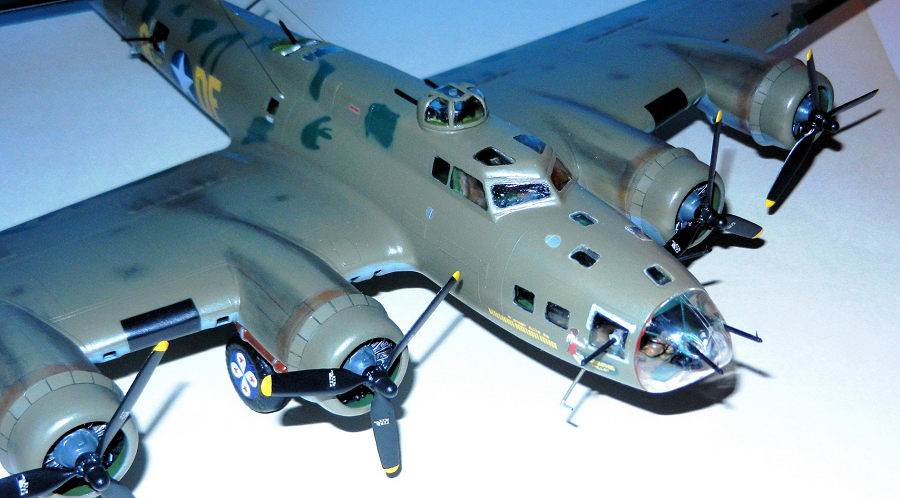
The complexity of the project did not end after all the hard work on the decals. There were lots of details to be added to the quite simple Revell kit. By now and after looking at pictures during the building process I realized I had forgotten to add the supports for the machine guns on the nose of the fuselage. For these I took a couple of pieces of thin wire cut to shape, glued them at almost 45 degrees to a central rectangular piece of plastic (from the spares) and painted in interior green. With a lot of juggling and patience (and several failed attempts) I was able to glue them in each window (the rectangular one being the main support under each machine gun). The rotating balls thru which the machine guns come thru were painted in aluminum.
 The ball turret in the Belle
had a “cushion” made of sheepskin. I represented this by painting a brown
rectangle on the access door. I glued a square piece of plastic to represent
the gunsight in between the twin .5 machine guns. I placed the back of the
turret inside the fuselage around the shafts and then, while pushing it up
with care (using a tweezer covered in tissue paper) I glued against it the
front of the turret sporting the machine guns. No mistake was made and the
turret rotates freely like in the real thing.
The ball turret in the Belle
had a “cushion” made of sheepskin. I represented this by painting a brown
rectangle on the access door. I glued a square piece of plastic to represent
the gunsight in between the twin .5 machine guns. I placed the back of the
turret inside the fuselage around the shafts and then, while pushing it up
with care (using a tweezer covered in tissue paper) I glued against it the
front of the turret sporting the machine guns. No mistake was made and the
turret rotates freely like in the real thing.
The kit is missing all the little (navigation?) lights on top of the horizontal tail surfaces and the tail spine. To make these I took a navigation light from the spares and imprinted it on blue tack multiple times to make more than enough copies. These depressions were filled with 2 part epoxy. Once cured I removed them from the Blue tac, attached them to the sticky side of Tamiya masking tape to hold them in place and first painted them in aluminum followed by a coat of a mix of Dark blue and Future to make the blue translucent. Once they were dry I glued them in place (note there is one that is clear so I left it in aluminum). The kit is missing also one of the navigation lights placed under the wing (green) so I took one of these self made lights and glued it in place. All navigation lights on the wings were painted the proper colour on top of a coat of aluminum using ModelMaster Acryl Clear red and Clear green. With a couple of blobs of plastic painted in aluminum I represented the main landing lights. Their covers were then glued in place. The British navigational aid under the nose came from the spares, painted in black after some minor modifications.
Machine guns that received PE gunsights were the ones for the radio operator, the 2 on the nose blister, the 2 waist ones and the scratchbuilt tail gunner gunsight. An extra piece of plastic rod cut in an angle was needed to give the waist MGs a natural pose/angle. These 2 machine guns also had their U shaped support scratchbuilt and painted in aluminum. Once these were ready they were glued to the waist windows supports.
In terms of antennas I had to glue back the one on the tail spine as I had removed it when I disassembled the kit. The two under the back of the fuselage were scratchbuilt as they were lost very early in the process.
The top turret had the details painted including the bullets in bronze. The clear part was glued in place. The greenhouse (nose Plexiglas) requires some modifications: First I had to make lines representing the union of 2 pieces of Plexiglas on the top half of the nose blister. There are also a couple of panels missing along the triangular bombardier window on the blister. These I also marked with a knife very carefully. The frame of the bombardier window was painted in light brown per pictures. Also in the movie you can see that there is a red/brown area where the blister meets the fuselage. I painted this with a mix of both colours following the pattern I was able to identify in those few frames of the movie.
Now the really challenging
part was tackled: the support for the 2 machine guns in the nose cone. There
were 200 kits made in the US and sent to the UK to be installed on the
B-17s. They had a support on the top and side of the nose frame and from
that place there were 3 braces/supports running to each one of the machine
guns. The supports on the fuselage were easy to make in thin plasticard and
were painted in interior green before gluing in place. The rods or supports
were more complicated for a couple of reasons: they had to be the correct
length and I did not want them to scratch the paint while test fitting them.
Therefore I crated a template of the cross section of the nose using paper
and I played with it to adjust the length and position of t he supports
before installing them. The openings for the 2 nose MGs were painted in
interior green. I made the 6 supports with thin wire, painted in interior
green and installed them using gel instant glue. Inevitably some mistakes
were made when these pieces failed to stay in place and some instant glue
touched the interior of the glazing. This forced me to apply a coat of
Future with a brush to the insides of the Plexiglas cone. With the supports
in place it was time to add the machine guns. Easy.
he supports
before installing them. The openings for the 2 nose MGs were painted in
interior green. I made the 6 supports with thin wire, painted in interior
green and installed them using gel instant glue. Inevitably some mistakes
were made when these pieces failed to stay in place and some instant glue
touched the interior of the glazing. This forced me to apply a coat of
Future with a brush to the insides of the Plexiglas cone. With the supports
in place it was time to add the machine guns. Easy.
One other thing that I had to scratchbuild and that is clear in the restored plane and the movies is a rectangular structure covered in white fabric that is held in place with various black straps. With thick plasticard, a piece of rectangular black decal and several thin strips of Tamiya masking tape painted in black I recreated this thingy (I asked by email 3 times to the Museum in Dayton what that thing is but never got an answer…) Once it was ready I placed it on the left side of the floor sticking out of the fuselage.
I was now almost ready to attach the nose cone of the Belle. First I had to do some retouches based on pictures: aluminum for the support under the bombardier’s floor, brown to represent wood for the undersides of this section of the floor. With the guns on the side windows in the way of the 2 on the nose cone it took a bit of juggling and playing to attach the nose cone with 5 out of the 6 supports properly placed…it was not after the glue had dried and some pics taken that I realized that the support close to the rectangular structure is not sitting on the floor but in front of it…oh well…
The two pitot are L shaped pieces that came from the spares box. The football enclosure for the loop antenna also came from the spares box (Hobbycraft’s Hawk 75) as the original one got lost during the trip to Argentina.
Finally it was time to move to Pete and Repeat. Early in the building process I realized that they were coming thru an opening in the fuselage and that the opening was not covered with fabric as seen in other B-17s. To achieve this I drilled shallow holes that then I sanded together as decently as I could. This was then painted in black. The machine guns were glued in place, the camera and her support were scratchbuilt with thin plasticard (having been painted in black and aluminum respectively) and the two metal boxes on the outsides of the MGs were made with more plasticard painted in aluminum. The tail gunner gunsight was made with a L shaped piece that came from the spares, painted in black and sporting a smaller gunsight. All the hand manned guns (that is to say except the ones in the turrets) got their PE beads.
The Belle was nearing completion: windshield wipers were made with thin plastic string painted black, the insulation for the antennas were made with pieces from the spares and attached in place (fuselage close to the radio compartment and antenna on the tail), the wiring was made with stainless .012 wire both for the fuselage to tail and the under the fuselage positions.
To finish it all and using a couple of round Aerocalcas decals (low viz Mirage IIIEA) that almost perfectly matched the size I represented the (knock out?) panel on the right side of the nose cone.
Wow! What a trip! But a most rewarding finished product as far as I am concerned.
| CONCLUSIONS |
It took me around 5 months (interrupted by business trips) to finish my 4th and ultimate version of the famous Memphis Belle.
I want to dedicate it to all the members of the 8th US Army Air Force (ground crew and airmen) who fought so valiantly in those dangerous times. Also to my grandad, wherever he is, for bringing me the first Belle around 1975 and starting me in the hobby for real. No article in the web or magazines, no book about the war in the South Atlantic in 1982 neither my tributes to the 1982 veterans or Allied WWII veterans would have probably happened had it not been for the famous Memphis Belle.
That is why this plane holds a special place in my heart.
| REFERENCES |
The man who flew the Memphis Belle (Colonel Robert Morgan)
Images of War. The Memphis Belle (Graham Simons)
USAF Museum (Dayton, Ohio)’s website (for pictures and multiple videos)
Wikipedia
2013
My thanks to me for picking this one up on sale.
If you would like your product reviewed fairly and fairly quickly, please contact the editor or see other details in the Note to Contributors.
Back to the Main Page Back to the Previews Index Page Back to the Review Index Page