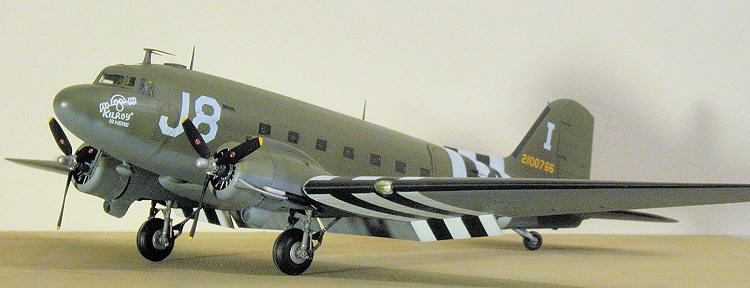
Trumpeter 1/48 C-47A
| KIT #: | 02828 |
| PRICE: | $131.19 SRP |
| DECALS: | Two options |
| REVIEWER: | Bryan Bernart |
| NOTES: |
|
| HISTORY |
To repeat the history of the Douglas C-47A would be redundant, to say the least.
So I won’t.
What I will do is give you my one and only first- hand impression of this great
aircraft, in flight.
It
must have been 1962 or ’63. We were living outside
Mom drove us to an airport-could have been one of a few-and we waited a little
more than anxiously for what Mom said was a “Gooney Bird”. We were lead out to
the ramp-I remember how hot it was, the blueness of the sky and the overwhelming
size and dazzling shininess of this “Gooney Bird”. We had to have been passed
off to some form of caretaker, but I don’t recall. We boarded and ascended what
seemed to be a long inclined tunnel with seats to the side. Everyone sat facing
the middle. Seat belts! We knew what to do with those-Dad installed them in his
cars and taught us how to use them long before they were standard equipment.
There were older guys than Dad aboard-mostly smoking and joking. We just sat
there, alternately eyeballing our cabin-mates and peering out the windows,
waiting for something to happen.
 The whine and deep rumble of the first engine lighting off jarred us-clouds of
smoke, vibration, more whining, coughing, then a briefly irregular rumbling,
quickly becoming orderly and uniform. Soon we were rolling across a bumpy ramp,
the sunlight changing angles in the cabin as we rolled toward the runway. Within
a minute or two we swung a hard turn and stopped, throttles pulled back. I
wondered what was wrong, and before I got my small brain wrapped around the
problem, we were accelerating-what incredible noise-and the tail began to come
up. The “Gooney Bird” roared down the runway, lifting off smoothly and banked to
starboard a few degrees, showing me and Bill the horizon, then the pastures and
fields that were the major geographic feature of that area at the time.
The whine and deep rumble of the first engine lighting off jarred us-clouds of
smoke, vibration, more whining, coughing, then a briefly irregular rumbling,
quickly becoming orderly and uniform. Soon we were rolling across a bumpy ramp,
the sunlight changing angles in the cabin as we rolled toward the runway. Within
a minute or two we swung a hard turn and stopped, throttles pulled back. I
wondered what was wrong, and before I got my small brain wrapped around the
problem, we were accelerating-what incredible noise-and the tail began to come
up. The “Gooney Bird” roared down the runway, lifting off smoothly and banked to
starboard a few degrees, showing me and Bill the horizon, then the pastures and
fields that were the major geographic feature of that area at the time.
As we flew-might have been 2500’ agl-my
face was flattened against a starboard window. We flew over and endless
procession of farms, corn fields, livestock and stands of trees. Roads with
moving vehicles on them traced an irregular path to God-knows-where. Everything
looked so small and toy-like. I stared at the wing-the broad metallic expanse
that tapered off into the distance and regarded the engine and nacelle, the
spinning propeller just yards away from my face, and saw the black stuff
streaming back from the engine. Lots of it. I elbowed one of my elderly
neighbors and asked what it was. He looked out and replied, “Oil. Happens all
the time.” and went back to his newspaper. I nudged Bill, and offered a very
technical explanation, I’m sure.
By now we had gained enough altitude that our ears needed to equalize, and our
attempts to do so brought some chuckles and some fatherly advice and help.
Between pinching our noses and blowing, and Wrigley’s gum, we got it done. We
were advised that it would happen again on the way back down. My recollection is
we handled it like pros.
I don’t remember the rest of the flight, but do know that it began for me a lifelong love of aviation, and for Model Aircraft. I humbly submit to you my rendition of an old favorite.
| THE KIT |
Molded in a rather soft, grey plastic, it comes in Trumpeter’s sturdy corrugated
boxing. Everything’s bagged, well organized and protected.
Vinyl
tires (3)
White Metal Main landing gear struts (2)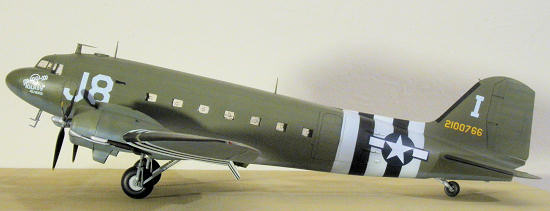 adder, etc.
At first glance all appears to be fine. Very little flash, if any, and crisp
exterior details. Lots of parts. I began my usual perusal of the instruction
sheet, reading it front to back to sideways to find the correct path-and found
that I’d have to blaze that path fairly well on my own. As I worked my way
through the kit, I found it very much like reassembling an exploded diagram,
with most “modules” having a somewhat synergistic relationship in the fact that
their construction is inter-related. Reminded me of an old auto repair manual
(you pick the publisher) that allowed you to get crankcase-deep before springing
nuggets of wisdom on the reader-but several steps late.
| CONSTRUCTION |
As mentioned previously, the build-up is modular, and for the most part
manageable. I built these “modules” concurrently, due to their synergistic
nature and the need to cross dry-fit as necessary.
Let’s go step-by-step.
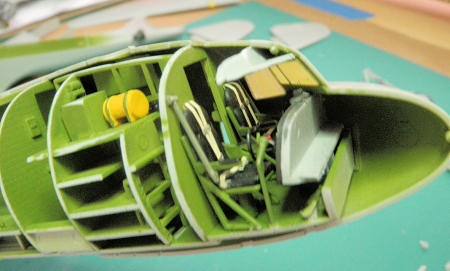 Sections One (1) through Four (4):
concern the forward parts of the fuselage interior.
It all goes together fairly well, but Trumpeter affords
very little guidance on the color of anything in there. The film instrument
panel didn’t work for me, so I hand painted it, as usual. My decision was to use
light colors here and there in order to lighten the interior-whether proper or
not-and to forego anything beyond basic painting, as 95% of the interior is
never to be seen again. Glue all of the bulkheads and floors together solidly,
because you’ll be back. Oddly, part A 5 is never addressed. It’s the overhead
instrument console that belongs over the windscreen. In Section Nine (9) it
exists in a drawing, but is unmarked or flagged. It fits well when in place.
Sections One (1) through Four (4):
concern the forward parts of the fuselage interior.
It all goes together fairly well, but Trumpeter affords
very little guidance on the color of anything in there. The film instrument
panel didn’t work for me, so I hand painted it, as usual. My decision was to use
light colors here and there in order to lighten the interior-whether proper or
not-and to forego anything beyond basic painting, as 95% of the interior is
never to be seen again. Glue all of the bulkheads and floors together solidly,
because you’ll be back. Oddly, part A 5 is never addressed. It’s the overhead
instrument console that belongs over the windscreen. In Section Nine (9) it
exists in a drawing, but is unmarked or flagged. It fits well when in place.
Sections Five (5) through Eight (8):
deal with the cargo-carrying after section of the fuselage.
Again, some stuff you’d need an arthroscope to see, and
a hokey arrangement for 29 sets of seatbelts that were evidently designed to
stand on edge. Right or wrong-I omitted them after thinking long and hard about
it. I did, however, hang a pair of belts off the aft bulkhead, per instructions.
Again, very little offered in the way of colors. The
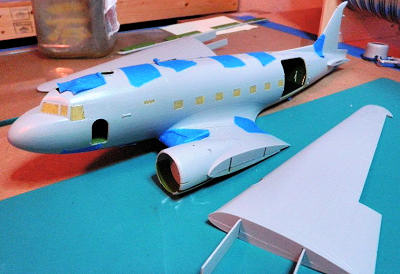
windows were all pre-masked using Tamiya tape, glued in, then I sprayed the
interior
green.
I then glued on the small instrument boxes that I had previously
painted, and located part M-4, a small window located in the starboard, aft,
upper fuselage which is easy to miss. Don’t forget to unmask the interiors of
the windows before joining fuselage halves!
Pay attention to the overhead lighting at the spine of the fuselage. Section
Nine (9) is where it comes into play.
 Section Nine (9):
deals with mating the fuselage halves. At this point the test fitting really
comes into play. I first gave the halves a quick flat sanding, and they looked
good, so I placed them together, and found that when joined, the cross section
was no longer basically cylindrical, but shaped like a bloated peanut, as it
curved back into itself, particularly on the bottom, just aft of the main wing
trailing edge. The top of the fuselage suffered the same problem. I’d have to
deal with it later.
Section Nine (9):
deals with mating the fuselage halves. At this point the test fitting really
comes into play. I first gave the halves a quick flat sanding, and they looked
good, so I placed them together, and found that when joined, the cross section
was no longer basically cylindrical, but shaped like a bloated peanut, as it
curved back into itself, particularly on the bottom, just aft of the main wing
trailing edge. The top of the fuselage suffered the same problem. I’d have to
deal with it later.
I
began fitting the interior modules into the port side half, basically because I
wanted to assure alignment of the openings in the side with the deck surface.
Since there are two doors-one forward, one aft-and both had the same issue, it
made sense. I cleaned up the bulkheads and mating surfaces and got them as tight
as possible, then thoroughly glued, strapped and clamped them together, checking
that I was not contorting or twisting the half as I went.
The overhead lighting panel mentioned earlier needs to be painted and affixed at
this time. Pay particular attention to how it is oriented when glued in. It
needs to be plumb, square, level and in the correct position. This actually
aligns the top of the fuselage halves, as there are few locating pins to be
found.
The next issue is the tail wheel assembly.
Trumpeter chose not to supply a metal assembly like the
mains, so here’s what you do.
Put part # E29 through part # E24, as illustrated. Go to your stash and find a
large-ish collar (Trumpeter chose not to supply one) that will fit snugly on the
shaft. Next, drill out the length of the Tail wheel strut-part # 29-to accept a
straightened paper clip or other, small diameter metal rod. Once inserted, CA in
place. Cut off the excess paper clip, and build as directed. Make sure the
assembly swivels freely.
This is a
timesaver, as I snapped mine off after the halves were joined and the tail wheel
was fully finished. Cutting the whole assembly out, doing the fix and
reinstalling took a while.
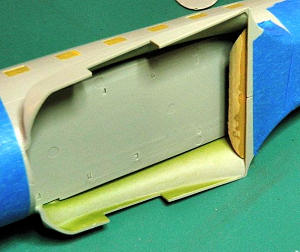 At this point I began the fuselage join in earnest. I ended up with a 100 grit
sanding stick and had to move a lot of plastic to get the halves close, but got
there. Before I glued them up, I had to address the concavity in the bottom. I
trimmed a piece of wood and CA’d it to one fuselage half after checking
clearances. I installed the tail wheel bucket, and put the towing eye in place
with some tape.
At this point I began the fuselage join in earnest. I ended up with a 100 grit
sanding stick and had to move a lot of plastic to get the halves close, but got
there. Before I glued them up, I had to address the concavity in the bottom. I
trimmed a piece of wood and CA’d it to one fuselage half after checking
clearances. I installed the tail wheel bucket, and put the towing eye in place
with some tape.
After several sessions of dry-fitting, squeezing and coaxing, I felt I had
developed a system (!) that would work the first time, despite lack of indexing
pins, concavity and originally poor fit. I put glue on every mating surface I
could (I had removed the paint from all surfaces as well), and began the join. I
found that if I grasped the fuselage mid-cabin, I could massage the rest of it
in place with the other hand. Using pieces of pre-cut tape, I began to line up
the rather long joints, top and bottom. The tail area, nose and crew areas went
together well, but the top and bottom of the fuselage were ugly. I aligned the
top as well as possible, then the bottom, culminating by CAing the wooden brace
to the other side of the fuselage half. Over the next 10 minutes or so I
adjusted a few things, but it was a done deal.
Sections Ten (10) through Thirteen(13) ;
deal with the wings.
While straightforward, proper alignment
and assuring that the leading edges of the wings are
straight are paramount. I taped the leading edges to a flat surface during
glue-up to keep from having an antique Dreamliner effect. I chose the flat
option for the ailerons, and found that every part needed to be down-sized to
fit. The spars provided actually fit and function very well. They mate well to
the center section, and can be removed for storage. The tail feathers were the
same, clean, but in need of a lot of carving and sanding to fit. Flaps and
actuators will be among the last to be installed.
 Sections Fourteen (14) through Eighteen (18)
concerning the engines, nacelles and landing gear bays is where a lot of this
synergy that I speak of comes into play. Obviously a lot of painting takes place
before most of this is assembled, and you get finished pieces being jigs for
unfinished. You will spend a lot of time packing and unpacking parts from the
nacelles.
Sections Fourteen (14) through Eighteen (18)
concerning the engines, nacelles and landing gear bays is where a lot of this
synergy that I speak of comes into play. Obviously a lot of painting takes place
before most of this is assembled, and you get finished pieces being jigs for
unfinished. You will spend a lot of time packing and unpacking parts from the
nacelles.
The engines themselves were OK, but the balancing act required to keep
everything aligned was difficult. I used temporary jigs,
and the nacelle/gear compartment firewall as aids. In
the end, they all have to fit together in a straight line. More of that synergy
stuff.
Sections Nineteen (19) and Twenty (20)
have us join the center wing panels after positioning the engines. Parts D 5 and
D 15 need to be considered before this step, due to paint requirements. If you
did everything right in the previous steps this step is a breeze. Also covered
is the construction, but not the installation, of the main landing gear.
The main landing gear, in white metal, is an exact clone of their plastic
predecessor-right down to the size and location of injector pin marks. Because
of a mix of metal, plastic and vinyl the parts were cleaned up, glued together
(CA) in place in the nacelle-another jig-pulled out, filled, primed, painted,
clear coated and weathered before assembly. They will be CA’d in almost last.
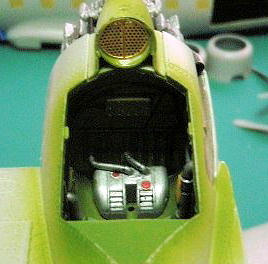
Section Twenty (20):
also includes the propeller and hub assembly, and the installation of the PE
screens at the oil cooler intakes. Pre-fit the screens-they are too big.
I “assumed” once-the mangled mess is still there.
The prop assembly looks nice, has an extra part that could have been
incorporated into one, but again has fit problems. Propshaft-hub clearance is
excessive, allowing the propellers to be out of line with the crank, and will
need to be addressed. The cowlings, which according to those who know, are
grossly incorrect, but fit like a glove with minor trimming around the intake
and exhaust cut-outs.
Section Twenty-One (21):
addresses the wing-fuselage join and minor part installation, top half. I’ll
leave the doo-dads for section 23.
 The
wing-fuselage join looks relatively simple, and is, if properly and frequently
dry-fitted with anything that it will finally touch, throughout the build. After
a couple of practice runs, I glued her up and gave it a squeeze, working the
joint and pressing my thumb against the top of the wing root, working back and
forth until the parts felt snug and the seams created were as uniform, and as
tight as possible. I stabilized it and let it sit. I masked and filled the
joints on each wing root with Squadron White and cleaned them up. Don’t forget
the RDF gear that lives under the clear dome. I did.
L
The
wing-fuselage join looks relatively simple, and is, if properly and frequently
dry-fitted with anything that it will finally touch, throughout the build. After
a couple of practice runs, I glued her up and gave it a squeeze, working the
joint and pressing my thumb against the top of the wing root, working back and
forth until the parts felt snug and the seams created were as uniform, and as
tight as possible. I stabilized it and let it sit. I masked and filled the
joints on each wing root with Squadron White and cleaned them up. Don’t forget
the RDF gear that lives under the clear dome. I did.
L
Section Twenty-Two (22):
completes the structural parts of the build-horizontal stabilizers and rudder.
The experts say there’s something
bad going on back here, too. Looks fairly C-47ish to me,
but it does need to be cleaned up if you want movement. Good, even joint at the
root was treated the same as the main wings.
Section Twenty-Three (23):
is the collection of antennas and minor exterior bits, and is fairly
self-explanatory.
| COLORS & MARKINGS |
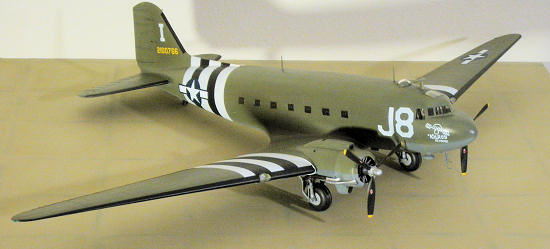
 I
used Model Master enamels throughout the build in the typical OD/Neutral grey of
the era. I slightly darkened the lower sides of the fuselage and vertical
stabilizer with OD, and the balance Faded OD, after pre-shading with a slightly
softened black. If given another chance, I’d have sanded the model after
pre-shading in order to lessen the darkening effect, and would have done the
panel lines only as the Divots (rivets) aren’t worth trying to deal with-you end
up with a black airplane, and it’s just too dark to start with. Gloss coat by
MM, as my favorite, Floquil Gloss was unavailable locally. There is some
question as to the interior color-mine is US interior green-which I think is
appropriate for aircraft built before June of 1944.
I
used Model Master enamels throughout the build in the typical OD/Neutral grey of
the era. I slightly darkened the lower sides of the fuselage and vertical
stabilizer with OD, and the balance Faded OD, after pre-shading with a slightly
softened black. If given another chance, I’d have sanded the model after
pre-shading in order to lessen the darkening effect, and would have done the
panel lines only as the Divots (rivets) aren’t worth trying to deal with-you end
up with a black airplane, and it’s just too dark to start with. Gloss coat by
MM, as my favorite, Floquil Gloss was unavailable locally. There is some
question as to the interior color-mine is US interior green-which I think is
appropriate for aircraft built before June of 1944.
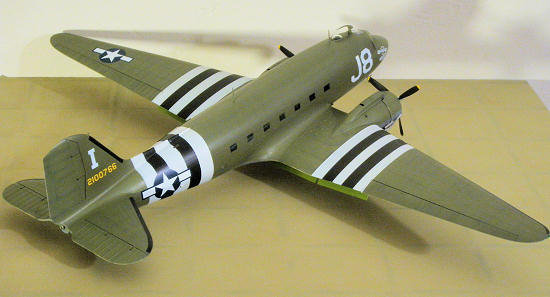
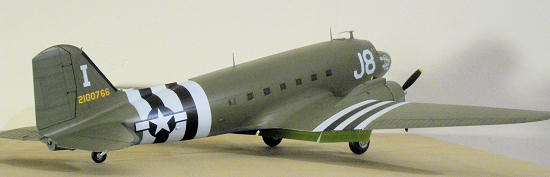
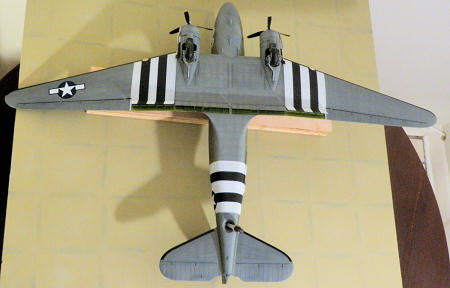
The kit-supplied decals worried me-particularly the fuselage invasion stripes-so
I painted them all, and purchased a sheet of Xtradecals primarily for the
national markings, so they’d all be the same color. I also used the Xtradecal
serial numbers, as the yellow kit supplied numbers were too light. The balance
came with the deal. I did use copious amounts of Micro-sol to get them to lay
down, and was not entirely successful, but passable from a couple of feet away.
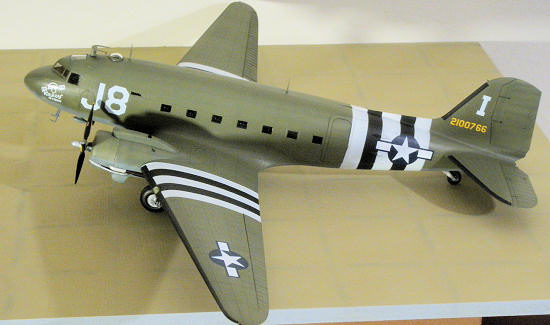
I did very little weathering if at all, then shot a light flat coat to finish
her off.
| CONCLUSIONS |
 I’ll not cover the complaints of others (there are plenty) concerning, shape,
profile or other inaccuracies, but feel there is plenty of room for Trumpeter to
improve the breed. Admittedly, I have a soft spot in my heart for the Dak, and
it actually looks pretty much like a C-47 to me, but didn’t inspire me to go to
great lengths to improve anything. It is a somewhat difficult kit to build, and
I sincerely believe that Trumpeter could have done more with less, and been
better received in the marketplace. Yeah, I’ll build another Trumpeter kit (2
big ones waiting for me), but will have lowered expectations, and will think
twice (and maybe do more research) before paying the premium that they ask in
the future.
I’ll not cover the complaints of others (there are plenty) concerning, shape,
profile or other inaccuracies, but feel there is plenty of room for Trumpeter to
improve the breed. Admittedly, I have a soft spot in my heart for the Dak, and
it actually looks pretty much like a C-47 to me, but didn’t inspire me to go to
great lengths to improve anything. It is a somewhat difficult kit to build, and
I sincerely believe that Trumpeter could have done more with less, and been
better received in the marketplace. Yeah, I’ll build another Trumpeter kit (2
big ones waiting for me), but will have lowered expectations, and will think
twice (and maybe do more research) before paying the premium that they ask in
the future.
| REFERENCES |
 Various internet sources-mostly as visual aids
June 2012
If you would like your product reviewed fairly and fairly quickly, please contact the editor or see other details in the Note to Contributors.