1/72 A-20 Havoc Comparison (Classic Kits)
|
REVIEWER: |
Brian Baker |
|
NOTES: |
Comparison of Airfix, Revell and Matchbox kits. |
In
1936,
Douglas
began working on a successor to the Army’s A-17 attack bomber.
Designed by the soon to be famous
Jack Northrop and Ed Heinemann,
the
initial Model
7A twin engine attack bomber was superseded by
the Model 7B, which was the first to be built in prototype form. After flight
tests, including the crash of the 7B prototype with a French observer aboard,
the Army wanted something bigger and better, and the enlarged
DB-7 began
tests in 1939. The DB-7 was an extensive redesign of the original 7B, and
production began immediately on a French order.
After a number of DB-7A’s were produced, a higher
powered variant, the DB-7B appeared. This was ordered by the French,
British, and
U.S.
Army as the A-20.
Most of the French order eventually ended up with the
British after the fall of France in 1940, and supercharged A-20’s began
equipping American
 light
bomber units by 1941, although the superchargers were later removed, and some
were rebuilt at night fighters and reconnaissance types.
light
bomber units by 1941, although the superchargers were later removed, and some
were rebuilt at night fighters and reconnaissance types.
The
Army’s A-20A corresponded almost exactly with the British
Boston
III,
and these aircraft were used by
AAC
squadrons at the beginning of the war.
Some were fitted with nose mounted .30 cal. Machine
guns, featuring the characteristic bulges ahead of the cockpit.
A few A-20B’s were built,
but by 1941, the A-20C was being built in substantial
numbers by Douglas’s Santa Monica plant as well as Boeing’s facility in Seattle,
many of which were exported to Britain and the Soviet Union.
A number of experimental
models were developed, but the main production model was
the A-20G, which had a power dorsal turret and provision for heavy armament in
the nose, including combinations of four 20 mm cannon or six .50 cal. Machine
guns.
The A-20J was essentially an A-20G with a glassed in nose position, and
the A-20H and A-20K were more powerful variants of the same aircraft.
The
British used different variants of the
Boston,
as they called it for light bombing and night intruder duties,
including some interesting Turbinlite night fighter
conversions. The night intruder was called Havoc, which also became the
American name for the aircraft, while the pure bomber
types
remained Bostons.
An American development, modified from the original
production A-20’s, was fitted with British AI Mk. IV radar and designated P-70.
Without superchargers, its performance was rather weak,
and although a few were used
by the 6th
NFS
in the Southwest Pacific, their record was not really satisfactory, and they
ended up primarily as trainers for crews which were to fly the P-61 Black Widow
in combat.
 Several
1/72 scale kits depicting the Douglas A-20/DB-7
have been issued by various manufacturers over the
years.
Airfix and Frog both produced kits during the sixties, while Revell and
Matchbox kits appeared during the seventies and eighties. I recall that the Frog
kit was pretty sad, and never got one.
Recently, MPM issued a new
Boston
III
in RSAF and SAAF markings for a whopping $42.00 MSRP, and I have not seen this
version, although I would assume that it is probably a better kit, according to
the reviews.
However, I have built the Airfix, Revell, and Matchbox kits, and
decided to do a review on those kits to compare them as an alternative to the
pricier newer kit.
Besides, it was a challenge, and a test of modeling
skills.
The Revell and Airfix kits were built last week, while the Matchbox kit,
which first appeared in 1977, was done back in 1988 when it was a relatively new
kit. Keep in mind that although I am a serious modeler, I don’t measure things
and check somebody’s drawing against the real article. In short, if it looks
like an A-20 when I’m done, I’m satisfied.
Several
1/72 scale kits depicting the Douglas A-20/DB-7
have been issued by various manufacturers over the
years.
Airfix and Frog both produced kits during the sixties, while Revell and
Matchbox kits appeared during the seventies and eighties. I recall that the Frog
kit was pretty sad, and never got one.
Recently, MPM issued a new
Boston
III
in RSAF and SAAF markings for a whopping $42.00 MSRP, and I have not seen this
version, although I would assume that it is probably a better kit, according to
the reviews.
However, I have built the Airfix, Revell, and Matchbox kits, and
decided to do a review on those kits to compare them as an alternative to the
pricier newer kit.
Besides, it was a challenge, and a test of modeling
skills.
The Revell and Airfix kits were built last week, while the Matchbox kit,
which first appeared in 1977, was done back in 1988 when it was a relatively new
kit. Keep in mind that although I am a serious modeler, I don’t measure things
and check somebody’s drawing against the real article. In short, if it looks
like an A-20 when I’m done, I’m satisfied.
The Airfix Kit
The Airfix kit, originally marketed in the
sixties as a Boston
III,
and retailing for an exorbitant 89 cents at the time, was typical of kits of its
era. Mine was a U.S. Airfix product. Molded with protruding rivets and raised
panel lines, the kit presents a respectable outline, but features moveable
ailerons, elevators, and rudder. There is virtually no interior aside from seats
in three positions, a floorboard in the cockpit, and an instrument panel which
snaps into the forward bulkhead.
A control wheel is also included.
A gun mounting ring fits into the rear cockpit, and a
pair of twin machine guns of some type is also provided. The engine nacelles are
molded in two pieces, and the landing gear struts need to be put in place before
the halves can be assembled. I thought this would be a problem as they might
break off, but they are pretty robust, and it worked out fine.
The same goes for the nose gear
 strut,
which has to be installed before the fuselage halves go together.
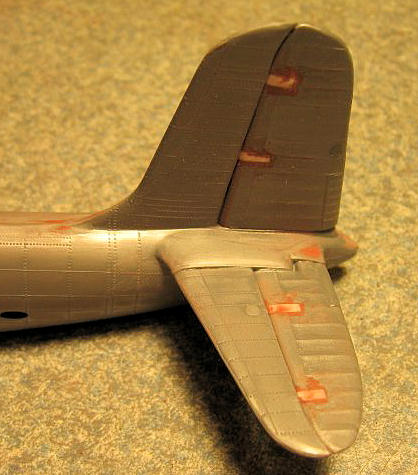
The one protrusion that did disappear during assembly
was the small pitot tube that is molded into the vertical fin. I had to
scratchbuild this later.
The engines are molded into the faces of the cowlings,
and actually have quite a bit of detail, so a quick spray of grey paint, plus
scraping some off to represent the pushrod housings, makes for an acceptable
engine.
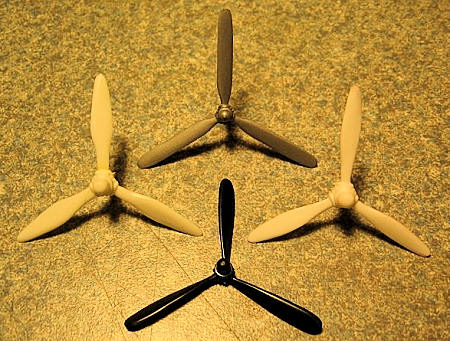
The props are totally wrong in shape, and I replaced them.
The mainwheels are good, but the nosewheel had some mold
marks on one side that were difficult to remove.
strut,
which has to be installed before the fuselage halves go together.
The one protrusion that did disappear during assembly
was the small pitot tube that is molded into the vertical fin. I had to
scratchbuild this later.
The engines are molded into the faces of the cowlings,
and actually have quite a bit of detail, so a quick spray of grey paint, plus
scraping some off to represent the pushrod housings, makes for an acceptable
engine.
The props are totally wrong in shape, and I replaced them.
The mainwheels are good, but the nosewheel had some mold
marks on one side that were difficult to remove.
Assembly
This model requires some serious sanding to get
rid of the excessive surface detail.
Fine sandpaper did a good job, and I left just enough to
make the surface look realistic.
The fuselage required some work in the cockpit area, as
I put some detail in the sidewalls, added some goodies like an instrument panel
face and a rebuilt seat that looked more like the one in the real airplane. A
bit of filling and filing was needed to correct some sink marks, but this was
nothing serious. I
didn’t do anything with the bombardier’s position in the nose, as I had
originally intended to do an RAAF version that had this painted over, but after
getting partway through assembly, I decided against this because the glass
covering the nose position didn’t fit, so I decided on a Western Desert model.
My original intent was to fill the nose with lead shot extracted from shotgun
shells, but since the nose position was now going to be visible, I could only
put some shot under a floorboard I made.
Still, this was almost
 enough to
balance the airplane, although for good measure, I filled the engine nacelles
with shot to assure that the plane would not sit on its tail under any
circumstance.
enough to
balance the airplane, although for good measure, I filled the engine nacelles
with shot to assure that the plane would not sit on its tail under any
circumstance.
The major problem with this kit is the control surfaces, which were designed to
be moveable.
Since these were originally intended for kids (before computers,
IPODs, etc.) each control surface has little pins that fit into recesses in the
stabilizers or wings.
They really look terrible, so I glued in a piece of
strip plastic, smoothed down the surface, and glued them directly to their
attachment points.
They don’t look quite like the real thing, but they are
certainly better than the original kit form.
The engine
nacelles don’t quite match up with the wing leading edges and cowling, so a
little bit of trimming was needed.
Another problem is the propellers, which are
even chord when they should be tapered towards the tips.
I don’t think they can be salvaged for this model, but
since I had four new props from a Matchbox PB4Y-2 kit that I did a year ago,
these did the trick, and with a little trimming and replacing, they worked fine.
The reason I had the extra props was that I did the Cobra Resin detail
conversion PB4Y-2 kit, which has perfect props for that airplane. There are
little clear disks that fit into the wing undersurfaces as landing lights, and
these need some trimming. However, I just filled the little windows in the rear
fuselage with Crystal Clear rather than using the little parts provided in the
kit.
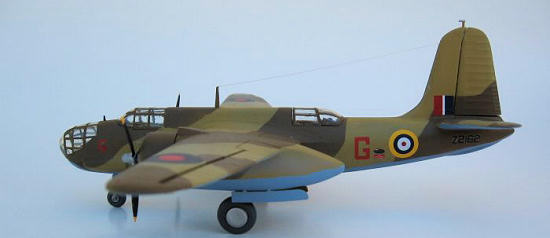
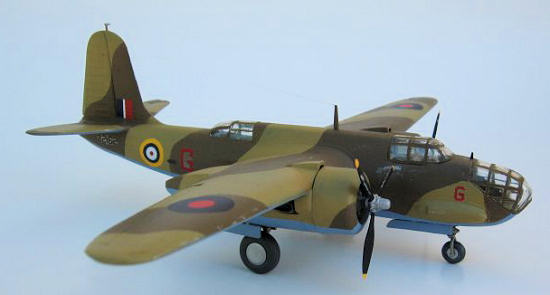
Painting and Finishing
I chose to do a Boston
III
of No. 12 squadron, Royal South African Air Force, which operated in the Western
Desert during 1942.
There is a color profile in the second Squadron
In-Action book, and a photo of the same airplane in the first edition. The only
difference is that the drawing shows a black propeller hub, while the photo
shows a silver one. The airplane is Dark Earth and Middle Stone over Azure Blue,
which makes for a very colorful aircraft.
Markings came from the spare decals box, and I was very
satisfied with the results.
Remember that this is a kit that has been around for nearly fifty years, and it
certainly isn’t state of the art, but with a little time and effort, an
acceptable A-20/Boston model can be made, and you can spend what you would have
spent on the expensive kit on wine, women, and song, in whichever order you
prefer.
I didn’t have a model of this particular variant when I began, but I do
have one now, and I’m satisfied. It was fun, not too challenging, and looks good
in the display case.
The Revell Kit
Coming out a bit later than the Airfix kit, this
represents the next level of kit design technology.
The main improvement is the lack of separate control
surfaces, with the join lines becoming much more realistic.
The surface detail is still a little overdone, and the
cockpit detail is still minimal, with no detail at all in the rear cockpit. The
plastic is fairly brittle, be shouldn’t be a problem to an experienced modeler.
 Revell
issued this kit in two distinct versions, an A-20A/Boston
III
combination and a P-70 night fighter model. The P-70 plans are dated 1975, so
this is a fairly old kit. I built the A-20A kit back in 1996, and did this P-70
model last
week. My comments will apply to both models, as they differ somewhat in
component parts.
Surface detail is still a bit heavy, and must be removed or
subdued for realism.
Cockpit detail is minimal, and nothing at all is in the
rear cockpit.
The props are a little better than the Airfix, but they are still
the wrong shape and should be replaced.
The pitot tube is mounted on top of the vertical;
stabilizer, and
this invariably gets knocked off during assembly and handling.
However, be careful here, as the kit instructions state
that the low frequency radio antenna wire runs from
the mast
ahead of the windshield on the P-70, and
behind the cockpit on the A-20A directly to the pitot
tube on the stabilizer.
These, according to photos, should connect on the
leading edge of the vertical stabilizer about 2 scale feet down from the tube,
and never to the pitot tube.
Somebody dropped the ball on this one.
Revell
issued this kit in two distinct versions, an A-20A/Boston
III
combination and a P-70 night fighter model. The P-70 plans are dated 1975, so
this is a fairly old kit. I built the A-20A kit back in 1996, and did this P-70
model last
week. My comments will apply to both models, as they differ somewhat in
component parts.
Surface detail is still a bit heavy, and must be removed or
subdued for realism.
Cockpit detail is minimal, and nothing at all is in the
rear cockpit.
The props are a little better than the Airfix, but they are still
the wrong shape and should be replaced.
The pitot tube is mounted on top of the vertical;
stabilizer, and
this invariably gets knocked off during assembly and handling.
However, be careful here, as the kit instructions state
that the low frequency radio antenna wire runs from
the mast
ahead of the windshield on the P-70, and
behind the cockpit on the A-20A directly to the pitot
tube on the stabilizer.
These, according to photos, should connect on the
leading edge of the vertical stabilizer about 2 scale feet down from the tube,
and never to the pitot tube.
Somebody dropped the ball on this one.
The A-20A kit comes with the glass nose, similar
to the Airfix kit.
It fits marginally well, but is opaque enough that the
interior details of the bombardier’s position are somewhat difficult to see. I
scratch built seats for everyone on this kit.
I don’t recall exactly where I put the nose weights for
balance, but they are in the nose somewhere.
Maybe they are behind the pilot’s cockpit. I used the
kit propellers on the A-20A kit.
I also simulated the little vents in the cowling with
decal strips.
These were deleted on later models.
On the P-70, the nose is different, with no
glass, an ideal place for nose weights.
On this kit, I replaced the props with the other two
from the Matchbox conversion, and they look much better than the ones on the
A-20A.
I detailed the cockpit interior, but didn’t do much with the rear
cockpit, as I had no information on its layout.
I would assume that the radar operator sat facing
forward, but that is not a given.
The kit has three separate radar arrays, all of which
are too thick.
On the left wing are four small radar antennas, two above and two
below, which are marked on the inside of the wing by a little hole that you are
supposed to hollow out before you join the wing tops and bottoms..
I drilled them out from the insides, mainly for marking
holes. Then I just
 trimmed
them off at the bases and glued them on to the wing during final assembly.
The “Yagi”
antennas go on the fuselage sides just ahead of the cockpit, and these are also
too heavy.
The purist will want to rebuild the array using thinner wire to
replace the plastic.
I used them straight from the box, but I’m not really
satisfied with them.
The same goes for the little “arrow” units on the nose.
They are too thick but are otherwise the right size.
Both Revell kits make up into nice little models, and it is great
that they did
both variants.
This saves a lot of conversion time.
trimmed
them off at the bases and glued them on to the wing during final assembly.
The “Yagi”
antennas go on the fuselage sides just ahead of the cockpit, and these are also
too heavy.
The purist will want to rebuild the array using thinner wire to
replace the plastic.
I used them straight from the box, but I’m not really
satisfied with them.
The same goes for the little “arrow” units on the nose.
They are too thick but are otherwise the right size.
Both Revell kits make up into nice little models, and it is great
that they did
both variants.
This saves a lot of conversion time.
Painting and Finishing.
The A-20A was done in standard OD over neutral
grey.
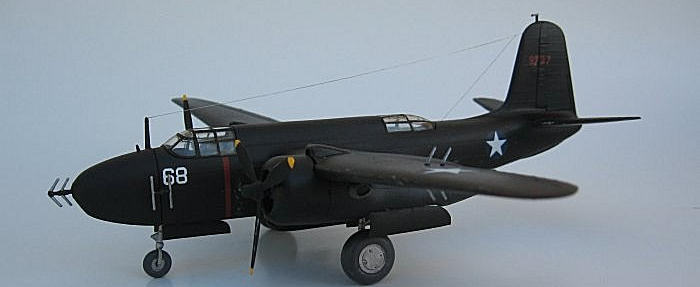
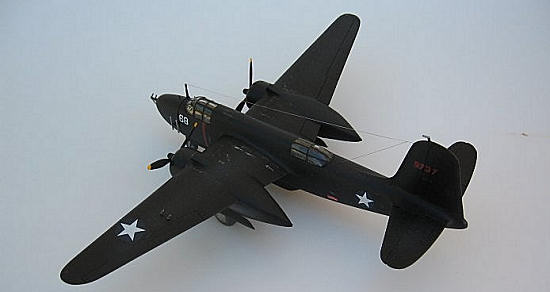
The P-70 was overall black. I did the A-20A as one from the 3rd
Bombardment Group as it was flown in the Louisiana Maneuvers in 1941.
There is a good photo of the plane in one of the
In-Action books.
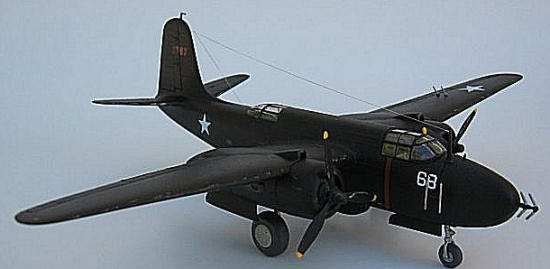
The P-70 is a model of the second production aircraft as it would
have appeared at Wright Field during the 1942 test program. It may have operated
later with the 6th
NFS
at Guadalcanal. Both kits can be made into acceptable models with only a little
bit of effort.
The Matchbox Kit
The Matchbox kit is copyrighted 1977, and
represents a late production A-20G with solid nose and six forward firing .50
cal. Machine guns and also a Boston Mk. IV (A-20H) with a glass nose.
Two similar
guns were in a power dorsal turret, while another was mounted in a
ventral position.
Only four of the nose guns are visible, as the two guns
in the side positions are not indicated on the kit.
Some photos show only four guns mounted, and some photos
show two additional forward firing guns on the glass nose A-20H version. There
is also a glass nose included for the H model.
 Cast
in three colors, the kit is reasonably accurate in outline, although it suffers
from the usual Matchbox “trench fever” with raised panel lines and recess
“trench” panel lines. Detail is minimal, but the overall effect is adequate.
The props are the best of the three kits, although the
blades appear to be to be just a tad short.
Cockpit detail consists of a floor, generis seat,
pilot’s control wheel, and nothing else.
This kit years for detailing since the clear canopy
allows some of the interior detail to be seen. There is no wheel well or gear
door detail although the main wheels are nicely done.
Cast
in three colors, the kit is reasonably accurate in outline, although it suffers
from the usual Matchbox “trench fever” with raised panel lines and recess
“trench” panel lines. Detail is minimal, but the overall effect is adequate.
The props are the best of the three kits, although the
blades appear to be to be just a tad short.
Cockpit detail consists of a floor, generis seat,
pilot’s control wheel, and nothing else.
This kit years for detailing since the clear canopy
allows some of the interior detail to be seen. There is no wheel well or gear
door detail although the main wheels are nicely done.
Assembly is very straightforward.
As with other kits, the main gear struts need to be in
place before the nacelle halves can be joined, although the nose gear can be
added later.
The choice of noses is a nice gesture, and allows a lot of
variants to be done from this one kit. I built this kit over twenty
years ago,
so I don’t recall some of the exact details,
but I recall that it went together quite easily, and I can’t see any seams in
the join lines.
I did have to scratchbuild the bomb racks, as these were
excluded.
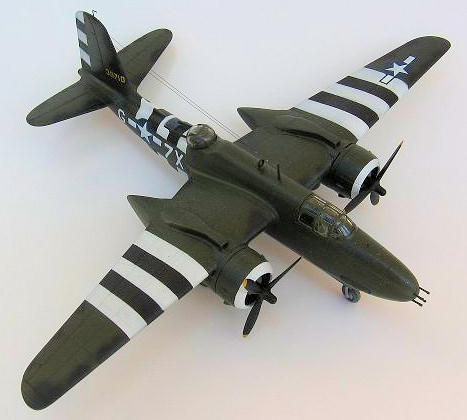
Painting and Finishing
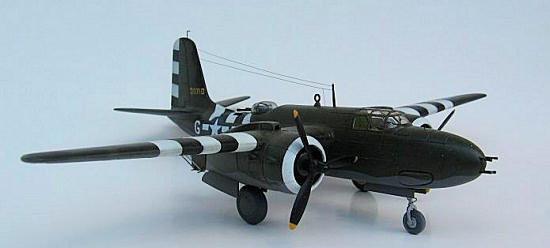
Even though the kit decals were colorful, I
decided to do an A-20G-30-DO, 43-9710, 7X-G of the 645 BS, 410 BG, 9th
AF, operating out of England just after D-Day in July, 1944. I wanted to do one
with invasion stripes, as they really stand out, and these certainly do.
I used standard OD with medium green splotches on top,
with neutral grey underneath. It took quite a bit of masking tape, but the
results were well worth it.
 If you
are determined to do an early model A-20 or Boston, and want to save your money,
I’d recommend the Revell kit over the Airfix one, mainly because of the control
surfaces, unless, of course, Airfix has reworked their molds to take care of the
problem, as they have already done with some of their kits they have recently
reissued. Both the A-20 and the P-70 are buildable, and with some detailing and
extra effort, a good model can be made. The Matchbox kit can be made into either
an A-20G or A-20H, and probably the later models also.
It also will take some work, but who said models should
be made by shaking the box. This one is also worth a try before you shell out
the big bucks.
All of these kits should be available at swap meets, and a lot of
people have them ratholed away in their stashes.
I’ve even seen some Frog kits at swap meets,
but I haven’t looked at one closely in years, so I can’t
comment on this kit’s accuracy or quality.
But try one of the three.
You might be surprised.
If you
are determined to do an early model A-20 or Boston, and want to save your money,
I’d recommend the Revell kit over the Airfix one, mainly because of the control
surfaces, unless, of course, Airfix has reworked their molds to take care of the
problem, as they have already done with some of their kits they have recently
reissued. Both the A-20 and the P-70 are buildable, and with some detailing and
extra effort, a good model can be made. The Matchbox kit can be made into either
an A-20G or A-20H, and probably the later models also.
It also will take some work, but who said models should
be made by shaking the box. This one is also worth a try before you shell out
the big bucks.
All of these kits should be available at swap meets, and a lot of
people have them ratholed away in their stashes.
I’ve even seen some Frog kits at swap meets,
but I haven’t looked at one closely in years, so I can’t
comment on this kit’s accuracy or quality.
But try one of the three.
You might be surprised.
NOTE:
The photo of the props shows (top) Airfix, (bottom)
Revell, (Left) unmodified Matchbox PB4Y-2, and (Right) modified Matchbox PB4Y-2.
There is a lot of material available on this aircraft.
Some sources include:
 Squadron-Signal
Aircraft Number 144
A-20 Havoc in Action
Squadron-Signal
Aircraft Number 144
A-20 Havoc in Action
Squadron-Signal Aircraft Number 56
A-20 Havoc in Action
Profile Publications: Harry Gann, The Douglas A-20 (7A to Boston
III)
WW2 Aircraft Fact Files:
William Green and Gordon Swanborough, U.S. Army Fighters
Part 2.
In addition, there is information available in numerous “camouflage and
markings” books and other references that are readily available.
Therefore, it should be no problem to document the
aircraft you wish to model. But check the photos carefully, as there are detail
differences in
the
variants.
Brian Baker
September 2010
If you would like your product reviewed fairly and quickly , please
contact
me or see other details in the
Note to
Contributors.
Back to the Main Page
Back to the Review Index Page