Pavla 1/72 P-43A Lancer
| KIT #: | 72601 |
| PRICE: | $20 |
| DECALS: | ? |
| REVIEWER: | Carmel J. Attard |
| NOTES: | Short run injected kit with etch brass, resin and vacuformed parts |
| HISTORY |
 Lancer could however be regarded as only moderately successful in its
standard role as a fighter as by the time it entered USAAF service in 1940 it
was already obsolescent. As a result production was only limited and many were
converted to photo reconnaissance aircraft, the Lancer’s good range being an
asset in this role.
Lancer could however be regarded as only moderately successful in its
standard role as a fighter as by the time it entered USAAF service in 1940 it
was already obsolescent. As a result production was only limited and many were
converted to photo reconnaissance aircraft, the Lancer’s good range being an
asset in this role.
| THE KIT |
The kit is clearly moulded in light grey plastic having all the panel lines incised. There are two clearly moulded cockpit canopies, one being spare. There are detail parts in resin while others are etched in brass.
| CONSTRUCTION |
The two row radial engine is supplied in resin; these are
cemented together, painted and put aside while other sub assemblies
 are put
together. The cockpit interior which consists of a rear bulkhead, that needed
some trimming in order to fit, floor, a seat, and column are then assembled and
painted as per instructions. The cockpit interior was cockpit green. The seat
has moulded on seat harness and is best painted before this is fixed in place.
The cockpit was fixed to one side of the fuselage. , I separated the brass etch
camera framing fuselage detail parts, since I elected to model the recce
version. These were bent to fit the fuselage contour; the two piece frame was
then fixed to the fuselage side, repeating same for the camera port on the other
side. It was important to mark the exact position of these oval frames with a
pencil prior to fixing them permanently.
are put
together. The cockpit interior which consists of a rear bulkhead, that needed
some trimming in order to fit, floor, a seat, and column are then assembled and
painted as per instructions. The cockpit interior was cockpit green. The seat
has moulded on seat harness and is best painted before this is fixed in place.
The cockpit was fixed to one side of the fuselage. , I separated the brass etch
camera framing fuselage detail parts, since I elected to model the recce
version. These were bent to fit the fuselage contour; the two piece frame was
then fixed to the fuselage side, repeating same for the camera port on the other
side. It was important to mark the exact position of these oval frames with a
pencil prior to fixing them permanently.
I pre painted the instrument panel in etch brass and was
then glued in place. This had a printed acetate film to correspond with the
various instruments in the panel. There is a tail wheel well roof to which the
tail wheel leg was fixed. And the fuselage was closed. The cowling and engine
sub assembly was then fixed in place after some minor adjustments. The main
wheel well roof had separate corrugated panels forming the wheel well interiors
that needed to be fixed to the one piece lower wing. This was then glued to the
lower fuselage which matched reasonably well. The two upper wing pieces were
then added on. A little filer was needed at the joining line to the fuselage.
The tail planes were next butt jointed to the fuselage ensuring the correct
alignment.
 The vertical fin and ruder comes as a separate item. This had a hole
drilled at the leading edge upper to anchor the antenna wire at a later stage.
Fuselage gun blisters were then fixed in place and upon drying these were
drilled to take hollow metal guns that I added instead of the resin ones
provided. I repeated the same to the wing guns. I read in literature that the PR
version did not carry armament but the only two photos that I had of this
version did have the guns visible, although the internal armament may have
indeed been removed to save weight to help increase range.
The vertical fin and ruder comes as a separate item. This had a hole
drilled at the leading edge upper to anchor the antenna wire at a later stage.
Fuselage gun blisters were then fixed in place and upon drying these were
drilled to take hollow metal guns that I added instead of the resin ones
provided. I repeated the same to the wing guns. I read in literature that the PR
version did not carry armament but the only two photos that I had of this
version did have the guns visible, although the internal armament may have
indeed been removed to save weight to help increase range.
The turbocharger and gun sight, both resin components were added on. Finally I fitted on the undercarriage oleo, leaving the wheels to a final stage since these were painted and placed aside. This requires drilling further the locating holes for the oleo legs and after these were fixed in place added the resin scissors and supporting rods made from short length of stretch sprue, made as per instruction dimensions. Wing guns, pitot tube and wireless antenna were then added. The cockpit canopy was trimmed with scissors and assembled in the closed configuration using white glue. This was then covered in Maskol in preparation for the painting stage. The prop which comes in separate blades was assessable and painted black with yellow tips and silver blade grip.
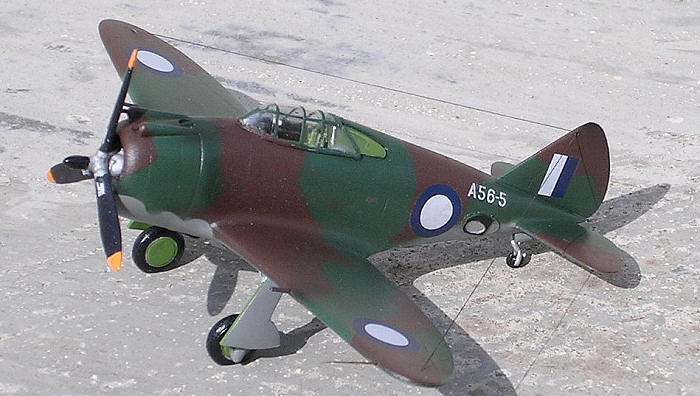
| COLORS & MARKINGS |
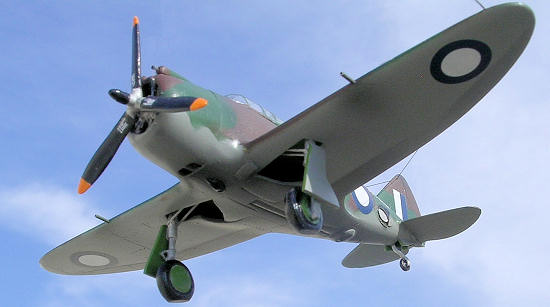 I was unsure
at the exact green and brown that the camouflage upper was going to be but after
colour reference to Australian Wirraways colour pictures I went for the foliage
green using Compucolor CA3, ANA 612 which was a brighter shade of medium green.
As for the brown shade which was rather dark brown I used CSF rust which is also
a Compucolor brand. In the end I managed to get a satisfactory Australian WWII
camouflage colours contrast. The undersides were neutral grey. Finally I gave
the kit two coats of Johnsons Klear. The decals were of top quality as usually
found in Pavla kits. The camera port edge was trimmed in matt black. A drop of
Kristal Kleer completed the camera port orifice. Finally the prop was added and
the main wheels fixed in place. The kit was finally given a coat of semi matt
Model Master Varnish with faint fading oil slicks at openings.
I was unsure
at the exact green and brown that the camouflage upper was going to be but after
colour reference to Australian Wirraways colour pictures I went for the foliage
green using Compucolor CA3, ANA 612 which was a brighter shade of medium green.
As for the brown shade which was rather dark brown I used CSF rust which is also
a Compucolor brand. In the end I managed to get a satisfactory Australian WWII
camouflage colours contrast. The undersides were neutral grey. Finally I gave
the kit two coats of Johnsons Klear. The decals were of top quality as usually
found in Pavla kits. The camera port edge was trimmed in matt black. A drop of
Kristal Kleer completed the camera port orifice. Finally the prop was added and
the main wheels fixed in place. The kit was finally given a coat of semi matt
Model Master Varnish with faint fading oil slicks at openings.
| CONCLUSIONS |
| REFERENCES |
Military
Aircraft of
October 2008
Copyright ModelingMadness.com. All rights reserved. No reproduction in part or in whole without express permission from the editor.
If you would like your product reviewed fairly and quickly, please contact the editor or see other details in the Note to Contributors.
Back to the Review Index Page 2024