
Accurate Miniatures 1/48 A-36 Apache
| KIT #: | 3401 |
| PRICE: | €25 in 2007 |
| DECALS: | One option |
| REVIEWER: | Spiros Pendedekas |
| NOTES: | Reboxed by Italeri in 2013 |
| HISTORY |
Following the Mustang I's successful combat initiation and wanting to ensure
that the type remained in production, North American kept pressing the newly
redesignated USAAF for a fighter contract of the essentially similar P-51, 93 of
which had passed into the USAAF when the Lend-Lease contract with Britain ran
out of funds.
Whereas no funds were available for new fighter contracts in 1942, the
appropriations for attack aircraft led USAAF General Oliver P. Echols,
responsible for the development, procurement and supply of aircraft and
aeronautical equipment, to specify modifications which would turn the P-51 into
a dive bomber, so the A-36 was born. The resulting contract for 500 A-36
aircraft fitted with bomb racks, dive brakes, and heavier-duty wing that was
signed on 16 April 1942, was a major contributor to keep the P-51 program alive.
The “Apache”, basically utilizing the P-51 airframe and Allison engine, was
structurally reinforced at several high stress areas, with the engine optimized
for use at low altitudes. A set of hydraulically operated dive brakes were
installed in each main wing plane, which, combined with the slightly inboard
placement of the bomb racks, necessitated a complete redesign of the P-51 wing.
The main air scoop inlet became a fixed unit with a larger opening, replacing
the earlier scoop which could be lowered into the airstream. Finally, the
carburetor air intake was later fitted with a tropical air filter to stop sand
and grit being ingested into the engine.
Primarily deployed in the Mediterranean theater, the plane, though essentially a
stop-gap measure, proved to be a potent weapon: thanks to its dive brakes, it
could dive vertically from 12,000 ft with a dive speed not exceeding 390 mph.
Depending on the target and defenses, the bomb release would take place between
2,000 and 4,000 ft, followed by an immediate sharp "pull up."
 Despite establishing a reputation for reliability and performance, the one
"Achilles' heel" of the type (and the entire Mustang series, as a matter of
fact) remained the ventral-fuselage location of the radiator/cooling system,
leading to many of the losses.
Despite establishing a reputation for reliability and performance, the one
"Achilles' heel" of the type (and the entire Mustang series, as a matter of
fact) remained the ventral-fuselage location of the radiator/cooling system,
leading to many of the losses.
Some disquieting accident rates resulted in orders issued to Combat Units to
restrict their approach to a 70° "glide" attack and refrain from using the dive
brakes, the latter exhibiting a tendency to extend unequally due to variations
in hydraulic pressure, setting up an invariable roll. Whereas these restricting
orders were generally ignored by experienced pilots, who invented proper
techniques to cure the dive brakes anomaly and, subsequently, achieving
extremely consistent results, some units did wire-shut their dive brakes until
modifications were made to the hydraulic actuators. The dive brakes were
nevertheless a successful design, much appreciated by pilots, offering the plane
the required stability and control when in a dive, with the statement of them
being “mostly wired-shut due to malfunctions or because of the danger of
deploying” leaning towards exaggeration.
Besides dive bombing, the type racked up aerial victories, totaling 84 enemy
aircraft downed and creating an "ace", Lieutenant Michael T. Russo from the 27th
FBG (ultimately, the only ace using the Allison-engined Mustang). As fighting
intensified, the type began to suffer an alarming loss rate with 177 falling to
enemy action, the main reason for the attrition being the hazardous missions the
plane undertook. By June 1944, A-36s in Europe were replaced by P-40s and P-47s.
The plane also served in the China-Burma-India theater, tasked with
reconnaissance, dive bombing, attack and fighter missions. Its main opponent,
the Ki-43, being light and highly agile, could outmaneuver it at all altitudes,
but it was lightly armed and offered little protection for pilot or fuel tanks.
The Apache, having to carry out long-range missions, often at altitudes above
The Hump, meant its Allison engine was below peak performance, so it would
typically fight the Oscar at a significant disadvantage.
The A-36 was a great dive-bomber, acquiring a reputation for precision,
sturdiness and silence. Its relatively brief service life should not camouflage
the fact that it made a major contribution to the Allied war effort, especially
in the Mediterranean and it amounted to the first USAAF combat use of a Mustang
variant.
| THE KIT |
This is the initial release 1/48 A-36, belonging to the early Mustang series
that Accurate Miniatures decided to treat us from as far back as 1994. By all
means a very nice kit, even for today’s standards, the specific kit was bought
in 2007 and has been patiently residing in my Shelf of Doom ever since, asking
for a chance to be built, with its high time arriving 15 years later.
For a more in-depth view of its contents, please read the preview
of this fine kit found at the MM archives.
| CONSTRUCTION |
 Since Accurate Miniatures provided the nose separately, in order to cater for
other variants, first thing I did was to attach each nose half to each fuselage
half, thus obtaining two “complete” fuselage halves: this is crucial, in order
to avoid the mismatch that would possibly arise, had I assembled the nose and
fuselage separately and then joined them.
Since Accurate Miniatures provided the nose separately, in order to cater for
other variants, first thing I did was to attach each nose half to each fuselage
half, thus obtaining two “complete” fuselage halves: this is crucial, in order
to avoid the mismatch that would possibly arise, had I assembled the nose and
fuselage separately and then joined them.
Having two complete fuselage halves, I went on attaching all interior bits,
namely the cockpit floor with the stick attached onto it, the instrument panel,
the very nicely detailed sidewalls, the batteries and radio aft of the pilot’s
seat and the radiator exhaust door at the rear. The fuselage halves were then
joined with fit being very good. I did not attach the seat, the rollover frame,
the gunsight and the rear wheel, planning to fit them at the end stages. Basic
cockpit color was Hu226 Interior Green, with black instrument panel, front
anti-glare area, stick grip, side consoles and rear batteries. The kit provided
instrument decal was applied and looked very nice indeed.
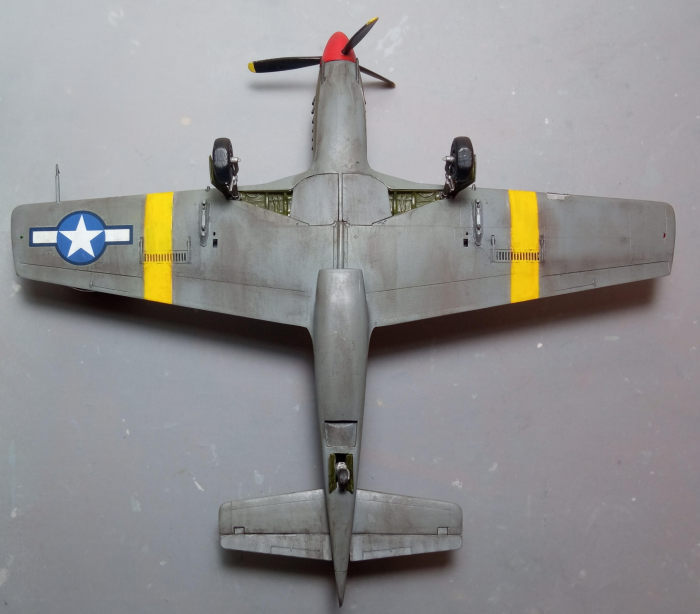
Main wing came next: again, I refrained from the usual (and tempting) method of
attaching the top halves onto the underside single half and affix the assembled
wing to the fuselage: what I did was to first attach the lower single wing half
to the fuselage, then, after having shaved off all locating pins, I attached the
top wing halves to the fuselage wing roots, obtaining the best possible fit
there and, finally, let the wing halves “rest” to the lower half and securing
them with water thin glue by its capillary action. This way, a nice allover fit
was ensured (not implying that the nicely designed AM kit would exhibit gaps
there no matter what - indeed, the opposite would be expected).
In order for more “dynamic” looks, I decided to separate the elevators by
carefully and patiently running the back side of my hobby knife into the hinge
lines. Upon separation, I sanded smooth all resulting edges and then attached
only the stabilizers to the fuselage, leaving the elevators out to facilitate
painting. The radiator scoop was attached at this time as well, its fit needing
some attention at the points it meets the fuselage.
The complete basic model was then initially filled with liquefied styrene, then
with “normal” putty and sanded smooth, with not too much filling actually
needed, as fit was mostly very good. After attaching the keyed bomb racks under
the wings, I took my Apache to the paint shop!
| COLORS & MARKINGS |
I first painted all undersides, including the gear doors, with a leftover Molak
1126 Neutral Gray. I was ready to mask it off and happily proceed to the
topsides, when Tom Cleaver told me that I had forgotten to attach the carburetor
intake, which I immediately did. Once again, Tom saved my day, just in time.
 After filling and sanding the intake smooth, I used tack strings to mask the
camo borders and then painted all topsides with Hu155 Olive Drab. Upon removing
the tack strings, nice demarcation lines arised (neither too hard nor too soft),
with a coat of future preparing the bird for decals.
After filling and sanding the intake smooth, I used tack strings to mask the
camo borders and then painted all topsides with Hu155 Olive Drab. Upon removing
the tack strings, nice demarcation lines arised (neither too hard nor too soft),
with a coat of future preparing the bird for decals.
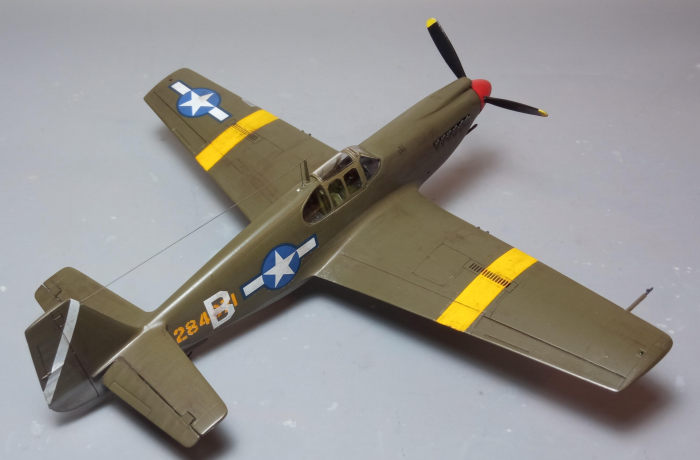
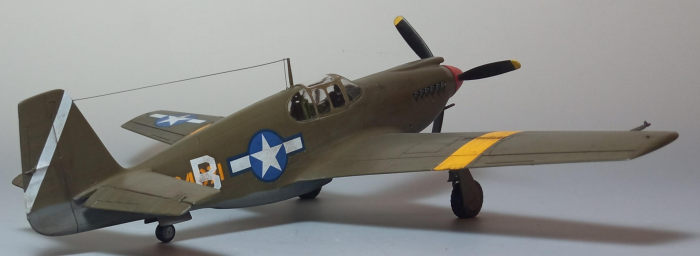
I usd the kit decals, in order to depict the only scheme provided, which is
27FG’s s/n 284071 bird, as it stood in Italy in Spring 1944, having performed
190 bomb runs. Despite their age, the decals generally behaved satisfactorily,
and settled down reasonably with the help of decal softening solution. They
presented little, if any, silvering, and the whites and yellows were reasonably
opaque. The infamous wing ID broad yellow lines were also provided as decals and
did not conform that well, needing copious amounts of softening solution and
inevitable time consuming touch-ups. The fact that they cross over the
perforated part of the air brakes did not help either and, to summarize, take
Tom’s advice to toss the yellow band decals and paint them, instead of playing
smartypants like Yours Truly and paying the price…
A coat of Future sealed the decals.
| FINAL CONSTRUCTION |
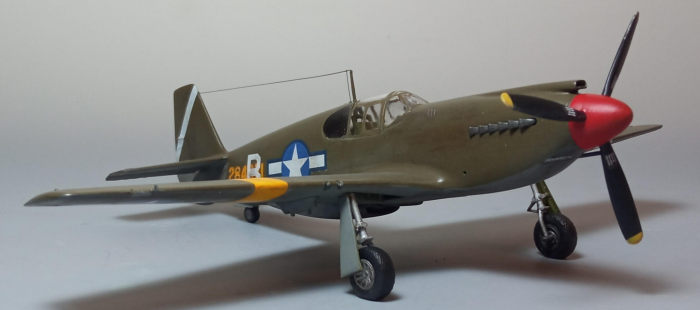
I attached the main landing gear legs, followed by the wheels, for which I chose
the “weighted” option. The rim faces were separately molded, which made painting
a breeze. The rear wheel was attached at this time as well, quite effortlessly,
since Accurate Miniatures have brilliantly molded one of its fuselage housings
with a suitable notch, so the strut can be press-fitted and clicked into place!
Well done AM!
The doors were then attached, where I chose to glue the main ones shut, as, to
my understanding, in earlier Mustangs they would not droop upon engine shutdown.
The main legs received brake lines from stretched sprue, accordingly routed.
Landing gear legs and the outer rims were painted “steel”, the inner rims were
painted gunmetal, tires and brake flexible hoses were painted black, oleos were
highlighted with my fine tip silver pen, whereas bays and door innards were
painted Hu226 Interior Green.
The rollover frame was attached, followed by the seat, which received seat belts
made from masking tape and painted “leather”. The elevators were then attached
“drooped”, accompanied by a control stick push forward (in a brutal manner,
truth be told, since it was molded together with its connecting rod underneath).
Finally, the exhausts, guns and bomb sway braces were painted Testors Burned
metal and attached to their corresponding positions.
 The prop was assembled and had its spinner base seam filled and sanded smooth,
The spinner was painted red, whereas the blades were painted black with yellow
tips. I decided to apply the blade data stencils at their roots, though these
were fading soon out in the field. The prop was then affixed into place,
followed by the pitot tube, which had its body painted per the camo and its tip
burned metal.
The prop was assembled and had its spinner base seam filled and sanded smooth,
The spinner was painted red, whereas the blades were painted black with yellow
tips. I decided to apply the blade data stencils at their roots, though these
were fading soon out in the field. The prop was then affixed into place,
followed by the pitot tube, which had its body painted per the camo and its tip
burned metal.
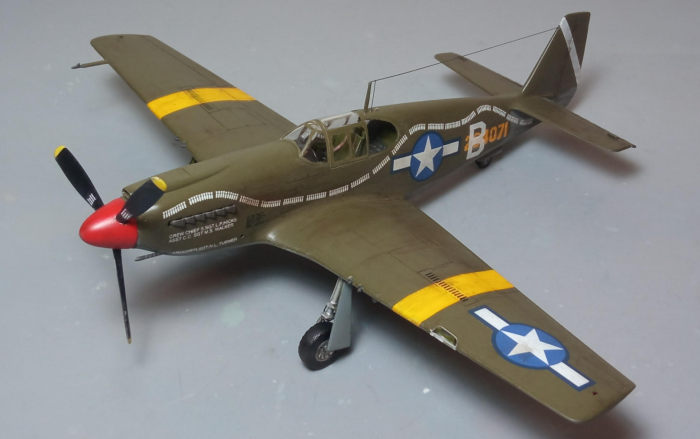
Since Accurate Miniatures stated in their very comprehensive supporting text
that the specific bird was pretty well used, having performed its 190 bombing
missions, I did not restrain myself too much in weathering. I first gave the
bird a black wash that accentuated all engraved details and gave areas like the
bays and various hinges an oily look. I then applied dry pastels of dark
brown/black shades at all areas where dirt, grime or even engine staining would
accumulate. Finally, silver dry brushing was applied not only at the usual
suspect places to simulate paint chipping and dings (blade tips, wing roots and
so on), but also in the main bays to accentuate the nicely molded piping. A
satin (towards matt) coat gave the Apache its final finish.
The transparencies had their frames hand painted and were attached, with fit
being good, the minor gaps faired with white glue. A couple of sprue gates were
too close to the actual transparent parts, which were slightly affected upon
removal from the sprues, but nothing too serious.
The antenna mast was finally attached and thin stretched sprue was run from its
tip to the fin, with a smaller piece ending into the spine just aft of the mast.
The top beacon was simulated with a “pin” from my fine tip silver pen onto the
corresponding spine bulge, whereas the wingtip lights were replicated by mini
blobs of red and green clear paint, before calling the A-36 done!
| CONCLUSIONS |
This is a really fine kit of the very important in many respects Mustang
dive bomber variant. Overall shape looks spot-on, molding is superb, panel lines
are nicely engraved, cockpit, landing gear and details in general are more than
adequate for the majority of us, fit is very nice (provided you will attach each
nose half to each fuselage half first, then join the fuselage), transparencies
are good and decals, with the exception of the notorious wing yellow bands, were
usable.
 Instructions are very explanatory text-wise, but lack pictorial-wise, as they
are done by hand in a somehow simplistic manner. In any case, praise the net
days, you can easily download the vastly upgraded ones that come with the
Italeri reboxing. Almost as easily built as the Tamiya Mustang, the kit can be
tackled by even a novice.
Instructions are very explanatory text-wise, but lack pictorial-wise, as they
are done by hand in a somehow simplistic manner. In any case, praise the net
days, you can easily download the vastly upgraded ones that come with the
Italeri reboxing. Almost as easily built as the Tamiya Mustang, the kit can be
tackled by even a novice.
Accurate Miniatures has to be congratulated for coming up with such a great kit
from as far as 1994, let alone the fact that, to my knowledge, even nowadays
(2023), this is still your only mainstream option for a quarter scale A-36.
Though it is sad that AM does not exist any more, the good news is that their
molds have survived and found their way through other manufacturers, with the
specific kit reboxed by Italeri in 2013, featuring great instructions and superb
decal options.
In any case, if you own one or come across one of these kits, by all means grab
it and build it, coming up with a wonderful A-36 and letting your casual (not
Experten) friends wonder what on earth this “perforated panel “ on the Mustang
wing stands for.
Happy Modeling!
March 2015
Copyright ModelingMadness.com. All rights reserved. No reproduction in part or in whole without express permission.
If you would like your product reviewed fairly and fairly quickly, please contact the editor or see other details in the Note to Contributors.