| KIT #: | 05404 |
| PRICE: | Around €35 |
| DECALS: | Two options |
| REVIEWER: | Spiros Pendedekas |
| NOTES: | Monogram tooling |
| HISTORY |
The Douglas A-26 was in essence the company’s successor to the A-20, first flying in prototype form on 10 July 1942 at Mines Field, El Segundo, with test pilot Benny Howard at the controls. Featuring an innovative NACA laminar-flow airfoil wing, the prototype exhibited excellent performance and handling, with not too many follow-on changes, mainly at the cowlings (to deal with engine overheating) and the nose landing gear area (to make it stronger, as the nose gear was found prone to collapse).
 Early
versions were built either as the gun-nose A-26B, featuring a combination of
armament, or the glass-nose A-26C, utilizing a Norden bombsight for medium
altitude precision bombing and two fixed nose mounted M-2 guns (the latter were
soon eliminated). The two nose sections were interchangeable, with the operation
needing only a few hours, thus physically (and officially) changing the
designation and operational role.
Early
versions were built either as the gun-nose A-26B, featuring a combination of
armament, or the glass-nose A-26C, utilizing a Norden bombsight for medium
altitude precision bombing and two fixed nose mounted M-2 guns (the latter were
soon eliminated). The two nose sections were interchangeable, with the operation
needing only a few hours, thus physically (and officially) changing the
designation and operational role.
The dorsal and ventral turrets were remotely operated via a novel but complex dual-ended periscope sight, which not only delayed production, taking some time to be developed, but also proved a challenge during field maintenance. After about 1,570 production aircraft, three guns were installed in each wing, coinciding with the introduction of the "eight-gun nose" for A-26Bs, giving some configurations with as many as 14 machine guns in fixed forward mounts. The flat-topped canopy was also changed to a clamshell style in late 1944 after about 820 production aircraft, with greatly improved visibility.
During WWII, the Invader served at both the Pacific and European Theaters, whereas after the war it saw service during several major Cold War conflicts. A limited number of highly modified USAF aircraft also served in Southeast Asia until 1969. Apart from the US, the versatile Invader was used post WWII to various degrees by numerous Air Forces. With appropriate modifications, the type also found its way to civil operations as executive personnel transport, air tanker and fire fighter.
| THE KIT |
 This is the
1996 Revell reboxing of the 1995 Pro Modeler version, which, in return, was a
beefed up edition of the original 1993 Monogram tooling, featuring extra sprues,
not only to make different versions, but also to enhance the basic model,
including, among others, weighted tires, bays’ extra walling and some figures
for adding a diorama style. A by all means good kit, its main issue being the
tad thicker than normal fuselage cross section, something that became more
apparent with the arrival of the very good and correct in proportions 2019 ICM
offering. Still, the Monogram’s slightly fatter fuselage might not pose a too
notable discrepancy for a number of us.
This is the
1996 Revell reboxing of the 1995 Pro Modeler version, which, in return, was a
beefed up edition of the original 1993 Monogram tooling, featuring extra sprues,
not only to make different versions, but also to enhance the basic model,
including, among others, weighted tires, bays’ extra walling and some figures
for adding a diorama style. A by all means good kit, its main issue being the
tad thicker than normal fuselage cross section, something that became more
apparent with the arrival of the very good and correct in proportions 2019 ICM
offering. Still, the Monogram’s slightly fatter fuselage might not pose a too
notable discrepancy for a number of us.
The specific kit was bought sealed at around 2005 from one of my then usual
(now, sadly, closed) toy/hobby shops in my town, Chalkis, carrying a fair price
tag. For a more in-depth look of this fine kit’s contents, you may read its preview found
at the MM archives.
| CONSTRUCTION |
I started by putting together the cockpit, attaching onto its floor the instrument panel, the front and rear bulkheads and the lower front section. The nose bay side walls, which have the gear doors molded on, were attached underneath the floor, as well, only hoping that their sensitive hinges would survive my less than delicate handling during the build.
Having attached the two tiny side windows from the insides, I joined the fuselage halves, with the cockpit, the wing spar bulkhead and the fore and aft gunner’s bulkheads trapped in. The remote operated dorsal and ventral turrets were not trapped in, planning to attach them at later stages (hopefully with no big drama). Since I was going for closed bomb bays, the corresponding doors were glued “shut”.
 Basic
interior color was Hu226 interior green, the instrument panel, yoke and various
consoles were painted black and the seat cushions “leather”. Instrument faces
were dry brushed with silver and various “knobs” were replicated by “pins” of
red, white and yellow paint. The molded on seat belts were painted khaki with
silver buckles. The seats, the yoke and the periscope were left aside, to be
attached at later stages.
Basic
interior color was Hu226 interior green, the instrument panel, yoke and various
consoles were painted black and the seat cushions “leather”. Instrument faces
were dry brushed with silver and various “knobs” were replicated by “pins” of
red, white and yellow paint. The molded on seat belts were painted khaki with
silver buckles. The seats, the yoke and the periscope were left aside, to be
attached at later stages.
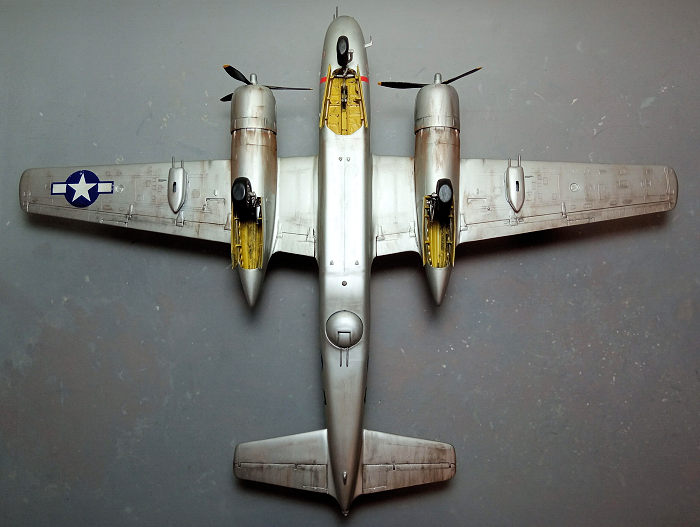
The 2-piece main wings were next assembled, followed by the 6-piece nacelles/main wheel bays, which were attached underneath them, with the completed wings then glued to the fuselage. Fit was very good, with the rigidity of the area much aided by the very cleverly designed wing reinforcing spars. The very nice one piece horizontal stabilizers and the underwing twin gun packs were attached at this time, as well.
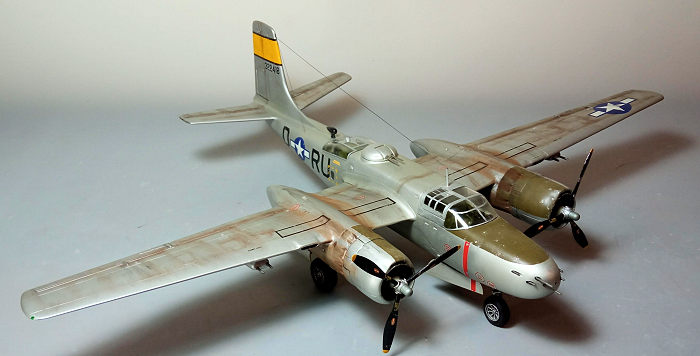
The good looking engines were glued to their rear exhaust collector rings, with the prop axles trapped in between, followed by the front cowlings, with the completed subassemblies then attached to the wings. Engine cylinders were painted black, then heavily dry brushed with silver, the front casings were painted gray and the cowling innards were painted aluminum (the latter called by the instructions - I was expecting zinc chromate there).
Finishing basic assembly, the solid nose was filled with fishing weights and attached. Overall fit, though requiring its usual attention at the expected areas (wing/fuselage joins, nacelles etc) was quite good, with the construction being relatively uncomplicated (for a twin engine bomber) and very pleasant. After a filling and sanding session, I masked all interior openings and took the bird to the paint shop!
| COLORS & MARKINGS |
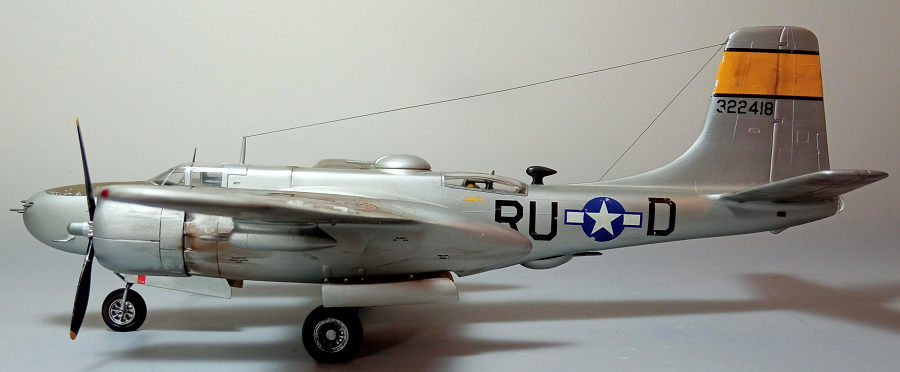
 First thing
I did was to give the front and the nacelles’ anti glare areas a coat of Hu155
Olive Drab. After masking them off, I sprayed the complete model with Hu11
Silver, with a coat of Future preparing it for decals.
First thing
I did was to give the front and the nacelles’ anti glare areas a coat of Hu155
Olive Drab. After masking them off, I sprayed the complete model with Hu11
Silver, with a coat of Future preparing it for decals.
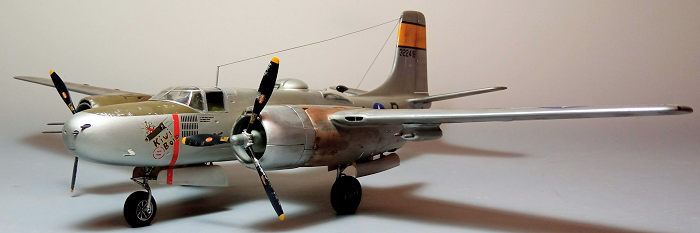
I used the kit decals, in order to represent #322418 “RU D” bird, named “Kiwi Boid”, as it stood in Sint-Truiden, Belgium, June 1944. To be on the safe side, the well printed but old kit decals were carefully treated, and I was rewarded with them behaving well with no nasty surprises (crackings and the like). A coat of Future sealed them.
| FINAL CONSTRUCTION |
I assembled and attached the landing gear legs, followed by the wheels (I used the weighted ones), with the Invader proudly and securely standing on her feet. Legs and wheel rims were painted “steel”, tires and the nicely molded on brake lines were painted black, whereas bays’ interior was painted zinc chromate. The crew interior was finalized at this time, as well, by attaching the pilot’s seat, the yoke and the rear gunner's periscope.
It was then time for some weathering. I started with some black wash at the landing gear, wheel bays, door innards and all engraved hinges. Then I went on applying dark brown/black dry pastels to all areas where dirt, grime, engine soot and the like might accumulate. Some silver chipping was also performed at the olive drab areas, with a satin coat sealing everything and giving the bird its final hue.
 The nice
one-piece props were painted black with steel hubs and yellow tips, had their
decal tags applied, received a silver dry brushing at their blades’ leading
edges and attached in position. The transparencies had their well defined frames
hand painted and affixed in place. The gunner’s fit well, but the pilot’s was a
tad wider at the front. Nevertheless, the gaps were evened with white glue. The
two underwing landing lights and the tail light transparencies were also affixed
at this time, as well.
The nice
one-piece props were painted black with steel hubs and yellow tips, had their
decal tags applied, received a silver dry brushing at their blades’ leading
edges and attached in position. The transparencies had their well defined frames
hand painted and affixed in place. The gunner’s fit well, but the pilot’s was a
tad wider at the front. Nevertheless, the gaps were evened with white glue. The
two underwing landing lights and the tail light transparencies were also affixed
at this time, as well.
Though instructions called for attaching only the dorsal turret for my version,
I decided to attach the ventral also, as it does have good chances to have been
attached to the specific bird. Turrets were painted fuselage color and their
guns were painted gunmetal, as were the six front guns which were subsequently
attached, together with the tiny pitot tube.
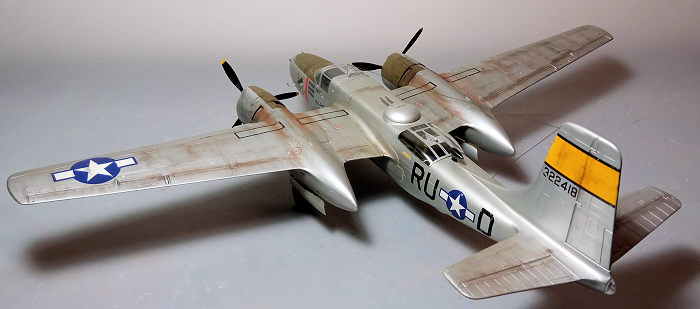
The DF loop antenna was painted black and attached at the rear top (again, a matter of debate, as it was typically attached at the bottom if the ventral turret was absent). The front antenna mast was attached at the top front, with the aerial wire, represented by stretched sprue, run from it towards the fin and then to the port rear fuselage area as illustrated at the instructions. The wing tip lights were replicated by pins of red and green clear paint, before calling the iconic bomber/strafer done!
| CONCLUSIONS |
ICM came in 2019 with
their excellent quarter scale Invader line, having reboxed them another 12 times
in just three years (!) covering most, if not all, sub variants and even special
versions. The ICM offerings are clearly the way to go if you want the latest and
greatest Invader and the fact that one of these reboxings is done by Revell
itself tells a lot.
That said, the now classic Monogram Invader is by no means an obsolete kit:
though superseded by the ICM offering, let alone the fact that its fuselage
cross section tad fatter than it should (but, truth be told, a good number of us
will only notice it upon side by side comparison with the ICM), this is a solid,
well molded kit with adequate all over detail, good fit, well written
instructions, great decals, with he construction itself being relatively simple
for a twin engine bomber. Still not that difficult to find today (2023)
and priced notably lower than the ICM, this is a great, unpretentious kit, from
which a nice model will emerge.
Happy Modeling!
31 July 2023
Copyright ModelingMadness.com. All rights reserved. No reproduction in
part or in whole without express permission.
If you would like your product reviewed fairly and fairly quickly, please
contact
the editor or see other details in the
Note to
Contributors. Back to the Main Page
Back to the Review
Index Page
Back to the Previews Index Page