
| KIT #: | Various |
| PRICE: | $25.00 MSRP for the most recent gun nose release |
| DECALS: | See review |
| REVIEWER: | This is basically a group build. |
| NOTES: | Bombshell Decals used. History by Tom Cleaver |
Yossarian: “Is Orr crazy?”
Yossarian: “Then you can
ground him?”
Doc Daneeka: “You got it,
that's Catch‑22.”
During the Italian campaign from September 1943 to March 1944, the 340th
bombed airfields, railroads, bridges, road junctions, supply depots, gun
emplacements, troop concentrations, marshaling yards and factories in
The last great eruption of
 As a result, the 340th Bomb Group was moved with the rest of
the fighter, bomber and reconnaissance units of the 57th Wing to the
island of Corsica, where they were far removed from any further peril from Mount
Vesuvius, and were also placed strategically to provide better support for the
Italian campaign as the lines moved through central Italy and on into the
northern half of the peninsula over the next year of the war, in addition to
positioning the aircraft to make raids on southern France and southern Austria.
So many Allied aircraft were based on
As a result, the 340th Bomb Group was moved with the rest of
the fighter, bomber and reconnaissance units of the 57th Wing to the
island of Corsica, where they were far removed from any further peril from Mount
Vesuvius, and were also placed strategically to provide better support for the
Italian campaign as the lines moved through central Italy and on into the
northern half of the peninsula over the next year of the war, in addition to
positioning the aircraft to make raids on southern France and southern Austria.
So many Allied aircraft were based on
Following the move to
On the night of
Following this raid, many of the 340th B-25s were hurriedly
camouflaged on their upper surfaces with what was likely British or Italian dark
green paint applied roughly to the silver upper surfaces of these
otherwise-unpainted aircraft, giving the unit a very distinctive look for the
remainder of the war as the survivors continued to make their missions.
Flying from
On
The 340th Bomb Group flew its last bombing mission on
The Kit:
 Monogram’s 1/48 B-25 first appeared in 1975 (according to the copyright
printed on the lower horizontal stabilizer), first showing up as the
cannon-carrying B-25H gunship.
The
kit was re-released in 1981 as the glass-nose B-25J, and then appeared in around
1986 as the all-gun solid-nose B-25J strafer.
It was then released in the late 1990s by Monogram’s Pro-Modeler program
as the glass-nose early strafer.
All of these kits have been re-released over the years, with the most current
re-releases made by Revell of the Pro-Modeler strafer and just this past month
with the solid-nose strafer.
Monogram’s 1/48 B-25 first appeared in 1975 (according to the copyright
printed on the lower horizontal stabilizer), first showing up as the
cannon-carrying B-25H gunship.
The
kit was re-released in 1981 as the glass-nose B-25J, and then appeared in around
1986 as the all-gun solid-nose B-25J strafer.
It was then released in the late 1990s by Monogram’s Pro-Modeler program
as the glass-nose early strafer.
All of these kits have been re-released over the years, with the most current
re-releases made by Revell of the Pro-Modeler strafer and just this past month
with the solid-nose strafer.
Over the years, there have been many decal sheets released for these
kits.
There are none that are
better or more interesting than the three sheets recently released by Bombshell
Decals, providing markings for six B-25Js of the 340th Bomb Group.
These decals are so good that when I received the review sheets, I wanted
to see them all done.
Not wanting
to create my own B-25 factory in the workroom, I sent the decals to several good
friends who are good modelers, and asked them to do their take on the markings
provided.
And thus here we are with
this “group review” of a sheet of decals and a celebration of one of the great
“war horses” of scale modeling, the Monogram B-25J Mitchell.
Tom Cleaver:
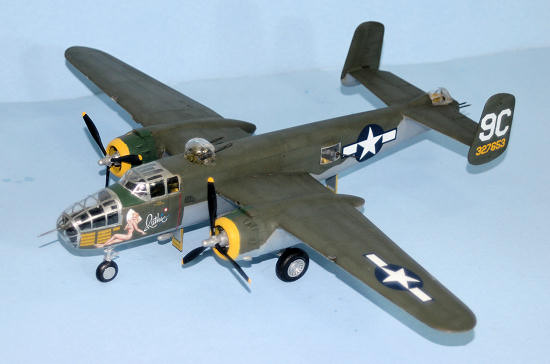
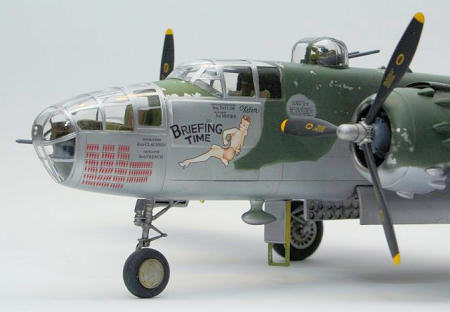
Being He Who Had The Decals, I chose to do “Ruthie” from the 489th
Bomb Squadron, 340th Bomb Group.
As noted in the decal instructions, “Ruthie” was a real survivor, flying
108 missions between May 1944-April 1945; during this period, the 489th
lost 75 aircraft, three times its assigned strength as a result of losses on
missions or from unrepairable battle damage. Whoever the unknown artist was, the
“Ruthie” nose art is perhaps one of the best nudes ever put on an airplane
during the Second World War, and Bombshell Decals catches all the nuances of
this piece of artwork beautifully.
My kit was one I had purchased at a show several years ago, that came out
of the garage stash.
Construction:
 Assembly is straightforward.
I assembled the wings with engine nacelles, and the tail surfaces before
proceeding with the fuselage.
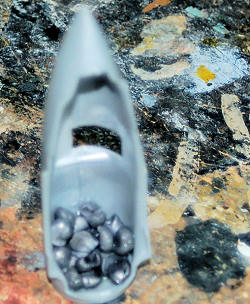
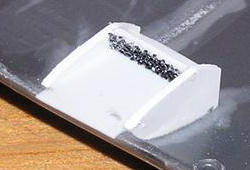
I
made sure when I did the engine nacelles to fill the space with as many
flattened fishweights as I could put in ahead of the main gear, since the model
needs all the help it can get; flattening the weights allows even more to be
crammed in there.
Luckily, the main
gear legs are strong enough one doesn’t have to worry about harming them with
the weight.
I finished off the
sub-assemblies by painting and assembling the engines, then attaching the
cowlings with their individual exhaust stacks.
Assembly is straightforward.
I assembled the wings with engine nacelles, and the tail surfaces before
proceeding with the fuselage.
I
made sure when I did the engine nacelles to fill the space with as many
flattened fishweights as I could put in ahead of the main gear, since the model
needs all the help it can get; flattening the weights allows even more to be
crammed in there.
Luckily, the main
gear legs are strong enough one doesn’t have to worry about harming them with
the weight.
I finished off the
sub-assemblies by painting and assembling the engines, then attaching the
cowlings with their individual exhaust stacks.
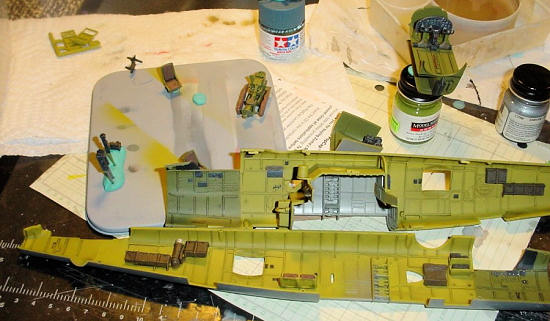
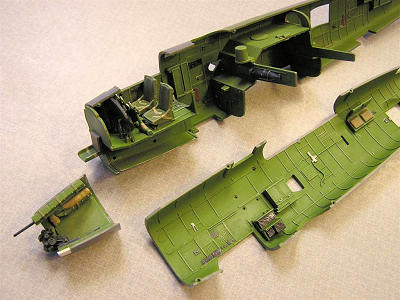
I proceeded with the interior painting.
The bombardier’s position and the cockpit were done in Dull Dark Green,
for which I used Tamiya “Deep Green” with some Black. The rest was done in
Yellow Zinc Chromate, with the various electronic great done with Semi-Gloss
Black and the rest in Olive Drab.
You don’t see this in any detail when finished, so I did not spend a lot of time
on detailing, other than to drybrush the instrument panel with Flat Aluminum.
Once I assembled the interior structure into the left fuselage half, I
added as many flattened fishweights as possible into the nose wheel well, where
they couldn’t be seen.
The fuselage
seemed nose heavy, so I taped the halves together and then slid the wings onto
the spars; there would be no problem with nose sitting.
With that, I glued the fuselage together, then attached the wings and
tail, and the nose without the glass.
I filled the “depression” around the wing attachment to the fuselage with
cyanoacrylate glue, let it dry, then covered it with Tamiya “Mr. Surfacer” to
fill it in. I applied Tamiya “Mr. Surfacer” to all other seams, and when dry
sanded them smooth.
I finished all
that by rescribing the main panel lines with a #11 X-acto.
I carefully test-fitted the bombardier’s canopy and cockpit canopy, then
sanded the edges so there was a good fit, and attached the glass, all of which
had been previous dipped in Future.
I left off the waist windows and the turret.
One thing important to note with the turret: there is no metal framing!
You don’t need to paint anything!
What looks like “framing” is plexiglass strip that was glued over the
seams of the individual parts in the production. Leave all that alone, the
raised detail is perfect.
Just dip
it in Future.
Then, once you have
the turret attached, fill in the slots with white glue.
On the real thing, these are fabric zippers, that run up and down as the
guns are elevated and depressed.
Once that is dry, paint it olive drab and you have the turret right.
99.9999% of modelers get this wrong because they have never seen the real
turret, but we have several out at
Painting:
The Bombshell decals say that the lower surfaces of these airplanes were
painted grey.
Every photo I could
find of these airplanes says that is wrong.
They arrived in NMF and the upper camo was applied in the field, with the
lower surfaces still in NMF.
I had
a long series of e-mails on this with Mike Kloppenburg, who created the decals,
and he agrees.
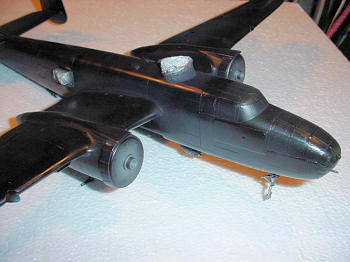
I first painted the cowlings yellow, then masked them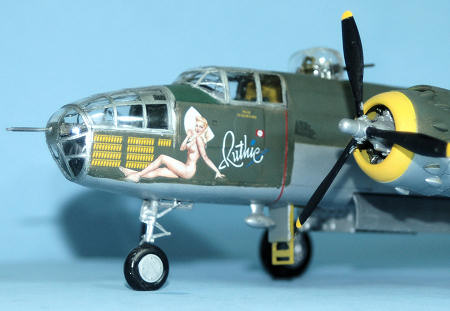 off, then painted the anti-glare panels on the cowlings and nose with Deep
Green, then painted the entire model with Talon acrylic Aluminum.
I masked the model with borders around the bombardier, cockpit and tail
gunner canopies, as well as the border of the upper colors. and then painted the
upper surfaces with Xtracrylix “RAF Dark Green” which I post-shaded a bit.
I had decided to do “Ruthie” as she would have looked shortly after the
repaint.
When that was dry, I gave
the upper surfaces a coat of Xtracrylix Gloss Varnish.
off, then painted the anti-glare panels on the cowlings and nose with Deep
Green, then painted the entire model with Talon acrylic Aluminum.
I masked the model with borders around the bombardier, cockpit and tail
gunner canopies, as well as the border of the upper colors. and then painted the
upper surfaces with Xtracrylix “RAF Dark Green” which I post-shaded a bit.
I had decided to do “Ruthie” as she would have looked shortly after the
repaint.
When that was dry, I gave
the upper surfaces a coat of Xtracrylix Gloss Varnish.
Final Finish:
Photos of these airplanes show the upper surfaces to be very flat in
finish, so I gave the upper surface a coat of Xtracrylix Flat Varnish with a
brushful of Tamiya Flat Base.
I finished off by unmasking the glass, attaching the wheels, bomb racks,
bomb bay doors, and props.
Milton Bell:
 I had the Monogram B‑25J kit on the shelf for close to 20 years, maybe a
few more. It was produced in the days that Monogram furnished decals that were
in good registration but were printed on very glossy material that usually
defied most setting solutions. Although I liked the markings for "Pancho," I
decided to wait for better markings. Over the years, my interest in late‑war
Mitchells waned and the kit continued to discover dust. When I heard of the Bomb
Shell decals for Corsican B‑25s I decided it was time to resurrect the old kit
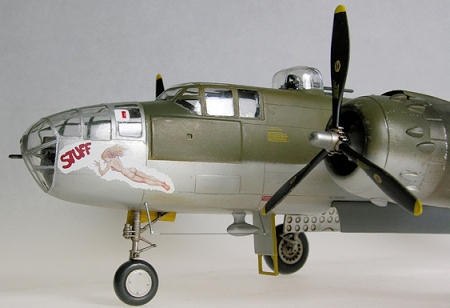
and rekindle my interest. It fell to me to do "Stuff," an aircraft from the
445th Bomb Squadron whose only outstanding quality seems to have been the
beautiful nude pin‑up girl painted on her nose.
I had the Monogram B‑25J kit on the shelf for close to 20 years, maybe a
few more. It was produced in the days that Monogram furnished decals that were
in good registration but were printed on very glossy material that usually
defied most setting solutions. Although I liked the markings for "Pancho," I
decided to wait for better markings. Over the years, my interest in late‑war
Mitchells waned and the kit continued to discover dust. When I heard of the Bomb
Shell decals for Corsican B‑25s I decided it was time to resurrect the old kit
and rekindle my interest. It fell to me to do "Stuff," an aircraft from the
445th Bomb Squadron whose only outstanding quality seems to have been the
beautiful nude pin‑up girl painted on her nose.
Construction:
I've got to say that the decals were some of the best I've used. The
separated from the backing sheet quickly and cleanly.
 They are
very opaque but not thick and reacted very well Micro Sol
setting solution. I experienced a little silvering with the large white
tail figure but some work with the point of a new #11 blade and a little extra
Micro Sol solved the problem. I'll have to try their new series of B‑25 decals
for my 1/72 Hasegawa B‑25J
They are
very opaque but not thick and reacted very well Micro Sol
setting solution. I experienced a little silvering with the large white
tail figure but some work with the point of a new #11 blade and a little extra
Micro Sol solved the problem. I'll have to try their new series of B‑25 decals
for my 1/72 Hasegawa B‑25J
I rescribed the upper surfaces of the wings and all of the fuselage
mainly because I removed a lot of the raised detail getting the seams to level
out. I also discovered that during the past 20 plus years, several parts,
particularly those around the nose had warped! Getting the clear parts to line
up required some temporary spreaders and some patience while the plastic
"reset."
Like many tricycle gear kits, this one wanted to be a tail‑sitter.
Fortunately, there's a good space for weight in the nose‑gear well and in the
bombardier's crawl space. After several tries, I finally got the model to sit
properly.
 Other than fiddling around with the order of construction, building the
model was easy. I added all the guns late in the process because I really hate
to break things in handling. The only exception was the nose gear which had to
be added early on and yes, I broke it. I drilled a small hole in each part,
added a small piece of brass wire and CA, and the strut was good as new.
Other than fiddling around with the order of construction, building the
model was easy. I added all the guns late in the process because I really hate
to break things in handling. The only exception was the nose gear which had to
be added early on and yes, I broke it. I drilled a small hole in each part,
added a small piece of brass wire and CA, and the strut was good as new.
I attached most of the clear parts with Gator's Grip Hobby Glue. The nose
cap with the fixed .50 cal was attached with jeweler's cement. I like this
cement for clear parts because it holds well, dries very clear, and can be
cleaned up with alcohol. It doesn't attack the clear styrene!
Painting:
"Stuff" was delivered in natural metal and probably remained so until a
Luftwaffe raid on the airfield easily picked out the uncamouflaged B‑25s. A coat
of either British dark green or
I finished my Monogram kit with Alclad Duraluminum on all lower surfaces
and Polly Scale Olive Drab 42 on the upper surfaces. Since these aircraft were
well used, I weathered mine a bit with darkened paint around the engine
nacelles.
Decals:
Bomb Shell's decals include color photographs as well as color profiles
so the choice of paints is pretty well narrowed down.
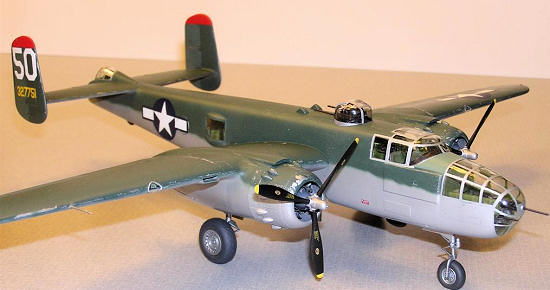
Steve Towle:
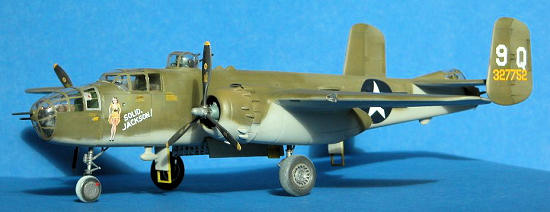 My set of Bombshell decals featured "Solid
Decals
I found my decals to be in
perfect register, opaque and with little or no carrier film. When I applied them
they all snuggled down provided that enough future had been brushed onto the
model along with some
decal setting
solution had been used on the decals. I had no problems with the Stars and Bars
or the Pin‑up girl but, when I added the lettering for "Solid
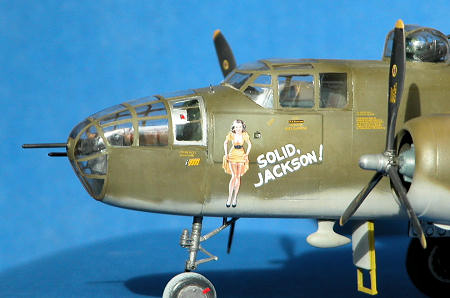 yellow
serial numbers for the tail they silvered. This may have been caused by my
brushing on a thin layer of "Future" on the twin tails and on the port side of
the cockpit.
yellow
serial numbers for the tail they silvered. This may have been caused by my
brushing on a thin layer of "Future" on the twin tails and on the port side of
the cockpit.
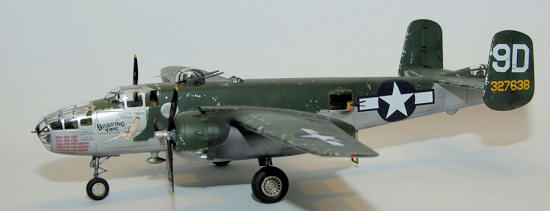
I also found the ID number 9Q on the tail to be too big. The letter "Q"
should not cover the trim tabs on the rudder . I looked a photo taken by Eddie
Little showing "Solid Jackson" flying in formation with a P‑51 and the markings
on the tail as a reference and I also looked at some photos of the Mid
Atlantic's Air Museums B‑25 "Briefing Time".
So I got some frisket paper and made stencils and sprayed white paint on
for the number 9 and Q.
To sum it up Bombshell's
representation of "Solid
Terry Miesle:
This is a bomber group I was not very familiar with.
The 12th Army Air Force, mostly American but notably including the
Brazilian 1st Fighter Squadron is an interesting subject.
Looking at the subject of this decal set, the 489th Bomb Squadron, a wide
variety of markings is available.
It seems no two aircraft are painted identically, and some very quirky subjects
are available.
 There
are controversies about which paint colors were applied in the field and many
planes sport unique color highlights and nose art.
This is all very fun for a modeler.
There
are controversies about which paint colors were applied in the field and many
planes sport unique color highlights and nose art.
This is all very fun for a modeler.
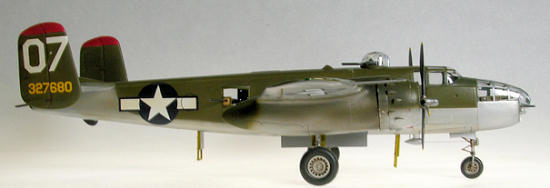
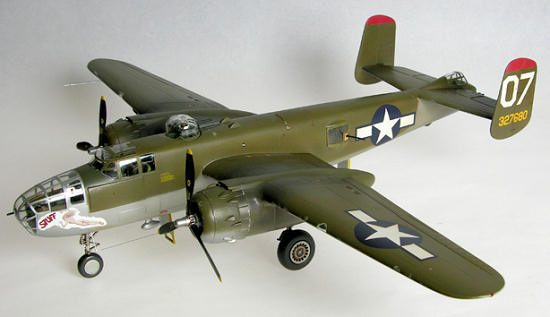
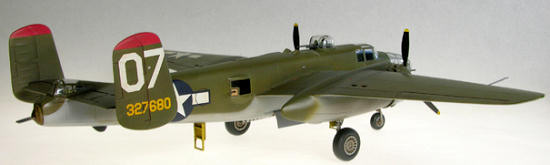
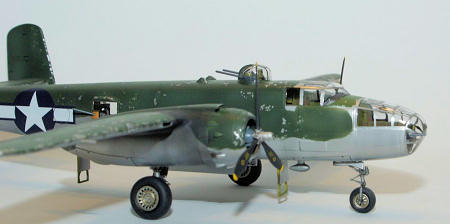
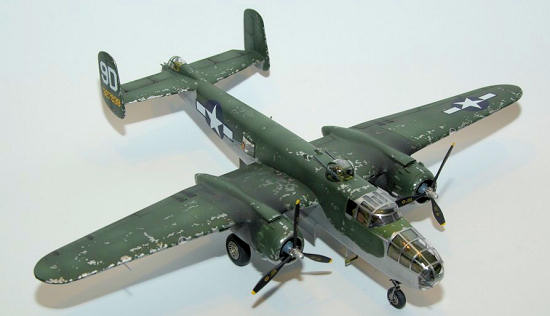
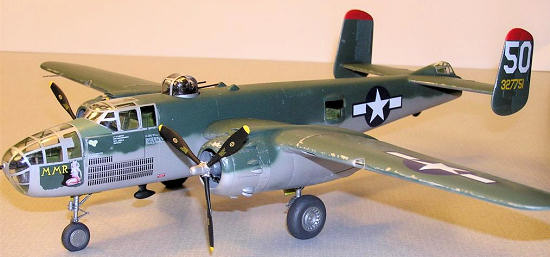
“Briefing Time,” later “Quitting Time” at war’s end, was 340th BG 489th
BS ‑ SN 43‑27638. Colors were often field applied, and Briefing Time may have
been British Dark Green or American Olive Drab.
I chose British Green, as it was more interesting and it seemed more
“field applied” to me.
Applied over
bare aluminum, the paint easily chipped away, particularly considering the flak
these bombers flew through.
Construction:
Building the Monogram B‑25J kit is not without its tricky spots.
I decided to build this out‑of‑the‑box to simplify the review.
I wasn’t asked to review the well‑known kit, but new decals and new
paint.
I’ll pass along a few
observations, though, to help fellow builders.
Fitting the interior has a few tricky spots.
The bombardier’s seat positioning is not clear, and may interfere with
the 50‑cal gun.
Assemble the
bombardier area before adding the seat.
The bomb racks seem a bit too long for their position.
Wait until the area is assembled before adding them.
The turret sub‑assembly may be added after fuselage assembly if you nip
off most of the locking mechanism at the post’s base.
This makes painting much easier.
 Fuselage assembly is a bit tricky, the halves seem misaligned with a step
joint.
If you’re comfortable with
doing so, remove the pins and sand the sides flush.
I did not, and had to do some joint sanding and correction.
It’s pretty straightforward and Gunze Sangyo’s Mr. Surfacer or Aves
Apoxie Putty served the function.
After that filling I decided to scribe the fuselage instead of trying to
replicate the raised panel lines.
Most panels on B‑25s were overlapping, not butting, so make your own decision
about which looks better
Fuselage assembly is a bit tricky, the halves seem misaligned with a step
joint.
If you’re comfortable with
doing so, remove the pins and sand the sides flush.
I did not, and had to do some joint sanding and correction.
It’s pretty straightforward and Gunze Sangyo’s Mr. Surfacer or Aves
Apoxie Putty served the function.
After that filling I decided to scribe the fuselage instead of trying to
replicate the raised panel lines.
Most panels on B‑25s were overlapping, not butting, so make your own decision
about which looks better
I packed the hollow beneath the cockpit with lead sinker weights and
epoxy putty.
I got very close to
the weight required, but did need to add some additional weight behind the
engines.
The engine nacelle fit
isn’t great, so I sanded them down for another Aves treatment.
It’s great for this purpose, as smoothing with alcohol then water meant I
didn’t need to sand.
Fortunately, the clear parts fit very well.
Little surface correction was required after gluing them in place with
Elmer’s White Glue.
This was a
pleasant surprise.
I used Eduard’s
mask set and was highly impressed.
The tape is similar to Tamiya Tape.
It can be removed and re‑positioned if necessary, cuts easily with a sharp
curved blade where necessary and after painting removes easily without taking
paint with it.
This mask set is
well worth the money.
I left the
fuselage windows off to paint separately and later mount the guns.
Their excellent fit allowed this preferred method.
Painting.
 The interior is two different colors.
Zinc Chromate interior green in the cockpit and (I think) the tail
gunner’s position.
I also used this
color on the turret interior.
The
rest of the interior is the yellow chromate color.
The bomb bay is bare aluminum, I painted it at the same time as the
exterior.
Here are the major colors
I used:
The interior is two different colors.
Zinc Chromate interior green in the cockpit and (I think) the tail
gunner’s position.
I also used this
color on the turret interior.
The
rest of the interior is the yellow chromate color.
The bomb bay is bare aluminum, I painted it at the same time as the
exterior.
Here are the major colors
I used:
Interior Green: Gunze Sangyo Acrylic H58; Yellow Chromate: Tamiya Yellow
Green XF‑4 brightened with Tamiya Flat Yellow XF‑3 (don’t worry too much about
this you see very little when the plane is assembled); Aluminum: Alclad Aluminum
over Alclad’s Black Primer: Fuselage green: Acrylicos Vallejo Model Air 71049
Dark Green lightened and darkened with Vallejo Black and White; Washes:
Acrylicos Vallejo Wash 73200 Sepia and 73201 Black; Tires and propellers: Gunze
Sangyo Acrylic H77 Tire Black ; Oil stains:
Gunze Sangyo Acrylic H342 Oil;
Gun Barrels: Reaper Pro
Paints 08111 Gun Metal; Flat Clear: PolyScale Acrylic Flat Clear
 Generally speaking, painting was straightforward.
I did test the Alclad over both Gunze Sangyo 1000 spray‑can and the
Alclad black.
I found the black
superior for random appearance and stressed look.
If you need a uniform paint color, the gray Gunze is fine.
I used Blue‑Tak to provide a soft mask delineation and taped over that.
While painting, I temporarily attached the engine cowls.
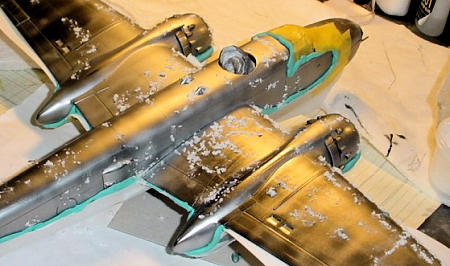
Since the aircraft had a lot of paint chipping, I used the
salt‑weathering technique.
Make
sure you have a way to clean up the excess moisture.
You can do this with makeup sponge‑brushes, and can do this after drying.
You will see the salt residue you need to remove.
Generally speaking, painting was straightforward.
I did test the Alclad over both Gunze Sangyo 1000 spray‑can and the
Alclad black.
I found the black
superior for random appearance and stressed look.
If you need a uniform paint color, the gray Gunze is fine.
I used Blue‑Tak to provide a soft mask delineation and taped over that.
While painting, I temporarily attached the engine cowls.
Since the aircraft had a lot of paint chipping, I used the
salt‑weathering technique.
Make
sure you have a way to clean up the excess moisture.
You can do this with makeup sponge‑brushes, and can do this after drying.
You will see the salt residue you need to remove.
 I found the
 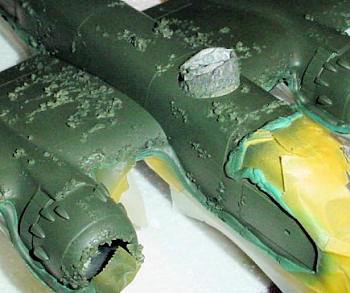 ee
whether I could thin it and apply thin lines.
I did test on my aluminum trial piece and was able to control the paint
well enough to make rings and freehand camouflage.
ee
whether I could thin it and apply thin lines.
I did test on my aluminum trial piece and was able to control the paint
well enough to make rings and freehand camouflage.
When removing the salt you do need to be careful.
I just use my fingers but I do wear gloves.
After removing crystals I clean the areas with the foam applicators and
water.
I also look carefully at the
spots Blue‑Tak was used, to make sure no residue remains.
Decals:
I applied Future acrylic floor polish with the foam applicators only to
areas decals would go.
One coat was
sufficient.
The decals are
top‑notch.
I really need to avoid
hyperbole here, but they’re among the best I’ve had the pleasure to use.
They wet quickly, are resilient enough to hold up to positioning and
settle down very nicely.
I used a
bit of Microscale’s Micro Set beneath the decals and for most of them, this was
all I found necessary.
For some
trickier places, like the rudder joints and conforming over the position lights
on the vertical stabilizers, I used a little Walther’s Solvaset.
The decals responded very nicely
 to both
solutions.
to both
solutions.
Final Finish:
After a little wash application in the regular spots like elevator and
aileron joints I was ready for Dullcoat.
I prefer PolyScale’s clear flat coat, but it does need to be diluted and
applied in very fine coats.
It does
not forgive over‑application, so go easy.
If you do it right, it’s the best acrylic Dullcoat I’ve ever used.
The moment of truth for any decal is Dullcoat.
Absolutely no silvering showed up after Dullcoat.
I was very happy.
Lastly, but certainly not least apprehensively, I removed the masks from
the clear parts.
Again, I was
happily surprised.
Unlike many
vinyl masks the Eduard tape masks pulled up easily and cleanly.
A little cleaning with the foam applicators and water removed any stray
flakes.
Overall:
I built this model in record time, partly because I decided to build
out‑of‑the box (OOB).
Monogram’s
bombers are great choices for OOB building.
Their fit is usually good, and interior detail is often quite good.
One disappointing area of this kit is the
 bombardier
area, which notably omits many details of this “office” area.
It’s too bad, really, as the greenhouse is so prominent and visibility
inside here is great.
Another
reason the build went so quickly was the great performance during finishing.
Vallejo’s paint worked well, Alclad’s paints worked well, and the decals
were a pleasure to use.
bombardier
area, which notably omits many details of this “office” area.
It’s too bad, really, as the greenhouse is so prominent and visibility
inside here is great.
Another
reason the build went so quickly was the great performance during finishing.
Vallejo’s paint worked well, Alclad’s paints worked well, and the decals
were a pleasure to use.
I highly recommend the Bombshell Decals, you won’t be disappointed.
This is a great subject for the iconic B‑25 Mitchell and gives the
modeler something to show off with simple weathering techniques.
While OOB, I find a little extra money spent on decals and items like
Eduard’s masks are well spent.
Jim McLaughlin:
Construction
 The Monogram B-25 is one of my all-time favorite kits.
I built it as a B-25H when it first came out (that model is now long
gone) and then as a gun-nosed J (which sits in my case to this day) in its
second release, using the short-run nose once produced by IPMS.
But I’ve never built a glass-nosed B-25 until now.
The Monogram B-25 is one of my all-time favorite kits.
I built it as a B-25H when it first came out (that model is now long
gone) and then as a gun-nosed J (which sits in my case to this day) in its
second release, using the short-run nose once produced by IPMS.
But I’ve never built a glass-nosed B-25 until now.
The kit went together reasonably well for me, the only sticking points
being of my own making.
From past
experience, I knew that the wing roots were not quite thick enough to completely
fill the depressions molded for them in the fuselage sides.
After gluing the wing tops to the bottoms, I wedged a thin strip of .030
plastic into the roots to make the sections a little thicker.
With this modification, the wings fit the fuselage with no filler needed.
I also added detail to the
 intakes
outboard of each nacelle.
This
consisted of a few bits of plastic sheet each to box in the intakes.
The nacelles fit the wings pretty well but I improved the fit by adding a
sprue spacer inside each nacelle to widen it until it fit the wing better.
Doing this allowed me to reduce the amount of filler necessary to blend
the nacelles into the wings.
I was
able to accomplish this with just a little Mr. Surfacer.
I hate filling seams and will go a long way around the problem to avoid
it.
intakes
outboard of each nacelle.
This
consisted of a few bits of plastic sheet each to box in the intakes.
The nacelles fit the wings pretty well but I improved the fit by adding a
sprue spacer inside each nacelle to widen it until it fit the wing better.
Doing this allowed me to reduce the amount of filler necessary to blend
the nacelles into the wings.
I was
able to accomplish this with just a little Mr. Surfacer.
I hate filling seams and will go a long way around the problem to avoid
it.
One of the areas in which I built-in trouble for myself was the engine
cowlings.
I wanted
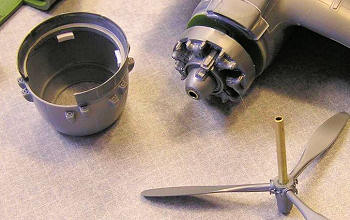 to use a set
of resin cowlings that had much better shape and excellent exhaust detail.
Since they were not made for the Monogram kit, I had to devise my own
mounting scheme.
I ended up cutting
the Monogram cowl flaps from their mounting plates and attaching them to the
aftermarket cowls.
Then I added the
intake pieces to the wings and the engine mounts, along with the engines, to the
fronts of
to use a set
of resin cowlings that had much better shape and excellent exhaust detail.
Since they were not made for the Monogram kit, I had to devise my own
mounting scheme.
I ended up cutting
the Monogram cowl flaps from their mounting plates and attaching them to the
aftermarket cowls.
Then I added the
intake pieces to the wings and the engine mounts, along with the engines, to the
fronts of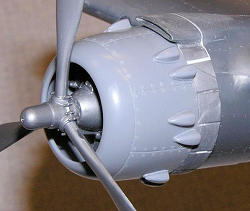 the nacelles.
Each cowl was then
attached at three points: at the top to the intakes and at the 120-degree and
240-degree points (working around the inside of the cowl from the top center
position) with small plastic tabs inside of the resin cowl.
In all, it was far more work than it needed to be due to my poor prior
planning.
the nacelles.
Each cowl was then
attached at three points: at the top to the intakes and at the 120-degree and
240-degree points (working around the inside of the cowl from the top center
position) with small plastic tabs inside of the resin cowl.
In all, it was far more work than it needed to be due to my poor prior
planning.
The fuselage interior was painted interior green with details painted in
various shades.
I did no extra
detailing or weathering inside the fuselage, since little can be seen once the
halves are joined.
Since I had an
older kit, I scavenged another pilot’s seat from a second kit for the copilot’s
position.
For the nose compartment,
I used the kit piece for the right-hand side, since it has fairly good ammo box
and fixed gun detail.
For the left
side, however, I used the corresponding part from the AM B-25 kit
 which has
much better detail.
which has
much better detail.
One problem this generated for me, though, was the fit of the Norden
bombsight.
The bombsight in the
Monogram kit appears to be a little too big for 1/48 scale and initially
interfered with the fit of the left side panel.
I carved it down in several places and moved its locator until everything
slotted into place.
In the future,
when I build another glass-nosed J, I think I’ll replace the sight with a
smaller version.
Continuing in the nose compartment, I added some detail to the
flexibly-mounted .50 caliber machine gun and glued it to the inside of the nose
transparency.
I removed the barrels
from both guns in the nose compartment since I intended to replace them with
better barrels from Quickboost.
My
sequence for building the nose was the attach the two clear parts together
first, then add them as a unit to the detailed compartment piece.
This left me with a complete nose section to add to the completed
fuselage.
The construction sequence for me from this point on was to close the
fuselage halves, attach the horizontal tail and fill the seams, attach the nose
compartment, attach all of the remaining clear parts, and then attach the wings.
To this assembly I attached the vertical tail pieces after I had masked
and sprayed the red tips (undercoated in white, of course).
I did not rescribe the airframe.
Any raised lines I lost in filling and sanding were restored by lightly
running a sharp #11 blade once over the plastic
 to raise the
very slightest edge.
It’s a good
representation of the very fine Monogram raised lines.
This left me ready to paint the airframe.
to raise the
very slightest edge.
It’s a good
representation of the very fine Monogram raised lines.
This left me ready to paint the airframe.
Painting:
I used Floquil Old Silver for the basic airframe.
I sprayed the entire airframe silver, intending to do a lot of chipping
through the final upper coat.
For
the British dark green, I used a tin of Humbrol Matt 30, a replacement in their
line for the old HB2 color.
The
patch for the nose art was sprayed through a mask, the shape for which is
provided in the decal instructions.
The remainder of the green was sprayed freehand using my favorite Paasche H
airbrush.
I didn’t preshade the
upper surfaces, but did spray the topcoat sparingly, leaving some areas better
coated than others.
I also went
back later and sprayed a slightly lightened green to break up the monotone
effect.
The only other color on the airplane is the faded green antiglare panel
forward of the windscreen.
This was
painted with Humbrol Matt 78.
I attempted some chipping using tape to pull up bits of paint.
This worked well (I think) on the cowl fronts, but very badly on the
upper wing.
The tape tended to pull
either too little or way too much paint off.
I compromised by pulling up a little bit and rubbing off some m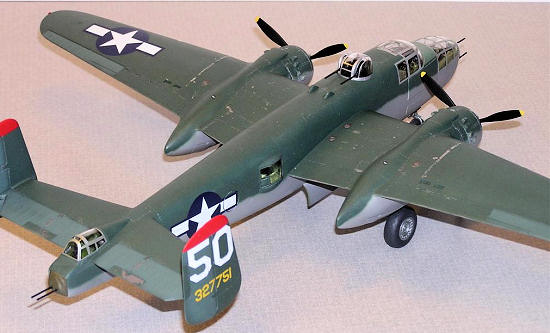 ore
with a blunt toothpick, and eventually ended up respraying several areas where
the chipping looked too heavy for my taste.
ore
with a blunt toothpick, and eventually ended up respraying several areas where
the chipping looked too heavy for my taste.
Decals:
After a coat of Humbrol clear gloss, I applied the decals.
Bombshell supplied all of the unique markings for
The Bombshell decals were a pleasure to work with.
They went on well and the white for the tail numbers was sufficiently
opaque.
The nose art is a real
treat – very realistic, I’d say!
Final Finish:
From there, clear coat, black wash, flat coat and some additional
weathering, and then I added all the remaining bits.
One other area I’d like to point out is the gear struts.
I painted these using a sort of drybrush technique.
I used Testors Metalizer Stainless Steel applied drybrush fashion.
It doesn’t look very good initially, but if you keep going, all of a
sudden the struts take on a shine that looks a lot like metal.
It’s a technique I picked up on an Australian website where the modeler drybrushed an entire 1/48 P-51D and
achieved a wonderful result.
an Australian website where the modeler drybrushed an entire 1/48 P-51D and
achieved a wonderful result.
Conclusions:
This won’t be my last B-25 – after all, there are 5 more schemes
available from Bombshell.
Their
decals are beautifully printed and go on very easily, laying down into and over
surface detail with no problems.
I
recommend these decals with no reservations.
Overall:
Monogram’s B-25 is one of the “old dependables” that can be trusted to
turn into a nice model with a modicum of effort.
The Corsican B-25s of the 340th BG can provide a modeler with
a lot of opportunity to do anything from an airplane freshly repainted to an old
faded veteran of 100+ missions, which means a lot of good fun for the “artists”
among us.
Models courtesy of the our
collective wallets.
Decals courtesy
of Bombshell Decals.
Get yours at
www.bombshelldecals.com
If you would like your product reviewed fairly and fairly quickly, please contact the editor or see other details in the Note to Contributors.