Tamiya 1/48 P-47D Thunderbolt
|
KIT # |
61086 |
|
PRICE: |
$18 (In Japan) |
|
DECALS: |
See review |
|
REVIEWER: |
Brian Shields |
|
NOTES: |
|
BACKGROUND |
B
rian doesn't do histories or kit info so it's on to the next step.|
CONSTRUCTION |
 Construction started with the
cockpit as usual. There is absolutely no need for an aftermarket resin set here.
The only thing one may want to add is a set of photo-etch seat belts. Decals for
them are supplied, but in my opinion they don’t look very good. The parts fit
together perfectly and make a very nice looking “office”. I painted the cockpit
Model Master Interior Green which is a bit light so I gave it a wash of black
followed by a dry brushing of the green again. This produced a much darker, worn
appearance. Switches, knobs, & other smaller panels were then painted their
appropriate colors. Typical of some Tamiya kits there is no instrument detail
on the main instrument panel. I chose to cut out the kit supplied decals and
apply them individually. After a little bit of Solv-a-set was applied they
snuggled down into the bezels nicely and looked very realistic.
Construction started with the
cockpit as usual. There is absolutely no need for an aftermarket resin set here.
The only thing one may want to add is a set of photo-etch seat belts. Decals for
them are supplied, but in my opinion they don’t look very good. The parts fit
together perfectly and make a very nice looking “office”. I painted the cockpit
Model Master Interior Green which is a bit light so I gave it a wash of black
followed by a dry brushing of the green again. This produced a much darker, worn
appearance. Switches, knobs, & other smaller panels were then painted their
appropriate colors. Typical of some Tamiya kits there is no instrument detail
on the main instrument panel. I chose to cut out the kit supplied decals and
apply them individually. After a little bit of Solv-a-set was applied they
snuggled down into the bezels nicely and looked very realistic.
Now it was time to install the
cockpit into the fuselage along with the wing spar. The fit of the spar was
excellent, which is important since it is designed to make up part of the main
 wheel well. The supercharger was also added at this point and the fuselage
halves were joined together. I encountered no problems in joining them and a
quick pass with the sanding stick made the mating seam disappear.
wheel well. The supercharger was also added at this point and the fuselage
halves were joined together. I encountered no problems in joining them and a
quick pass with the sanding stick made the mating seam disappear.
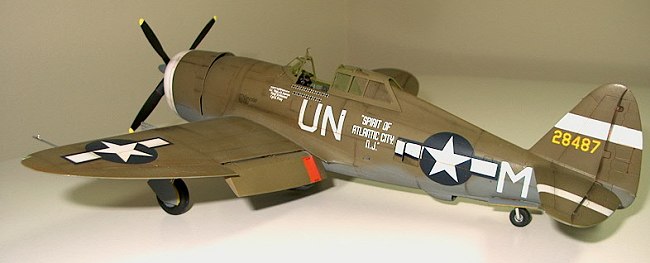
From this point on you must decide if you are going to do version A “The Little Chief” or version B “The Spirit of Atlantic City N. J.” There are several different parts used for each specific version. I chose the later of the two since it’s never been offered before in kit form (that I’m aware of).
Construction went by very quickly and easily after I decided what version to build. One note of caution: be careful after installing the centerline fuel tank mounts, they will break off very easily! I almost found that out the hard way when I went to set it down on the belly, luckily common sense kicked in! I spent a little extra time detailing the engine but once installed it’s hard to notice. After the cowl was mounted, I assembled the wings and glued them to the fuselage. They fit securely with no gap at the wing root. I decided to leave the rear horizontal stabilizers, flaps & other smaller parts off until painting was complete.
|
CAMOUFLAGE & MARKINGS |
 I painted the cowl and the tail
Model Master White first then masked off the desired areas and painted the
overall Olive Drab / Grey scheme. I’m sure the provided decals for the white
tail stripes would have worked fine but construction went so fast I decided I
would go ahead and paint them on. I masked and painted the canopy with Tamiya
tape and a new no.11 blade. I haven’t had very good luck with aftermarket masks,
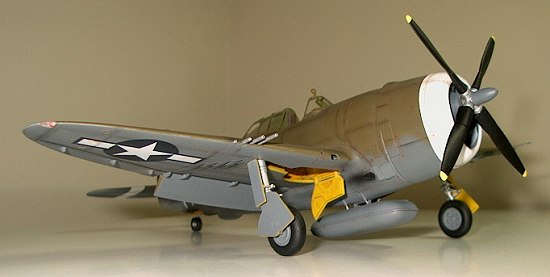
they always seem to be slightly off. I also used a slightly darker color Grey
than what was called for because in the photograph I was using as a reference it
appeared to be darker. In hindsight I probably should have followed the
directions of the kit. Regardless it looks fine as is. I then masked off the
wheel wells and painted them Testor’s Zinc Chromate from the tiny ½ 0z bottle. I
also painted the gear door covers and the gear themselves at this point. Once
the paint had dried I gave it a coat of Future and prepared to apply the decals.
I painted the cowl and the tail
Model Master White first then masked off the desired areas and painted the
overall Olive Drab / Grey scheme. I’m sure the provided decals for the white
tail stripes would have worked fine but construction went so fast I decided I
would go ahead and paint them on. I masked and painted the canopy with Tamiya
tape and a new no.11 blade. I haven’t had very good luck with aftermarket masks,
they always seem to be slightly off. I also used a slightly darker color Grey
than what was called for because in the photograph I was using as a reference it
appeared to be darker. In hindsight I probably should have followed the
directions of the kit. Regardless it looks fine as is. I then masked off the
wheel wells and painted them Testor’s Zinc Chromate from the tiny ½ 0z bottle. I
also painted the gear door covers and the gear themselves at this point. Once
the paint had dried I gave it a coat of Future and prepared to apply the decals.
I used the kit decals and had no problems at all with them. They reacted fine to Solv-a-set and seemed a little thinner than the usual Tamiya decals. I did manage to get some slight silvering on two but it’s hardly noticeable once completed.
|
FINAL CONSTRUCTION |
At this
point things were really starting to come together. I attached the gear and gear
doors in their appropriate locations.
Again everything fit very nicely in its place. Once the gear were in place I
picked out a few of the details molded in the wheel wells with some silver and
black Testor’s paint. I also decided to add the 150-gallon drop tank instead of
the 80-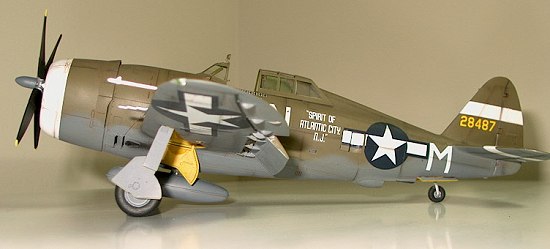 gallon type. There is a chart in the instructions that shows you the
different loads carried for each particular mission. The machine guns were added
next, they are very nicely molded. Each barrel is already slightly hollowed out
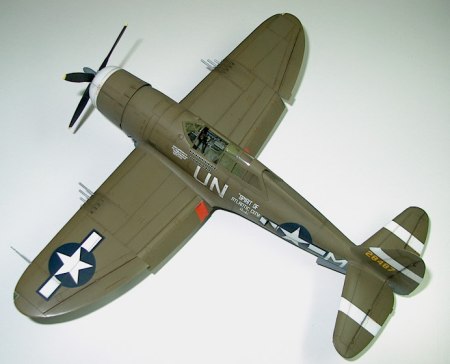
and the ends have a nice bevel on them. After attaching these parts I gave the
entire plane a wash of Burnt Sienna artist oil thinned with Turpinoid to accent
the panel lines. After allowing it to dry for a couple of days I sealed it with
flat and lightly dusted the panel lines with Black pastel chalk. This was
followed by another very light coat of flat to seal the pastel. The finishing
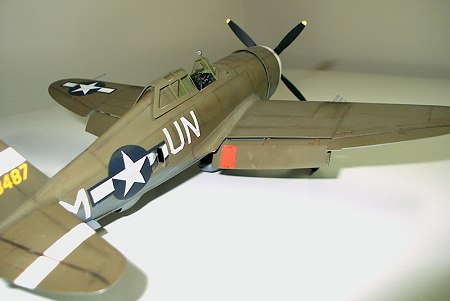
touch was to add the canopy and the tip lights. Tamiya added a really nice touch
in the inclusion of notches in the tip lights to represent the bulbs. Just add a
drop of the appropriate color and you have a very realistic looking bulb inside
the lens.
gallon type. There is a chart in the instructions that shows you the
different loads carried for each particular mission. The machine guns were added
next, they are very nicely molded. Each barrel is already slightly hollowed out
and the ends have a nice bevel on them. After attaching these parts I gave the
entire plane a wash of Burnt Sienna artist oil thinned with Turpinoid to accent
the panel lines. After allowing it to dry for a couple of days I sealed it with
flat and lightly dusted the panel lines with Black pastel chalk. This was
followed by another very light coat of flat to seal the pastel. The finishing
touch was to add the canopy and the tip lights. Tamiya added a really nice touch
in the inclusion of notches in the tip lights to represent the bulbs. Just add a
drop of the appropriate color and you have a very realistic looking bulb inside
the lens.
|
CONCLUSIONS |
This was by far the easiest kit I have ever built, taking only one week of evenings after work to complete. It has excellent detail and looks great next to my other WWII fighters. I can recommend this kit even to the very beginner.
March 2003
Copyright ModelingMadness.com
If you would like your product reviewed fairly and fairly quickly, please contact the editoror see other details in the Note to Contributors.