|
KIT # |
15 |
|
PRICE: |
$6.00 in 1989 |
|
DECALS: |
See Review |
|
REVIEWER: |
|
|
NOTES: |
Various detail sets used (see review |
|
HISTORY |
The old bent wing Corsair’s
history has been repeated many times. It has also been one of the very favorites
of all modelers the world over and more so in the last few years when Tamiya
came out with all their nice versions. We are all aware of what
 the aircraft did
in two wars and how rugged it was and how it was one of the very best aircraft
during the home stretch of WWII (yea, I know, big debate between the P-51, F6F,
but no Axis types because they all lost). The primary Corsair types that fought
for the allied forces in the Pacific were the F4U-1 “Bird Cage” and the Bubble
tops, the F-4U-1A and the F4U-1D.
the aircraft did
in two wars and how rugged it was and how it was one of the very best aircraft
during the home stretch of WWII (yea, I know, big debate between the P-51, F6F,
but no Axis types because they all lost). The primary Corsair types that fought
for the allied forces in the Pacific were the F4U-1 “Bird Cage” and the Bubble
tops, the F-4U-1A and the F4U-1D.
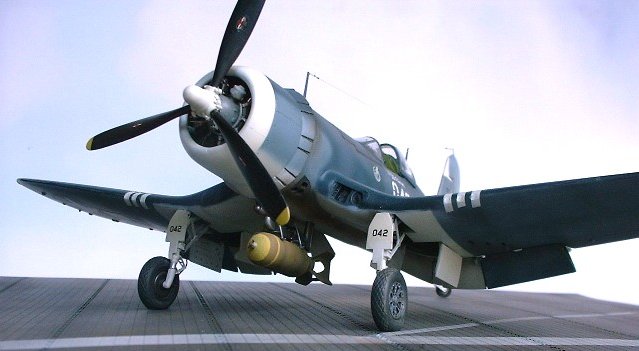
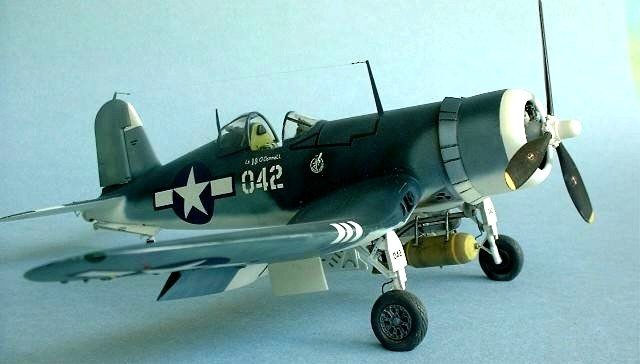
The version I tried to model, is the F4U-1A, which was a slight step up from the first production “Birdcage” with better visibility bubble type canopies. I say tried because, I had to do it the hard way which we will cover shortly. The model depicted here was an actual F4U-1A flown by a Marine Lt. J.T. O’Connell of VMF 321 and was photographed aboard the USS KWAJALEIN in August of 1944. That seems to indicate a cleaner, non-sand/ rock chipped aircraft that most of the Marine Corp planes had during that period. I don’t know if the plane was assigned carrier use at that time or was just a temp stop over during a combat mission which sometimes happened.
|
THE KIT |
To start with, the old Otaki
F4U-1A is and was, by today’s standards, a dinosaur of models. The basis of this
build was a dog of dogs but the only one of it’s kind in 1/48 scale prior to the
very nice release of the Tamiya F4Us which came after I went to all the effort
and hard work to have me a nice “bent wing”. (Your editor would like to refute the 'dog'
appellation given to the 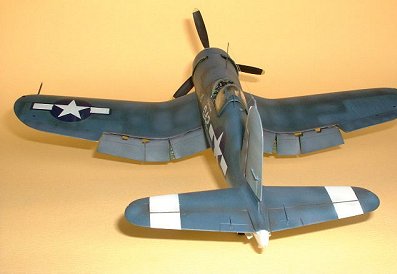 Otaki F4U kit. Yes, it is over 30 years old, but it is
quite accurate and in my mind, far from being a pooch.) It was just a short few months
after mine was complete that the Tamiya bird was released but the modeling law
had struck again as always. BUT! I am not sad nor too
disappointed with the outcome of that model. I have since built the Tamiya
kit and have more in the hanger and they are very simple to build next to what I
did to the Otaki kit.
Otaki F4U kit. Yes, it is over 30 years old, but it is
quite accurate and in my mind, far from being a pooch.) It was just a short few months
after mine was complete that the Tamiya bird was released but the modeling law
had struck again as always. BUT! I am not sad nor too
disappointed with the outcome of that model. I have since built the Tamiya
kit and have more in the hanger and they are very simple to build next to what I
did to the Otaki kit.
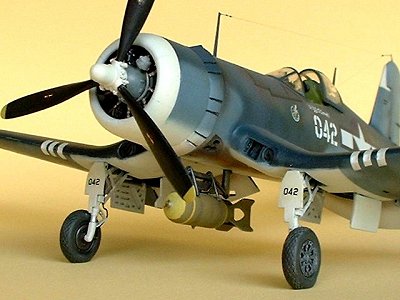
Some of you will remember back a few years ago, the complete make over detail set, by High Tech (later part of KMC) which included many, many detail parts just for the Otaki Corsair, which was expensive but gave you a bucket full of resin cockpit parts, metal/resin parts to make a complete engine, flaps, Rudder, etched metal for detailing everything, and new resin wheel wells, wheels, and cowl flaps and new gear doors and Brewster Bomb Rack etc. anyway you get the Idea. Well, that is what I got and went to work on cutting up the Otaki kit and installed all that stuff. It took a while but at first I thought I could make the Hobbycraft kit work better because it just came out shortly afterward. No dice, the chunk of resin for the cockpit would not fit at all so I gave up and went back to the original idea.
|
CONSTRUCTION |
 I remember chopping, cutting,
and throwing things away and digging out all the cockpit kit detail. The wings
had to be cut for the flap installation, the nose area had to be engineered for
a place to put the new engine and a replacement cowling. The kit prop was no
good so I replaced it from somewhere. The canopy was not any good so I used a
part of vac-fromed type from Squadron. With the flaps cut off the wings, there
was a large hole to fill in the fuselage . I cut the rudder off so that it could
be replaced with a resin type.
I remember chopping, cutting,
and throwing things away and digging out all the cockpit kit detail. The wings
had to be cut for the flap installation, the nose area had to be engineered for
a place to put the new engine and a replacement cowling. The kit prop was no
good so I replaced it from somewhere. The canopy was not any good so I used a
part of vac-fromed type from Squadron. With the flaps cut off the wings, there
was a large hole to fill in the fuselage . I cut the rudder off so that it could
be replaced with a resin type.
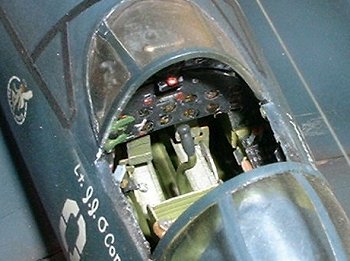
The new wheel wells were installed on the wings, and the tail wheel assembly was replaced with an all etched metal assembly. The resin cockpit was mostly a large, one piece affair and very heavy. The seat and it’s frame / components, were all etched metal and so was the belts. The cockpit was painted with interior green with a small wash of raw umber (MM) and dry brushed with chromate green and yellow to enhance all the nice details. Of course, the panel and consoles were painted black and dry brushed with some grays. After putting all this stuff together, all the seams were filled and primed and ready for the paint table for the most part.
|
PAINT & DECALS |
 I had decided that I would do
the three tone scheme before hand so it was an done deal except for the
markings. I had about two different sheets of aeromaster decals for several
aircraft and I picked one and proceeded, after I got all of that done, I did not
like it because the decal solution was too hot and it orange peeled the decals
so I ripped them all off. That is the way I ended with the O’Connell ride and
paint scheme. So, sometimes bad things do work out but not often.
I had decided that I would do
the three tone scheme before hand so it was an done deal except for the
markings. I had about two different sheets of aeromaster decals for several
aircraft and I picked one and proceeded, after I got all of that done, I did not
like it because the decal solution was too hot and it orange peeled the decals
so I ripped them all off. That is the way I ended with the O’Connell ride and
paint scheme. So, sometimes bad things do work out but not often.
After the dull coat(s), I started installing the gear and brake lines and the resin flaps,( now, the mounting side of the airplane does have the step in the flap, the F-4U-1A did not come from the factory with this feature, however, some of my reference does state, that some of them were reto-fitted with them as they (flap size) were all the same on all models , I don’t know if this plane ever had a change or not, but on mine, it is. That’s my story and I am sticking to it. Every model builder alibis something on every build, this is one of mine). After the canopy parts were on and faired-in, the etched metal antenna mast were installed and I used the invisible thread product for the wire and it was ready to fly with the Brewster bomb rack and loaded.
|
CONCLUSIONS |
Well, no regrets on the build, it is still a nice version but with the newer and nicer tamigawaga kits on the market now there is no need to go through the torment. It is a little clean for a combat area aircraft but I would counter by saying, that planes did not go from pristine to grunge over night and was a gradual weathering process. I had a judge one time at a show that said he could not vote for this model because it did not have enough mud on it. I just explained to him, that I modeled it on the day it was washed and put on the carrier deck. He didn’t get it, and even voted for something that had a two foot scale busted seam. Go figure. But it can still hold it’s own even with the Tamiya kits.
|
REFERENCES |
F4U Corsair in Action – Squadron publications Aircraft Number 145.
Detail & Scale F4U Corsair Part 1 - XF4U through F2G
December 2002
If you would like your product reviewed fairly and fairly quickly, please contact the editor or see other details in the Note to Contributors.