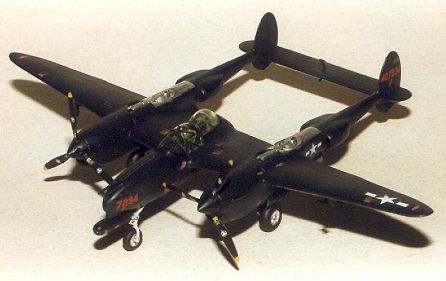
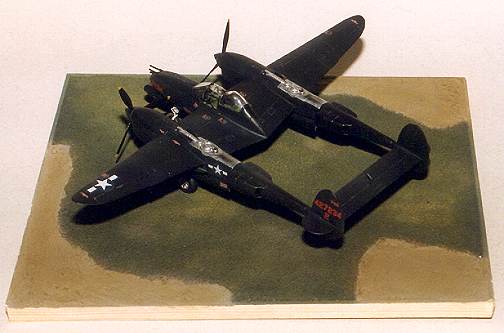
P-38M Lightning, 1:72, Dragon/DML
Review and Photos by: Martin Sczepan
The P-38M is a rather rare version of the Lightning. Only 75 were built, none of them ever saw combat. The few planes were used by the 319th wing for training and evaluation purposes in 1945 and by the 418th and 421st night fighter Sqn for a short period - only three moths from January to March - in 1946 (see [2]).
The Dragon/DML kit is based on the P-38L kit issued by DML/Dragon/Italeri. The box contains five sprues molded in light gray styrene with fine recessed panel lines. The surface has the light pebblish appearance typical for kits of that manufacturer but the parts are almost free of flash. The sprue with the clear parts is separately bagged. Although the parts are clear and (almost) distortion free, the canopy framings are a little bit on the heavy side. The instruction sheet is informative and instructive and contains all necessary painting and decaling information. The small decal sheet contains a fair amount of stenciling in yellow and red and markings for one plane of the 418th night fighter squadron. Since the plane was used only by three squadrons and the number of possible color schemes is restricted to the black overall scheme (if you don't want to model the prototype) this is acceptable.
Compared to the scale drawings in [1] the wingspan measures 4 mm (11 scale inches) to short and the wing tips are to pointed. This could be corrected by sanding but since it would result in even shorter wings I decided not to change it. The dihedral of the wings appears somewhat to large. The fuselage, tail booms and stabs seem to be correct. When it comes to the assembly of the kit, it soon becomes apparent that the kit suffers from overengineering and serious fit problems. Some gaps (between outer wing undersides and engine nacelles) were up to 1.5 mm wide and the upper fuselage half is 1 mm wider than the lower half. So careful dry fitting and lots of patience (and putty) are a must during the construction process. The level of detail in the cockpit is acceptable if you want to model the cockpit in the closed position. I moved the instrument panel 1.5mm back (towards the seat) since it sits too far to the front, added seat belts and reworked the radar operators sight device. This is really necessary since the rear canopy will not fit over the original kit part - and the shape is wrong anyway.
Before upper and lower fuselage parts are glued together enough weight should be added. The next sub assemblies to complete are the engine nacelle/tail boom/outer wing sections. Also here a fair amount of gap filling, puttying and sanding is required. The radiators are empty so something should be fitted into the inside to prevent see trough effect. I used two pieces of plastic sheet which I painted black.
The most difficult part of the assembly is the mating of the fuselage/inner wing section with the outer wing/engine nacelle/tail boom sections. Careful alignment of the parts is absolutely necessary. The outer wings tend to bend down, which would result in a B-25 style wing and F-18 style vertical stabs. I solved the problem by inserting additional wing spars made from sprue into the wings to strengthen the wing joint. Then I glued the sections separately together. First one side and - when the glue has dried - the other one. Then the horizontal stabilizer can be inserted. Since it was a little bit to short, I pressed the tail booms together with the help of rubber bands. The front canopy fits more or less (only minimal amount of putty and light sanding needed) but the rear canopy is 1 mm to short so I had to fill the resulting gap.
At this point I rescribed all the panel lines which were lost during the construction process. The container for the radar equipment is ca 3 mm (8 scale inches) to short which is quite noticeably since the whole thing should be only 22 mm long. So I cut off the container from the pylon and used only the pylon. The container was replaced by a scratch built item, made from an old bomb from the spares box. After adding the small parts I airbrushed the model with a base coat of flat black, followed by a top coat of glossy black.
Now it was time for decaling. The decals reacted well to Microset/Micriosol but were slightly out of register which is a problem with all these small stencils since the underlying white is showing through at one side. Then a coat of satin varnish - which was mixed with some drops of light gray to achieve the desired scale effect - was applied. The bare metal areas around the turbo superchargers were hand painted and slightly weathered by polishing with some graphite from a soft pencil. The weathering of the model should be done only very lightly considering that the plane was used only for a short time under 'peace time' conditions. At the end all of the remaining small parts (turbo superchargers, landing gear, guns) were glued in place. Drop tanks and HVAR rockets are provided in the kit but I didn't use them since all of my reference photos show the plane without rockets and fuel tanks.
Summary:
You can make a nice representation of the Lightning night fighter version from the kit. Even if it looks quite good in the box, this kit is not a 'shake the box and take the finished model out' type of kit. It is rather something for the experienced modeler since the construction process is sometimes difficult and you have to do some major filling, sanding and rescribing.
References:
[1] Squadron in action: good overview
[2] Air International, August 1978, S.81-87: good reference about all P-38 night fighter versions
[3] Skryzydla 4/91 and 1/92: good scale drawings, lots of photos but in Polish language