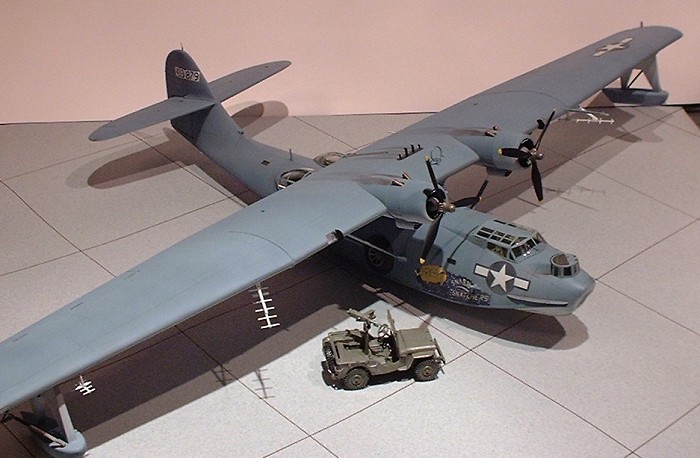
Monogram 1/48 PBY-5A Catalina
| KIT #: | 5613 |
| PRICE: | ~$35.00 |
| DECALS: | Two options |
| REVIEWER: | Dale Rannals |
| NOTES: |
| HISTORY |
 Competing against
Douglas in 1933 to supply the US Navy with a new monoplane flying boat, the
Catalina emerged as a truly outstanding aircraft. It featured a parasol
mounted [almost] cantilever wing with just two streamlined struts on each
side. Power was supplied by two 825hp R-1830 Twin Wasps (initially, later
1200hp) mounted on the wing leading edges just outboard the fuselage.
Competing against
Douglas in 1933 to supply the US Navy with a new monoplane flying boat, the
Catalina emerged as a truly outstanding aircraft. It featured a parasol
mounted [almost] cantilever wing with just two streamlined struts on each
side. Power was supplied by two 825hp R-1830 Twin Wasps (initially, later
1200hp) mounted on the wing leading edges just outboard the fuselage.
The initial order for 60 was huge in those days; total production would eventually exceed 4000.
Users included Brazil, Netherlands East Indies, RAF, RAAF, RCAF, RNZAF, SAAF, Soviet Union, USAAF, and of course the US Navy. The Soviet Union bought three in 1938 and quickly tooled up to produce its own version called the GST. In 1939 Britain ordered one and followed with large orders, calling the boat Catalina, the name adopted shortly after by the US.
A most attractive aircraft, it acquired a reputation for ability and reliability. Used in almost all theatres in WW2, it played a prominent role especially in the Pacific, where it had the invaluable attribute of long range. One attacked a Japanese carrier in daylight after radioing “please inform next of kin”. One found the Bismarck in the mid Atlantic after she evaded British shadowers. The Black Cats (Patrol Squadron 12) started a tradition of stealthy night devastation. And one of No. 210 Squadron’s aircraft sank the 196th and final U-boat claimed by Coastal Command on 7 May 1945.
| THE KIT |
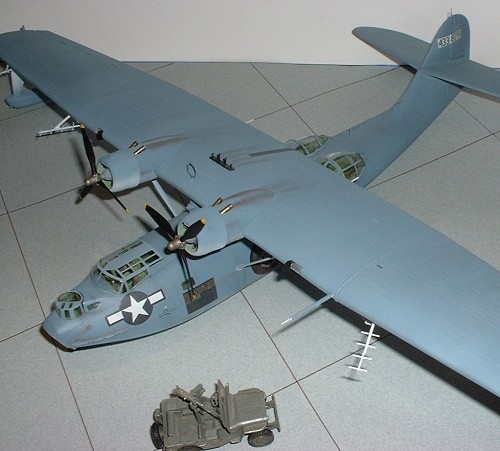
 This is a big one!
Wingspan goes a little over 26”; length is a bit more than 16”. It’s easy
to forget that this aircraft is the size of a B-17. The kit is molded in
160 light gray and clear parts. It has nicely engraved panel lines and my
boxing exhibited little in the way of flash or sink holes. Looking on
E-bay there are apparently many boxing of this kit: PBY-5, PBY-5A
(amphibian with landing gear), and promodeler version. My kit was the non
pro-modeler PBY-5A from 2002. The kit allows the landing gear up or down,
stabilizer floats up or down, blister windows open/shut, two different nose
turrets, pilot and gunner figures, and ADF mast and depth bomb options.
This is a big one!
Wingspan goes a little over 26”; length is a bit more than 16”. It’s easy
to forget that this aircraft is the size of a B-17. The kit is molded in
160 light gray and clear parts. It has nicely engraved panel lines and my
boxing exhibited little in the way of flash or sink holes. Looking on
E-bay there are apparently many boxing of this kit: PBY-5, PBY-5A
(amphibian with landing gear), and promodeler version. My kit was the non
pro-modeler PBY-5A from 2002. The kit allows the landing gear up or down,
stabilizer floats up or down, blister windows open/shut, two different nose
turrets, pilot and gunner figures, and ADF mast and depth bomb options.
Decals are for two aircraft: “Snafu Snatchers”, a circa 1944 Pacific Theatre and a very colorful search and rescue aircraft circa 1950. The decals worked very well and I experienced no problems with them.
The instructions are a most complete 16 page book of exploded drawings and notes. Painting calls out generic colors but does give FS numbers for about half of them (we really don’t need FS numbers for black and white anyway, so no big deal).
| CONSTRUCTION |
I started with paint: the fuselage interior and all the interior parts got a dose of US interior green. Then came decision time: Mine would be gear up, floats down, and commanded by ghosts (I cannot for the life of me paint a realistic pilot figure, so all the men had to stay off). This made construction a lot simpler as I didn’t have to worry about the landing gear (though that wasn’t the deciding factor: with gear down it would take up far too much real estate in my display case. It will instead soar above my computer desk.). Okay…onward…
 The
very nice cockpit was assembled along with the rear observation
compartment. These were glued into the fuselage halves after all the small
interior windows were glued into place. I then started gluing the fuselage
halves together. These are of some size so it worked better for me to glue
in sections, working my way around. This brings me to an interesting
point: the left fuselage half was missing the “tip” right aft under the
rudder. About ½” was gone (gone as in “nowhere to be seen”; it was not in
the box at all), so I did some putty surgery to reform the area. It was
relatively easy. This was the only area that putty was used on the entire
model.
The
very nice cockpit was assembled along with the rear observation
compartment. These were glued into the fuselage halves after all the small
interior windows were glued into place. I then started gluing the fuselage
halves together. These are of some size so it worked better for me to glue
in sections, working my way around. This brings me to an interesting
point: the left fuselage half was missing the “tip” right aft under the
rudder. About ½” was gone (gone as in “nowhere to be seen”; it was not in
the box at all), so I did some putty surgery to reform the area. It was
relatively easy. This was the only area that putty was used on the entire
model.
I attacked the wings next. This assembly is formed from five large staggered pieces, which makes into a sturdy LARGE wing. The engines were painted, highlighted and glued to the wings. I left the floats off until after the painting was finished.
I then set everything aside and worked on the clear parts. There’s a lot of “glass” here, and a lot of framework surrounding it. This took some time. I use a liquid water based mask called “Master Mask”. You paint it on rather thickly, inside and out, of all the clear parts. Then you wait…. For a day or two…. Until it dries clear (kinda, it’s a bit opaque). Then with a sharp #11 blade, you score around the frames lightly. Then carefully peel the mask from the frame area. Then paint the whole piece the interior frame color (on the outside); let it dry. Then the exterior frame color (still on the outside); let it dry. Then you remove the mask from the rest of the piece (the “glass” areas). Sounds like a lot, but it’s pretty easy…just take your time.
Oohhh, I can hear my airbrushes calling……..
| COLORS & MARKINGS |
 Remember when mixing your paints: this thing is
big. I’m used to 1/48 single or twin engine aircraft. The wing on this
baby probably has more surface area than the last five entire models I’ve
built. Proportion your portions accordingly.
Remember when mixing your paints: this thing is
big. I’m used to 1/48 single or twin engine aircraft. The wing on this
baby probably has more surface area than the last five entire models I’ve
built. Proportion your portions accordingly.
I started off with the undersides. I preshaded all the panel lines with flat black. To give it a weathered look, I lightly and unevenly sprayed the wing and fuselage (still separate pieces – much easier to handle) flat white. The light gray plastic was a perfect under-color for the white paint – I wanted a dirty off-white look to it.
Then I mixed up many shades of blue-grey. I lightly sprayed the base coat, again unevenly, and again the light grey plastic work great underneath. I followed the base with the varying shades of blue-grey; some shades heavier in areas than the rest. The result is a very subtle uneven surface.
The decals went on without problems, succumbing well to setting solutions. I tried over spraying the decals with a light gray color to give them a weathered look. The effect turned out ok, but I think I need to work on it some more.
| FINAL CONSTRUCTION |
 Time to merge all the big and small parts into
one very big part. I glued the wing to the fuselage, attaching the struts
in the process. The stabilizer floats went on next. Then all the clear
bits. HHHmmmmm……..Something to remember for next time: continue
weathering the clear bits as you weather the airplane. I faithfully
painted the clear parts when I painted the first base coat of blue-grey.
Then for some reason I completed forgot about the clear parts for the
remaining shades of paint. Brain dead area I guess. Anyway, the clear
parts were a definite shade or two different than the rest of the
aircraft. What to do? I had already removed the mask, putting that back
on would be a real pain…..
Time to merge all the big and small parts into
one very big part. I glued the wing to the fuselage, attaching the struts
in the process. The stabilizer floats went on next. Then all the clear
bits. HHHmmmmm……..Something to remember for next time: continue
weathering the clear bits as you weather the airplane. I faithfully
painted the clear parts when I painted the first base coat of blue-grey.
Then for some reason I completed forgot about the clear parts for the
remaining shades of paint. Brain dead area I guess. Anyway, the clear
parts were a definite shade or two different than the rest of the
aircraft. What to do? I had already removed the mask, putting that back
on would be a real pain…..
Pastels to the rescue! I brushed on black and gray pastels to the clear parts frames to try to get it close to the top color. I got it close and that’ll have to be good enough. I also completely missed the black leading edge that is supposed to go on the wings, elevators, and rudder. The painting guide isn’t clear on this and even the box art doesn’t show it well. Oh well, call me inaccurate.
Propellers, radar antennas, depth bombs, and all the other breakable nits were then put on. And I was done.
| CONCLUSIONS |
This was a fun project. The biggest kit I’ve done recently was a P-61 Black Widow for my father-in-law. This was sort of an eye opener. I remember doing a B-17 and a B-36 when I was a kid, but nothing big really since then. This is a great kit of a great airplane. A beautiful airplane. It kinda gets passed by for the models of bombers and fighters. My advice: don’t pass it by. Get one and build it. You’ll be glad you did.
September 2005
Copyright ModelingMadness.com. All rights reserved. No reproduction in part or in whole without express permission from the editor.
If you would like your product reviewed fairly and fairly quickly, please contact the editor or see other details in the Note to Contributors.
Back to the Review Index Page 2016