KIT REVIEWED: P-40E/F/L CONVERSION
Scale: 1/48
Manufacturer: Hi-Tech (Distributed by Aeromaster)
Price: MSRP $15.95
Accuracy: A+
Quality: A+
Review and Photo by: Thomas McKelvey Cleaver (THE AERONUT)
Date of Review: 5 January 1998
Even with the advent of AMT/ERTL's P-40F kit, the Hi-Tech P-40E/F/L conversion kit fills an important void. The AMT kit sucks, to put it gently; not only is it as bad as the rest of their P-40 series, but it's a SHORT-TAIL!! Virtually none of that type ever got to where the war was.
With this conversion kit, used in conjunction with Mauve's marvelous P-40M injection-molded kit, it is possible to do a.) a late-model P-40E with fishtail exhausts; b.) an early-model P-40F "short-tail,"; c.) a later-model P-40F "long tail;" and d.) a P-40L. I also recommend getting the True Details cast-resin P-40 cockpit interior and the Squadron vacuform P-40M canopy, though you can get along without the last if you dip the kit glass in Future - you just don't get to open it up to see that superb cockpit interior.
The kit includes a full fin and rudder to use if doing the short-tail version, and the full Merlin cowling forward of the firewall. There is much more to that than merely the absence of the downdraft carburettor intake for the Allison, since the Merlin had vastly different radiators, which are plainly visible in that big cowl intake, and are done correctly.
The conversion to any of the three versions is easy. To do the short-tail - either as a P-40E or an early P-40F - you cut away the injection-molded vertical fin and rudder, and about 1/4" of the extreme aft fuselage. The conversion kit instructions give you all the information you need. To do an E, merely assemble the kit per instructions from this point on. For the F and L Merlin-powered versions, cut off the nose along the cowl lines; again, the conversion instructions are clear and this is easily accomplished.
At this point, I proceed to assemble the injection-molded fuselage, without the cockpit interior, then attach the conversion cowling with cyanoacrylate (Bet you thought I couldn't spell that, didn't you?). I use a good bit of it on the inside, with kicker to make the bond nice and solid. You will see, if you fit things right, that very little if any putty will be needed around the exterior of the joint.
I then paint and assemble the True Details cockpit, and insert it into the fuslage through the wing opening. The cockpit fits very nicely, but remember to cut off the armored headrest, since that applies to the P-40N. Past that, it is standard assembly for mating the wings to the fuselage and setting in the tail surfaces.
There is one thing to remember, whatever version P-40 you are doing with the Mauve kit, and that is that the propeller blades are 1/8" too long (and I'm not talking scale). Spin the prop, and you'll see the arc includes the inner wing guns - not good! You can shorten at the base of the blade, and solve the problem. Alternatively, I have enough DeHavilland propeller blades from Hasegawa Spitfire V kits - which are the proper length and proportioned right - that I've used them on my Mauve P-40 collection.
At this point, if you are doing the L version, also known as the "Gypsy Rose Lee" for being "stripped," you remove the two inner machine gun barrels on the wings, putty in the shell ejection chute for that gun and sand it smooth. For the F, you're done except for painting and marking.
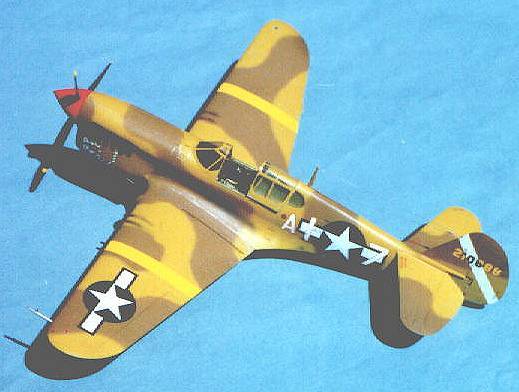
I chose to do a P-40L of the 99th Pursuit Squadron, the first group of the famed "Tuskeegee Airmen" to enter combat, when they were assigned to the 79th Fighter Group in Italy in the Spring of 1944. I used the Three Guys Replicas Tuskeegee Airmen sheet, which includes the P-40L "Ace of Pearls." These are excellent decals, fully up to Aeromaster standards. In fact, I think this sheet is superior to Aeromaster's Tuskeegee Airmen sheet, since it includes a P-39Q and the above-mentioned P-40L, in addition to several P-51B/Cs and P-51Ds, with better nose art for all the possible models.
There were several color schemes for the Merlin P-40s as used in the Med. I found a photo of a 79th Fighter Group P-40L in Jeff Ethell's "World War II In Color," and it was done in British Dark Earth/Middle Stone uppers and Azure Blue lowers, with other aircraft in the background that were similarly-painted. That was easy to do, so I did it. You can see the result above.
With the remaining tail, I did Squadron Leader Richard Cresswell's RAAF P-40E, with the beautiful flags marking on the cowling, from the SuperScale sheet.
There are knock-offs of this conversion, available at cheaper prices, which don't include the short-tail option. I picked one up at a contest, and have done a P-40F with it. I chose to do Bob Baseler's aircraft at the time the 325th Fighter Group arrived in North Africa and took off from the "Ranger," since that is a famous photo. Looking at the photo, the colors seemed light enough for the underside and the lighter of the two upper colors, and dark enough for the remaining upper color, to conclude it was the USAAF "sand and spinach" scheme, which I did with Neutral Grey lowers, Olive Drab for the darker upper color, and Tamiya's "Buff" for the tan color. Behind that airplane in the photo is a darker P-40, which I suspect is standard OD/Grey, probably with the medium green "bites" around the wings and horizontal stabilizers (since there are other photos available that show this on OD P-40s of the 325th). Behind that aircraft is an airplane darker that the first one and lighter than the second; I'll bet that is Dark Earth/Middle Stone. Herschel Green, the leading 325th FG ace, who was there that day, once told me when I met him out at Planes of Fame that the group had P-40s "in every camouflage scheme you can imagine." This fits well with Curtiss' factory practice of switching dark and light areas, doing "mirror schemes" with the patterns, and combining camouflage colors without regard to official specifications. This production history, through at least 1943, makes almost any hard-and-fast camouflage rule for P-40s open to suspicion. Get a photo of the one you're doing, and do it. That's the only guarantee of accuracy.
This is an aftermarket conversion that is well worth the cost, and will give you all the basic stuff you need to do an award-winning model, if you like that sort of thing. I recommend it highly.