
Hasegawa 1/72 SBD-4 Dauntless
| KIT #: | ? |
| PRICE: | $14.98 MSRP |
| DECALS: | Two options |
| REVIEWER: | Bill Michaels |
| NOTES: | Kit engineering has several shortcomings |
| HISTORY |
None provided, but plenty can be found with a good google.
| THE KIT |
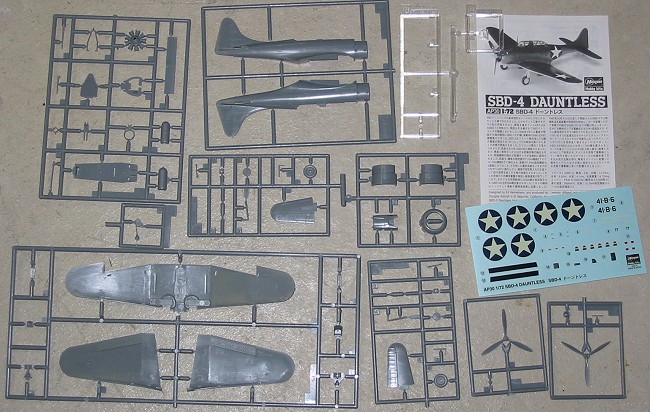 The kit, molded in
light grey, consists of four sprues of parts, and a decal sheet. It comes
in the standard Hasegawa 1/72 box. Included in the kit are two different
props. This kit is marketed as an SBD-4, and it includes the correct prop
for that version. The other prop in the kit is the one used on the SBD-3.
Given that the different prop and hub were the only external differences
between the -3 and -4 version, you could also build a twin-gun SBD-3 from
this kit. (You’d need to provide your own decals.)
The kit, molded in
light grey, consists of four sprues of parts, and a decal sheet. It comes
in the standard Hasegawa 1/72 box. Included in the kit are two different
props. This kit is marketed as an SBD-4, and it includes the correct prop
for that version. The other prop in the kit is the one used on the SBD-3.
Given that the different prop and hub were the only external differences
between the -3 and -4 version, you could also build a twin-gun SBD-3 from
this kit. (You’d need to provide your own decals.)
My model had very clean moldings— no signs of mis-alignment, and no flash. Trailing edges seem to be pretty fine, too. The kit has good looking recessed panel lines- which I think is the best feature of this kit.
The cockpit is a little sparse. The pilot’s area consists of a floor with molded in rudder pedals, a seat, a control stick, and an instrument panel with three decals. The gunner’s area consists of a seat, a block console that is supposed to represent the ammo storage rack, and a control stick. There is no sidewall detail at all, which is a disappointment, especially considering that you can see so much of the cockpit in an SBD.
 The wings are the
biggest disappointment in this kit. The left and right dive brakes are
molded closed, as a single unit attached to the top wing. The holes in the
brakes are represented as shallow dimples. Because of the way they are
molded, drilling them out is not really an option, as the holes in the top
and bottom brakes do not line up on the real aircraft. Your only options
are live with them as molded, or replace them with PE parts.
The wings are the
biggest disappointment in this kit. The left and right dive brakes are
molded closed, as a single unit attached to the top wing. The holes in the
brakes are represented as shallow dimples. Because of the way they are
molded, drilling them out is not really an option, as the holes in the top
and bottom brakes do not line up on the real aircraft. Your only options
are live with them as molded, or replace them with PE parts.
The canopy is also a disappointment. It is molded in three pieces- windscreen, pilot’s canopy, and a single piece with the last three sections molded as one in the closed position. When I build an SBD, I want to show the rear canopy open! I went ahead and cut the rear two sections free, and only used the front three. (I’ve seen pictures of SBDs with the rear canopies removed, rather than just open.)
The instructions are the standard Hasegawa pictorial style, with warnings and color definitions in five different languages. The instructions are very complete, and include painting instructions. Color callouts are given using the Gunze line of paints.
There are decals for two aircraft. One USN, and one USMC. The decals look to be of average thickness, and my copy was printed in register. The white on the big stars are not pure white- they look a little dingy.
| CONSTRUCTION |
 This is a model my
son bought for me as a gift. Even though the kit is a little disappointing
in some areas, the SBD has always been one of my favorite subjects, so I
decided to do the best I could with the kit. I built my model Out of the
Box, including the using the kit decals. I used Polly Scale paints
throughout.
This is a model my
son bought for me as a gift. Even though the kit is a little disappointing
in some areas, the SBD has always been one of my favorite subjects, so I
decided to do the best I could with the kit. I built my model Out of the
Box, including the using the kit decals. I used Polly Scale paints
throughout.
Construction
started with the usual cockpit. Everything was given a coat of interior
green, then the panel details were picked out with black and some silver
drybrushing. The plain cockpit sidewalls got a quick coat of green as
well. The instrument panel was painted scale black, and then drybrushed
 to
bring out the detail.
to
bring out the detail.
The completed cockpit is trapped between the fuselage sides when the fuselage is assembled. Fit was good here, too. The cowling was such a tight fit, that I just pressed it into place, leaving it there throughout painting. This allowed me to assemble and paint the engine, and leave it off the model until after the airframe was painted.
The wings are made up of three main pieces. There is a single bottom piece, and left and right top pieces. As I mentioned before, the dive brakes are molded as a single piece. The wing bomb racks are molded as part of the wing, but look OK. The wing parts fit well, with a small amount of filler used at the joint with the fuselage.
| COLORS & MARKINGS |
Painting
The model was
painted in the standard USN blue-gray over light gray color scheme. For
the first time, I tried the preshading
 technique that I’ve
seen in many of the articles here on MM. Instead of using black, I
used dark blue—I figured that would be dark enough against the lighter blue
gray paint to show an effect, without overdoing it. As it turned out,
the effect was pretty subdued—I like the way it came out.
technique that I’ve
seen in many of the articles here on MM. Instead of using black, I
used dark blue—I figured that would be dark enough against the lighter blue
gray paint to show an effect, without overdoing it. As it turned out,
the effect was pretty subdued—I like the way it came out.
When the paint dried, I removed the cowl, touched up the inner surfaces, and installed the engine. I then re-attached the cowl, with a small amount of glue to make it permanent.
Decals
To prepare for the decals, I brushed a coat of future on the model where the decals would be going. I used the kit decals for the USMC version of the aircraft. The kit decals seemed to go one fine, and reacted pretty well to Solvaset. The wing stars needed several treatments to get them to fully settle down in the slots by the leading edge.
| FINAL CONSTRUCTION |
 I applied an
oil-based wash using dark brown oil paint. I use the Windsor and Newton
artist’s oils, thinned with household paint thinner. I used the wash
primarily in the area around the engine- to simulate the effects of the
little oil leaks that every engine seems to have. I then used my silver
artists’ pencil to add some paint chipping effects in the usual places. I
like the pencil because it gives more precise control over the placement of
the marks than I can get with a drybrush technique.
I applied an
oil-based wash using dark brown oil paint. I use the Windsor and Newton
artist’s oils, thinned with household paint thinner. I used the wash
primarily in the area around the engine- to simulate the effects of the
little oil leaks that every engine seems to have. I then used my silver
artists’ pencil to add some paint chipping effects in the usual places. I
like the pencil because it gives more precise control over the placement of
the marks than I can get with a drybrush technique.
At this point, the prop, bombs, pitot tube, and the antenna mast went on. Then a coat of PollyScale clear flat was airbrushed on. The model then went off to be photographed, and set aside for a contest a few days away.
It wasn’t until I got to the contest that I realized I had forgotten two items—I had never put the clear part for the lower wing light, and I completely forgot to add an antenna from the mast to the top of the fin. (I would have used “smole” colored invisible thread.) As it turned out, the judges didn’t notice either—the model took second in its class!
| CONCLUSIONS |
Conditionally recommended. The kit is nicer than the Airfix kit, and a lot nicer than the Testors’ kit. Assembled and painted, the fine recessed panel lines make for a nice looking model. But, for the price, I expected more from this kit—at least better dive brakes and some (any) sidewall detail. To bring it up to current standards, you’d need to add a PE dive brake set, a resin cockpit, and perhaps an aftermarket canopy if you want to pose them in the open position.
Hasegawa apparently heard these complaints, and later released this kit in a deluxe version. At my local shop, the deluxe version ($5 more) comes with PE dive brakes, and a section of carrier deck to pose the model on. That is the version of the kit that I would recommend to people.
Review kit thanks to my son.
| REFERENCES |
SBD Dauntless in Detail and Scale, D&S Vol. 48, by Bert Kinzey, Squadron Signal Publications, 1996.
November 2004
If you would like your product reviewed fairly and fairly quickly, please contact the editor or see other details in the Note to Contributors.