Academy 1/72 PBY-5 Catalina
|
KIT # |
2126 |
|
PRICE: |
$26.00 MSRP |
|
DECALS: |
See review |
|
REVIEWER: |
Bill Michaels |
|
NOTES: |
|
HISTORY |
The PBY-5 was first delivered to the US Navy in 1940. The aircraft was a definite success, and orders from the US Navy and RAF kept pushing production up. The PBY was the standard US Navy Patrol and Air-Sea Rescue aircraft. The RAF used the Catalina for both patrol and ASW missions, too. By the time of Pearl Harbor, the PBY already had a great track record.
 In late 1940, the British had ordered 200 Catalinas
from the US. As part of the growing US-British cooperation, the US Navy
sent officers to familiarize the British pilots with the Catalina. Part
of this training included US Navy pilots flying Costal Command PBYs on
search missions.
In late 1940, the British had ordered 200 Catalinas
from the US. As part of the growing US-British cooperation, the US Navy
sent officers to familiarize the British pilots with the Catalina. Part
of this training included US Navy pilots flying Costal Command PBYs on
search missions.
In May of 1941, the Bismarck sortied into the North Atlantic. The Bismarck sank the HMS Hood, but received some damage in return. As a result, changed course and made for the port of Brest in occupied France. Fooled by this change in course, the British lost track of the ship for over a day. An intensive air and surface search was launched to find the German battleship.
On May 26, 1941, a Catalina of No. 209 Squadron, piloted by ENS Leonard B. Smith, USN, with a British copilot and crew, took off to fly their assigned search. Shortly after 10 am, they found the Bismarck, and were able to radio the position. They immediately jettisoned the standard 4 depth charges they carried, and started maneuvering to track the ship.
As they dropped out of the clouds, they were met by intense, accurate anti-aircraft fire. ENS Smith immediately began a series of evasive maneuvers, and sought to hide in the low cloud cover. The Bismarck’s AA fire was described by ENS Smith later in his report:
 “It was very intense and were it not for evasive
action we would have been shot down. The barrage was so close that it
shook the aircraft considerably (one man was knocked from his bunk) and
the noise of the burst could be hear above the propeller and engine
noise. Numerous bursts were observed at close quarters and small
fragments of shrapnel could be heard hitting the plane. The fitter came
forward to pilots compartment saying we were full of holes. As soon as we
were well clear of Bismarck we investigated the damage, which
consisted of a hole in after port hull (about 2" in diameter) and one in
bottom hull directly below instrument panel (about 1" in diameter). No
other damage was visible at the time. I made short flight test (several
turns, checked engines, etc) and finding everything satisfactory returned
to area to resume shadow of Bismarck.”
“It was very intense and were it not for evasive
action we would have been shot down. The barrage was so close that it
shook the aircraft considerably (one man was knocked from his bunk) and
the noise of the burst could be hear above the propeller and engine
noise. Numerous bursts were observed at close quarters and small
fragments of shrapnel could be heard hitting the plane. The fitter came
forward to pilots compartment saying we were full of holes. As soon as we
were well clear of Bismarck we investigated the damage, which
consisted of a hole in after port hull (about 2" in diameter) and one in
bottom hull directly below instrument panel (about 1" in diameter). No
other damage was visible at the time. I made short flight test (several
turns, checked engines, etc) and finding everything satisfactory returned
to area to resume shadow of Bismarck.”
Smith’s position report enabled the British to vector forces to intercept. That evening, with dusk approaching, Swordfish from the HMS Ark Royal managed to score two torpedo hits, one of them the hit that wrecked the Battleship’s rudders. Unable to maneuver, Bismarck was unable to continue her escape attempt, and was engaged and sunk the next morning by British surface units.
|
THE KIT |
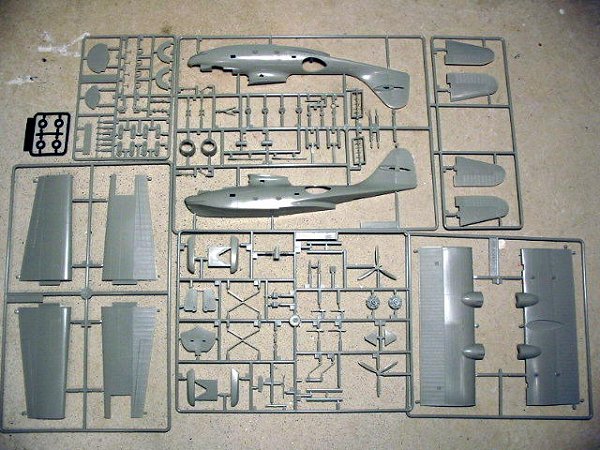
The kit consists of over 100 parts, molded in light gray plastic (except for the clear parts). The kit features recessed panel lines throughout. Moldings in my kit were crisp, with no signs of flash or mold mis-alignment. The kit includes decals for one aircraft: “14-P-11”, a US Navy aircraft in the colorful pre-war colors of overall silver with chrome yellow wing.
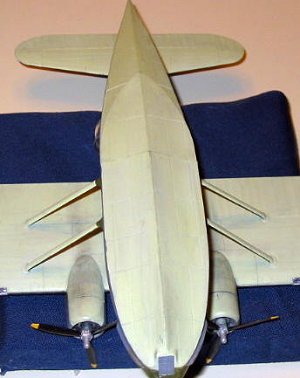
Options: The model can be built with the wing tip floats up or down. Also, there is an optional set of beaching gear- main wheels and a tail wheel. (The main wheels are supplied as vinyl tires.) I opted to build my PBY “in flight” with the tips retracted, and without the wheels. I didn’t use the kit decals, so I can’t comment on them.
|
CONSTRUCTION |
 Fuselage: First thing I did was to paint the
interior of cockpit, waist, and nose turret area with US interior green.
There’s not a lot of detail in the waist—two bulkheads, a floor, and the
two gun positions. (Still, it is better than the total lack of detail in
the Revell kit in this area!) The guns consist of two pieces- a gun and
mount, and a shield. I found that I had to shorten the height of the
gun mount, to get the shield to clear the top of the fuselage. Still,
when it was assembled and drybrushed with some silver to bring out the
raised detail, it looks pretty good.
Fuselage: First thing I did was to paint the
interior of cockpit, waist, and nose turret area with US interior green.
There’s not a lot of detail in the waist—two bulkheads, a floor, and the
two gun positions. (Still, it is better than the total lack of detail in
the Revell kit in this area!) The guns consist of two pieces- a gun and
mount, and a shield. I found that I had to shorten the height of the
gun mount, to get the shield to clear the top of the fuselage. Still,
when it was assembled and drybrushed with some silver to bring out the
raised detail, it looks pretty good. 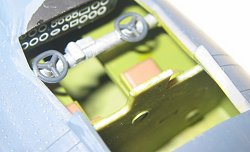
There is very little detail to speak of in the cockpit. It consists of two seats, an instrument panel, and a control yoke. The instrument panel is represented by a black decal with white rings. Fortunately, you can’t see it once the model is closed up. There is no interior detail at all in the nose turret area.
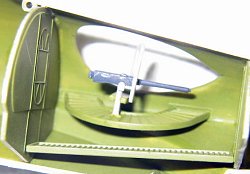
The nose turret presents a little bit of a problem in assembling and painting the fuselage. It has an odd shape, and is partly recessed into the fuselage. Because of this, you really need to paint the framing of the turret before you install it in the model— masking it in place would be very difficult. The way the turret mounts in the nose precludes you from installing the turret afterwards.
I painted the turret off the model, and painted the area of the fuselage around the turret’s position. This allowed me to assemble the fuselage with the turret in place, deal with the small seams, and then mask off the turret area before painting the rest of the fuselage.
The wings are easy to assemble, and fit was good. The wingtip floats fit well, requiring no modifications to get them to fit properly in the retracted position. On my model, it is too late to check now, but I don’t remember seeing any detail inside the bottom wing, in the areas that would be exposed if the floats are built in the deployed position.
|
COLORS AND MARKINGS |
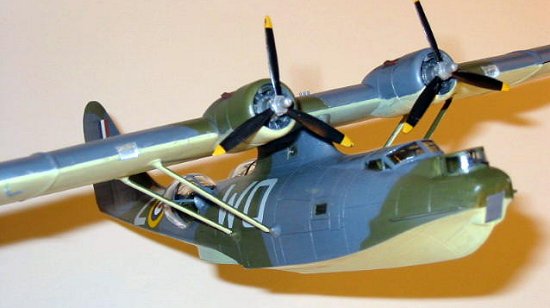
 Ever since I built my Tamiya Swordfish, I’ve been
interested in the British efforts to find and sink the Bismarck. One of
the aircraft I wanted to do was the PBY-5 WO*Z of Coastal Command, the
aircraft that found the Bismarck in time to allow the Swordfish from the
Ark Royal to attack. When I won this kit at a show raffle last year, I
renewed my search for the Microscale 72-039 “Catalina Collection” decal
sheet. (I found it on E-bay a couple of months after I started looking
for it.)
Ever since I built my Tamiya Swordfish, I’ve been
interested in the British efforts to find and sink the Bismarck. One of
the aircraft I wanted to do was the PBY-5 WO*Z of Coastal Command, the
aircraft that found the Bismarck in time to allow the Swordfish from the
Ark Royal to attack. When I won this kit at a show raffle last year, I
renewed my search for the Microscale 72-039 “Catalina Collection” decal
sheet. (I found it on E-bay a couple of months after I started looking
for it.)
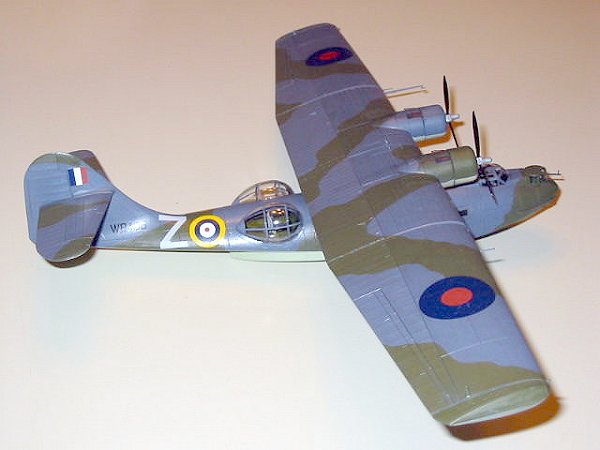
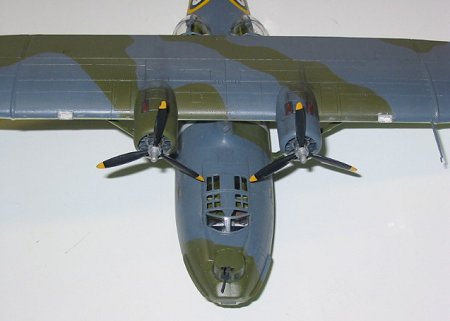
The model is finished in standard RAF colors- Extra Dark Sea Gray and Dark Slate Gray (a green color, really), and Sky undersides. I used PollyScale acrylics for all the colors. I painted the undersides first, then painted the uppers in the Sea Gray. I then masked with frisket for the camouflage pattern, and airbrushed the green.
I decided it would be easier to paint the model before assembling the wing and fuselage. Not having the wing in the way made it much easier to paint the upper part of the fuselage, and the underside of the wing.
|
FINAL ASSEMBLY |
 First, the wing was attached. Then, the wing struts
were added. I must say that I didn’t like the way the struts are
mounted—the fairing they attach to are molded as part of the wing and
fuselage, respectively. The strut pieces are just the airfoiled rod,
with a butt joint at each end. Fortunately, the pieces are a little
longer than needed, so you can sand them down to the right length. I
tacked them in place with super glue, and then used the gap filling kind
to fill the seam at the joints.
First, the wing was attached. Then, the wing struts
were added. I must say that I didn’t like the way the struts are
mounted—the fairing they attach to are molded as part of the wing and
fuselage, respectively. The strut pieces are just the airfoiled rod,
with a butt joint at each end. Fortunately, the pieces are a little
longer than needed, so you can sand them down to the right length. I
tacked them in place with super glue, and then used the gap filling kind
to fill the seam at the joints.
After the model was assembled, I brushed a coat of Future in preparation for decaling. After it dried, I used Future as a setting agent when I applied the decals. The Microscale decals settled down well. After the decals had dried for a day, I then brushed a second coat to seal them.
Weathering was kept to a minimum. I used some dark pastel chalk to add a little engine exhaust. I also used a silver artist’s pencil to add a little paint chipping effect to the leading edge of the wings and props, and on the bottom of the hull. I then airbrushed a coat of Pollyscale flat to seal everything in.
|
CONCLUSIONS |
Recommended. The Academy series of PBY Catalinas are the best in 1/72 scale I’ve seen. The kit goes together well, and fit is good. The only place I used filler was some small dabs along the bottom of the hull. Painting the nose turret and mounting the wing struts are the only places where a beginner might have a problem.
Overall, I feel that the kit is worth the money. I have an old Revell PBY kit in my stash, and I looked at it when first thinking about my Bismarck project. The fact that the Revell kit has nothing under the waist canopies except the machine guns would always put me off—I knew I’d have to scratch build some amount of interior detail, which I just wasn’t ready to do. I never realized how much nicer the Academy kit is until I won one in a raffle. If I was to do another one, I would definitely buy the Academy kit.
Review kit courtesy of the IPMS Patriot Chapter Patcon 2002 kit raffle.
|
REFERENCES |
US Naval Historical Center: Bismarck: British/American Cooperation and the Destruction of the German Battleship
http://www.history.navy.mil/faqs/faq118-1.htm (Follow the link to see ENS Smith’s flight report.)
The Cutaway PBY: A collection of some great PBY interior pictures. http://home.earthlink.net/~cutawaypby
December 2003
Copyright ModelingMadness.com. All rights reserved. No reproduction in part or in whole without express permission from the editor.
If you would like your product reviewed fairly and fairly quickly, please contact the editor or see other details in the Note to Contributors.