There are 4 full-build reviews of various P-40B kits on this site already - rather than reinvent the wheel, I'll just suggest you look at them if you yearn for historical info on this plane.
|
THE KIT |
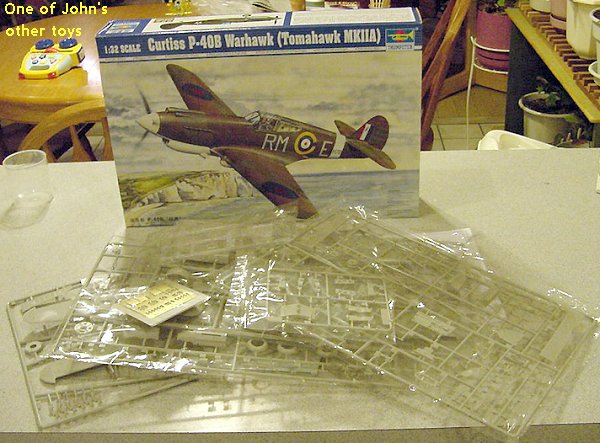
Inside
the Trumpeter's trademark sturdy box are 5 grey styrene sprues
(containing 190 or so parts), one clear sprue (17 parts), a sheet of
photoetched brass (19 parts), an acetate sheet, one small metal rod, a
decal sheet and instruction booklet. Kit options include:
Detailed engine with removable top cowl piece;
Positionable control surfaces (and moveable rudder);
Opened or closed cooling flaps;
Markings for two aircraft in service circa 1941.
 The styrene pieces are
very well molded with very few visible flaws. After reading our fearless
editor's travails with sink marks and ejection pin divots on this
company's 1/32 Corsair, I checked very closely for similar problems. I
found almost none - there are ejection pin divots, but every one I've
found so far is on a surface that won't be exposed to the penlight
police. There are no sink marks at all on my particular kit, and even
the mold seams are so faint as to be practically non-existent. Groovy.
The styrene pieces are
very well molded with very few visible flaws. After reading our fearless
editor's travails with sink marks and ejection pin divots on this
company's 1/32 Corsair, I checked very closely for similar problems. I
found almost none - there are ejection pin divots, but every one I've
found so far is on a surface that won't be exposed to the penlight
police. There are no sink marks at all on my particular kit, and even
the mold seams are so faint as to be practically non-existent. Groovy.
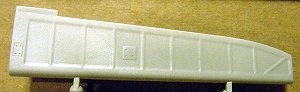
Detail is what you'd expect from state-of-the-art injection molding in
dies cut by computer. Of particular note are the fabric-covered control
surfaces. Banished are the "hills and valleys" I've always seen before -
to be replaced by what looks like underlying framework tightly covered by
a plastic wrap. Frankly, it threw me and I had to put a call out to for
photographic evidence. It appears that Trumpeter got the fabric effect
dead-on, or very nearly so (I think it will look fine under a primer coat
and a color coat of paint, but others with more discerning tastes may
want to lightly sand the area to make the rib tape stand out less).
Clear parts (canopy glazing and a surprising number of lights) are
commendably clear and distortion free. Of note here is that the areas of
the framing actually have a texture; with that and the distinct edges,
they should look exceptional under a coat of paint. On the down side,
there are two raised tabs molded to the inside of the windscreen, used to
align the 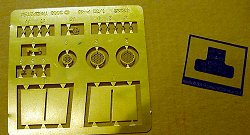 armored plate
glass piece. I don't know how that will look when it's all together …. I
can only hope for a tight fit because filling a seam on a clear part is
out of my league.
armored plate
glass piece. I don't know how that will look when it's all together …. I
can only hope for a tight fit because filling a seam on a clear part is
out of my league.
The photoeteched pieces (screens and seat harness buckles, mostly) are
crisply done and appear free of any chemical residues (something I've
come across on other manufacturer's products).
There's no indication who printed the decals, but they look like
MicroScale or Cartograf products. Registration is perfect, the colors
look accurate enough and they appear to be opaque enough that the
underlying camouflage should not show through. Markings are provided for
a British Lend-Lease Tomahawk Mk IIA assigned to 26 Squadron in June/July
1941, and a USAAC machine of the 18th Pursuit Squadron in Hawaii.
National 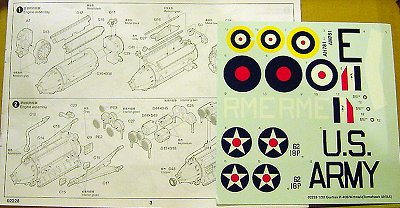 insignia and
squadron identification markings are provided, but the only stencils on
the sheet are for the propeller (or "prepeller", as the instructions call
it).
insignia and
squadron identification markings are provided, but the only stencils on
the sheet are for the propeller (or "prepeller", as the instructions call
it).
Instructions are standard Trumpeter - detailed line drawings with color
call outs, arranged into 18 assembly steps. From past builds of
Trumpeter kits, I'm willing to bet at least one part location is
ambiguous, and at least one part is mis-identified …. I'll let you know
which it is when I build this kit. Paints are described generically -
"Dark Earth", "Grey", "Interior Green". I'll double-check before I
actually break out the airbrush, but at first glance they appear accurate
enough, as far as they go.
And speaking of accuracy …. Is the kit an accurate rendition of the
prototype? I'll answer that with a qualified "yes". Qualified, because
so far I've not found one scale drawing that agrees with any other.
Without a drawing I trust to be accurate, I won't be scaling up any and
laying the kit on the page - any errors in the drawings will simply be
magnified that way. Comparing against photos - primarily AVG machines -
the model's outline appears accurate, or close enough to being so. Panel
lines look to be close to where they should be, if not dead on.
Unresolved are what I presume are lights on the fuselage - one under the
sliding canopy, one back by the tail. Every drawing I've found shows a
circle in those positions, but every photo and profile I've dug up shows
them painted over. Interestingly, the box art shows another clear
circle, which I presume covers a camera, in the hatch over the baggage
compartment on the port fuselage side, right in the yellow ring of the
British "bullseye". There's a cutout for it in the decal …. but no clear
part. I'm suspicious of the marking guide for the US plane. The stars
are obviously oriented wrong on the wing, for one, and I do believe the
one on the top wing should be placed further toward the wingtip. It's
too much to expect a ChiCom manufacturer to provide decals of the dreaded
twelve-pointed sun …. Too bad. I'll be waiting for someone do to 'Flying
Tigers' decals, a'cuz that's what I want to build.
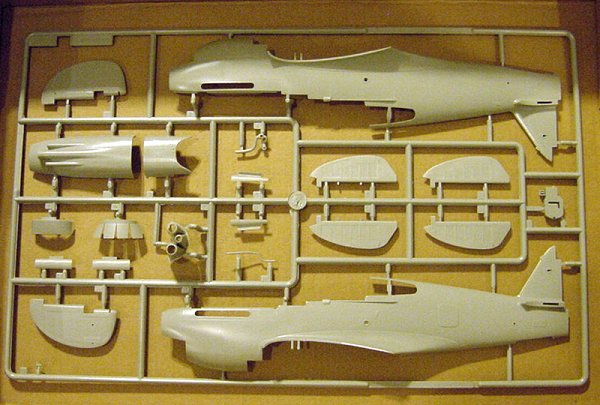
Editor's Note: I've decided to show just the main sprue as an example of
what you'll expect.
By The
Numbers
The instructions would have you start with the engine. Compared to the
photos I've dredged up (Squadron's P-40 Walkaround has some great shots
of an exposed engine, but it's for the P-40E and I am not overly sure of
the differences, if any) this assembly looks dead on. Photoetched brass
screens are provided for the oil coolers - which will look good whether
or not the engine is exposed. All you'd really need to add - if you plan
to show this off - is the wiring/tubing. Of course, if you really want to
show this off, you'll need a razor saw. Trumpeter enables you to pull the
top of the cowl off. To show any more, you'll want to hack and stab
along the appropriate panel lines. The spinner plate front is detailed,
so you could even lose the spinner and show off a naked prop, if your
tastes run in that direction. Given the problems I've run across in kits
that have a detailed engine - like the rest of the fuselage not fitting
around it, for one - I'd be tempted not to build the engine if I planned
to keep the cowl closed. However, the exhaust stacks (properly circular,
and not "fishtail" like later marks) must be glued to the engine. So,
there ya go: no choice. I hope it fits.
Next up is the cockpit. It's reasonably well detailed, though again you
may want to break out the copper wire and solder to replicate some of the
cable runs. Resin sets would be a waste of money you could spend on
decals (IMO, of course). The instrument panel is built up as a sandwich,
in the familiar limited-run way. Dial faces are printed on the acetate
sheet, which you affix to the clear panel front and then back up with a
(painted) grey styrene part. The rest of the "front office" looks as if
it builds like most aftermarket resin kits --- sidewalls are separate,
and affixed to the fuselage. The seat is to be detailed with paper lap
and shoulder belts (cut from the instruction booklet) and brass buckles.
The harness provided is the American style - if memory serves, British
aircraft should have a Sutton-style harness (gonna want to double-check
that though).
Cockpit, firewall and engine are glued together, then trapped between the
fuselage halves (as is the tailwheel assembly and the rudder). The
rudder is the only control surface that gets the photoetched hinge
treatment. Maybe they learned their lesson - though not fully - with the
Corsair?
Wings and landing gear come next, and look straightforward. Flaps and
ailerons are built up separately. There are tabs you need to slice off
if you put these in the neutral position (i.e., no control input).
Landing gear and wheels are well detailed (and all styrene - none of
those nasty plastic-eating vinyl tires here). If you want beer-bellied,
fire-the-crew-chief tires - wait for the aftermarket to catch up.
Otherwise, these are acceptable. About all you'd really need to add are
brake lines. The wing is built up from a single lower piece and two top
halves - no problems getting the right dihedral here. Generic-looking
.30 cals are provided for the wing guns. The receivers are not at all
well-detailed - but since they'll be completely hidden inside the wing,
who cares? Barrels will need to be drilled out, though.
|
CONCLUSIONS |
So ….. is this kit worth 40+ bones? In the immortal words of John
Chricton - "Can I get a 'hell yeah'"? IMO again, of course.
Well-molded, well-engineered, detailed enough that guys like me are
satisfied while providing a good start for the truly obsessed … it truly
does not suck. Job well done, Trumpeter.
Now, if I may suggest a 32d scale J-21? You know you want to …..
Many thanks to the fine folks at
HobbyLink Japan for making me the first kid on the block to have this
shiny new toy - and not telling my wife what you did to my credit card.
Pre-orders ROCK!