Hasegawa 1/48 P-51D Mustang
|
KIT # |
9317 |
|
PRICE: |
$23.98 |
|
DECALS: |
Two aircraft |
|
REVIEW: |
|
|
NOTES: |
'Pacific Mustang' boxing; aftermarket decals |
|
HISTORY |
The P-51 Mustang may have been the most important and famous American fighter of WWII in the European Theatre (ETO), but its importance in the Pacific Theatre (PTO) was somewhat less since most of the early production units were deployed to the ETO and the Mustang was not as widely deployed in the Pacific. Mustangs saw action in three major areas; Chinese-Burma-India (CBI), Philippines, and Iwo Jima.
 The improved Merlin-engined
P-51B’s were first posted in April 1944 to the 311th at Dinjan,
India replacing the Allison-engined P-51A and A-36 models. The long range of the
Mustang was well suited to the vast distances in the Chinese Theatre and they
were mainly used in the ground attack role, strafing and bombing transportation
targets and neutralizing enemy airfields.
The improved Merlin-engined
P-51B’s were first posted in April 1944 to the 311th at Dinjan,
India replacing the Allison-engined P-51A and A-36 models. The long range of the
Mustang was well suited to the vast distances in the Chinese Theatre and they
were mainly used in the ground attack role, strafing and bombing transportation
targets and neutralizing enemy airfields.
In early 1945, the Mustang was deployed to the Philippines to provide a better fighter capability against Japanese aircraft, and it was here that William Shomo earned the only Medal of Honor given to a Mustang pilot in the Pacific by downing seven Japanese planes in a single mission. Lastly, the Mustang was sent to Iwo Jima in March 1945 and while their first days of combat were spent in ground attack missions, after the islands were secured they participated in long-range escort duty for B-29 raids based in the Mariana’s flying missions against the Japanese homeland. These flights tested the endurance and range of the Mustang to its maximum, featuring 1,400 mile round trips while spending eight hours in the air.
|
THE KIT |
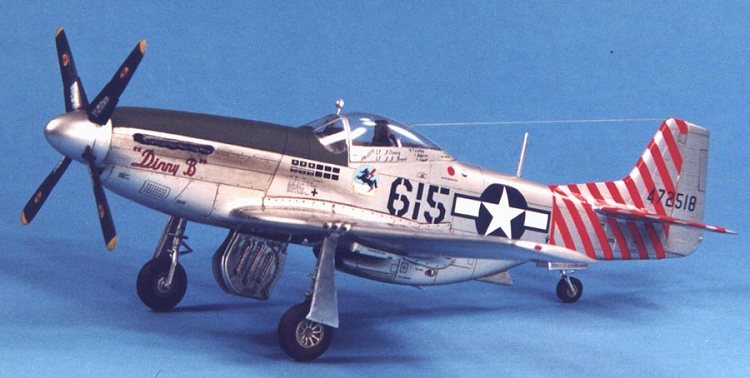
The kit is a re-release of the older Hasegawa release of the P-51D with new decals from the Pacific Theatre, and the parts needed (propeller & canopy) to build the P-51K model flown late in the war. The kit is typical Hasegawa; a high quality injected molded plastic with detailed recessed engraving. The kit consists of approximately 100 injected molded plastic parts that are the envy of the business in quality. Two decal options are provided in the kit, a P-51K flown by LTCOL William Banks, and a P-51D flown by LTCOL Edward McComas. The instruction sheet is typical Hasegawa, an eight-page foldout with color references for Gunze-Sangyo paints.
|
CONSTRUCTION |
 Construction started
with the cockpit interior (where else!). Cockpit detail is typical Hasegawa,
fairly nice, and builds up with no problems. If you are planning on keeping the
canopy closed, an aftermarket resin set would be a waste of money as the detail
present is more than adequate. Closing up the fuselage with liquid cement
presented no problems, and no putty was needed for the seams. However, the curse
of Hasegawa (poor fitting inserts!) reared its ugly head again as the chin
intake and radiator intake inserts required some putty and extensive sanding for
a smooth join.
Construction started
with the cockpit interior (where else!). Cockpit detail is typical Hasegawa,
fairly nice, and builds up with no problems. If you are planning on keeping the
canopy closed, an aftermarket resin set would be a waste of money as the detail
present is more than adequate. Closing up the fuselage with liquid cement
presented no problems, and no putty was needed for the seams. However, the curse
of Hasegawa (poor fitting inserts!) reared its ugly head again as the chin
intake and radiator intake inserts required some putty and extensive sanding for
a smooth join.
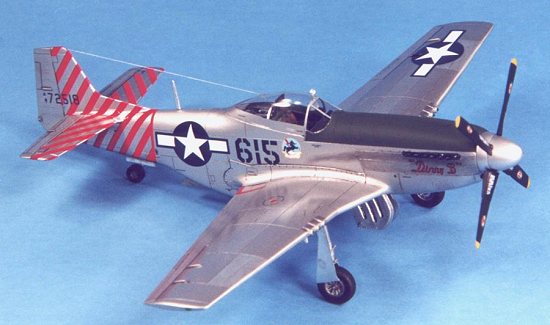
The wings went together nicely and after a little cleaning up of the seams with sanding sticks they were installed to the fuselage. Fit was very good without the typical Hasegawa wing root gaps and no filler was required. The horizontal stabilizers also went on without problem. I then masked off the canopy sections and installed them in place with jewelers watch cement. Since I was painting the model in a natural metal finish (NMF), I applied Gunze Sangyo Mr. Surfacer 1000 to all the seams and after curing I sanded them down with very fine sandpaper. I find this method to be much easier than using superglue and the Mr. Surfacer leaves a very fine sanded finish almost as good as superglue. After a good wipe down with Polly’s Plastic Prep it was off to the paint shop.
|
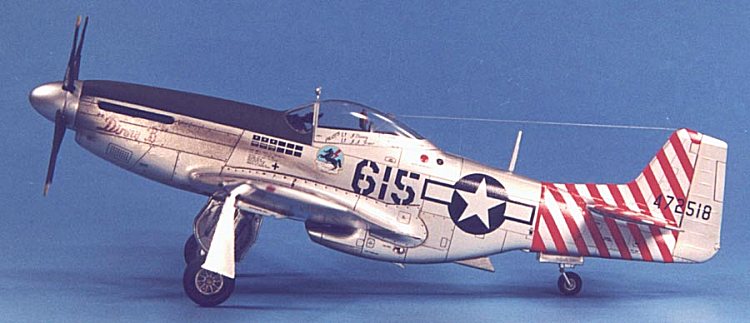
PAINT & DECALS |
 The paint scheme is very
simple; a natural metal surface. I used Floquil Railroad Colors Bright Silver
airbrushed on for the NMF since it is the most durable of all the metallic
paints. After drying overnight, I airbrushed a light coat of Future to prepare
the surface for decaling. The decals supplied with the kit are pretty good, but
I already had the Aeromaster Mustangs Forever sheet (48-285) that also features
Pacific flown aircraft and substituted them. As usual the Aeromaster decals went
down flawlessly and responded quite well to Micro Sol setting solution. The only
problem I experienced was the bottom of the red stripe decals would not match up
exactly, but that was probably my own ineptitude showing.
The paint scheme is very
simple; a natural metal surface. I used Floquil Railroad Colors Bright Silver
airbrushed on for the NMF since it is the most durable of all the metallic
paints. After drying overnight, I airbrushed a light coat of Future to prepare
the surface for decaling. The decals supplied with the kit are pretty good, but
I already had the Aeromaster Mustangs Forever sheet (48-285) that also features
Pacific flown aircraft and substituted them. As usual the Aeromaster decals went
down flawlessly and responded quite well to Micro Sol setting solution. The only
problem I experienced was the bottom of the red stripe decals would not match up
exactly, but that was probably my own ineptitude showing.
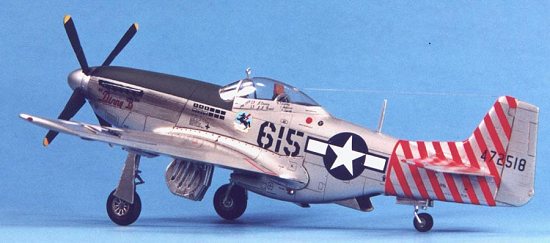
After drying overnight, I wiped the decals off with a moist cloth with Pollys Plastic Prep to remove any residue and after drying I shot a very light coat of Future thinned with rubbing alcohol (50-50 mix) over the decals to seal them. This was followed by a light burnt umber wash for the panel lines and engraved detail.
Next, a light coat of Polly S Flat Finish was shot to provide a surface for pastels. I had planned to airbrush different colored metal panels, but after about a half hour of masking a few off I got bored (lazy?) and decided to try a different approach using my tried and true pastel pencils. I used various shades of gray Derwent pastel pencils to tint the panels and while it was quite easy (and much faster!) I was not entirely pleased with the effect. Lastly, I sealed everything with a light coat of Future.
|
FINAL CONSTRUCTION |
I installed some hypo tubing to simulate the gun barrels and installed the landing gear and propeller to finish up the model.
|
CONCLUSIONS |
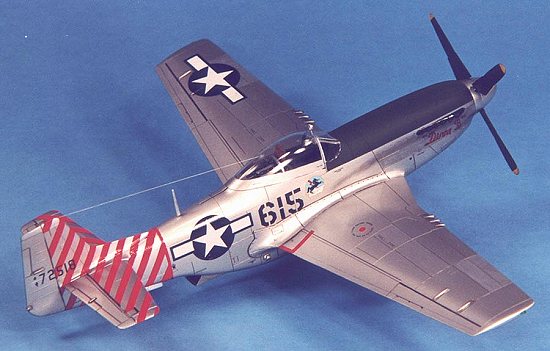
This is an excellent model of an important WW II aircraft. It would be an extremely easy build suitable for first time modelers if not for the intake fit problems. A little careful work with that portion of the kit and you will be rewarded with an excellent model.
|
REFERENCES |
Doubleday, Mustang at War, Roger A. Freeman, (OOP)
Squadron/Signal Publications, P-51 Mustang Walk Around, SS5507, $14.95
Squadron/Signal Publications, P-51 Mustang in Action, SS1045, $8.95
Copyright ModelingMadness.com
If you would like your product reviewed fairly and fairly quickly, please contact the editor or see other details in the Note to Contributors.
Back to Reviews Page 2016