|
KIT # |
9140 (JT 40) |
|
PRICE: |
$49.99 CDN |
|
DECALS: |
Two Aircraft |
|
REVIEWER: |
|
|
NOTES: |
Eagle Strike 48-030 used |
|
BACKGROUND |
For a short history and a look in the box, click here.
|
CONSTRUCTION |
This is my first 1/48 Hasegawa kit, and I was afraid to loose myself along the way, so I picked the safest route by starting with the cockpit. This was built before the big interior colour discussion had taken place on the forum, so I happily brushed Green Zinc Chromate to all the parts, and then detailed them with Flat Black and Chrome Silver as necessary. The bits simply fall together, and the cockpit is a drop fit into the fuselage. So far so good.
 I built the wheel wells, glued them in
the wings before they were closed, and again brushed them with Green Zinc
Chromate, along with the gear doors. The wings were closed and added to the
fuselage. The fit is not that great, as advertised a long time ago in a review
published in FSM. I promptly dispatched the seams with Tamiya Putty, before
sanding them smooth. The wing seams cracked quite often, so I was busy
rebuilding them. I assembled the drop tank, the two 500 lbs bombs and their
racks, and then it was time to give the engine a go. The cylinders were brushed
with Model Master Gun Metal, with the push rods detailed with Chrome Silver.
The crankcase and the inside of the cowling were painted Model Master Neutral
Grey. I detailed the magnetos with Flat Black, then did the detail work on the
oil cooler and slapped everything together, not forgetting to add the small
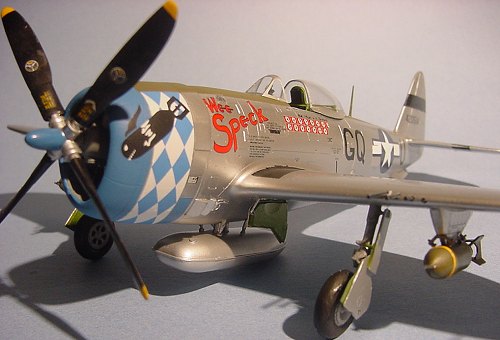
vinyl grommet. I also build the propeller, painting the blades Gunze Flat
Black with Model Master Insignia Yellow tips. Because of the nice summer
weather and the work I had taken up, the kit lay dormant for six long months,
until an October evening…
I built the wheel wells, glued them in
the wings before they were closed, and again brushed them with Green Zinc
Chromate, along with the gear doors. The wings were closed and added to the
fuselage. The fit is not that great, as advertised a long time ago in a review
published in FSM. I promptly dispatched the seams with Tamiya Putty, before
sanding them smooth. The wing seams cracked quite often, so I was busy
rebuilding them. I assembled the drop tank, the two 500 lbs bombs and their
racks, and then it was time to give the engine a go. The cylinders were brushed
with Model Master Gun Metal, with the push rods detailed with Chrome Silver.
The crankcase and the inside of the cowling were painted Model Master Neutral
Grey. I detailed the magnetos with Flat Black, then did the detail work on the
oil cooler and slapped everything together, not forgetting to add the small
vinyl grommet. I also build the propeller, painting the blades Gunze Flat
Black with Model Master Insignia Yellow tips. Because of the nice summer
weather and the work I had taken up, the kit lay dormant for six long months,
until an October evening…
I picked my P-47 up again and went on to prep it for painting. I checked the plan to see if I had omitted anything, and I realised (what a goof!) that I had forgot to install the oil cooler ducting in the cowling. I tried to remove the latter, but the Humbrol glue I use categorically refused to cooperate. Oh well, next time I’ll do it right. I started to polish the surface with 3M Compound, then switched to various grits of sand paper, and the Republic was finally ready for the paint shop after a quick masking session.
|
CAMOUFLAGE |
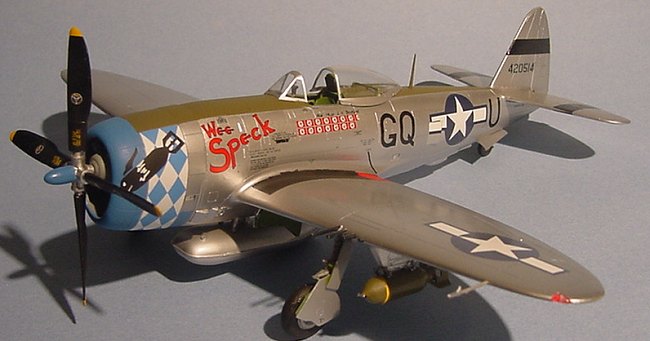
 I chose ALCLAD II as the main medium for
the job, and applied a very badly thinned coat of Model Master Aircraft Grey to
the aircraft, which was promptly striped off paint right after. I re-primed it
using Future, but I got a surface that was bumpy. By this time, I was beginning
to be really fed up with that P-47, so I just decided to move on. The canopy,
gear doors and the belly tank were painted Model Master Non-Buffing Aluminium
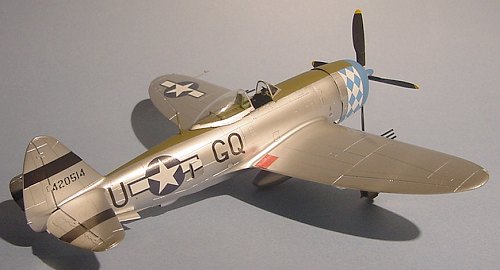
Metalizer, and then the plane was coated with ALCLAD. Once it was dry, I masked
the nose section and the propeller bullet, shooting them with Model Master FS
35183 Bright Blue. This was followed by more masking, and then by Model Master
Olive Drab for the anti-glare portion of the fuselage. Another trip was needed
to the paint shop for the walk-way on the left wing (a cracked seam problem,
invisible under the black paint) At last, I did some touch-ups with the ALCLAD
and the painting was all done.
I chose ALCLAD II as the main medium for
the job, and applied a very badly thinned coat of Model Master Aircraft Grey to
the aircraft, which was promptly striped off paint right after. I re-primed it
using Future, but I got a surface that was bumpy. By this time, I was beginning
to be really fed up with that P-47, so I just decided to move on. The canopy,
gear doors and the belly tank were painted Model Master Non-Buffing Aluminium
Metalizer, and then the plane was coated with ALCLAD. Once it was dry, I masked
the nose section and the propeller bullet, shooting them with Model Master FS
35183 Bright Blue. This was followed by more masking, and then by Model Master
Olive Drab for the anti-glare portion of the fuselage. Another trip was needed
to the paint shop for the walk-way on the left wing (a cracked seam problem,
invisible under the black paint) At last, I did some touch-ups with the ALCLAD
and the painting was all done.
|
FINAL CONSTRUCTION |
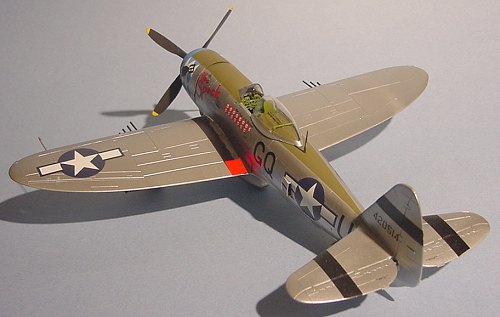
I painted the landing gears Testor
Aluminium (small jar) and chose to do the wheels without the covers. I painted
the spaces between the spokes with a black ink pen. The ordnance braces were
also painted aluminium at this time, and then they were glued to the racks. I
glued the gears on, then added the bombs and the big drop tank. The gear doors
were added next, but one of the smaller ones had broken turnbuckles, so I
fashioned some by looking into the spare box.
 Everything was finally glued with
a mix of Humbrol and Cyano glues. I added the guns which had previously been
painted Model Master Gun Metal.
Everything was finally glued with
a mix of Humbrol and Cyano glues. I added the guns which had previously been
painted Model Master Gun Metal.
Then it was time for the decals. I choose Wee Speck from the Eagle Strike sheet and went on to put every decal and stencil on the plane. They all went on beautifully, except for the ID strips on the stabiliser (which required trimming) and the propeller stencils (which refused to cooperate). After I was done, I found out that I had made my Olive Drab line too high on the fuselage and that the checkered decals didn’t cover the cowl all around. I added some blue with a brush and you just can’t tell the difference!
I coated the aircraft with Poly Scale Satin Finish to seal the decals and the aluminium paint, and much to my surprised, the metallic finished came out untouched. I then masked the area around the anti-glare and the nose with Post-It notes and shot a coat of Poly Scale Flat.
I painted the top of the instrument panel flat black then glued the windshield on, and I managed to loose the canopy rail attachment so I made a new one for cosmetic purposes. The dorsal antenna was glued along with the Pitot tube and some Flat was brushed on the bombs and the wheels to tone them down a bit.
Well, that was it.
|
CONCLUSIONS |
The P-47 was a really long project, not because it was more difficult than others, but the long painting combined with some building difficulties led to a disinterest in the model. I wouldn’t recommend this particular kit to a beginner because of the little fiddly bits and the seam under the fuselage, but a NMF paint scheme is not that hard to do when you plan ahead and take your time. A sad thing, this project almost fed me up with P-47s, but I can see AMtech’s whacky P-47s just over the horizon, so all hope is not lost…
March 2003
Copyright ModelingMadness.com. All rights reserved. No reproduction in part or in whole without express permission from the editor.
If you would like your product reviewed fairly and fairly quickly, please contact the editor or see other details in the Note to Contributors.