Koster/Monogram 1/48 Republic XP-72 Ultrabolt
Price: $10 for conversion pieces, $8 for the P-47 kit
Media: Vacuum-formed styrene fuselage; resin spinner, radiator, engine fan
Decals: None provided
Accuracy: Very good
Overall: A well-made and inexpensive conversion kit
Review and Photos by: Lee Kolosna
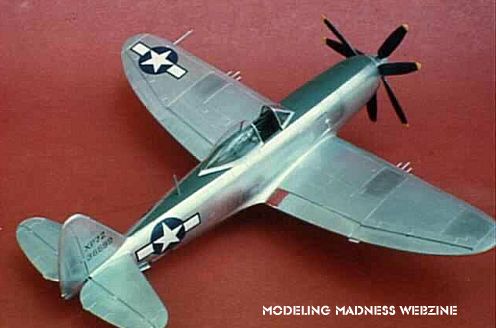
The XP-72 represented the final upgrade for Alexander Kartveli’s venerable P-47 Thunderbolt. Only two of the aircraft were made. The largest and most powerful piston engine of the war, the Pratt & Whitney R-4360 Wasp Major, was used to drive a pair of Aeroproducts three-bladed contra-rotating propellers. No doubt the unusual propeller set up was needed to combat the massive torque effect of the 3450 HP engine. The first aircraft, serial 43-6598, flew with a regular four-bladed propeller and achieved a speed of 490 MPH. The second aircraft, serial 43-6599, was equipped with the contra-rotating props but crashed early in flight testing. A production order for 100 aircraft was signed, then later canceled as it became evident to the Army Air Force that the future of military aviation lay with jet propulsion.
Being a huge fan of the P-47, I ordered this vacuform conversion kit after seeing Bill Koster’s ad in Fine Scale Modeler. The price is certainly reasonable, compared to vacuform products from other companies. It requires you to use the thirty-year-old 1/48 scale Monogram P-47D bubble top kit for the wings, cockpit, canopy, wheels, and horizontal stabilizers. Koster provides a one sheet molding of the fuselage and cowling with resin pieces for the propellers, the engine fan, and the radiator. The panel lines are raised, just like the Monogram kit. It looks like Bill used stretched sprue or very fine wire to make the panel lines on the master mold because there is a definite bump in the places where each line intersects. The resin pieces are of the older “stinky” kind with an oily feel to them. I had a few minor bubbles on the spinner, which were hard to fill without messing up the overall profile. A one sheet instruction manual is included. Helpful tips about detaching the vacuformed pieces from the sheet are provided, as well as a side view for the second airplane made, serial 43-6599. Full size templates for the serial number and the “XP-72” are printed on the instruction sheet. The modeler can use the template to replicate the tail markings with a word processing program, then print them on blank decal sheet with a laser printer. The only other markings on the aircraft are the national insignia and ”no step” warnings on the flaps.
The Monogram cockpit tub leaves a lot to be desired, so I ordered the Kendall Model Company P-47D resin cockpit. It is designed for the Hasegawa kits, but it fit in the XP-72 with no problem. I took advantage of the photoetched pieces provided with the Monogram kit and used the rudder pedals and the map light. The latest research from the National Air and Space Museum’s Dana Bell indicates that P-47 cockpit interiors were painted Dull Dark Green, so I used Polly Scale RAAF Foliage Green (FS34092). I had to scratch-build a head rest out of sheet plastic. I picked out the instrument markings with a white color pencil and put a drop of future on each gauge face. I finished out the cockpit by painting the side console parts scale black, drybrushed them with silver for effect, and applied a dark gray wash to highlight the floor and seat belts. This is the first time that I’ve ever used an after-market cockpit set, and I have to say that I’m very, very impressed. Not only did it save a lot of time, but it looks great!
I separated the fuselage and cowling pieces as instructed by scoring each piece with a knife, then snapping them off the sheet. I taped a piece of 100 grit sandpaper to a table and sanded each half until I felt that the proper depth was achieved. After painting the radiator and engine fan blades, I glued them and the cockpit into the right fuselage half with CA glue. I made little rectangles of sheet plastic and attached them to the edge of each fuselage piece as a gluing support. The two halves were mated together with normal styrene cement. I used gap-filling CA glue to fill every seam. Over the course of working with the model, I busted just about every seam open at least twice. This is probably a fact of life of vacuform kits, with their extremely thin gluing surface. My ham-fisted nature is more likely the cultprit.
The wings and horizontal stabilizers attached pretty well to the fuselage. I had a slight alignment mismatch of the tail surfaces and the wings when viewed head-on. It’s not very noticeable, so I didn’t mess around with it much. The wheel well covers need to be reshaped and corresponding sheet plastic added to the wheel well opening. This is described in the instruction sheet. The XP-72 only had three .50 guns in each wing, so the smallest P-47 gun was nipped off and the shell ejector hole filled. The longest P-47 gun is cut down to match the new outer gun, and its shell ejector hole had to be filled and a new hole cut further aft. The only picture I’ve ever seen of the XP-72 is in the Squadron/Signal P-47 In Action book. It is of the first aircraft 43-6598, with the single four blade propeller. This aircraft did not have the wing pylons attached to it. Koster’s side view of aircraft 43-6599 has the pylons. I can’t definitively attest to which is correct. I elected to remove the pylons on my model, going with the theory that other experimental P-47 prototypes (like the P-47H and J) were clean.
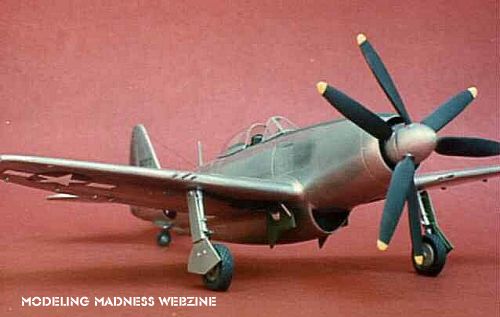
I used this model as a way to experiment with new tools and techniques. I ordered True Details resin wheels (whoever is responsible for keeping the air pressure up in these flattened and bulged tires should be relieved of duties) and the Squadron vacuformed canopy. I also ordered SNJ Spray Metal to use as the paint for the natural metal finish. A lot of areas were sanded on this model, so I attempted to smooth everything out by sanding with finer and finer grit sandpaper and then a final polish using Brasso metal polish. For the raised panel lines that were obliterated by this process, I used stretched sprue to replace them. I took a long piece of stretched sprue and reattached it to the panel with styrene cement. Tenax is too powerful for this, so use Testors’ or Micro Scale's liquid cement. This was quite a tedious process, but it looks pretty good. Next time, however, I’ll probably go back to my old method of scribing the lines back in, mixing engraved and raised lines on the same model. It usually fools the eye enough to get away with it.
I used the SNJ according to the instructions, misting it on in four light coats over an hour. Metallic finishes highlight in agonizing detail every sanding flaw, so I had some rework to do. This caused me to sand the vacuformed pieces so thin in some places that some joints failed, like the one between the cowling and the fuselage. I was able to save it with some more CA glue, but it isn’t flawless. I found that polishing the SNJ finish without using the special powder didn’t do much of anything. Using the powder, however, did bring out an impressively nice shine. I was a little concerned that this shine looked too artificial, almost toy-like, so I rubbed some dark gray pastels on various panels to tone things down a bit. Next time, I might not use the polishing powder. It works for a highly polished airplane like an unlimited racer or a commercial airliner, but for military craft in the middle of a war, an oxidized finish is more realistic.
All my interpretations of color photos of P-47s lead me to believe that Republic used Dull Dark Green paint for the anti-glare panel, so out came the Polly Scale FS34092 again. SNJ’s claim to fame is that unlike Testors’ fragile Metallizer series of laquers, it can be masked over with normal masking tape without fear of pulling the finish off. I used Scotch “Magic” transparent tape to get a nice crisp line. I noticed in the picture of 43-6598 that the anti-glare paint was only applied from the cockpit forward. Koster’s side view of 43-6599 shows the panel extending back to the tail. Giving Bill the benefit of a doubt, I complied. Finishing touches included new wing tip lights using five-minute epoxy, attaching the Squadron canopy and wheels (after sanding out those ridiculous bulges!), painting the interior of the wheel wells FS34151 interior green, and attaching an antenna wire made from 2 LB fishing line. My kids always touch these antenna lines and they inevitably break. Sprue is much too fragile, so the fishing line offers a much stronger and I hope permanent solution. I used a black Sharpie marker to paint the line after it was installed. This worked great.
For decals, I used some Super Scale national insignia. Koster’s recommendation for placement of the fuselage markings differs from the picture of the first aircraft. I chose to go with the picture, putting the start and bar almost next to the horizontal stabilizer. With Microsoft Word, I used Universal font with 14 point type to make up the tail markings on my computer, then printed them with a laser printer on a piece of blank decal paper I ordered from Micro Mark. I made tiny stencil marks on the letters and numbers by scraping the printing with an X-acto knife. Finally, I applied Micro Scale Decal Film to seal the laser-printed numbers to the decal paper. I then applied the decals in a normal manner to the model. It looks convincing enough.
I used a wash made of Windsor and Newton oil paints thinned with Turpenoid to outline the areas around the control surfaces. Turpenoid is a turpentine substitute that is much milder in nature. Still, it ate through the SNJ in a few places, causing me to retouch those areas. Only after I finished did I find another instruction sheet with the SNJ that said to use washes made of India ink and water only. Doh!
The final model is very striking looking with its six propeller blades and shining metallic finish. While not an easy build, it wasn’t overly difficult and it allowed me to stretch my skills as a modeler. I’ll know what to do next time to make a natural metal finish even better. Total cost of the model was $10 for the conversion, $8 for the P-47 kit, $8 for the cockpit set, $2 for the canopy, $3 for the wheels, and about $5 for the decals. That comes up to $38, about what a standard Hasegawa P-47 kit goes for. Instead of a run-of-the-mill Thunderbolt, I’ve got a real rarity. Highly recommended to any modeler with advanced skills, or someone like me, a more modestly skilled person who wishes to learn more about the hobby and attempt new techniques.
Copyright ModelingMadness.com
Back to Reviews Page 2016