Revell 1/32
F4U-1A Corsair
|
KIT # |
? |
|
PRICE: |
$15.95 |
|
DECALS: |
See review |
|
REVIEWER: |
Jim Baker |
|
NOTES: |
Dense Foam resin base |
An Exercise in Insanity
 The Revell 1/32 scale Corsair is an old kit. I
personally have seen it in as many as six different incarnations, plus the
latest Revell Germany release. I can remember building it a number of times
when I was a kid, including one “superdetailed” one where I actually drilled out
lightening holes in the wing spars behind the, uh, folding mechanism. The kit
is currently being marketed as an F4U-1D, but unless it’s a very early –1D, with
the ribbed canopy, it is more accurately built as a –1A. Mine was an old
‘70s-issue of the kit, also incorrectly marketed as an F4U-1.
The Revell 1/32 scale Corsair is an old kit. I
personally have seen it in as many as six different incarnations, plus the
latest Revell Germany release. I can remember building it a number of times
when I was a kid, including one “superdetailed” one where I actually drilled out
lightening holes in the wing spars behind the, uh, folding mechanism. The kit
is currently being marketed as an F4U-1D, but unless it’s a very early –1D, with
the ribbed canopy, it is more accurately built as a –1A. Mine was an old
‘70s-issue of the kit, also incorrectly marketed as an F4U-1.
Overall, the kit is an excellent place to start. The
outline is pretty much accurate, down to the offset vertical fin, but that's as
far as it goes. All internal detail is useless. The engine is bad, the landing
gear is REALLY bad, the wheels are terrible, and the wings are broken at the
fold lines, which makes it very time-consuming to make it with the wings folded
down.
Which, of course, is what I decided to do. Pity me.
Warning! My model is not completely accurate. This is
because I was living on the Navajo Indian Reservation at the time I undertook
this rather bizarre project, and so did not have the resources to make it
perfect. I planned better when I built my Matchbox Dauntless, and there will be
another article forthcoming about THAT model, or Why I Should Own Controlling
Stock in Krazy Glue and Evergreen Styrene.
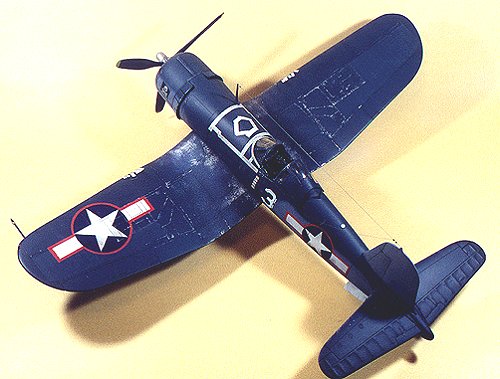
The kit goes together fairly well; overall, the fit is
quite good for a kit of its age. The major problem area is the wings, where the
wing folds are. I grafted the wings together using an entire tube of CA glue as
filler. I did have to put spreader bars in the outer wing panels to make them
fit flush with the center section. When the wings were faired in – by far the
most time-consuming part of the build, but hey, I was living in the middle of
nowhere and needed SOMETHING to do – I scribed the whole model. This was a real
pain for the scriber-challenged modeler, and I used up a lot more CA glue
filling in scratches and battle damage from scriber accidents. For the most
part, I followed the kit’s raised panel lines, but discovered that the ones on
the bottom of the wing center section do not line up, so I kind of fudged it a
little. I added the cowling stiffeners from very thin styrene and the wingtip
and formation lights fro clear plastic. Then, realizing I was already way too
involved in the project, I discarded the idea of scratch building a Brewster
bomb rack.
 The Cockpit
The kit's cockpit is worthless. The F4U-1/1A/1D/2
series, like its contemporary in the US Navy inventory, the Grumman F4F Wildcat
series, did not have a cockpit floor; there was a little window on the bottom of
the fuselage of the early Corsairs so the pilot could see out the bottom of the
airplane. Revell, in its infinite wisdom, included a floor. This was deleted,
but until the F4U-4 series the Corsair had no floorboards.

Since the cockpit is so deep, I wrapped a piece of
plastic around to make a semi-tubular tub and ribbed it with Evergreen strip
stock. I then cut the side panels off of the kit cockpit and detailed them up
with bits and pieces from my scrap box. I made the seat out of sheet stock and
the seat belts are made out of an old Sensodyne toothpaste tube I still have
bits and pieces of lying around. That metal is great stuff – it stays where you
bend it and makes for very nice seatbelts.
The only kit parts in the cockpit are the instrument
panel and the control stick. The rest is scratch built.
 Landing Gear and Wheel Wells

The wheel wells are non-existent in the kit, so I used
the Tamiya 1/48 F4U-1D Corsair kit as a template to be able to figure out what
to put in there. I boxed the wells in with sheet styrene and used assorted bits
from my myriad scrap boxes and strip stock to add details that approximated the
details in the Tamiya offering. I did the same with the blank gear doors. I
cut out some basic shapes which approximated what I saw in the Tamiya kit and
glues them to the gear doors, and filled and sanded until they were smooth.
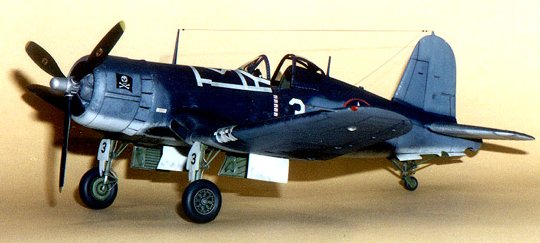
I detailed the landing gear with rod styrene and wheels
from a Hasegawa Hellcat, which look pretty good on the model. The
 only metal on
the model is the brake lines, which I made from medium weight solder.
Everything else is plastic. The tail wheel assembly is completely scratch
built, including the wheel well, gear doors, and arrestor hook.
only metal on
the model is the brake lines, which I made from medium weight solder.
Everything else is plastic. The tail wheel assembly is completely scratch
built, including the wheel well, gear doors, and arrestor hook.

Engine
I used the kit engine, which maybe I shouldn't have.
The engine from a Hasegawa Hellcat would probably look better. I did add some
widget-wiring to the front end of the engine, and made some exhaust pipes from
angle-cut plastic tube. But I think it came out pretty well. You can only see
the front of the engine anyway unless you’re REALLY anal-retentive and have a
flashlight.
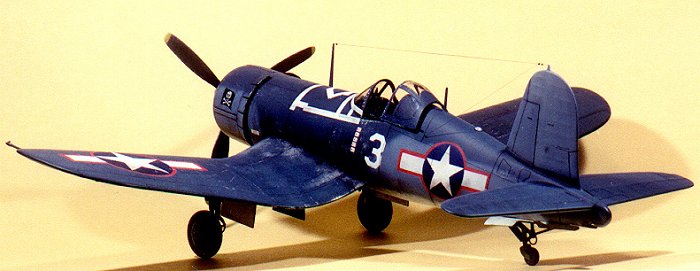
The paint is entirely Polly-Scale, since that's all I
use. The upper color is a nifty color called Weather Deck Blue, which looks
kind of like a faded sea blue and shows weathering MUCH better than Sea Blue. I
use it on almost all of my three-tone aircraft. Since this airplane was
island-based, it needed to be heavily weathered. The other colors are
Intermediate Blue-Grey and White. I masked the canopy off with Parafilm M and
sprayed away.
 I discovered I did not have red-surrounded stars, and
the nearest hobby shop was three hundred miles away, so I ended up masking and
painting the stars and bars. I couldn't tell you what the rest of the decals
are, since my decal box is a true nightmare to sift through. Probably they are a
mixture of Superscale and other assorted decals from other kits. I
accomplished the weathering with a mixture of Polly-Scale Bright Silver, very
well-thinned Polly-Scale Night Black, and chalk pastels, including the grime and
gunk on the lower fuselage and panel lines.
I discovered I did not have red-surrounded stars, and
the nearest hobby shop was three hundred miles away, so I ended up masking and
painting the stars and bars. I couldn't tell you what the rest of the decals
are, since my decal box is a true nightmare to sift through. Probably they are a
mixture of Superscale and other assorted decals from other kits. I
accomplished the weathering with a mixture of Polly-Scale Bright Silver, very
well-thinned Polly-Scale Night Black, and chalk pastels, including the grime and
gunk on the lower fuselage and panel lines.
The antennas, which many Corsairs had removed (since
they were VHF radios and therefore line-of-sight, which was useless in the
Pacific), are stretched sprue.
Overall, I'm pleased with the finished model. It looks
like a Corsair, and it has the characteristic bulk the Corsair possesses. It’s
BIG. It has taken a number of first-place trophies in assorted contests,
including the 2000 IPMS Regionals in Phoenix. Someday I'll take it to Nationals,
just to see what will happen.
·
Osprey Corsair Aces book
·
Tamiya 1/48 F4U-1D
·
Squadron/Signal’s F4U Corsair In Action (the new one – there are two).
Copyright ModelingMadness.com. All rights reserved. No reproduction in
part or in whole without express permission.
If you would like your product reviewed fairly and fairly quickly, please
contact the editor or see other details in the Note to
Contributors.
Back to Main Page
Back to Reviews Page
2022