|
KIT: |
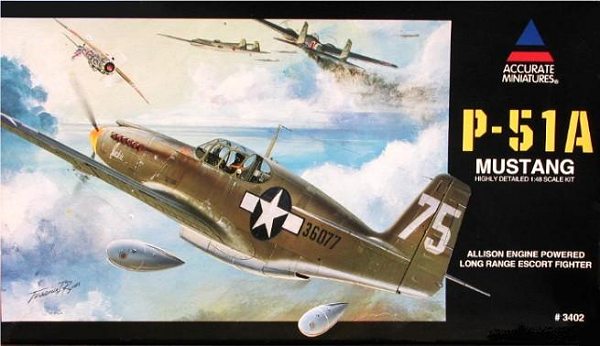
Accurate Miniatures 1/48 P-51A |
|
KIT # |
3402 |
|
PRICE: |
$29.98 |
|
DECALS: |
One Aircraft |
|
REVIEWER: |
|
|
NOTES: |
Currently Out of Production |
|
HISTORY |
North American Aviation’s P-51A was a further refinement of the company’s original NA-73 model, which had been designed to British specifications and named the Mustang I to meet the RAF’s burgeoning demand for fighters in the early days of WWII. Prior to the 7 December 1941 attack on Pearl Harbor the United States Army Air Force had shown little official interest in the aircraft, but, suddenly facing multiple threats from Japan and Germany, the AAF demonstrated a vigorously renewed curiosity.
After purchasing a small number of the basic P-51 (some of them diverted from the original British contract) and calling them Apaches, the service requested some modifications. Changes resulting in the ‘A’ designation included replacing the brace of 20-millimeter cannon in each wing with a like number of M-2 .50 caliber Browning machineguns. An up-rated Allison V-1710-81 engine turning a Curtiss 10’-9” prop was installed which produced sufficient moxie to push the P-51A to 409 MPH at 10,000 feet.
Under wing pylons were capable of carrying a variety of ordnance or fuel tanks, while field-expedient mounts were often installed outboard of these hardpoints to permit carriage of triple-configured “bazooka” rocket launchers, popular with units assigned to the 10th and 14th AF providing close air support to General “Vinegar Joe” Stilwell’s forces in the CBI. Lend-Lease P-51As delivered to the RAF were designated Mustang II, while those modified for photo-recon work with a pair of obliquely-mounted K-24 cameras became F-6Bs.
 The USAAF-decreed “Apache” sobriquet was never very popular among the troops,
while further confusion and consternation was caused by calling the essentially
similar A-36 dive-bomber version the Invader. P-51 aircrews, likening
their mount to a thoroughbred racehorse, preferred the British moniker
Mustang, and in a rare departure of protocol the Army Air Force relented,
officially renaming all P-51 sub-types as the Mustang (the AAF would later play
the same ‘name game’ with the Lockheed P-38, initially calling it the
“Atalanta”).
The USAAF-decreed “Apache” sobriquet was never very popular among the troops,
while further confusion and consternation was caused by calling the essentially
similar A-36 dive-bomber version the Invader. P-51 aircrews, likening
their mount to a thoroughbred racehorse, preferred the British moniker
Mustang, and in a rare departure of protocol the Army Air Force relented,
officially renaming all P-51 sub-types as the Mustang (the AAF would later play
the same ‘name game’ with the Lockheed P-38, initially calling it the
“Atalanta”).
The P-51A was the last of the Allison-powered variants to be produced (discounting the F-82 Twin Mustang), and while its high altitude capability was considerably inferior to its arch-rivals from Germany and Japan, it nevertheless was a solid performer at medium and low levels. It was a righteous and honest airplane with none of the vices and peccadilloes of the later Merlin-powered marques which could (and would) kill a number of young and foolhardy lieutenants unfamiliar with that aircraft’s notorious torque-roll phenomenon during take-off.
|
THE KIT |
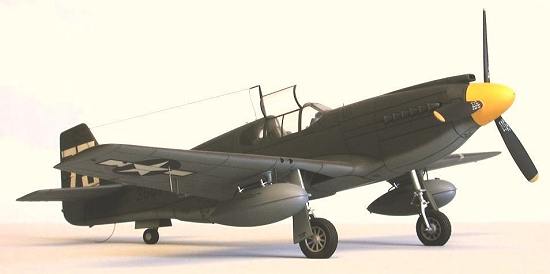
Accurate Miniatures’ P-51A kit consists of 51 parts molded in a rather pliable light gray styrene, a clear sprue with nine pieces, a well-executed decal sheet featuring one scheme, and an elaborate instruction booklet. To its credit, Accurate Miniatures is to be commended for its packaging philosophy—decals and clear parts are segregated in the box by a divider pasted to the bottom. The lid offers outstanding commissioned artwork, something truly appreciated by this reviewer among today’s contemporary releases.
The major airframe components assemble in the traditional Mustang manner with the sole wrinkle being the separate cowling parts which join the fuselage at the firewall panel line. The reason for this is that the companion P-51 and A-36 models share many components with this kit but the cowlings have subtle differences. The surface detail is remarkably realistic, being both fully recessed and structurally spot on in accuracy.
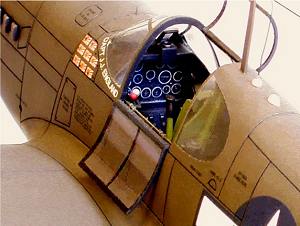
The cockpit is well appointed, lacking only the rear seatback armor. The instrument panel is molded clear with the instrument faces in raised relief, the intent being to apply the provided instrument decal to the backside of the panel. The panel can also be finished conventionally by painting it black overall, then dry-brushing the details in white or light gray.
 The landing gear offers both weighted and un-weighted diamond-treaded tires with
separately molded inner and outer hubs, the former being the most accurate to
date in this scale. The doors are correctly cast with the requisite detailing
on the inner surfaces, while the wells are deep enough to preclude the need for
replacement with an expensive resin aftermarket set.
The landing gear offers both weighted and un-weighted diamond-treaded tires with
separately molded inner and outer hubs, the former being the most accurate to
date in this scale. The doors are correctly cast with the requisite detailing
on the inner surfaces, while the wells are deep enough to preclude the need for
replacement with an expensive resin aftermarket set.
The three-piece prop is somewhat awkwardly molded as the blades, though of proper length and chord, are beau coup thick. Thinning them will be required to achieve a true scale appearance. Conversely, the fishtail exhaust stacks are beautiful, though very tedious to clean up the molding seams.
The clear parts are this kit’s major deficiency, molded excessively thick and with overly heavy framing (so much so that I felt compelled to write to the company). Replacement of these pieces is definitely recommended, though a major re-work can improve their appearance as well.
External stores consist solely of a pair of two-piece 75-gallon drop tanks with integrally molded sway braces and casing nuts. Bombs from the modeler’s spares box could be substituted as well as adding the bazooka tubes from the Monogram razorback Jug kit.
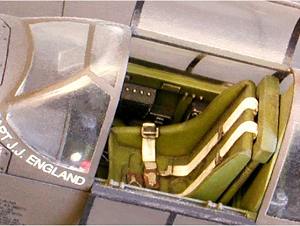
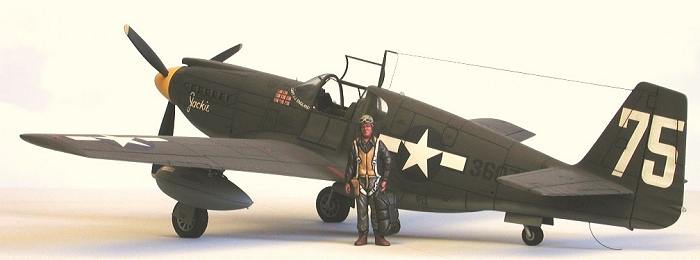
The decals offer markings for Captain James J. England’s “Jackie”, a P-51A assigned to the 530th FS, 311th FG, 10th AF (note: in e-mail correspondence with Accurate Miniatures co-founder Bill Bosworth subsequent to completing this model, he indicated that “Jackie” appeared on both sides of this aircraft’s cowling…a second decal sheet will be necessary to accomplish this). As a bonus, a beautifully done “NAA” logo and a 10th AF insignia are also included.
|
CONSTRUCTION |
Predictably, I began construction with the wing (as I do with most of these single-engined WWII fighters). New recessed wing gun assemblies were fashioned from 3/32” aluminum tubing. The gun barrels themselves are #20 hypo needles, sleeved into 1/16” aluminum tubing collars and glued into the 3/32” tubing with the muzzles recessed 3 or 4 millimeters from the finished ends.
 After assembling
the three-piece wing, the guns were inserted into the ports and glued with CA
then everything was filed and sanded flush. I made a new pitot tube from some
leftover hypo needle bent into an ‘L’ and a short piece of straight pin, then
installed it in the appropriate location. A short length of .013” guitar string
replicated the HF marker beacon dipole under the starboard wing.
After assembling
the three-piece wing, the guns were inserted into the ports and glued with CA
then everything was filed and sanded flush. I made a new pitot tube from some
leftover hypo needle bent into an ‘L’ and a short piece of straight pin, then
installed it in the appropriate location. A short length of .013” guitar string
replicated the HF marker beacon dipole under the starboard wing.
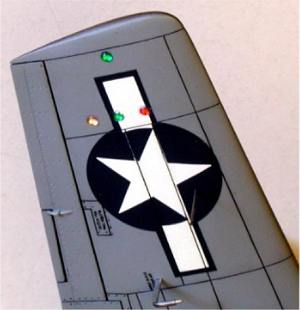
Following a rescribe of the surface detail lost during the seam clean-up I drilled dimples at each wingtip, top and bottom, where I would later install red and green MV lenses to serve as position lights. MV lenses were also used as the combat ID lights under the right wingtip. The dismally molded landing light cover was replaced by a vacuformed piece (thank you, Mattel!), with a white MV lens drafted for duty as the sealed beam bulb behind it.
Moving to the fuselage, I taped the components together and test-fitted the empennage at the rear. Loath to rely solely on adhesive, I drilled holes at the fillet ends of each stabilizer and used a single piece of brass wire to fix and maintain their correct zero dihedral angle and lend structural integrity to the overall assembly.
The cowling and propeller were next, and after assembling these parts I removed the plastic shaft from the prop and replaced it with a 2” length of 1/16” brass tubing. A similarly-sized piece of 3/32” aluminum tubing was installed as a bearing at the front of the cowling. The prop blades were thinned several times in an effort to get the thickness more to scale but total replacement might be a better alternative.
 With the engine
and prop complete, I un-taped the main fuselage and started on the interior.
While most of the sidewall detail was acceptable, I decided to hotrod things a
bit by replacing the oxygen hose and regulator. Wound .036” guitar string and
some sprue wafers were used here. I also built a new throttle quadrant complete
with knobbed handles for the throttle, mixture, and prop controls.
With the engine
and prop complete, I un-taped the main fuselage and started on the interior.
While most of the sidewall detail was acceptable, I decided to hotrod things a
bit by replacing the oxygen hose and regulator. Wound .036” guitar string and
some sprue wafers were used here. I also built a new throttle quadrant complete
with knobbed handles for the throttle, mixture, and prop controls.
After assembling the seat I added a set of TD photo-etched lap-and-shoulder belts. The missing rear seat armor plate was addressed with Evergreen .010” sheet, using .025” rod for the bracing. After wiring up the batteries and radio equipment, I installed a few more doo-dads to the sidewalls and instrument panel then assembled and painted everything. I discarded the gimmicky decal instruments and finished the panel conventionally with flat black, dry-brushing the details in white.
 With the cockpit
complete I assembled the rear fuselage halves with Crazy Glue. After sanding
the seams and rescribing the lost surface detail I notched the trailing edge of
the rudder and attached a short piece of stretched clear sprue to serve as a
rear position light. Sheet styrene was used to create a well for the tailwheel,
then the strut was installed after first painting the assembly.
With the cockpit
complete I assembled the rear fuselage halves with Crazy Glue. After sanding
the seams and rescribing the lost surface detail I notched the trailing edge of
the rudder and attached a short piece of stretched clear sprue to serve as a
rear position light. Sheet styrene was used to create a well for the tailwheel,
then the strut was installed after first painting the assembly.
Next up were the windscreen and quarter windows. I replaced the rear glass with pieces taken from Monogram’s P-51B kit since they were closer to scale thickness. The windscreen was cemented with CA, then I used a jeweler’s file to blend the seam and reduce the thickness to an acceptable dimension. The fixed right side pane of the canopy was replaced by some scrap clear styrene and with everything sturdily glued, I filed and sanded the glass to shape, then polished the pieces out with jeweler’s rouge and a Dremel-powered buffing wheel set on slow speed.
 The cowling was
glued to the fuselage using Testor’s liquid cement. Tolerances between the
sections was very close, requiring only a light scuffing with 320-grit to even
things out. After the adhesive had fully dried I inserted the interior from
below and anchored it with small drops of gap-filling Hot Stuff.
The cowling was
glued to the fuselage using Testor’s liquid cement. Tolerances between the
sections was very close, requiring only a light scuffing with 320-grit to even
things out. After the adhesive had fully dried I inserted the interior from
below and anchored it with small drops of gap-filling Hot Stuff.
Mating the wing to the completed fuselage proved to be a minor headache as my wings did not have sufficient dihedral to produce a tight butt-join at the fillets. After fiddling with the wing for two hours I was finally able to tweak it enough so the gaps at the roots were reduced by half. Permanent installation was still going to equate to a WWF “Smackdown” so I attached the horizontal stabilizers as a visual aid to maintaining symmetry between the wings.
After gluing the wing to the front and rear of the lower fuselage I wrapped a single piece of masking tape span-wise around both wings, pulling it tight to close the gaps at the wing roots while simultaneously maintaining the correct dihedral relative to the fuselage C/L. Once my angles were fixed I used gap-filling Hot Stuff on the fillet areas and let it cure overnight.
The next evening I removed the tape then sanded the seams flush. Lost surface detail was rescribed then I attached the radiator and intercooler pieces. After sanding them smooth with the fuselage I installed the inner landing gear doors in the closed position. With the major airframe components assembled I flew a series of test-hops around the studio while I decided how to proceed with the remainder of the build.
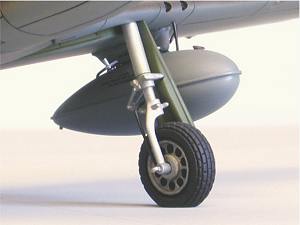 Due to the
pliable nature of the AM styrene I decided to replace the landing gear struts
with scratch-built units made from aluminum tubing. A pair of Monogram P-51D
parts provided the forks and oleo-scissors assemblies, carefully removed with a
razor saw. After polishing the aluminum oleo tubes with Brasso until they shone
like chrome steel, I attached the plastic bits with minute drops of CA. Cast
brass eyebolts were used to replicate the tie-down rings while small diameter
wire was used to simulate the hydraulic brakelines.
Due to the
pliable nature of the AM styrene I decided to replace the landing gear struts
with scratch-built units made from aluminum tubing. A pair of Monogram P-51D
parts provided the forks and oleo-scissors assemblies, carefully removed with a
razor saw. After polishing the aluminum oleo tubes with Brasso until they shone
like chrome steel, I attached the plastic bits with minute drops of CA. Cast
brass eyebolts were used to replicate the tie-down rings while small diameter
wire was used to simulate the hydraulic brakelines.
The wheels and tires were supplanted by resin TD replacements as I thought the tread pattern on the AM tires was a bit overdone when compared to period photos. After painting everything in the appropriate colors I attached the remaining doors and turned my attention to the drop tanks.
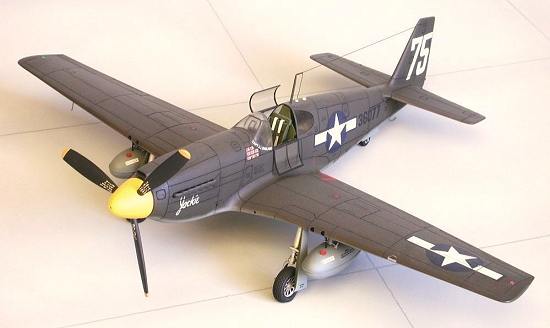
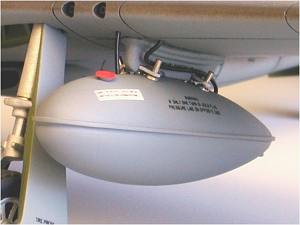 A pair of
tear-drop tanks salvaged from an old Monogram P-51B were substituted, using
steel wire pins to facilitate installation. Sway braces were fabricated from
sheet aluminum strips with modified pin heads simulating the casing nuts. I
used small diameter wire to plumb the mounts with fuel and vacuum-return lines,
while the filler caps were made from some Detail Associates photo-etched model
car radiator caps glued to flat-head copper rivets then press-fitted into a
pre-drilled hole.
A pair of
tear-drop tanks salvaged from an old Monogram P-51B were substituted, using
steel wire pins to facilitate installation. Sway braces were fabricated from
sheet aluminum strips with modified pin heads simulating the casing nuts. I
used small diameter wire to plumb the mounts with fuel and vacuum-return lines,
while the filler caps were made from some Detail Associates photo-etched model
car radiator caps glued to flat-head copper rivets then press-fitted into a
pre-drilled hole.
After installing the exhaust manifolds I engineered and attached the HF antenna. Sheet brass was used to fashion a mast which I inserted into a socket made of partially crushed aluminum tubing and recessed into the fuselage aft of the canopy. Next, I glued a 2 mm length of #27 hypo needle to the end of a long piece of monofilament line. I drilled a hole in the leading edge of the fin cap and inserted my hypo needle ‘antenna mount’, gluing it securely with a small drop of Crazy Glue. After drilling a hole in the end of the antenna mast with a #80 bit, I scratch-built a tensioner spring by coiling soft, small diameter wire around a .008” guitar string.
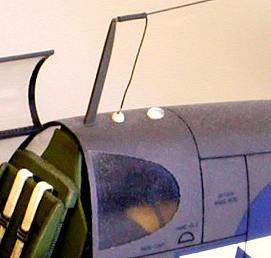 In sailing ship
fashion, I “rigged” the antenna by passing the free end of the monofilament line
through the spring, into the hole in the mast, then back through the spring in
the opposite direction. By carefully tugging on the line while simultaneously
teasing the spring toward the mast with a pair of tweezers, the monofilament
assumed and held a tautness without the need for adhesive.
In sailing ship
fashion, I “rigged” the antenna by passing the free end of the monofilament line
through the spring, into the hole in the mast, then back through the spring in
the opposite direction. By carefully tugging on the line while simultaneously
teasing the spring toward the mast with a pair of tweezers, the monofilament
assumed and held a tautness without the need for adhesive.
As a lead-in to the rear-mounted radio equipment, I built an insulator from another piece of #27 needle and a 1 mm length of Evergreen .025” styrene rod. With the needle glued into a hole drilled through the center of the rod, I tapered the external end of the plastic to match my photos. The needle portion of the insulator was inserted into a hole drilled behind the mast, then I threaded the monofilament through the hypo needle and carefully snipped off the excess from the inside of the fuselage using a pair of suture scissors.
The battery drain vent and grounding strap were the last details to be added and after a thorough wipe-down with a tack-cloth and a dusting with air from my compressor, the model was sent to the paint shop for its “uniform”.
|
PAINT & DECALS |
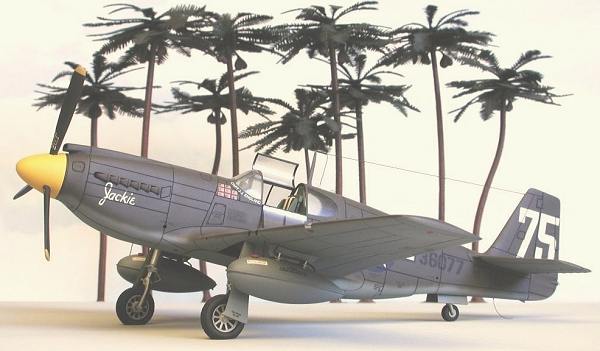
After priming the entire prop with flat white I sprayed the spinner with bright yellow. When dry, I masked the spinner and used my special “propeller-tip yellow” on the ends of the blades. When this color fully cured the tips were masked then I shot flat black over the remainder of the blades.
Since the molded framing had been sanded off the glass I re-created the bracing with thin strips of masking tape, then I masked each pane of glass individually. My original framing tape was removed then the canopy was sprayed with flat black to ensure opacity under the final color coat. The exhaust stacks were painted flat black, then moderately dry-brushed with Testor’s rust. While the paint was still tacky I dusted powdered graphite over them and burnished them lightly with a Q-tips to give them a slightly metallic sheen.
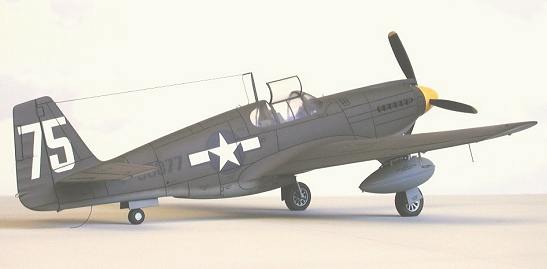
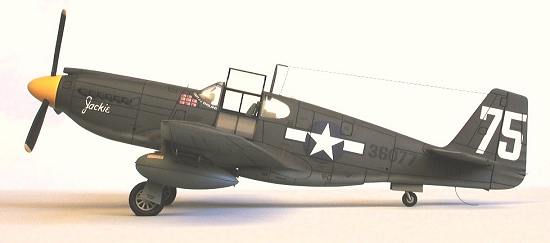 The finished
areas were masked with tape and/or moistened tissue then the exterior was
painted, using a home-brewed Modelmaster mix for the olive drab and Hot Rod
Primer from the Modelmaster car line as a stand-in for the AAF #43 neutral
gray. When the enamel was dry to the touch I sprayed Testor’s Glosscote overall
to prep the surface for decals. The kit sheet was used, supplemented by
stenciling items from SuperScale’s Mustang data sheet.
The finished
areas were masked with tape and/or moistened tissue then the exterior was
painted, using a home-brewed Modelmaster mix for the olive drab and Hot Rod
Primer from the Modelmaster car line as a stand-in for the AAF #43 neutral
gray. When the enamel was dry to the touch I sprayed Testor’s Glosscote overall
to prep the surface for decals. The kit sheet was used, supplemented by
stenciling items from SuperScale’s Mustang data sheet.
I didn’t care for AM’s faded national insignia so these were replaced by RepliScale stars-and-bars from a now-OOP decal. After allowing 24 hours for the decals to fully dry I sprayed Testor’s Dullcote overall to seal them and provide a base for some minimal weathering. Charcoal gray Liquitex watercolor was used as a wash to highlight the recessed surface detail, sealed with more Dullcote to render the areas waterproof. The remaining masks were removed then the MV lenses were attached using Elmer’s white glue.
The hinged canopy pieces were fabricated by vacuforming clear butyrate, using K & S aluminum airfoil shapes as masters. After several attempts I managed to get a serviceable set made, then trimmed them to fit the model. After masking and painting the frames they were installed, again using white glue. Following a flat black enamel wash on the monofilament line, I press-fitted the drop tanks to their pylons and spun the prop into position up front, and the model was complete.
|
CONCLUSIONS |
The Accurate Miniatures P-51A and its companion P-51 and A-36 kits admirably fill an obvious hole in many a modeler’s collection of WWII fighter aircraft. Offering state-of-the-art molding and a competitive price, these kits are well detailed with few insurmountable assembly vices. Difficulties with the wing root joints are typical of all Mustang kits and I expected no less from this model. The transparencies are another story however.
 In a personal
response to my letter to AM, Bill Bosworth acknowledged the problems with the
clear parts (and the myriad reasons behind them) then indicated that subsequent
production runs of this kit would contain corrected canopy pieces. I cannot
attest to that as I have not seen any of the later releases but I’d recommend
this kit to all Mustang modelers nonetheless. It may be the only game in town,
but at least it’s a good game.
In a personal
response to my letter to AM, Bill Bosworth acknowledged the problems with the
clear parts (and the myriad reasons behind them) then indicated that subsequent
production runs of this kit would contain corrected canopy pieces. I cannot
attest to that as I have not seen any of the later releases but I’d recommend
this kit to all Mustang modelers nonetheless. It may be the only game in town,
but at least it’s a good game.
Sadly, Accurate Miniatures folded its tents in the summer of 2001 and closed up shop. Wild speculation regarding the circumstances of the company’s demised have been posited by many, but AM tanked for altogether different reasons. Without betraying what Bill Bosworth revealed to me in confidence I will categorically state that every suspicion and rumor was wrong.
This kit may still be found occasionally in hobby shops or at swap meets and there is every indication that it will be re-released in the not-too-distant future, probably under the Italieri label. Modelers interested in Mustangs would be wise to pick one up if and when it is—a new-tool Allison-powered P-51 from Tamigawa, while possible, is highly unlikely.
|
REFERENCES |
P-51 Mustang In Action - Larry Davis; Squadron-Signal Publications
Aces Of The Southwest Pacific – Gene B. Stafford; Squadron-Signal Publications
Fighting Colors: P-51 Mustang In Color – Larry Davis; Squadron-Signal Publications
P-51 Mustang Aces – Thomas G. Ivie & William N. Hess; Motorbooks International
Classic Aircraft: Fighters – Bill Gunston; Motorbooks International
AAF: The Official WWII Guide To The Army Air Forces – Reprint by Bonanza Books
Fighter Command: American Fighters In Original WWII Color – Jeffrey L. Ethell & Robert T. Sand; Motorbooks International
A special note of thanks to Bill Bosworth for providing background on the unfortunate demise of Accurate Miniatures, and to Steve Eisenman for his elephantine memory.
Ó June 2002 by Roger M. Jackson
First Time North American Rights To Scott Van Aken and ‘Modeling Madness’
If you would like your product reviewed fairly and quickly where it will be seen by well over 150,000 visitors a month, please contact me or see other details in the Note to Contributors.