|
KIT: |
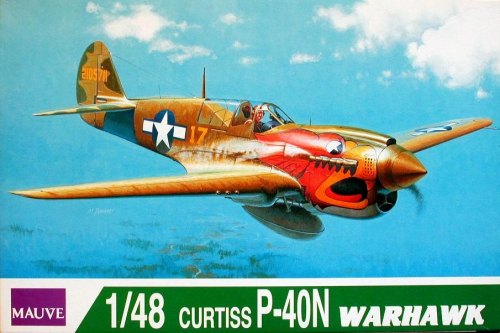
Mauve 1/48 P-40N Warhawk |
|
KIT # |
1 |
|
PRICE: |
$18.00 |
|
DECALS: |
One options |
|
REVIEWER: |
Roger Jackson |
|
NOTES: |
True Details resin interior and wheels |
|
HISTORY |

The P-40N was the final production variant of the by then geriatric-yet-ubiquitous Curtiss Warhawk and was envisioned as an attempt to keep the design competitive despite its growing obsolescence. An out-growth of the basic P-40E, it featured an up-rated Allison V-1710-81 liquid-cooled V-12 powerplant of 1125 HP mated to the long-tailed fuselage of the late-production F/K/M marques. In a further effort to improve performance, selected airframe components were re-engineered to pare unnecessary weight while smaller main wheels and tires were fitted.
Early production blocks reduced the armament to a pair of .50 caliber weapons per wing and utilized the original P-40 canopy arrangement with a heavily-framed sliding hood and rear sidelights. This canopy design was superceded by a new configuration that had the rear decking aft of the cockpit cut down and covered by a Perspex greenhouse which improved rear visibility immensely. A new single-paned plexiglas hood completed these enhancements.
 P-40Ns in
USAAF guise saw combat service in the SWPA, CBI, and Aleutian theaters
only, with many aircraft retained stateside to serve as advanced combat
trainers. Some of these were converted to tandem two-seaters by removing
the fuselage fuel tank, extending the plexiglas greenhouse further aft, and
installing a second set of flight controls. Substantial numbers of the
P-40N were furnished to the Allies under the terms of Lend-Lease and
included the Soviet Union and Australia among others.
P-40Ns in
USAAF guise saw combat service in the SWPA, CBI, and Aleutian theaters
only, with many aircraft retained stateside to serve as advanced combat
trainers. Some of these were converted to tandem two-seaters by removing
the fuselage fuel tank, extending the plexiglas greenhouse further aft, and
installing a second set of flight controls. Substantial numbers of the
P-40N were furnished to the Allies under the terms of Lend-Lease and
included the Soviet Union and Australia among others.
The P-40N was the most numerous sub-type of the entire Tomahawk/Warhawk line, with 5219 examples built. It was also the last Curtiss aircraft design ever produced as the company’s proposed postwar jet fighter, the XP-87, lost out in service trials to more promising products from Lockheed, Republic, and North American Aviation—a sad ending indeed for a company founded by one of America’s aviation pioneers and a prophetic omen of things yet to come within the aerospace industry in the United States.
|
THE KIT |
Mauve’s P-40N kit consists of 65 parts molded in olive green styrene, an 11-piece clear sprue, decals for one aircraft, and a small instruction pamphlet offering Japanese text only. However, the relatively straightforward construction should be assured by following the well-illustrated assembly sequence. References should be consulted for the interior detail painting while the exterior color specifications are given as standard FS 595a numbers.
The parts are flash- and dimple-free with only a few mold release plugs to mar the otherwise excellent casting. The surface detailing is fully recessed with outstanding depictions of the doped-fabric flight control surfaces. The canopy transparencies are usable though they do not have the jewel-like clarity of those from Tamiya or even Monogram. Thus, some modelers may consider opting for a True Details vacuform replacement .
 The kit
assembles conventionally, with the two-part fuselage bisected vertically
and a three-piece wing to assure the proper dihedral. Mauve’s designers
properly offset the vertical fin, a detail often ignored with WWII fighter
planes. A two-piece radiator/oil cooler insert provides sufficient depth
and detail but will doubtless prove troublesome to install with any degree
of coincident alignment. Conversely, the individual fishtail exhaust
stacks are attached from the outside thus simplifying painting and decaling
procedures.
The kit
assembles conventionally, with the two-part fuselage bisected vertically
and a three-piece wing to assure the proper dihedral. Mauve’s designers
properly offset the vertical fin, a detail often ignored with WWII fighter
planes. A two-piece radiator/oil cooler insert provides sufficient depth
and detail but will doubtless prove troublesome to install with any degree
of coincident alignment. Conversely, the individual fishtail exhaust
stacks are attached from the outside thus simplifying painting and decaling
procedures.
The cockpit is comprised of nine parts with a level of detail reminiscent of the older Otaki and Fujimi releases. The instrument panel is correctly depicted but the remaining components are in dire need of some serious attention. A clear gunsight rides atop the instrument panel coaming while the three-piece canopy permits display in the open position, albeit with some difficulty.
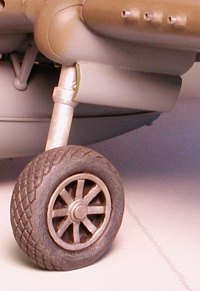
The lion’s share of this model’s parts are devoted to the landing gear and are generally poor. The lackluster struts are far too spindly and the main wheels are visibly undersized, scaling out to around 1:52. Attachment pins on the gear doors appear only as an afterthought and installing these cantankerous items will evoke visions of Nero’s furiously futile fiddling.
The multi-piece propeller with its individual blades may prove problematic for some though alignment pins are provided to preclude this. Separate parts are furnished for the cowl flaps and rudder bellcrank, the latter item missing on many P-40 kits. Detailed inserts wall off the gearwell portions of the wing while clear teardrops represent the position lights on the wingtips and vertical fin. Likewise, a transparency is provided for the retractable landing light.
 Optional
parts consist of a 52-gallon droptank with sway brace mounts and a DF loop
antenna which was installed on some aircraft deployed overseas. This
antenna was mounted on top of the spine directed aft of the HF mast on
P-40Ns so equipped but is acknowledged nowhere in the instruction sheet.
The modeler should check the available references for the proper
application and installation.
Optional
parts consist of a 52-gallon droptank with sway brace mounts and a DF loop
antenna which was installed on some aircraft deployed overseas. This
antenna was mounted on top of the spine directed aft of the HF mast on
P-40Ns so equipped but is acknowledged nowhere in the instruction sheet.
The modeler should check the available references for the proper
application and installation.
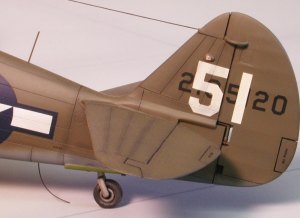
Decals are of predictable Japanese quality—colorful and on-register, yet thick and matte-finished. The aircraft portrayed purports to be from the 502nd FS in standard OD/NG camouflage with medium green mottling on the vertical fin and rudder. I am reasonably certain that the wings and stabilizer should also have the mottling on the leading and trailing edges, despite the painting guide’s curious directions to the contrary. A parrot’s head personal marking covers both sides of the cowling, lending a dash of color to an otherwise drab scheme. Numerous aftermarket decal options for the P-40N are available from various sources and replacement is recommended.
Note: Shortly after the Mauve company began production of this kit and the companion P-40M, their plant in Kobe, Japan was destroyed by a major seismic event. In an effort to recoup some of their losses, Mauve sold the molds to Eduard which now markets this kit as a basic ‘stripper’ and as a ‘profi-pack’ release. The latter issue includes a resin-and-photoetch cockpit, resin wheels, and aftermarket-quality decals from Aeromaster. (Editor's Note: suggest passing on the Profipak version as apparently the resin doesn't fit) In any event, the styrene is identical with the original Mauve release.
|
CONSTRUCTION |
After mocking up the airframe components with masking tape to check for shape and/or scale discrepancies I began the actual assembly with the wing. No surprises here, the pieces fit well though some rescribing was required at the leading edges to get the panel lines to jive between top and bottom. Mauve’s tool-and-diemakers quite admirably captured the wingtip washout characteristic of all P-40s though I was less impressed with the poorly depicted Browning wing guns.
 These were removed and new muzzle
fairings fabricated from 1/16” aluminum tubing. The gun barrels proper
were made from #21 hypodermic needles. Likewise, I fashioned a new pitot
tube—all metal and nearly bulletproof. I’d already deemed the kit gear
struts as unworthy of a quality effort so new ones were built with bits of
aluminum tubing and steel wire, with some brass eye-bolts for the tie-down
anchors.
These were removed and new muzzle
fairings fabricated from 1/16” aluminum tubing. The gun barrels proper
were made from #21 hypodermic needles. Likewise, I fashioned a new pitot
tube—all metal and nearly bulletproof. I’d already deemed the kit gear
struts as unworthy of a quality effort so new ones were built with bits of
aluminum tubing and steel wire, with some brass eye-bolts for the tie-down
anchors.
After gluing the struts solidly
to the wing I compared the styrene wheels with their resin True Detail
counterparts. While the Mauve hubs are closer visually to those of the
prototype, a visit with Mr. Micrometer revealed the overall diameter to be
roughly 1.65 millimeters too short. Thus, the resin replacements reigned
king and these were adapted to interface with my metal strut spindles. The
completed wing was set aside and I moved to the cockpit.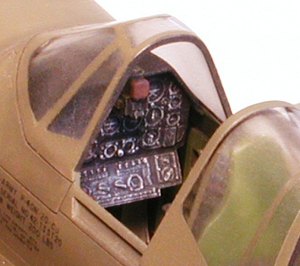
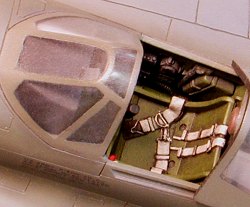
The kits parts, save for the instrument panel, were banished to the bowels of the spares box to be replaced by the resin set from TD. I deviated from Squadron’s instruction sheet by gluing the sidewalls directly to the fuselage halves instead of assembling the entire unit as a module. Problems aligning the floor correctly were the reason for this. After adding some additional doodads everywhere the cockpit was painted, washed, and drybrushed to bring out the highlights. Some fuselage prep was required before I was ready to install the pit and button everything up.
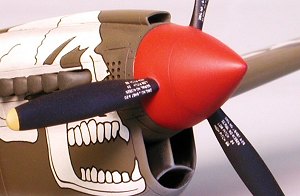
The forward fuselage is where I
found most of the exterior shortcomings of this
 kit. I had already
determined that the overall length was too long by some 3 or 4 scale inches
but I couldn’t ascertain why. After test fitting the prop pieces I
discovered the cause. The prop spinner should be much blunter than the kit
part, with an approximate radius of 1/32” (actual dimension). However,
Mauve’s interpretation terminates in an extreme point inconsistent with a
traditional ogive.
kit. I had already
determined that the overall length was too long by some 3 or 4 scale inches
but I couldn’t ascertain why. After test fitting the prop pieces I
discovered the cause. The prop spinner should be much blunter than the kit
part, with an approximate radius of 1/32” (actual dimension). However,
Mauve’s interpretation terminates in an extreme point inconsistent with a
traditional ogive.
After knocking the tip of the spinner down to match my reference photos, the model’s overall length came within .5 scale inches of the aircraft’s published dimension of 33 feet, 5 and 23/32 inches. My battle with the propeller was not yet over though. After tacking the blades to the base of the spinner it appeared that the propeller arc was too large. Out came the engineer’s calipers and a ruler for a quantifiable analysis.
 Why……I’VE GOT A P-40 WITH A 12-FOOT PROP—by Jove, I better call the
Guinness Book folks! Indeed, the propeller arc measured exactly three
inches (all production P-40s used an 11-foot prop). Rather than lop
off the tips and re-contour the entire blade I opted to shorten each blade
at the shank end by 1/8”. This bob job also cost me the alignment
pins necessary to maintain a uniform angle of incidence between each blade
but a fresh BA90 in my Mk 1 eyeball computer kept the geometry copasetic.
Why……I’VE GOT A P-40 WITH A 12-FOOT PROP—by Jove, I better call the
Guinness Book folks! Indeed, the propeller arc measured exactly three
inches (all production P-40s used an 11-foot prop). Rather than lop
off the tips and re-contour the entire blade I opted to shorten each blade
at the shank end by 1/8”. This bob job also cost me the alignment
pins necessary to maintain a uniform angle of incidence between each blade
but a fresh BA90 in my Mk 1 eyeball computer kept the geometry copasetic.
Next up were the radiator bits. After assembling the parts I tried mightily over two hours to get the diffuser vanes to align with the aircraft centerline. I finally glued it as best as I could while I formulated a new plan of attack to refine the fit. Meanwhile I drilled out the convection holes in the gearbox access panels, simultaneously enlarging them per my reference pics. To avoid see-through from side to side I installed a baffle inside the right fuselage half.
 One detail missing from most P-40
models (and this kit was no exception) is the ethylene/glycol overflow vent
on the right side of the cowling. I replicated this using a small length
of aluminum tubing. Final modifications included adding a ‘floor’ to the
bottom of the carburetor scoop then engineering a firewall to prevent
see-through into the cockpit through the carb or radiator intakes. Once
installed, the fuselage was assembled and I returned to the radiator
diffuser.
One detail missing from most P-40
models (and this kit was no exception) is the ethylene/glycol overflow vent
on the right side of the cowling. I replicated this using a small length
of aluminum tubing. Final modifications included adding a ‘floor’ to the
bottom of the carburetor scoop then engineering a firewall to prevent
see-through into the cockpit through the carb or radiator intakes. Once
installed, the fuselage was assembled and I returned to the radiator
diffuser.
All reference photos of this area show the diffuser vanes flush with the forward lip of the intake but the poorly-designed kit part tends to fit in a recessed manner, with large gaps between the vane edges and the inner walls of the radiator duct. Ultimately I resorted to building up the leading edges of the diffuser vanes by sistering small pieces of .016” guitar string to the front of the vanes in an inverted ‘Y’ configuration and back-filling small gaps with Crazy Glue. The guitar string extensions were installed flush with the forward edge of the duct and after several pleasurable hours of microscopic work inside the radiator with files, chisels, and other implements of destruction an acceptable appearance was achieved.
The assembled prop was fitted
with a 2-inch shaft of 1/16” brass tubing and mated to a 1.75 inch bearing
constructed of 3/32” aluminum tubing flush mounted to the front of the
fuselage. This provides a convenient point of purchase while painting and
decaling the prop and permits easy removal for the purpose of transport.
It also facilitates a much tighter rotating fit tolerance than the original
plastic moldings. 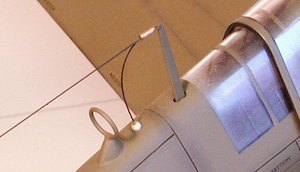
Next up were the antennas, which I replaced with scratch-built metal parts. The HF mast was cut and shaped from .010” sheet brass with monofilament line used as a stand-in for the aerial itself. Small wire was wound into a coil to serve as a tension adjustment spring for the mast. I fabricated the DF loop from .025” steel wire while the IFF whip is a piece of .010” guitar string.
Once the antennas were solidly glued from the underside I inserted the completed cockpit from below and cemented it into position. The empennage was added next after first fitting a pair of brass wire pins through the fuselage and both stabilizers at the roots to provide structural integrity and to maintain a 0 degree dihedral angle. The plastic rudder bellcrank was supplanted by a steel wire replacement then I prepared to mate wing to fuselage.
 After opening up the oil cooler
outlet at the rear of the wing’s ventral fairing I replicated the pilot’s
relief tube by gluing a short length of small-diameter wire insulation
inside the duct and routing it through the outlet. Once this detail was
addressed I made a preliminary test fit of the wing.
After opening up the oil cooler
outlet at the rear of the wing’s ventral fairing I replicated the pilot’s
relief tube by gluing a short length of small-diameter wire insulation
inside the duct and routing it through the outlet. Once this detail was
addressed I made a preliminary test fit of the wing.
Problems became apparent at this point as the resin floorboard refused to accommodate the upper wing root stiffeners inside the wings. Several surgical assaults with a router bit in the Dremel tool excised the offending impediments and fuselage/wing interface was accomplished. Fit at the fillets was not without sin, however. The right side fit reasonably well but the left (always seem to have problems with the left, ha ha) displayed massive gaps and required multiple fills with CA, coupled with some judicious file and sandpaper work.
After rescribing the surface detail at the wing roots and fillets I installed the fuselage decking and the gunsight. A small rectangle of clear acetate replaced the overly thick reflector portion then I test fitted the windscreen and canopy parts.
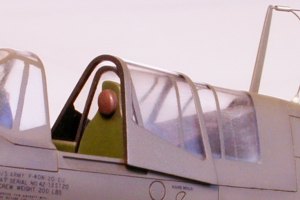 WHOOPS! Fit of the windscreen was terrible with the rear greenhouse none
too better. Not only that but I could not get the canopy correctly
positioned on the rails. The problem here was……there ain’t any rails!
Apparently, Mauve’s designers had never actually examined a P-40 with the
canopy slid open. Thus the tracks for the canopy to slide on were totally
ignored and hence omitted.
WHOOPS! Fit of the windscreen was terrible with the rear greenhouse none
too better. Not only that but I could not get the canopy correctly
positioned on the rails. The problem here was……there ain’t any rails!
Apparently, Mauve’s designers had never actually examined a P-40 with the
canopy slid open. Thus the tracks for the canopy to slide on were totally
ignored and hence omitted.
Following this discovery, I built up the rail areas with Evergreen .015” sheet and .010” x .015” strip. Once fitted and sanded to shape the canopy had a place to set and looked like it actually belonged on the aircraft. The windscreen and greenhouse were attached with Testors liquid cement, then blended into the fuselage contours with small beads of CA. After sanding these seams smooth I polished the glass back to clarity with a buffing wheel and jeweler’s rouge.
 Final assembly consisted of
trimming and fitting the cowl flap part, then attaching the gear strut
doors and tail wheel pieces. Note: There may be an error with the design
and intended positioning of the tail wheel strut within its well. I was
not aware of this discrepancy at the time of the build but Tom Cleaver has
chronicled this dilemma and his archived review of this kit should be
consulted for further information.
Final assembly consisted of
trimming and fitting the cowl flap part, then attaching the gear strut
doors and tail wheel pieces. Note: There may be an error with the design
and intended positioning of the tail wheel strut within its well. I was
not aware of this discrepancy at the time of the build but Tom Cleaver has
chronicled this dilemma and his archived review of this kit should be
consulted for further information.
The drop tank was assembled and detailed with fuel- and pressure-return lines and an overfill vent then I affixed the sway braces to the fuselage and added the tank. Some gentle cajoling of the casing nut pads will be required to obtain full contact with all four pads. I drilled a hole in each wing root at the leading edge as all P-40s drew air for cockpit ventilation from these intakes. On the bottom I scratch-built and installed a battery drain/vent while further aft I used a piece of monofilament line to replicate the anti-static grounding wire.
To prevent any surprises I test fit the exhaust manifolds and discovered that the holes within the cowling recesses were too small for the locating pegs on the stacks. These were enlarged with a #71 drill bit, then I cleaned up the manifolds for later installation. After an ‘air dusting’ via compressor and a wipe-down with Q-tips moistened with Testors lacquer thinner it was time to put some warpaint on this Warhawk.
|
COLORS AND MARKINGS |
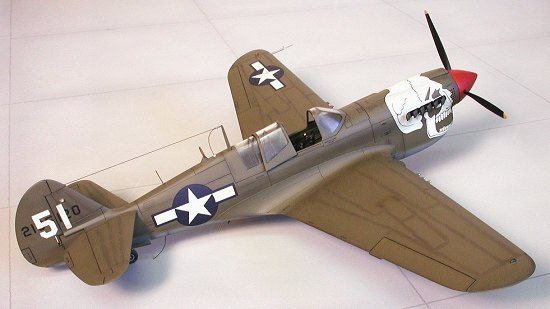
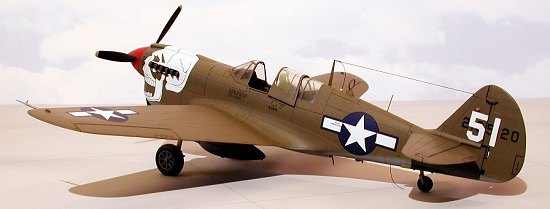
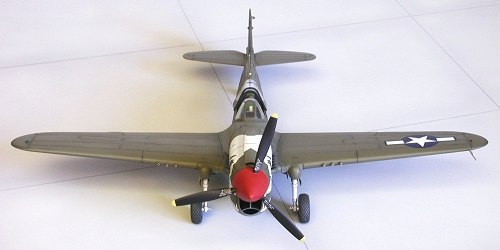
No great shakes here, the standard olive drab over neutral gray camo scheme was applied using my 25-year old Pactra enamel homebrew for the uppers and Modelmaster ‘primer’ from their enamel car line on the undersurfaces. This primer gray was also used as an undercoat for the red on the spinner, producing a deeper more restrained hue rather than the brighter red of a raspberry popsicle had I used white to prime.
 The gear wells were finished in FS
34151 Interior Green then lacquer thinner was used to remove the overspray
from my aluminum-and-steel gear struts. After painting the propeller
blades in standard colors the entire model was primed with three heavy
layers of Testors Glosscote and set aside to dry for a month.
The gear wells were finished in FS
34151 Interior Green then lacquer thinner was used to remove the overspray
from my aluminum-and-steel gear struts. After painting the propeller
blades in standard colors the entire model was primed with three heavy
layers of Testors Glosscote and set aside to dry for a month.
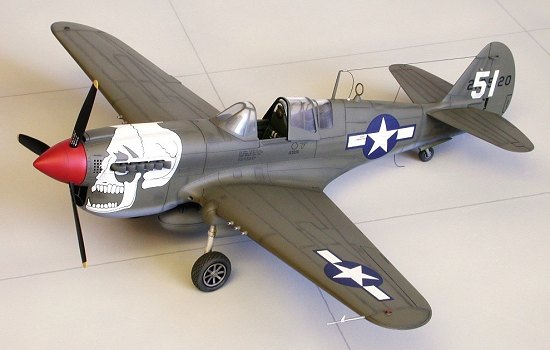
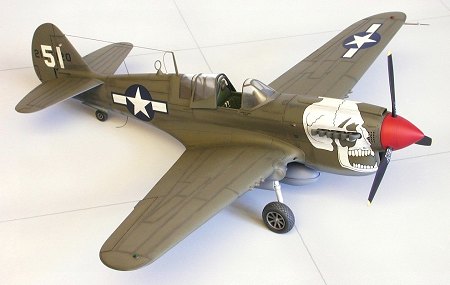
Aeromaster decals were used, specifically sheet #48-126C and although the 80th Fighter Group’s skull head markings may make for another ‘highly clichéd’ scheme, I personally place little stock in the over-hyped opinions of the styrene stazi. The sheet itself was a big disappointment however, containing no service stenciling at all—not even a data block.
Stenciling was taken from a Super
Scale Mustang sheet and I cobbled several P-51 data block bits together to
produce a credible P-40 stencil with the serial number in concordance with
that on the fin. After cleansing the model thoroughly of Solvaset
residue with a Q-tip and distilled water the decals were sealed with
several coats of Testors flat lacquer and
 allowed to dry for a
week.
allowed to dry for a
week.
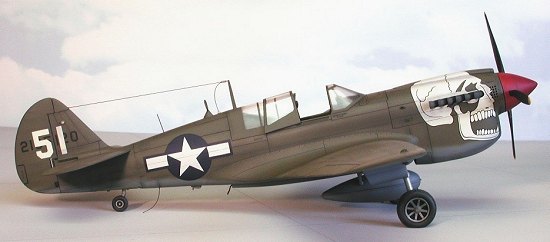
Once the Dullcote had dried I began a modestly ambitious weathering effort. The first step was to dull the markings down and fade them out a bit. For this I used powdered cigarette ash, applied with a wide synthetic camel-hair brush. Several applications were necessary, each one sealed with a light dusting of Dullcote.
Next, I lightly highlighted the surface detail by teasing powdered graphite along the panel lines with a 00000 sable hair brush. This was followed by scuffing the horizontal surfaces with yellow and tan pastel chalks, ground into powder and applied with a #1 brush to simulate paint fade. I went heavier on the ailerons, elevators, and rudder to simulate the sun-bleaching common to doped-fabric construction and provide some contrast to the metal airframe. These effects were also sealed, individually, with Dullcote.
Finally I used a black Liquitex watercolor wash to highlight the control surface demarcations and the cowl flaps. After these effects had been sealed I painted and installed the exhaust manifolds, then used black, gray, and brown pastels to create some exhaust staining.
After a final coat of flat lacquer overall I attached the position lights using white glue. The wingtip blisters were painted red and green while those on the fin were left clear. Glosscote was brushed over each to give them some added shine then I white-glued an MV lens below the left wing, replacing the kit’s landing light transparency. Installing the propeller completed this mission.
|
CONCLUSIONS |
 Though I had heard this kit
ballyhooed among various modeling circles as a wunderkit, the
product falls far short of that description at least when assembled
straight out of the box. What Mauve’s P-40N represents though is a good
starting point to build a great model.
Though I had heard this kit
ballyhooed among various modeling circles as a wunderkit, the
product falls far short of that description at least when assembled
straight out of the box. What Mauve’s P-40N represents though is a good
starting point to build a great model.
As with every kit I have ever built, from my beloved ‘50s relics all the way to the latest and greatest technological tour-de-force from Tamiya, I always manage to find something either slightly amiss or totally bogus and this release was no exception.
However the gaffs are generally minor and easily correctible, assuming adequate references and some fundamental modeling skills. These few errors notwithstanding, this kit will assemble into a credible replica of a P-40N and deserves shelf space in any P-40 fan’s model collection.
|
REFERENCES |
Curtiss P-40 In Action – Ernest R. McDowell; Squadron-Signal Publications
Walkaround: P-40 Warhawk – Lou Drendel; Squadron-Signal Publications
Aces Of The Southwest Pacific – Gene B. Stafford; Squadron-Signal Publications
Building The P-40 Warhawk – Glen Phillips & Kevin Hjermstad; Kalmbach Books
Fighter Command – Jeffrey Ethell; Motorbooks International
If you would like your product reviewed fairly and quickly by a site that has nearly 250,000 visitors a month, please contact me or see other details in the Note to Contributors.