|
KIT: |
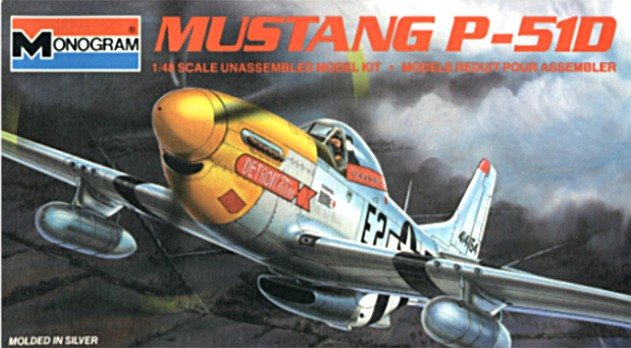
Monogram 1/48 P-51D Mustang |
|
KIT # |
5207 |
|
PRICE: |
$1.50 (1977) |
|
DECALS: |
One aircraft |
|
REVIEW & |
Roger Jackson |
|
NOTES: |
Original Issue |
|
HISTORY |
"The most aerodynamically perfect pursuit plane in existence". This sobriquet was applied to the P-51 Mustang just after WWII by a United States Senate War Investigating Sub-committee. Just what these politicians knew about military aviation remains to be seen (just as it is today), but regardless, the Mustang’s combat record was legendary.
Originally destined to supplement Lend-Lease Curtiss P-40s being supplied to Great Britain at the start of the Second World War, the NA-73 (the North American Aviation Company’s designation) was initially overlooked by the United States Army Air Corps. Precipitous events at Pearl Harbor would dramatically alter that perspective.
Embroiled in a global conflict, and pitifully short of everything save for its resolve, the United States scrambled to fortify its combat forces while simultaneously maintaining its commitment of materiel and munitions to the Allies. Consequently, the Mustang (as it was known in British parlance) was given a second look.
The relatively low-powered Allison V-12 engine was incapable of the high-altitude performance necessary for the interceptor role, but the newly re-designated Army Air Force (changed on 20 June 1941 at the direction of General Henry ‘Hap’ Arnold) decided the aircraft would be useful in the ground attack and reconnaissance roles and ordered it into production as the P-51 Apache.
 These aircraft were armed
with four wing-mounted 20 mm cannon and served mainly in observation squadrons
assigned to the Mediterranean Theater of Operations (MTO). Most were fitted with
reconnaissance cameras and officially designated as F-6As, though nearly all
pilots and ground personnel still referred to them as P-51s.
These aircraft were armed
with four wing-mounted 20 mm cannon and served mainly in observation squadrons
assigned to the Mediterranean Theater of Operations (MTO). Most were fitted with
reconnaissance cameras and officially designated as F-6As, though nearly all
pilots and ground personnel still referred to them as P-51s.
The airframe proved so popular and robust that the AAF ordered a dive bomber variant to provide strike and close air support capabilities to tactical theater commanders. The wing cannon were replaced by .50 caliber machine guns, with an additional pair mounted in the nose.
Perforated dive brakes were installed, top and bottom, in each wing while additional hardpoints were fitted for bombs. These aircraft, known as the A-36, were sent to the MTO as well as the China-Burma-India Theater of Operations (CBI) where they performed well under extraordinarily demanding conditions.
Early attempts to name this version the Invader came to naught and the officially-decreed ‘Apache’ label never really lit a fire among personnel assigned to fly it or any of the previous variants. Many pilots had taken a liking to the RAF’s designation despite official AAF lamentations to the contrary.
Minor refinements to the P-51 resulted in the P-51A. These improvements included an up-rated engine and a larger propeller, while the nose machine guns were deleted. Most of these aircraft were sent to the CBI and assigned to fighter units of the 10th and 14th Air Forces. As an aside, the AAF finally put the ‘Apache’ moniker to bed: henceforth the P-51 would forever be known as the Mustang.
Pilots loved the Mustang’s sturdy construction and forgiving nature but clamored for more power, especially at altitude. Meanwhile, studies were underway on both sides of the Atlantic to determine the best way to give North American Aviation’s pony ‘a bit more poke’. The Rolls Royce Merlin engine with a two speed/two stage supercharger was selected as the most expedient method available.
Though both the Merlin and Allison powerplants were liquid-cooled V-12s, the Merlin’s induction system and larger overall dimensions necessitated a major redesign of the Mustang’s nose. The carburetor intake was relocated below the prop in a ‘chin’ arrangement resulting in slightly better visibility over the cowling. As the Merlin required more cooling capacity, a bigger intercooler was fitted along with an enlarged radiator duct.
To fully realize the new engine’s potential, a four-bladed Hamilton-Standard prop with cuffs was installed, replacing the earlier variants’ Curtiss-Electric three-bladed units. Armament remained four .50 caliber machine guns, a pair in each wing.
This radically-modified Mustang was designated the P-51B and proved so popular with the Army Air Force that the Inglewood, California plant could not meet the demand for these aircraft. A second production line was opened in Dallas, Texas to produce the virtually-identical P-51C.
The new Merlin-powered Mustang was capable of true high-altitude performance, giving AAF pilots the upper hand in a dogfight environment, while the laminar-flow wing and overall efficiency of the design allowed long-range bomber escort missions to Berlin and beyond. In the Pacific, P-51s based on Iwo Jima could escort B-29s to the Japanese home islands and back.
 A final development would
result in the ultimate wartime Mustang variant. Plexiglas technology had
advanced to the point where large distortion-free moldings were possible. NAA
engineers designed a fully-transparent one-piece canopy and new companion
windscreen for the P-51, affording 360-degree visibility and easier entrance and
egress to the cockpit.
A final development would
result in the ultimate wartime Mustang variant. Plexiglas technology had
advanced to the point where large distortion-free moldings were possible. NAA
engineers designed a fully-transparent one-piece canopy and new companion
windscreen for the P-51, affording 360-degree visibility and easier entrance and
egress to the cockpit.
The rear fuselage decking was cut down to permit installation of the new ‘blown’ canopy, with the radio, main fuel tank, and oxygen system slightly re-arranged for this new configuration. The wing was re-designed with leading edge extensions at the root to provide additional fuel capacity, while the gun bays were enlarged to allow for a six-gun installation with increased ammunition load.
The P-51D, as this version was designated, was marginally slower than the ‘B’ and ‘C’ models, though pilots appreciated the additional range, armament, and better visibility. Like the preceding ‘C’ variant, the Dallas, Texas facility produced a near-identical copy, the P-51K.
After the defeat of the Axis forces in both Europe and the Pacific, P-51s soldiered on in the post-war era. During the Korean War, Mustangs assigned to the Fifth Air Force flew strike and close air support sorties until replaced by turbine-powered aircraft midway through the conflict.
The P-51 was phased out of USAF service shortly thereafter, with many sold abroad to the various emerging third world superpowers. Some Mustangs were still serving in this capacity in the late ‘60s. Popular with ‘Warbird’ enthusiasts, numerous flyable examples can be found working the air show circuit, and in museums and private collections.
|
THE KIT |
Monogram’s P-51D Mustang kit consists of 46 silver-gray parts, a two-piece canopy molded transparently, and a decal. The instruction sheet is a multi-lingual exercise featuring minimal text, a four-view diagram indicating decal placement, and a generic color chart.
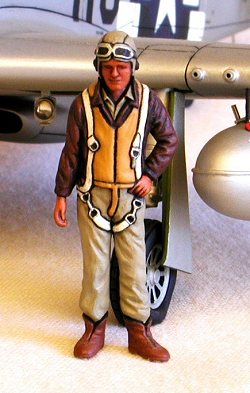
 The cockpit is a
seven-part assembly with adequate detail for the scale. Sidewall items are
molded to the inner fuselage halves in three-dimensional form. A well-sculpted
seated pilot figure is included, clad in appropriate garb.
The cockpit is a
seven-part assembly with adequate detail for the scale. Sidewall items are
molded to the inner fuselage halves in three-dimensional form. A well-sculpted
seated pilot figure is included, clad in appropriate garb.
Surface detail is raised relief with recessed flying surface demarcations. Gear wells, while a bit on the shallow side, are accurately depicted as are the inner gear door faces. Gear struts and wheels are realistically-molded with the tires featuring diamond-style tread and separate outer hubs.
A pair of 110-gallon paper/resin drop tanks are provided as the only external stores. The transparencies are particularly clear with a separate canopy frame designed to slide open or closed to suit the modeler.
Optional parts include both shrouded and un-shrouded exhaust manifolds, an exposable portside gun bay with a one-piece insert depicting the guns and ammunition tracks, and a removable lower cowling which is more troublesome than accurate.
Overall lines and shape look good, and the model scales correctly when compared to published specifications. The rotating cuffed Hamilton Standard prop and aforementioned sliding canopy constitute the sum total of the moveable parts.
The decal’s single scheme features Urban Drew’s "Detroit Miss", a P-51D-10-NA assigned to the 361st FG, 375th FS, 8th Air Force. Prominent victory marks for the canopy rails of this well-documented aircraft are missing (curiously enough, they are shown on the box-top illustration), but as the sheet is typically Monogram—thick, heavily-glossed, and totally unusable—the modeler will be better served by aftermarket decals.
|
CONSTRUCTION |
Assembling this kit presented no particularly difficult problems, although I did deviate from the instruction sheet’s recommended sequence in several areas. Starting with the wing, I carefully pre-fitted the gun bay door on the left side in the closed position and glued it solidly with gap-filling Hot Stuff. Diorama addicts may enjoy these removable panels but I loathe "kiddie" features such as this as they detract from the aircraft’s overall aesthetics.
 The wing’s three pieces
were assembled with CA, then I filled and sanded the seams flush. Colored Lexan
was used to fashion the wingtip position lights, while 1/16" aluminum
tubing replaced the six gun port fairings. Short lengths of #20 hypo needles
were inserted into the new gun ports to become .50 caliber guns. At the left
wing root I installed a piece of 1/16" aluminum tubing, sanded flush to the
leading edge, as a gun camera aperture.
The wing’s three pieces
were assembled with CA, then I filled and sanded the seams flush. Colored Lexan
was used to fashion the wingtip position lights, while 1/16" aluminum
tubing replaced the six gun port fairings. Short lengths of #20 hypo needles
were inserted into the new gun ports to become .50 caliber guns. At the left
wing root I installed a piece of 1/16" aluminum tubing, sanded flush to the
leading edge, as a gun camera aperture.
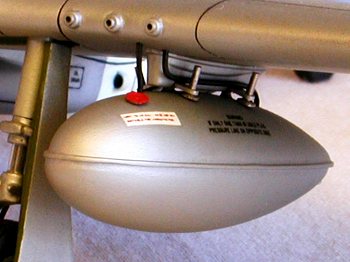 75-gallon droptanks from
Monogram’s earlier P-51B kit were fitted to the pylons with steel pins,
providing a snug, but removable, friction fit. I scratch-built two sets of sway
braces from strips of sheet aluminum, using common straight pins for the casing
nuts. Small diameter wire with black insulation was used to replicate the
neoprene hoses and plumbing while photo-etched Detail Associates pieces were
used for the fuel filler caps.
75-gallon droptanks from
Monogram’s earlier P-51B kit were fitted to the pylons with steel pins,
providing a snug, but removable, friction fit. I scratch-built two sets of sway
braces from strips of sheet aluminum, using common straight pins for the casing
nuts. Small diameter wire with black insulation was used to replicate the
neoprene hoses and plumbing while photo-etched Detail Associates pieces were
used for the fuel filler caps.
The inner gear doors were glued closed to provide as clean a profile as possible. The plastic pitot tube was replaced by a metal one made from a ¾" length of #21 hypo needle, bent into an ‘L’ shape and flattened to an airfoil configuration on the long end. A short piece of .024 steel wire was used as a venturi at the front of the pitot tube. With the wing complete I turned my attention to the fuselage.
The molded cockpit sidewall detail, while state-of-the-art in 1977, looked weak in comparison with the latest wonderkit imports, so I removed it with a Dremel tool and a router bit. After sanding the areas flat I rebuilt the sidewalls with various bits of Plastruct, strips of Evergreen, wire, and other doo-dads from my spares box.
 The remaining cockpit
parts were assembled and detailed with additional wire, guitar string and
Evergreen sheet. I replaced the molded seatbelts with True Details photo-etched
pieces. With the office complete I painted it in the appropriate colors then
weathered it with washes and powdered pastel chalks.
The remaining cockpit
parts were assembled and detailed with additional wire, guitar string and
Evergreen sheet. I replaced the molded seatbelts with True Details photo-etched
pieces. With the office complete I painted it in the appropriate colors then
weathered it with washes and powdered pastel chalks.
After examining the prop spinner/cowl ring/forward fuselage fit, I determined that a max effort with filler, file and sandpaper would be necessary to produce the proper contours. Attaching the exhaust manifolds first (as per the instructions) would doubtless result in dings and errant tool marks to them.
Consequently, I re-engineered the cockpit mounts to allow installation of the interior from the bottom after the fuselage halves had been glued together. This method allowed me access to the inside of the nose so I could tweeze the manifolds into position after the fuselage had been assembled and shaped.
The removable lower cowling (part #18) fit atrociously and required multiple fills with Hot Stuff before I was able to shape it with file and sandpaper. I drilled out the carburetor scoop to provide depth and shadow, while aluminum tubing was installed in the nose to serve as a propeller shaft bearing.
The three-piece prop was assembled with Crazy Glue, and when dry, sanded to match the cowl ring’s contours. A 3/32" piece of aluminum tubing replaced the prop’s plastic shaft, and after attaching it, I removed the cuffs from the blades (you heretics hold your water…I can’t stand those things!).
 The manifolds were
installed from the inside with a pair of long tweezers, and after gluing them
with Testor’s liquid cement, I slid the assembled cockpit into position and
attached it with CA. The horizontal stabilizers were fitted to the tail via a
pair of brass wire ‘spars’ to give added structural support and maintain the
correct zero dihedral geometry. Hot Stuff was used to fill modest gaps at the
fillets.
The manifolds were
installed from the inside with a pair of long tweezers, and after gluing them
with Testor’s liquid cement, I slid the assembled cockpit into position and
attached it with CA. The horizontal stabilizers were fitted to the tail via a
pair of brass wire ‘spars’ to give added structural support and maintain the
correct zero dihedral geometry. Hot Stuff was used to fill modest gaps at the
fillets.
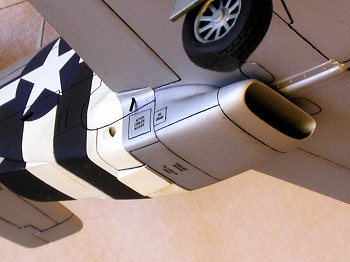
The fuselage and wing were re-scribed as sub-assemblies then mated together with gap-filling Hot Stuff. The overall fit here was very poor, requiring shims and lots of CA filler. When dry, I completed re-scribing the panel lines at the wing roots and fillets then focused on the intercooler.
I removed the back wall of the radiator duct molded to the lower fuselage,
then attached the intake to the front. After fairing it the to intercooler trunk
I chamfered out the inside, sanded it smooth, then installed a stiffener
vertically 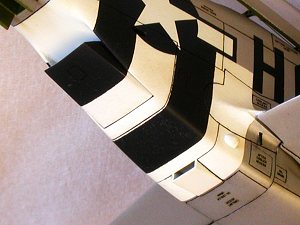 through the duct,
made from stretched sprue and set ¼" back from the intake lip.
through the duct,
made from stretched sprue and set ¼" back from the intake lip.
The intercooler outlet area at the rear was filled and sanded to eliminate the concave fit at the fuselage seam. I installed the radiator outlet (part #20) by means of a brass wire shaft, inserted through both fuselage halves and the door after carefully line-boring the four required holes. Steel wire installed vertically in the door served as an actuator. The oil cooler outlet was fabricated from a piece of K & S rectangular brass channel, inserted into a square hole cut into the bottom of the intercooler trunk and glued with CA. To eliminate the see-through effect through the radiator, I sawed a slot into the trunk perpendicular to the centerline and inserted a baffle made from .010 Evergreen sheet and painted it black. On to the undercarriage…
The struts were extensively modified and detailed with 1/16" and
3/32" aluminum 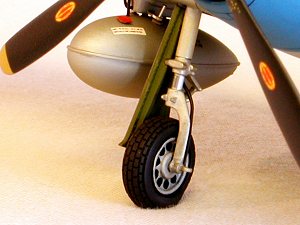 tubing
replacing most of the original parts. The only remaining plastic areas are the
scissors assemblies and the forks. Brass eyebolts were used as tow rings while
small-diameter wire replicated the brake lines. The kit’s wheels and tires
were discarded in favor of a True Details resin set featuring the ‘checkerboard’
tread pattern.
tubing
replacing most of the original parts. The only remaining plastic areas are the
scissors assemblies and the forks. Brass eyebolts were used as tow rings while
small-diameter wire replicated the brake lines. The kit’s wheels and tires
were discarded in favor of a True Details resin set featuring the ‘checkerboard’
tread pattern.
I removed the molded-on tailwheel doors, enlarged the hole, and installed a proper gear well for the tailwheel. After painting and detailing the tailwheel assembly I installed it then built new doors and attached them as well. With the landing gear complete I next tackled the glass.
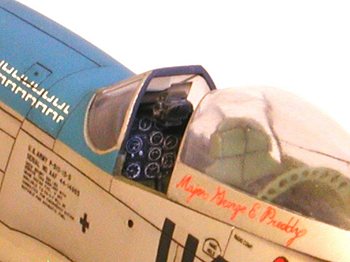
After detailing and gluing the gun sight to the underside of the instrument
panel combing I carefully affixed the windscreen to the fuselage with minute
drops of 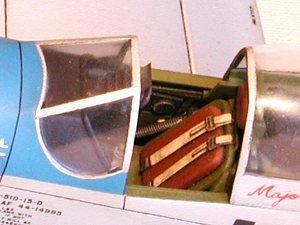 Testor’s liquid
cement. When dry, I filled the seam with Crazy Glue, sanded it flush, then
polished the windscreen to restore the clarity.
Testor’s liquid
cement. When dry, I filled the seam with Crazy Glue, sanded it flush, then
polished the windscreen to restore the clarity.
One other toy-like vestige of this kit is the sliding canopy. I resolved to make it functional, so after drilling lightening holes in the frame’s cross-brace and reshaping the slides, I painted the inside in zinc chromate green and attached the clear canopy, again using Testor’s liquid cement.
Small gaps in the joint were filled with CA and when dry, the entire assembly was sanded and polished. A couple of test-fits confirmed proper canopy operation then I turned my attention to the various antennas.
The tail warning radar unit was
 constructed of .017 guitar string and #25 hypo needle pieces while
the HF mast was made from brass sheetstock, suitably shaped. The ‘long wire’
was its own can of worms and it took me a couple of weeks to work up the nerve
to try it.
constructed of .017 guitar string and #25 hypo needle pieces while
the HF mast was made from brass sheetstock, suitably shaped. The ‘long wire’
was its own can of worms and it took me a couple of weeks to work up the nerve
to try it.
I wanted to maintain the canopy’s sliding function and that meant a one-shot stab at drilling a hole through a completed assembly that took me five or six hours to construct. I installed a small photo-etched eyebolt to the back of the headrest as an anchor point, then attached a long piece of 2 lb-test monofilament line to it.
I marked a datum line in the center of the canopy with a thin strip of masking tape then slid the canopy into the closed position and taped it shut. Using creative geometry and my Mk 1 Mod 0 eyeball computer, I plotted the height and angle of the required hole and marked the point on the tape strip.
After carefully dimpling the point with a center punch I removed the canopy, peeled off the tape and slowly drilled the hole with a #80 bit. Burrs and striations were chemically removed with a small amount of Weld-On #3 applied with a 00000 brush.
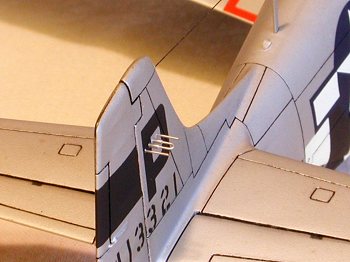
After re-installing the canopy, I threaded the antenna wire through the hole and stretched it taut to the fin, then plotted the attachment point there. I drilled a hole into the leading edge at the appropriate location and a second hole on the right side of the fin, even in height with the first and 3 millimeters to the rear.
This allowed me to insert the wire into the leading edge, thread it through to the side hole, pull it taut from the outside, and glue it from there, in one operation. Hot Stuff was used, and when dry, I snipped off the excess monofilament and sanded the side of the fin smooth. Full canopy operation was maintained and I breathed a huge sigh of relief.
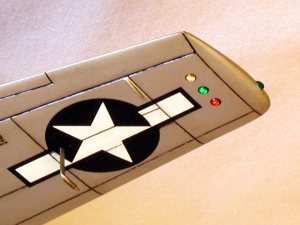
Upper position and rear navigation lights were made from clear sprue, sanded to shape then polished. I drilled three small dimples into the lower starboard wingtip, and after painting, red, green, and amber MV lenses would be installed there as combat ID lights. The landing light bracket was similarly addressed, using a clear MV lens.
The grounding strap was fabricated from the same monofilament line, anchored into a piece of #27 hypo needle with Crazy Glue. After drilling a vertical hole under the tail with a #78 bit I slid the hypo needle in until it was barely visible (equivalent to 1 RCH…). After gluing it firmly with a drop of CA, I placed the model on its wheels and trimmed the monofilament to the proper length. To the rear of this, I installed a battery drain vent made from a piece of #25 hypo needle inserted into an obliquely-drilled hole. The pilot’s relief tube was replicated with a short length of plastic insulation stripped off a piece of small-diameter wire.
After sanding the wing roots and fillets to remove some pesky file marks and test-fitting the main landing gear doors, it was off to the paint shop.
|
PAINT & DECALS |
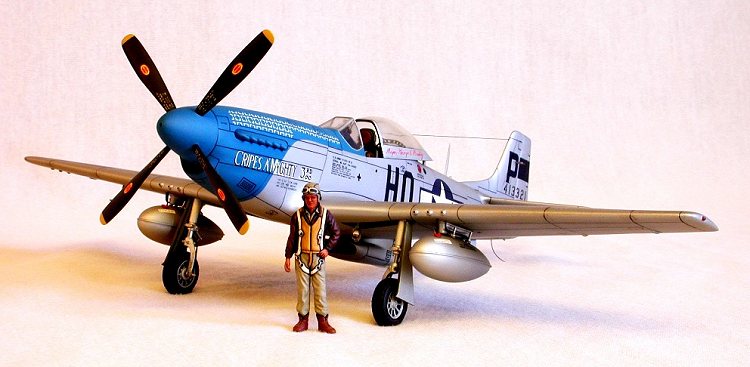
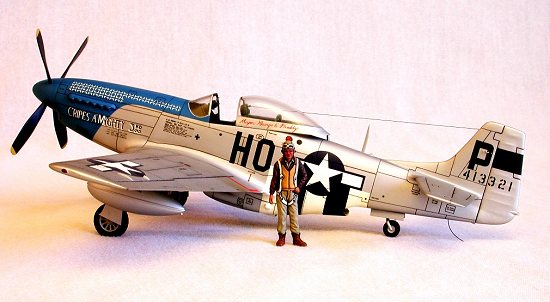
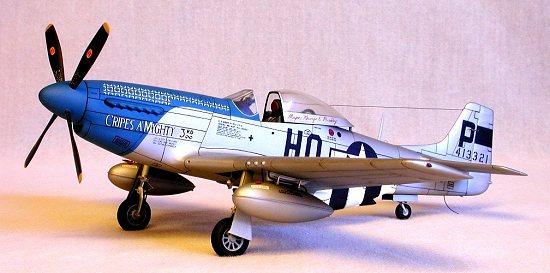
Several years ago (more than I care to count) at the annual Andrews AFB open house and air show, a restored Mustang on static display caught my eye. It was a P-51D done up in the markings of Major George Preddy, the famous "Cripes a’ Mighty 3rd". Later, after researching both the aircraft and its pilot, I decided if I ever modeled a ‘D’ model Mustang, his would be that aircraft.
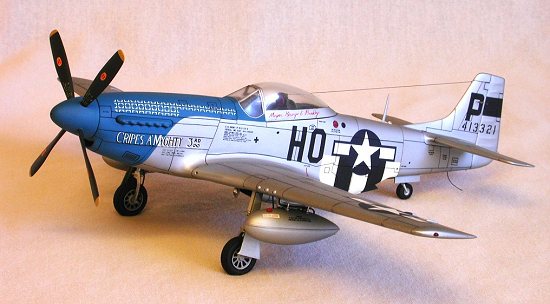 Painting this model was
relatively straightforward: a home-brewed medium blue for the 352nd
Fighter Group’s trademark nose markings, black and white for the mandated
D-Day invasion stripes, and Testor’s chrome silver for the remaining exterior
areas. Obligatory colors were used for the prop blades, gear wells, and tires.
Painting this model was
relatively straightforward: a home-brewed medium blue for the 352nd
Fighter Group’s trademark nose markings, black and white for the mandated
D-Day invasion stripes, and Testor’s chrome silver for the remaining exterior
areas. Obligatory colors were used for the prop blades, gear wells, and tires.
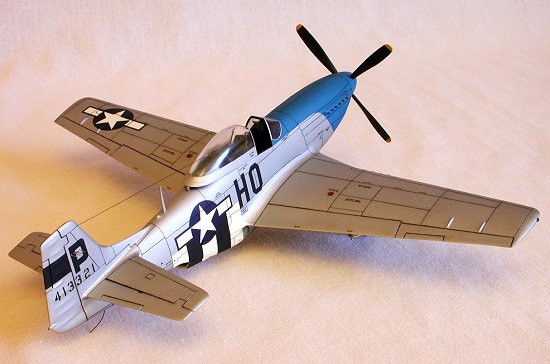
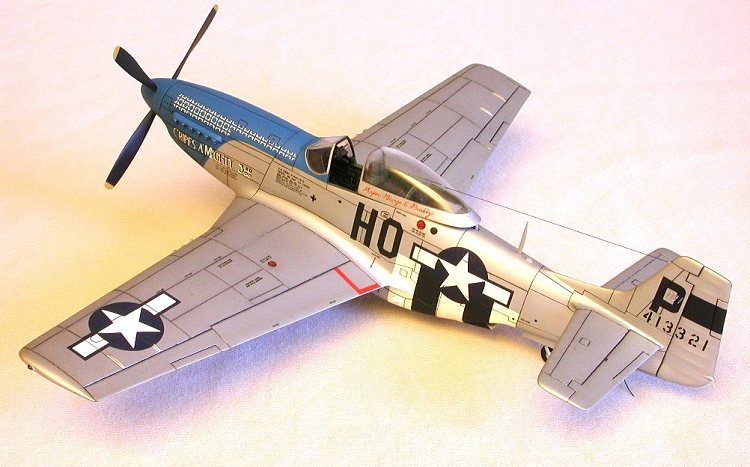
According to the instructions in MicroScale’s 48-19 decal sheet this aircraft carried a full set of invasion stripes. However, while this was certainly the case in June and July of 1944, directives to field commanders of the 8th and 9th Air Forces ordered the removal of these markings, starting late in the summer of that year.
Many units actually removed these stripes while others merely over-painted them with gray, British dark green, or olive drab (even on natural metal-finished aircraft!). Photos in my archives showed Major Preddy’s aircraft through several permutations in this regard (ie: full stripes, stripes removed from the upper surfaces only, and stripes visible on the underside of the fuselage only).
 I chose the third option
as the most expedient exercise in economy of labor (awright…I’m lazy),
masking to ensure no part of the black stripes would show beneath the fuselage’s
national insignia. When the stripes had dried I masked over them and laid out
the nose markings.
I chose the third option
as the most expedient exercise in economy of labor (awright…I’m lazy),
masking to ensure no part of the black stripes would show beneath the fuselage’s
national insignia. When the stripes had dried I masked over them and laid out
the nose markings.
After spraying the blue and allowing for an adequate cure time, I masked this area, the lights and canopy, stuffed Kleenex into the gear wells and shot several coats of Testor’s Modelmaster chrome silver. While this dried I painted the prop, wheels, and gear doors.
After a week I removed the masks from the nose and D-Day markings and applied the decals directly to the paint. As gloss colors had been used, I dispensed with decal primer, but otherwise followed the MicroScale regimen. MicroScale sheet #48-19 provided the nose art and basic markings, while SuperScale sheet #48-455 was used for service stenciling. Diluted MicroSet was used to coax the scoreboard down to the cowling due to the compound curves, but everything else behaved predictably.
Testor’s flat lacquer was used to seal the decals, followed by a wash of Liquitex dark gray tempera into the panel lines and movable control surfaces. This was followed by a light dusting of Testor’s Dullcote to seal the weathering and even out the overall finish.
The remaining masks were removed then I highlighted the ground strap and antenna wire, using an enamel wash. The combat ID lights, landing light assembly, and gear doors were attached with white glue, then I press-fitted the drop tanks to the pylons, inserted the prop, and taxied to the active…
|
CONCLUSIONS |
This kit, while competitive twenty-five years ago, falls woefully short when compared to the latest crop of new-tool wonderkits from Japan and elsewhere. The sole caveat to this comparison is price—an entire flight of Monogram Mustangs can be built for the cost of a single Tamiya kit. Of course, the quality of the moldings and the ease of assembly must be factored into any such equation.
But (and I use the word guardedly, as a challenge) using basic techniques that any modeler of average skill-level should already have developed, a passable replica of a Mustang can be built using this kit. In fact, in its first (and only) contest outing, this model smoked several Hasegawa and Tamiya entries.
After belatedly learning its true pedigree (it was mistaken for a wonderkit), the ‘experten’ in attendance gleefully pooh-poohed the un-cuffed Hamilton-Standard prop, presence of the fin fillet and tail warning radar (both apparently never fitted to Major Preddy’s aircraft), while the judges promptly awarded the model a first-in-class—go figure!
|
REFERENCES |
P-51 Mustang In Action - Larry Davis; Squadron-Signal Publications
Aces Of The Eighth – Gene B. Stafford & William N. Hess; Squadron-Signal Publications
Fighting Colors: P-51 Mustang In Color – Larry Davis; Squadron-Signal Publications
P-51 Mustang Aces – Thomas G. Ivie & William N. Hess; Motorbooks International
Classic Aircraft: Fighters – Bill Gunston; Motorbooks International
AAF: The Official WWII Guide To The Army Air Forces – Reprint by Bonanza Books
Fighters Of The Mighty Eighth – William N. Hess & Thomas G. Ivie; Motorbooks International
Fighter Command: American Fighters In Original WWII Color – Jeffrey L. Ethell & Robert T. Sand; Motorbooks International
Ó April 2001 by Roger M. Jackson.
First Time North American Rights To Scott Van Aken and ‘Modeling Madness’
If you would like your product reviewed fairly and quickly by a site that averages over 2,200 visits a day, please contact me or see other details in the Note to Contributors.