Revell 1/72 F4U-1D Corsair
|
KIT # |
` |
|
PRICE: |
$3.00 back about 2 decades ago. |
|
DECALS: |
One aircraft |
|
REVIEW: |
|
|
NOTES: |
Very good for add-on aftermarket detailing. |
|
HISTORY |
Another Zeke killer sharing the same R-2800 Double Wasp engine as the Republic P-47 Thunderbolt, the Vought Corsair quickly established itself with a reputation as a high-performance fighter able to go up against anything the Imperial Japanese Naval and Army Air Forces could throw at it – and come out the victor. Originally conceived to serve on board task force carriers, the plane was first used in the Pacific from land bases. One of the Navy fighter squadrons so equipped was VF-17, better known as "Blackburn’s Irregulars". VF-17 was formed in Norfolk, Virginia on New Years’ Day, 1943, under the command of Lt. Commander John T. Blackburn. Blackburn had commanded a squadron during Operation Torch in North Africa in 1942, and then was posted as a flight instructor in Miami until he was given command of VF-17. The squadron got its nickname from some of the pilots’ antics, such as one pilot flying his Corsair inverted above a road while playing "chicken" with a truck!
The squadron was originally assigned to operate from the carrier USS Bunker Hill, CV-17. However, due to the Corsair’s questionable "quest" to gain carrier acceptance, and the fact that the Navy posted a Hellcat squadron on board, the squadron was transferred to a land-based assignment, starting fighter ops from Ondonga on New Georgia in October, 1943.
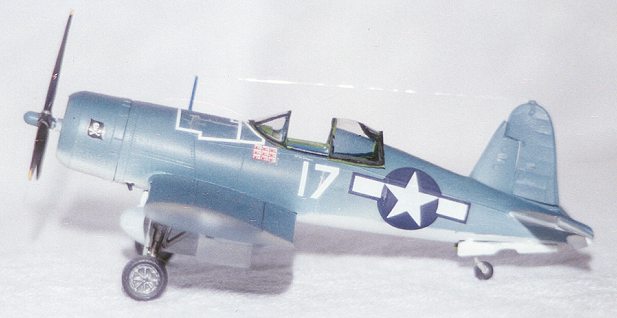
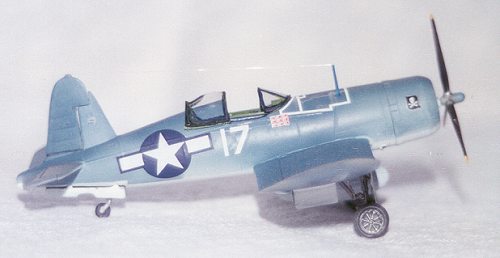
The aircraft depicted here is from VF-17 and is the mount of Lt.(jg) Kedrick, the Executive Officer of the squadron flying from Bougainville during 1944. He was an ace at the time with nine confirmed victories.
|
THE KIT |
The Revell kit of the F4U-1D is an old one, the directions indicating an original copyright of 1972, four years prior to the series "Baa, Baa Black Sheep" being aired on television, with Robert Conrad playing the role of Maj. Greg "Pappy" Boyington, and the aircraft depicted on the boxtop was his aircraft, "Lulubelle". The model comes with four small sprues of dark blue injection molded plastic, along with a clear sprue containing the canopy, which was molded in one piece. The directions consist of exploded drawings and can be easily followed. I started by washing all parts in warm water and dishwashing detergent to remove the mold release agents, a la Lee Kolosna, and allowed them to dry on paper towels.
The person I was making this kit for, Mr. T. Garth Connelly, kindly supplied me with a True Details resin cockpit set and wheel set for the 1:72 Corsair. It was the first time I ever worked with resin, and I must say that it was a real pleasure to see such detail in parts this small!
|
CONSTRUCTION |
I started construction not with the cockpit, but with the wheel wells, as Mr. Connelly wanted me to spruce them up with detail. I cut stringers from Squadron styrene sheet and proceeded to glue them into the wheel wells of the upper wing halves perpendicular to the leading edge, which was entirely wrong! I only discovered my error after looking at my reference, "Great Aircraft of World War II", again. I had by this time even painted the wells with zinc chromate! Nothing for it but to remove the mistakes and start over. I cut new stringers, and glued them in the right way, parallel to the leading wing edge this time. I primed the two areas, then painted anew with zinc chromate. The plastic I found to be inordinately shiny, however, and the zinc chromate paint was runny at first, so I had to add some drops of Dullcoat to the mix, and respray again. That did the trick. I then glued the two top wing halves to the bottom wing and set aside to dry.
 The fuselage halves were the trickiest part of construction, for I had to do
some major shaving and sanding of the True Details cockpit set in order to get
it to fit. I managed to prop the TD cockpit into position with a half a
toothpick, which I glued underneath one side with artist’s Goop. I then
proceeded to prime the resin piece. Allowing that to dry, I primed the sidewalls
of the interior fuselage in the cockpit area and in the tailwheel area, followed
by light zinc chromate. When all the painting was dry, I did up the TD cockpit
with light zinc chromate for the major part of the interior, followed with dark
zinc chromate for the seat. Instrument clusters on the side were painted very
dark grey, with the switches picked out in white and silver. The instrument
panel inself was painted in dark grey, with the instruments dry brushed in
silver to make the detail pop out. The map case was painted Model Master
Leather, and the shoulder harnesses off-white, followed by the lap belts in MM
sand. The buckles were painted silver. I added a length of wire, bent to
resemble the control stick, to the floor board hole, added a drop of Elmer’s,
and when it was dry, painted the top of the column flat black for the hand grip.
After this paint had all dried for a couple of days, the TD interior was treated
to a dirty wash of thinner to highlight detail, followed by the leg rests and
rudder pedals painted aluminum. There appeared a noticeable gap behind the
cockpit set where it did not butt against the two fuselage halves, so more
Squadron sheet was called for to fill the space, and serve as the bulkhead for
the headrest, which I fashioned out of a small piece of leather shoe string.
The fuselage halves were the trickiest part of construction, for I had to do
some major shaving and sanding of the True Details cockpit set in order to get
it to fit. I managed to prop the TD cockpit into position with a half a
toothpick, which I glued underneath one side with artist’s Goop. I then
proceeded to prime the resin piece. Allowing that to dry, I primed the sidewalls
of the interior fuselage in the cockpit area and in the tailwheel area, followed
by light zinc chromate. When all the painting was dry, I did up the TD cockpit
with light zinc chromate for the major part of the interior, followed with dark
zinc chromate for the seat. Instrument clusters on the side were painted very
dark grey, with the switches picked out in white and silver. The instrument
panel inself was painted in dark grey, with the instruments dry brushed in
silver to make the detail pop out. The map case was painted Model Master
Leather, and the shoulder harnesses off-white, followed by the lap belts in MM
sand. The buckles were painted silver. I added a length of wire, bent to
resemble the control stick, to the floor board hole, added a drop of Elmer’s,
and when it was dry, painted the top of the column flat black for the hand grip.
After this paint had all dried for a couple of days, the TD interior was treated
to a dirty wash of thinner to highlight detail, followed by the leg rests and
rudder pedals painted aluminum. There appeared a noticeable gap behind the
cockpit set where it did not butt against the two fuselage halves, so more
Squadron sheet was called for to fill the space, and serve as the bulkhead for
the headrest, which I fashioned out of a small piece of leather shoe string.
When all the painting was completed, the fuselage halves were joined, and the assembly set aside to dry. At this point, the elevators were separated by scribing followed by cutting with a razor saw. The cut pieces were sanded square at the cut lines and set aside for repositioning later. When the fuselage assembly was dry, the rudder was cut using the above described method, cut lines sanded square, then reattached slightly leaning to port, as the plane would appear in a parked position. While this was drying, the wing assembly was glued into position underneath the fuselage following test-fitting. The fit was good and tight, requiring very little in the line of filling and sanding.
After this whole assembly was dry, I reattached and glued the elevators in a slightly down position, again trying to depict the plane in a parked position. I glued on the front cowl piece, and the model really started to take on the lines of a Corsair. The lines separating the cowl flaps didn’t appear deep enough to me, so I scribed them deeper.
The oil coolers on the leading wing edges near the roots of the wing needed detailing attention, so I cut some brass shim stock to put in separator cooling vanes in the cooler spaces. I had to attempt this three times before I was satisfied with the effect. At this point, the airframe was ready for the paint shop.
|
PAINT |
The model was primed overall with three thin coats of MM enamel primer, mixed with some Dullcoat to help eliminate that annoying shine of the dark blue plastic. When this had thoroughly dried, I masked off the wheel wells and shot a mix of flat white mixed with a few drops of Aircraft Grey to give an off-white color to the bottom. When dry, I masked this area off to paint the outer bottom wings a nice shade of MM US Navy Blue Grey I mixed this with a little Sea Blue for the light shade of blue to the middle fuselage panels. After this was dry, I freehand airbrushed a lightened Sea Blue to the upper fuselage surfaces, and now had that classic 1944 Navy three-color fighter scheme to the aircraft that I wanted.
|
CONSTRUCTION CONTINUES |
Following all the major painting, I had to come up with some way to mount the TD wheels to the model’s original main struts. I ended up by cutting away the round parts of plastic down at the bottom of both main gear struts, drilling a small hole in each with my pin vise, and inserting small gauge steel wire to mount the wheels, which I cut carefully from their mold, and sanded the bottoms to get that nice TD flattened wheel effect. I primed both wheels and then painted them with a custom mix of MM colors to mimic tire black. The centers of the wheels were painted silver. I took wire from a bread loaf tie and attached it to each strut with thin strips of masking tape for brake lines, then painted the struts aluminum and the oleos silver. After the paint was dry, I glued on the wheels. The strut assemblies were then glued into their respective holes, along with wire supporting struts, to depict the support struts on the real aircraft.
|
DECALS |
 The decals were Aeromaster, from their "Island Hopping Corsairs"
collection, supplied to me by Mr. Connelly, and accurately depict Lt. Kedrick’s
aircraft. After Gloss Coating the model, the decals went on and settled
beautifully, with the one exception of the large decal depicting the taping
along the cowl. This one wanted to bubble and silver, and no amount of pin
pricking or setting solution seemed to work. Other than that, no complaints, and
the decals were sealed with Glosscoat, followed by two overall coats of Testor’s
Dullcoat. The model was very lightly weathered with drybrushed aluminum along
the prop and wing leading edges, along with where the pilot would step to enter
the cockpit on the port wing. Gun smoke was depicted with a very thinned mix of
dark grey, rust, and flat black, and was sprayed across the gun openings on the
top and bottom wing, along with the shell ejector chutes.
The decals were Aeromaster, from their "Island Hopping Corsairs"
collection, supplied to me by Mr. Connelly, and accurately depict Lt. Kedrick’s
aircraft. After Gloss Coating the model, the decals went on and settled
beautifully, with the one exception of the large decal depicting the taping
along the cowl. This one wanted to bubble and silver, and no amount of pin
pricking or setting solution seemed to work. Other than that, no complaints, and
the decals were sealed with Glosscoat, followed by two overall coats of Testor’s
Dullcoat. The model was very lightly weathered with drybrushed aluminum along
the prop and wing leading edges, along with where the pilot would step to enter
the cockpit on the port wing. Gun smoke was depicted with a very thinned mix of
dark grey, rust, and flat black, and was sprayed across the gun openings on the
top and bottom wing, along with the shell ejector chutes.
A Squadron vacformed canopy was cut and shaped and glued into place following frame painting both on the inside and outside. A pitot tube was fashioned from hypo tube and glued on the port wing, along with a tiny half-arrow of thin Squadron sheet at the end of the tube, and was painted silver. Invisible tailor’s thread served as the aerial.
|
CONCLUSIONS |
Although an old kit, this Revell was a real little gem, especially with the addition of all the aftermarket goodies supplied by Mr. Connelly. He was very satisfied with the overall results, and I told him later how hard it was to part with such a neat little model of this F4U-1A. If you can find this model on a dusty shelf somewhere in your hobby shop, buy it and treat yourself to a very satisfying build. My thanks go to Mr. T. Garth Connelly for so graciously supplying the kit and supplies to build it, and for providing the history of VF-17.
If you would like your product reviewed fairly and fairly quickly, please contact the editor or see other details in the Note to Contributors.