Pavla 1/72 Cessna T-50 Bobcat
| KIT #: | 72022 |
| PRICE: | $16.98 MSRP |
| DECALS: | options |
| REVIEWER: | Joel Hamm |
| NOTES: | Short run kit |
| HISTORY |
“Out of the blue of
the western sky comes [ R R R R R o a r r r r r r ] Sky King!” If you
remember that and would like to her it again, or if you don’t and would
like to hear it anyway, go web wading and the original recording will come
up on his home 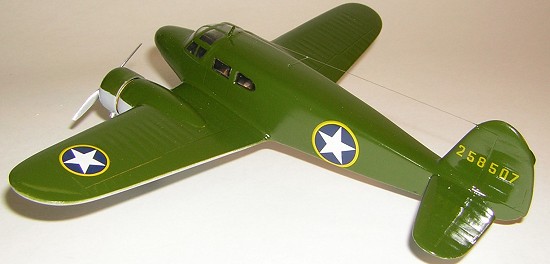 page. If you have no idea what’s being talked about, go find
someone with gray hair (or very little hair) and ask what the world was
like when television was all black and white, when a mouse was a furry
little rodent that left droppings on your kitchen shelves, and when
being gay meant you were happy.
page. If you have no idea what’s being talked about, go find
someone with gray hair (or very little hair) and ask what the world was
like when television was all black and white, when a mouse was a furry
little rodent that left droppings on your kitchen shelves, and when
being gay meant you were happy.
What does all this have to do with building a model of a Cessna T-50? Well, before he upgraded to a C310, TV hero Sky King flew a “Bamboo Bomber”, which was Cessna’s premier entry into the nascent twin market, around 1938. With the approach of WWII, it was drafted into the USAAC as a multi-engine trainer, and as a light utility transport. The RAF and other foreign services ordered them for the same purposes. For more detailed history, go back to the WWW. You’ll find plenty, most for some reason in French; but you should have paid better attention when your high school teacher tried to cram down your gizzard a bit of parlez-vous.
| THE KIT |
Pavla did a
string of U.S. utility and liaison aircraft. While they are to be lauded
for bringing us rapid fire releases of neglected subjects; they can be
somewhat faulted for failing to bring their quality out of the paleozoic
age of short run kits  (though their latest, X-15, reportedly lifts them
right up there with The Big Boys). More than many of their recent
releases, the T-50 suffers from shortcomings that take the fun out of it;
and even experienced modelers will be frustrated into relegating it to the
“I’ll get back to it one day – maybe” pile. Chief complaints: poor
engineering, thoughtless parts breakdown, inaccurate shapes, and ill fit,
particularly where filler and sanding are a “tickle” (wing roots and engine
nacelles).
(though their latest, X-15, reportedly lifts them
right up there with The Big Boys). More than many of their recent
releases, the T-50 suffers from shortcomings that take the fun out of it;
and even experienced modelers will be frustrated into relegating it to the
“I’ll get back to it one day – maybe” pile. Chief complaints: poor
engineering, thoughtless parts breakdown, inaccurate shapes, and ill fit,
particularly where filler and sanding are a “tickle” (wing roots and engine
nacelles).
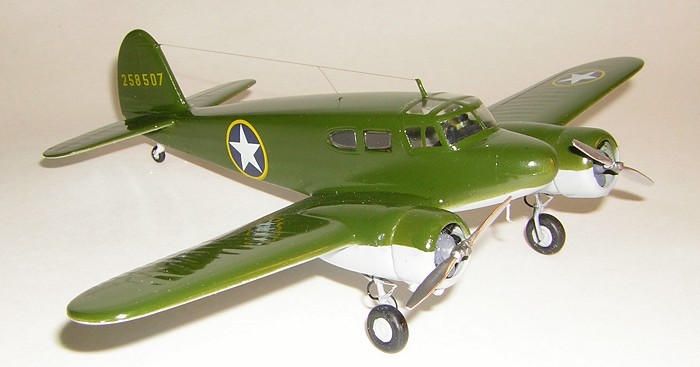
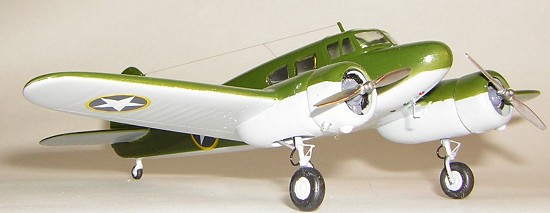
Side windows and canopy are vacu-formed (Pavla provides 2 canopies but only 1 set of windows). Resin engines have finely molded cases, with even the bolts visible (or did I imagine that), but the cylinders appear shriveled by some genetic or nutritional dystrophy. Propeller blades come separate from the hubs, and builders can choose from plastic or resin. Micro-thingies are etched in brass. Propagteam (I think) provides top notch decals for 2 US and 1 RAF plane. Instructions are their usual pictorial, with additional views for dihedrals and super detailing the landing gear; and colors referenced to a chart by letters.
| CONSTRUCTION |
Kits with side windows that must be inserted from inside always pose a difficult masking problem; but the large canopy opening offered the opportunity to add them post-painting. A dry run with the fuselage taped together proved this could be managed with only minor manipulations; and the entire interior could also be slid in later as a unit, though with the floor narrowed a few millimeters.
 With interior detailing deferred, work started on the airframe. Upper &
lower fuselage seams don’t match, so it’s best to glue the upper, then when
dry, force and tape the lower while squirting in liquid cement through the
forward opening. That will avoid having to sand the joint line, which if
done on the fuselage roof would misalign the vac-canopy. Dry fit the wings
to the fuselage before gluing the wing surfaces together. There are no
locating pins on the latter (or anywhere else) and if the upper wing pieces
are allowed to slide just a fraction of a millimeter outboard, a
difficult-to-fill gap will result at the fuselage joint. How do I know all
these possibilities? Because I boogered up one kit to the point that it
wasn’t worth fixing, then was lucky enough to find another still in stock
at Squadron shop.
With interior detailing deferred, work started on the airframe. Upper &
lower fuselage seams don’t match, so it’s best to glue the upper, then when
dry, force and tape the lower while squirting in liquid cement through the
forward opening. That will avoid having to sand the joint line, which if
done on the fuselage roof would misalign the vac-canopy. Dry fit the wings
to the fuselage before gluing the wing surfaces together. There are no
locating pins on the latter (or anywhere else) and if the upper wing pieces
are allowed to slide just a fraction of a millimeter outboard, a
difficult-to-fill gap will result at the fuselage joint. How do I know all
these possibilities? Because I boogered up one kit to the point that it
wasn’t worth fixing, then was lucky enough to find another still in stock
at Squadron shop.
Nacelles and cowlings are a major mis-shape. The upper nacelles are molded into the wings; but the lowers come as split halves. The starboard side mated OK, but the port was way out of round and had to be coaxed into shape. The profile of the nacelles proved overly square, and according to the box art and reference photos, need to have their forward edges rounded so that when the cowls are attached a slight gap is left, where the cooling air would exit. The cowls are also split halves of unequal thickness, and do not form a round cross section. Nor is the resulting seam line easy to clean up. These sorts of pieces are best molded as complete rings, but that may be beyond the capabilities of Pavla’s non-metalic mold process.
| COLORS & MARKINGS |
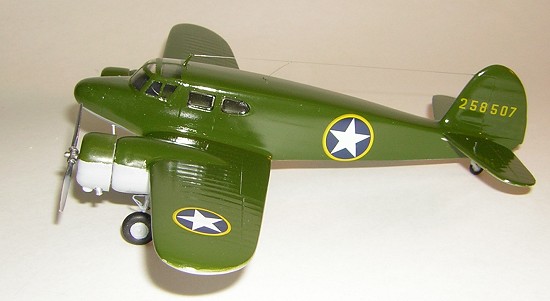
Decals and diagrams
are provided for one British plane, in overall yellow, and 2 American
craft, one in early OD and another in late or post-war naval silver. Being
a loyal Yank, I chose the army olive, because the yellow surrounded
star-in-circle insignia just looked so darn purty against the green
background. And why mess around with silver paint anytime you don’t
 absolutely have to? My personal preference, which will enrage purists, is
to finish everything in gloss enamels (just like modern day warbird
restorations), so the shade had to be home brewed by adding to Testors
bright green a dollop of orange, lightened, for scale effect, with a
soupscon of white. Underside got gloss light gray.
absolutely have to? My personal preference, which will enrage purists, is
to finish everything in gloss enamels (just like modern day warbird
restorations), so the shade had to be home brewed by adding to Testors
bright green a dollop of orange, lightened, for scale effect, with a
soupscon of white. Underside got gloss light gray.
This is as good a time as any to throw in my ha’p’ny on he subject of weathering. Some folks out there do a convincing job of wearing and tearing, battle damaging, and generally derelecting their fleet. I’ve tried one or two, and my results don’t look right even when they look right. I base my case for gloss pristinity on a recent engaging (and expensive) book by the Smithsonian Institution. The conservators at the National Air and Space Museum discussed the question of whether to weather their restorations. Answering the charge that service aircraft never appeared in the flawless states seen at the museum, they pointed out that “Hollywooding” exhibits with grime and worn paint was even less authentic; and that educational aims could best be served by showing off factory fresh finishes (even though many were not applied at the factory). If the philosophy is good enough for the Smithsonian, it’s good enough for me. Others are free to smear, smudge, and soot-ify their creations.
| FINAL CONSTRUCTION |
With the fuselage relieved of its masking toilet paper, it could be refilled with seats and assorted stuff. As mentioned, the floor had to be narrowed to slip through the windshield opening. The aft bulkhead was omitted as a useless obstruction, and was carved into a better rear couch than the slab-like one provided. The pilots’ chairs are beautifully done in PEB with all the support braces, to which I added seat belts from a True Details decal sheet. Instrument panel, including rudder pedals and control yokes, are also brass, with a photo backing for the gauges. Forming up the throttle quadrant and scratch-stretching throttle, prop, and mixture levers was simply not worth the effort, as little can really be seen. It would have been nice to have a separately molded door to glue open, but excising the molded-in panel would have made a mess.
 The
vacu-ed side windows went in easily enough with a long nosed forceps, held
in with water based poly-urethane varnish that had been allowed to thicken
up a bit in the air. The stuff sticks better than any clear parts cement,
doesn’t attack plastic, and is perfectly transparent, so boo-boo’s go
unnoticed. With no clear indication of where to position the assembled
flight deck, I slid it in and glued it with plastic epoxy so the seats are
in their usual position abeam at the “A” door post. This meant moving the
instrument panel aft and forming an extended cowl (with a nubbin stuck on
to represent the ever-present mag compass). When the canopy went on (also
with poly-U) this proved to be a mistake, as the seats should have sat
under the overhead windows and now everything was too far back. It’s
perfectly acceptable to me – and everyone else, as long as my collection
isn’t subjected to a high magnification inspection by the International
Accuracy Polizei.
The
vacu-ed side windows went in easily enough with a long nosed forceps, held
in with water based poly-urethane varnish that had been allowed to thicken
up a bit in the air. The stuff sticks better than any clear parts cement,
doesn’t attack plastic, and is perfectly transparent, so boo-boo’s go
unnoticed. With no clear indication of where to position the assembled
flight deck, I slid it in and glued it with plastic epoxy so the seats are
in their usual position abeam at the “A” door post. This meant moving the
instrument panel aft and forming an extended cowl (with a nubbin stuck on
to represent the ever-present mag compass). When the canopy went on (also
with poly-U) this proved to be a mistake, as the seats should have sat
under the overhead windows and now everything was too far back. It’s
perfectly acceptable to me – and everyone else, as long as my collection
isn’t subjected to a high magnification inspection by the International
Accuracy Polizei.
On to the engines, with their shrunken jugs. A search for replacements turned up a pair of “Engines & Things” Shaking Jakes of almost the exact model; but the cylinders on these were also undersized. Further searching turned up a set of P&W 14 cylinder double row Something-or-Others. Since the rear banks wouldn’t be visible on whatever they were mounted, I scrounged these and glued on the faces of the Jacobs’s. A great deal of work, but it resulted in a duo of convincing radials. Unfortunately, the finely detailed cylinder heads had to be ground away to fit them into the thick-walled cowl rings. The alternative would have been vacu-forming a new set, but this project had exceeded its share of heroic measures, and was now getting the bum’s rush off the bench and onto a shelf.
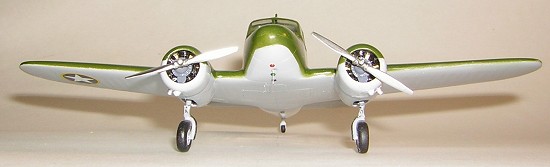 Well, almost. The main gear legs, with their finely etched scissors links,
hung down from the nacelles, inviting extra detail. I made brake lines
out of cyano–soaked black thread, ran them up the struts, along the wheel
forks, and made a semi-circle to span the oleo shocks. Looks better than
naked gams. Props: The resin blades looked much better than the plastic,
but all had minute short-shot bubbles at their tips that needed to be filed
square. Real propellers are de-dinged the same way; and as noted, no one is
going to apply any measuring instruments. Attaching blades to hubs at the
proper angles was a chore. Thankfully this wasn’t a four-engined monster
with contra rotating 6-bladers. Then again, if gluing parts together is a
chore, then you’re in the wrong hobby.
Well, almost. The main gear legs, with their finely etched scissors links,
hung down from the nacelles, inviting extra detail. I made brake lines
out of cyano–soaked black thread, ran them up the struts, along the wheel
forks, and made a semi-circle to span the oleo shocks. Looks better than
naked gams. Props: The resin blades looked much better than the plastic,
but all had minute short-shot bubbles at their tips that needed to be filed
square. Real propellers are de-dinged the same way; and as noted, no one is
going to apply any measuring instruments. Attaching blades to hubs at the
proper angles was a chore. Thankfully this wasn’t a four-engined monster
with contra rotating 6-bladers. Then again, if gluing parts together is a
chore, then you’re in the wrong hobby.
A smattering of fiddle-de bits completed assembly; notably exhausts stacks of aluminum tube drilled into the cowl rings, and antennae wires of nylon thread.
| CONCLUSIONS |
Another great model for masochists.
October 2005
If you would like your product reviewed fairly and quickly by a site that has around 300,000 visitors a month, please contact me or see other details in the Note to Contributors.