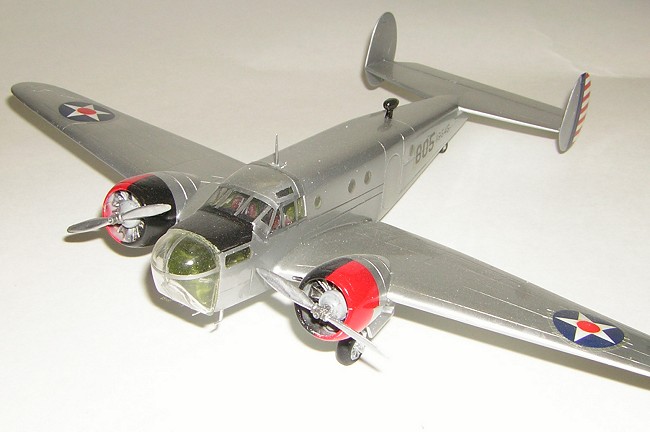
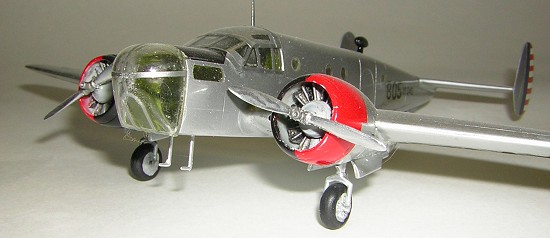
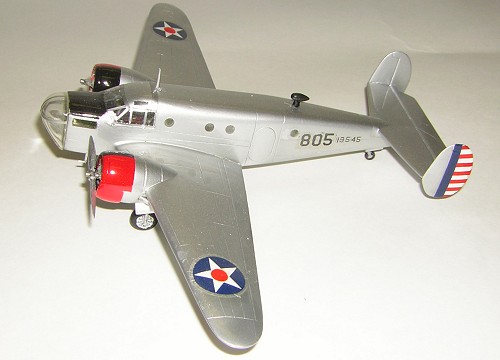
PM 1/72 AT-11 Kansan
| KIT #: | PM 0303 |
| PRICE: | 6.98 MSRP |
| DECALS: | Scrounged from the spares bin |
| REVIEWER: | Joel Hamm |
| NOTES: | Son of a Beech - Companion to Beech 18. |
| HISTORY |
The Enemy of Good is Better
How (Not to) Muddle a Model
Boasting is one of the biggest benefits of modeling. There’s little sense in all the research and refinement if the result can’t be bragged about. So why would anyone showcase a complete catastrophe? As a public service – to save others from the same fate. Here then is a morality tale of how to start with “So-so” and end up with “Oh no!”
The Kansan was a modification of the C-45 transport, which in turn was a straight off the shelf purchase of the Beech Model 18. By adding a glass nose and other changes it was turned into an advanced trainer for navigators, bombardiers, gunners, and Lord knows whom else. There’s gobs more history to be gotten in Googledom.
| THE KIT |
Subject of the
endeavor – or should it be said victim, was an intended shelf-mate to its
previously built solid-schnozzed C-45 Expeditor transport sibling. PM kits
are the only injected representatives in this scale of the Twin Beech
variants, both kits are semi-crude moldings, suffering more than their
share of 1960’s era tooling faults, though they were released in the 90’s.
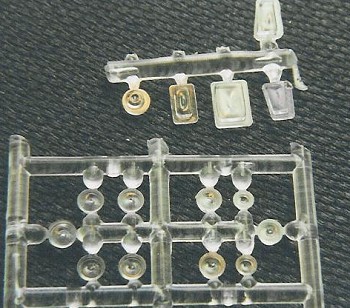
Chief complaint centers on transparencies reminiscent of early Airfix –
thick, rough, cloudy, dimpled, and ill fitting. The C-45 had been
re-fenestrated through pre-assembly in-situ casting of new windows,
followed by grinding, polishing, and masking
 with home brewed custom masks
turned out on a photocopier. Having only port holes for portals, the
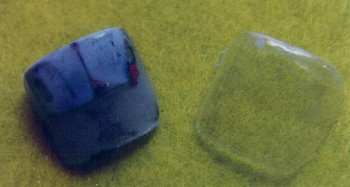
Kansan was set to demonstrate an alternate technique: backing with acetate
sheet, masking with gloppy rubber stuff (“Blue Tack etc.), and post paint
epoxying. That attempt turned into one giant leap for mankind down the road
to ruin. MORAL: Perfect all techniques on spare parts or a clunker before
applying them to a real project.
with home brewed custom masks
turned out on a photocopier. Having only port holes for portals, the
Kansan was set to demonstrate an alternate technique: backing with acetate
sheet, masking with gloppy rubber stuff (“Blue Tack etc.), and post paint
epoxying. That attempt turned into one giant leap for mankind down the road
to ruin. MORAL: Perfect all techniques on spare parts or a clunker before
applying them to a real project.
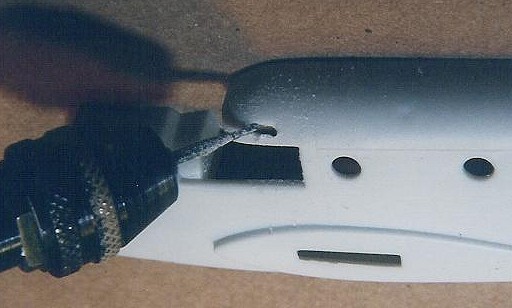
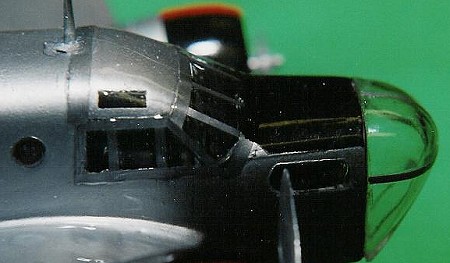
Clear parts were not the only shortcoming of these kits. Under the heading “Sins of Omission” came the lack of overhead flight deck windows, no problem to rout out with a roto-tool. Also in the “Oops” Column came failure to include the plane’s prominent exhaust stacks, also easily drilled and filled with snippets of tubing, slightly bent and scorched with a match for a bit of burnt weathering. Wheel wells were molded as empty shoe boxes, and engines as simplistic shirt buttons. The thick, yellowed decals proved another step down the path to perdition. Experimentation with the unused Turkish markings showed they would soften with an assortment of setting solutions, but wouldn’t straighten out once snuggled down. Nor would the discoloration yield to bleaching by sunlight, chlorine, or oxygen cleansers. They would have to go. All these glitches were satisfactorily and simply dealt with in constructing the C-45; but success there only inspired that fatal urge to indulge in more drastic plastic surgery. MORAL: Go with the flow that you know.
| CONSTRUCTION |
 Assembly started
with wings rather than fuselage. Detailing the wheel wells was
straightforward, especially since a Web site offered up a photo of the real
thing; but excess started to take its toll in “accurizing” the slab-like
doors. Indentations drilled with a 1/8” bit represented the lightening
holes of an inner door frame; but when the panels were sanded from the
outside, the holes popped all the way through. Modifying replacements from
the spares box was no big deal, but the omen should have been heeded.
Assembly started
with wings rather than fuselage. Detailing the wheel wells was
straightforward, especially since a Web site offered up a photo of the real
thing; but excess started to take its toll in “accurizing” the slab-like
doors. Indentations drilled with a 1/8” bit represented the lightening
holes of an inner door frame; but when the panels were sanded from the
outside, the holes popped all the way through. Modifying replacements from
the spares box was no big deal, but the omen should have been heeded.
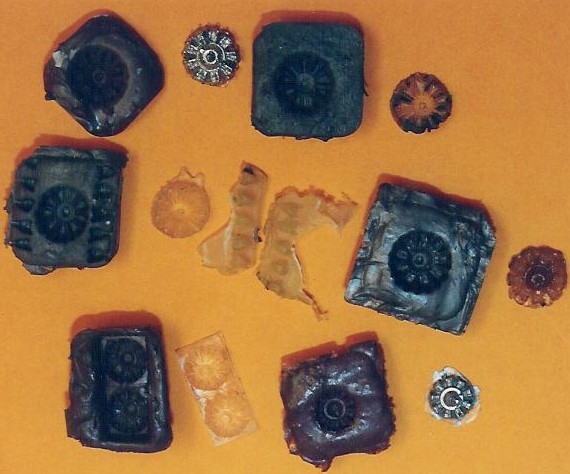 The nacelles were molded with integral
cowls, so engines had to be inserted before mating upper & lower wing
halves. The C-45 had received a pair of well defined Pratt & Whitneys from
the spare engine department; but they were the last in stock. Another set
of white metal or resin replacements à la Aeroclub or Engines&Things could
have been mail ordered, but that would have meant working up a minimum
order and waiting. Instead, a high quality radial was borrowed from an
unbuilt kit and used to cast a mold in modified RTV (Room Temperature
Vulcanizing) Silicone Sealant. (The modifier is anti-seize lubricant which
makes the rubber less sticky.) Dime-store epoxy poured into the mold cured
into perfect clones of the master. Of course the process didn’t go quite as
smoothly as described; and by the time all the glitches were worked out the
postman could have delivered a crate of after-market goodies at half the
cost of all the kitchen table alchemy. MORAL: Before starting a project,
inventory and order all necessary supplies and accessories.
The nacelles were molded with integral
cowls, so engines had to be inserted before mating upper & lower wing
halves. The C-45 had received a pair of well defined Pratt & Whitneys from
the spare engine department; but they were the last in stock. Another set
of white metal or resin replacements à la Aeroclub or Engines&Things could
have been mail ordered, but that would have meant working up a minimum
order and waiting. Instead, a high quality radial was borrowed from an
unbuilt kit and used to cast a mold in modified RTV (Room Temperature
Vulcanizing) Silicone Sealant. (The modifier is anti-seize lubricant which
makes the rubber less sticky.) Dime-store epoxy poured into the mold cured
into perfect clones of the master. Of course the process didn’t go quite as
smoothly as described; and by the time all the glitches were worked out the
postman could have delivered a crate of after-market goodies at half the
cost of all the kitchen table alchemy. MORAL: Before starting a project,
inventory and order all necessary supplies and accessories.
The cylinder heads had to be ground down to fit the engines into the nacelles; and it wasn’t until everything was glued and set together that the off-center placement became evident. The plane would now have a decidedly exophoric appearance that strategic propeller positioning would only partially appease. MORAL: Cyanoacrylate is utterly unforgiving. Dry fit and triple check everything before reaching for the super glue tube.
 Wing closure revealed another hitch. The
tool maker had never molded in the leading edge air intakes inboard of the
nacelles. They should have been no problem to drill and shape; and the left
port wasn’t. On the right wing, however, the liquid cement had softened the
already waxy plastic, and the edges of the hole kept collapsing. Efforts to
plug the gaps with assorted putties only exacerbated the cave-in until the
wing seemed to be suffering from advanced dental decay. With so much
already so wrong so early into the build-up, the best solution would have
been consigning what remained of the kit to the spares box and starting
again. (It only cost $5). Pride and impatience wouldn’t allow it.
Wing closure revealed another hitch. The
tool maker had never molded in the leading edge air intakes inboard of the
nacelles. They should have been no problem to drill and shape; and the left
port wasn’t. On the right wing, however, the liquid cement had softened the
already waxy plastic, and the edges of the hole kept collapsing. Efforts to
plug the gaps with assorted putties only exacerbated the cave-in until the
wing seemed to be suffering from advanced dental decay. With so much
already so wrong so early into the build-up, the best solution would have
been consigning what remained of the kit to the spares box and starting
again. (It only cost $5). Pride and impatience wouldn’t allow it.
Since the leading edge couldn’t be repaired it had to be replaced. The injured section was cut away and replaced with a chunk of pour plug from a sprue of resin parts. This was sanded to more or less match the original profile, and the intake half-heatedly drilled and shaped. MORAL: Prior to assembly check all parts against references. If drilling or shaping will be necessary, reinforce the plastic. Of course all that sanding obliterated surface detail, which had to be re-scribed, with inevitable slip of the stylus, leading to filling, more sanding, re-re-scribing, and so on.
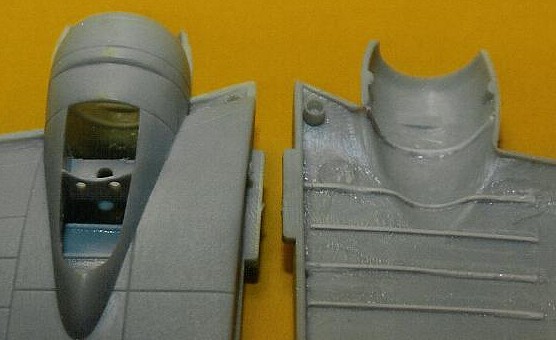
 With wings suitably botched attention
turned to the fuselage. After the absent overhead windows were drilled, all
apertures were backed with clear acetate sheet, care vainly exercised to
keep glue out of the openings. The backing provided a base for the epoxy
which was supposed to be poured in after all assembly and painting.
MORAL: The best laid plans of modelers and men... but more on that anon.
With wings suitably botched attention
turned to the fuselage. After the absent overhead windows were drilled, all
apertures were backed with clear acetate sheet, care vainly exercised to
keep glue out of the openings. The backing provided a base for the epoxy
which was supposed to be poured in after all assembly and painting.
MORAL: The best laid plans of modelers and men... but more on that anon.
Little else good or bad can be said
about airframe buildup – except that median and wing root joints required
filling and sanding, filling and sanding, filling and sanding. A minor
MORAL can be added that for proper alignment, tailplane affixing should
wait until wing dihedral is mastered. Fixing and installing the windshield
turned out to be
 the most damning phase of the project. Work on the
Expeditor led to a laborious but effective process for bestowing 20/20
clarity upon cataraceous clear parts. Sand away gross distortions starting
with 400 grit, working down to 2000, lubricated with soapy water. Stroke in
one direction, changing the angle with successively finer grades. Rub down
with water based metal polish (Mrs. Wright’s Silver Cream), and finish with
a SLOW SPEED (lest you melt it) machine buffing with plexiglass cleaner or
automotive compound such as Johnson’s Kit Scratch Out. Attach with a
miserly bead of clear epoxy. When that sets, caulk gaps with more epoxy,
guarding against drops dribbling inside. (Vinegar will remove fresh epoxy).
After curing, brush coat the entire windshield and surrounding structure
with a uniform coat of even more epoxy. When absolutely hard (resists
fingernail poking), which may take upwards of a week at warm room
temperature, repeat the entire sanding / polishing procedure. It sounds
like a lot or work because it is; but the result is a “Tamigawa” quality
transparency seamlessly blended with the airframe.
the most damning phase of the project. Work on the
Expeditor led to a laborious but effective process for bestowing 20/20
clarity upon cataraceous clear parts. Sand away gross distortions starting
with 400 grit, working down to 2000, lubricated with soapy water. Stroke in
one direction, changing the angle with successively finer grades. Rub down
with water based metal polish (Mrs. Wright’s Silver Cream), and finish with
a SLOW SPEED (lest you melt it) machine buffing with plexiglass cleaner or
automotive compound such as Johnson’s Kit Scratch Out. Attach with a
miserly bead of clear epoxy. When that sets, caulk gaps with more epoxy,
guarding against drops dribbling inside. (Vinegar will remove fresh epoxy).
After curing, brush coat the entire windshield and surrounding structure
with a uniform coat of even more epoxy. When absolutely hard (resists
fingernail poking), which may take upwards of a week at warm room
temperature, repeat the entire sanding / polishing procedure. It sounds
like a lot or work because it is; but the result is a “Tamigawa” quality
transparency seamlessly blended with the airframe.
Usually – but not always.
A search for optical perfection on the Kansan now led to excessive sanding of the top coat. Epoxy exhibits the nastiness of not bonding to itself or to underlying surfaces in the manner of solvent glues. Consequently, when the layer was worn through, the edges of the resultant wound could not be polished or in any way persuaded into invisibility. The good news was that the same lack of stick-to-it-iveness allowed the damaged overcoat to be pried up with a #11 blade. The bad news was that the roof was beginning to disappear under all that sanding.
 It took two more re-coatings to make the
MORAL sink in: Quit while you’re ahead. All that sanding and polishing
were steadily wearing away at a roof line already thinned by earlier
attempts to eradicate any traces of fuselage joint. The juncture between
clear and opaque plastic caved in, just as had the edges of the wing root
air intake. Also identical to that case, trying to plug the gap with
putties or cyano-gel only further opened the gap. A patch of
plastic-adhering instant epoxy halted the decay, but since additional
abrasion was out of the question, the fix could never be termed “seamless”.
It took two more re-coatings to make the
MORAL sink in: Quit while you’re ahead. All that sanding and polishing
were steadily wearing away at a roof line already thinned by earlier
attempts to eradicate any traces of fuselage joint. The juncture between
clear and opaque plastic caved in, just as had the edges of the wing root
air intake. Also identical to that case, trying to plug the gap with
putties or cyano-gel only further opened the gap. A patch of
plastic-adhering instant epoxy halted the decay, but since additional
abrasion was out of the question, the fix could never be termed “seamless”.
The build-up was now bunged up to a state that called for euthenizing the model – if not also the modeler. Nevertheless, work proceeded.
The windows had been masked with pellets of Blue Tack, a hybrid cross between gum rubber and plasticine modeling clay, sold in stationary stores for the purpose of posting pictures and notes on surfaces from which they could be removed without residue or damage. Snakes of Blue Tack also got wound and flattened around the faces of the two radials, even though snippets of tissue or foam rubber had always worked well enough to mask engine openings. Then it was time to pull out the paint bucket.
| COLORS & MARKINGS |
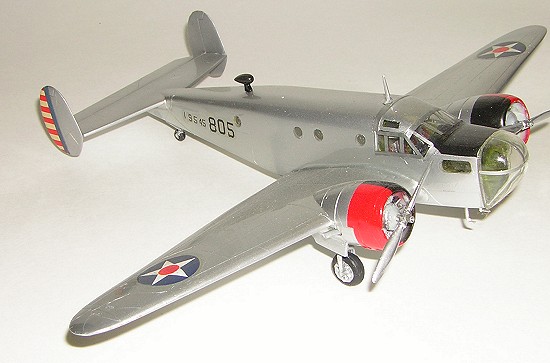
A library and Internet search turned up no marking scheme alternatives to the dreaded BMF – Bear (pun intended) Metal Finish – so the cowl colors and anti-glare panels had to be applied first then masked. Compound curves had always been the province of 3M Artist’s Masking Tape, a highly conformable vinyl adhesive that created on even impossible contours a crisp demarcation line. Neither a replacement roll nor a store in which to buy one was any longer locatable, due no doubt to the advent of PC graphics programs.* The mask task was instead assigned to a product that had received rave revues on several chat sites (can we mention the name Tamiya Tape?). First the black seeped under onto the red; then the red seeped under onto the black; and the see-saw battle continued until the cowl had to be stripped and re-painted using PVC electrical tape. MORAL: Don’t believe everything you read on the Internet.
A heavy coat of gloss white enamel
primer concealed most prepping flaws, and revealed others that were given
the “bum’s rush” repair. Fans of bare metal can choose from a bewildering
array of exotic and exorbitant alternatives; but in 1/72 scale, when the
intent is “get it off the bench and onto the shelf”, nothing works as well
as Testors silver enamel, thinned
 only about 25%, and amply applied under
high pressure in a wide spray pattern. (The regulator read 40 lbs but line
pressure was certainly nowhere near that.) The result promised that the
Kansan might still make a decent display – at least when viewed from a
distance.
only about 25%, and amply applied under
high pressure in a wide spray pattern. (The regulator read 40 lbs but line
pressure was certainly nowhere near that.) The result promised that the
Kansan might still make a decent display – at least when viewed from a
distance.
Then the trouble started.
The Blue Tack masking medium specially formulated to leave no residue – did. Those porthole blocking pellets left on the backing sheet not only a greasy smudge, but also pieces of themselves, none of which could be removed by anything that did not also attack the surrounding silver paint. Over zealous scrubbing with a micro swab succeeded only in poking one of the acetate backers into the fuselage. The experience did not bode well for uncovering the engines; and, sure enough, Blue Tack stubbornly stuck between cylinders and in other crevices immune to probing and tweezering. The only alternative was to swab it out with Easy Lift Off and repaint the engines in place. Of course some of the cowling color also got easily lifted off. What else could be expected? MORAL: Go with what you know. If a particular product or technique worked in the past, don’t go looking for trouble with new gimmicks.
That lesson struck home even harder in trying to cast the windows. The epoxy that had behaved so well in earlier experiments now rebelled and refused to properly level. The fix meant waiting another week for it to harden, then repeating the sand/polish procedure, during which some of the polishing compound snuck around the back side of the windows where it refused to be washed out. Of course the paint job was now gone, along with surface detail which had to be re-scribed.
The catastrophe was hardly complete. Sanding the overhead cockpit windows now started the previously thinned roof again evaporating. All that could be saved at this point was a last vestige of sanity – by subjecting the Beechcraft to controlled flight into terrain. Before it could be launched against the wall, pride, anger, and determination kicked in. Surrender was for cowards. This would now be a no holds barred, kick, scratch and bite battle between my surgical skills, and the immutability of Mr. Murphey’s First Law of Physics – What can go wrong will. MORAL: Modeling is meant to be relaxation. When it starts to increase the angst, pick up a new project – or hobby.
 No way
could a replacement roof section be scrounged from the parts box – but an
entire cockpit section could be vacuformed – which would simultaneously
solve the problem of windshield and windows. A razor saw cut through the
fuselage just forward of the flight deck bulkhead; then a curved scalpel
blade sliced the assembly away through the epoxy windshield joint. Before
it could crumble to dust, it was filled with quick-set epoxy to form a male
vacu-form mold. The first
No way
could a replacement roof section be scrounged from the parts box – but an
entire cockpit section could be vacuformed – which would simultaneously
solve the problem of windshield and windows. A razor saw cut through the
fuselage just forward of the flight deck bulkhead; then a curved scalpel
blade sliced the assembly away through the epoxy windshield joint. Before
it could crumble to dust, it was filled with quick-set epoxy to form a male
vacu-form mold. The first
 melt-suck
shot turned out a perfectly formed and fitting canopy. So perfect
that it suggested a “What If?’ model of a bubble-top Beech, but that was
also an easy way out. Windshield and overhead ports were masked off with
tape, as were the nose section side windows. Cabin portholes, now perfectly
polished and flush (but still smudged on their unreachable insides) were
masked with dots of tape cut with a hollow punch.
melt-suck
shot turned out a perfectly formed and fitting canopy. So perfect
that it suggested a “What If?’ model of a bubble-top Beech, but that was
also an easy way out. Windshield and overhead ports were masked off with
tape, as were the nose section side windows. Cabin portholes, now perfectly
polished and flush (but still smudged on their unreachable insides) were
masked with dots of tape cut with a hollow punch.
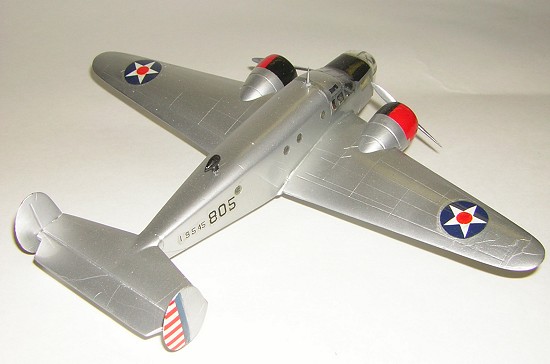
Out came the Badger and Testors for another silver coat. Off came the tape; and up popped the challenge of finding acceptable decals. Dumpster-diving into the spare decal file was a better alternative than using the out-of-the-box sheet. Insignia and alpha-numerics could likely be found; but surfacing with a set of precisely sized rudder stripes would require a miracle.
 The
starboard rudder panel was cut from the kit sheet and trimmed of yellow
film. Despite its armor plate appearance, upon touching water it burst into
a zillion shards. A near hopeless search of the spares file proved that
miracles do indeed still happen. Tucked in among the last scraps in the
envelope corner was a single tri-color stripes marking, exactly the correct
height. Slight shortcoming in width could be remedied by a 4/0 brush tipped
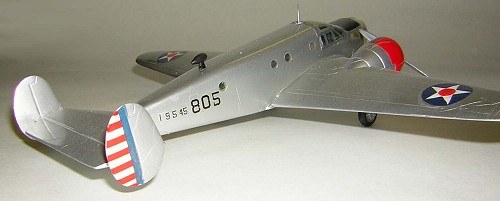
with insignia red. The operation was a complete success.
The
starboard rudder panel was cut from the kit sheet and trimmed of yellow
film. Despite its armor plate appearance, upon touching water it burst into
a zillion shards. A near hopeless search of the spares file proved that
miracles do indeed still happen. Tucked in among the last scraps in the
envelope corner was a single tri-color stripes marking, exactly the correct
height. Slight shortcoming in width could be remedied by a 4/0 brush tipped
with insignia red. The operation was a complete success.
The same mistake would not be made with the port panel. (For variety, a different one would). Disintegration disaster was averted with a double coat of Superscale Liquid Decal Film. The thickened decal held together, but now refused to settle down. A shelf full of setting solutions proved powerless, until the heavy artillery, Solvaset, was brought to bear. The film began to soften and was properly and patiently left overnight to do its own thing. It should have been chaperoned. When checked the next day it had settled and dried, but due to Coriolis Effect, magnetic variation, global warming, or just plain ornery-ness had shifted ten or so degrees from the vertical. Without a replacement there was no hope of a fix, but when the plane was sitting properly on its tail the goof was less noticeable. MORAL: Refer to op-cited Murphey’s Law.
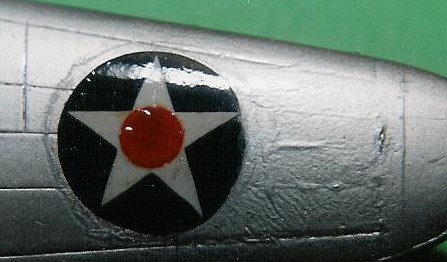 The rest of
the decals decided to join in on the attack. Four properly sized and
colored wing roundels were located but two instantly exploded when immersed
in H2O. The survivors were duly coated with Liquid Film and proceeded to
put up a struggle before they would snuggle down. Fuselage side codes were
individually cut from a numbers sheet; but it had aged and so had my eyes.
I didn’t notice, or by this time didn’t care to notice, that they weren’t
going on straight or that the carrier film was badly silvering. An overcoat
of Future usually takes care of the latter problem.
The rest of
the decals decided to join in on the attack. Four properly sized and
colored wing roundels were located but two instantly exploded when immersed
in H2O. The survivors were duly coated with Liquid Film and proceeded to
put up a struggle before they would snuggle down. Fuselage side codes were
individually cut from a numbers sheet; but it had aged and so had my eyes.
I didn’t notice, or by this time didn’t care to notice, that they weren’t
going on straight or that the carrier film was badly silvering. An overcoat
of Future usually takes care of the latter problem.
Usually, but not always.
If a light coating doesn’t work, then a heavy one surely will, right? Sorry, no. Additional coats only made the silvering more obvious – and introduced a new problem – or rather, an old problem - alligatoring. When a heavy layer of acrylic is overlain onto a heavy layer of enamel that hasn’t been allowed to fully harden (at least a millennium for Testors silver) then the differential shrinking causes not so minute cracks. Ammonia based window cleaners will usually remove Future.
Usually,
but not always.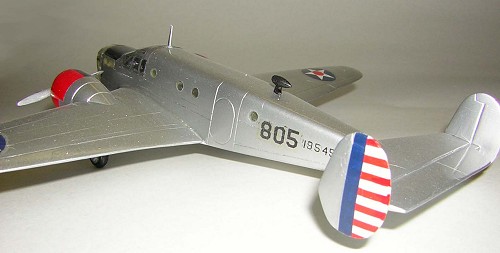
If mild ammonia solution wouldn’t work, then…well, you know the drill by now. The more I piddled with the finish, the worse it got. To avoid repainting damaged areas, I tried panels of silver decal film. Not exactly invisible. You can see the results in the photos. Strips of decal film also make a poor comb-over for unfilled joints – as where the new vacu-roof met the fuselage top.
To finish the botch job, a hasty and uncaring case of windshield framing with Pactra Trim tape, cut too wide, unsuccessfully disguised with even more Future. MORAL: When a project reaches the “I don’t care – just get it out of here” stage, it’s best to give it the old heave ho, take a breather, and start something new.
| CONCLUSIONS |
Sitting on a lower shelf, in poor light and from a distance of about 6 feet, it doesn’t look all that bad.
October 2005
Copyright ModelingMadness.com. All rights reserved. No reproduction in any form without express permission from the editor.
If you would like your product reviewed fairly and fairly quickly, please contact the editor or see other details in the Note to Contributors.
Back to the Review Index Page 2017