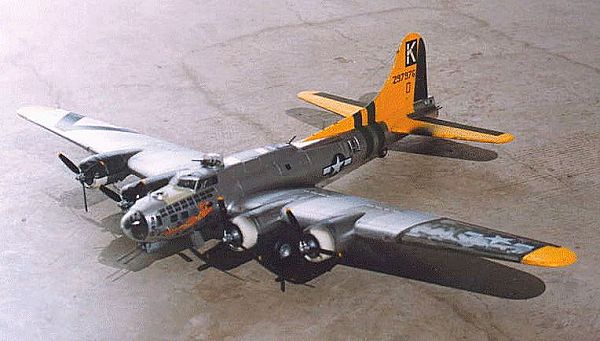
Figure 1 The finished model - "A Bit O'Lace"
Pro Modeller 1/48 B17G Flying Fortress.
Photos and Review by Grenville Davies
I remember my father building my first scale aircraft from Airfix and for some odd reason couldn't wait to get the 1/72 scale B17 with the semi-clad lady on the nose. This huge silver aircraft fascinated me, along with the feminine form nose art. Well many years have passed and I eventually found the kit being offered in 1/48 scale and bought it without hesitation.
I decided to build the B17G version of this kit, 'A Bit O Lace', guess the image of the reclining lady on this aircraft really got to me. It's interesting to note that the box art for the 1/72 scale Airfix kit shows the port outer motor on fire during a daylight raid. The Pro Modeller version has the outer wing tip replaced by an earlier aircraft, which was painted in the olive drab upper and light grey lower. Is this a coincidence or are the two kits inextricably linked?
Figure 1 The finished model - "A Bit O'Lace"
As I wanted to do this kit justice and I went to the trouble of purchasing the three photo-etched brass offerings from Eduard, which are for the exterior, interior and armament (48-208, 48-207 & 48-209 respectively). Now I should state that prior to building this kit I had very little experience with photo etched parts and was not entirely prepared for what lay ahead. I hear chuckles out there for my naivete, along with my optometrist, who is rubbing his hands with glee.
The model is well laid out and the kit provides for even the most fastidious of modellers, it includes a small offering of brass photo etch and the instructions are relatively clear. I had the fortune of having a book specifically on the B17 and used this to full advantage during the construction.
The kit took me an age to construct as most of the detailed work is internal and it seemed to take forever before the two fuselage halves were finally glued.
I did the various sub-assemblies in any order that seemed appropriate, doing work on one whilst another dried. My regret is that I did not take time out to photograph the various stages, as there is a pile of work done inside the body and most is now obscured by the fuselage.
My first stage of construction was to paint the interior of the fuselage in Interior Green from Gunze Sankyo. This was in turn painted over for the detailed area of the crew stations. Photo etched brass was added where required and likewise given the paint treatment.
The internal details around the various workstation areas is quite incredible, even down to a clip-board for the navigators sheets, duly painted brown with the silver clip. Painting each hose and electrical wires became an obsession with constant reference to 'the book'. In retrospect I think the effort was worth it, but you'll have to take my word for it, as I am not about to open up that fuselage for anyone!
The flight deck and bombardier's station were overhauled with brass photo etch. The instrument panel being comprised of acetate sheet and photo etch panel. Throttle levers, bomb door actuators etc were duly glued in position and the whole lot painted. Dry brushing was carried out to highlight the details, which are lost behind the closed fuselage! Still it was fun (?) getting it all together.
The bombardier's area in the original kit is solid plastic with the seat being installed on top of a rotating pin for the chin turret. The photo-etched parts led me to cut the area under the bombardier's seat out and replacing the chair with the brass parts. The seat sits on a semi-open portion of the floor and the pin for the chin turret was duly super glued onto the under-surface, taking care to ensure the turret rotated. This attachment took place after the fuselage halves had been cemented.
In the ProModeller kit there is provision for brass gunbelts and some sights, this was duplicated, to some degree, in the Eduard sets. I eventually went with a mix of both, cutting and bending as necessary. The fixing of the waist guns was achieved by pre-bending the belts and checking position prior to liberal use of glue to get the belts to sit in the ammunition boxes.
By far the most mind boggling exercise was the barrels for each of the guns. Eduard supplies the cooling jackets and calls for the barrels to be cut from the breech mechanisms. I decided to be a little obsessive and rubbed the plastic cooling jackets off before bending and glueing the new barrels in position. Using a small drill the remaining plastic was opened to simulate the barrels. The various bits were then painted in Tamiya's Gunmetal. The waist guns were carefully located around the pivot points and glued into their spots. The port and starboard cheek guns were similarly completed and located. All other guns were not fitted until the fuselage was completed.
I am disappointed with the rear Cheyenne turret, as the sight seems to be too big and the barrels look to be a little short. Also there is no mechanism for the twin-barreled gun to pivot, it is just pushed into position. As time has passed it bugs me more, but I am not going to change it now.
The kit gives you a bomb trolley and four bombs. My photo etched parts allowed me to construct two bomb bay doors and display the bomb racks complete with bombs. This was my preferred option and the final effect was worth the blood, sweat and swearing that took place! I opted to cut the plastic away for the doors, despite the kit part being quite detailed. I had a lot of trouble finding out how the doors were attached other than the actuating levers. I finally decided to use some brass rod and attach it to the back of the door, where it connected to the fuselage, and made a notch in which to sit the rod. The doors were painted Interior Green and left to dry. A light wash with black gave them a weathered appearance. When they were attached I used the photo etch actuating arms from Eduard.

Figure 2 Bomb bay doors, crew access door, exhaust ports - all courtesy
of Eduard
There were two other areas where the fuselage needed to be cut, the first was the rear door and the second the forward hatch under the cockpit. Both parts are highly detailed in the Eduard offerings, complete with internal and external handles and hinges. The rear fuselage door required a thin acetate sheet for the window, this can be made up from the sheet supplied.
Prior to cementing the two fuselage halves I completed each main wing, which involved attaching radiators (photo etch) into the leading edges before cementing the two wing halves together. Once they were dry the wings were attached to each fuselage half. A little putty was used both above and below the wing root and each portion was allowed to cure. The rear tail planes were similarly attached and, once the sub-assemblies for the various crew stations were secured to their relevant halves the fuselage was cemented. I wrapped tape around to help the bond and put the entire construction to one side.
Once it had dried I sanded back the seams and then sprayed Tamiya's Gloss Aluminium over the entire aircraft, having carefully filled wheel wells, cockpit window, front glazing, bomb bay, etc with tissue paper. This paint is enamel, a conscious choice as the paint to go over this surface was acrylic and made the future weathering job easier with a much more stable undercoat.
The next step was to attach the engines to the wings and to commence masking up areas of the wings and rear stabiliser in preparation for coats of yellow paint and olive drab and light grey for the replaced wing tip. These paints were from Tamiya's acrylic range.
The engine nacelles had quite a bit of detailing with wires being attached around the radial motor. The exhaust flanges were also replaced despite the detail on offer in the box. Liberal use of sharp modelling knife and sandpaper eventually had the surface ready for the attachment of the photo etch parts. These pieces were then painted.
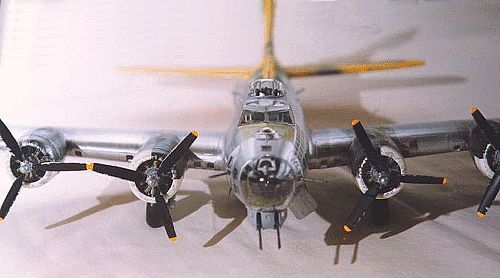
Figure 3 The business end of the B17 - a daunting view for any Luftwaffe
fighter pilot. The brownish colour in the engine nacelles is the wire
harness.
Now a major problem I have with Revell / Monogram kits is the generally poor fit of the clear parts. Unfortunately this kit is no exception with the waist guns being the worst offenders. The detail on these clear parts is exceptional, it is just a shame that the fit to the solid plastic doesn't match the detail. The brass photo etch had window frames for the cockpit, as well as windshield wipers. These were used by sanding off the clear plastic and then carefully glueing the brass in position. The frames were then painted. It was necessary to trim the brass along the port and starboard windscreens as they were a little too long, but once trimmed the fit was passable. This window was merely pushed into position as was the upper turret allowing removal to see some of the internal details. OK I admit that it may be necessary to use a hand lens, but details are visible! Check out the picture below.
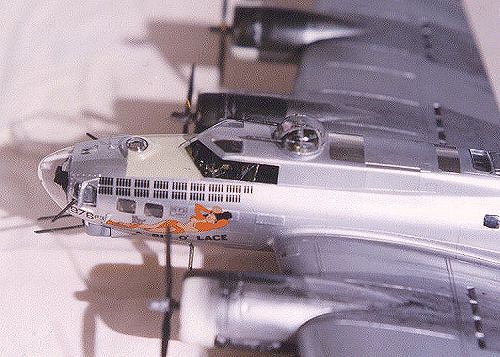
Figure 4 Port side of "A Bit O'Lace" windscreen removed to show interior
When all the paint had dried I commenced the weathering of the aircraft. From all I had read, plus the excellent detail supplied by ProModeller, it is apparent that this aircraft was battle weary. Her engines leaked oil that sprayed back along the wings and, in the case of the inner port engine, oil had spread back to the port tailplane. The wing leading edges and stabiliser were pitted and the port wing tip had suffered prior to being attached to 'A Bit O Lace'. The whole aircraft needed a face-lift!
To simulate the wing leading edge pitting I scraped paint off from the underlying enamel-based Gloss Aluminium. This works reasonably well. Simulating the jet-streamed, smeared oil was a little tougher with the airbrush being used with thinned Tamiya Smoke. To obtain the effect of different panel shades some were hand painted with Tamiya Flat Aluminium. Other panels were overlain with Bare Metal Foil. No rhyme or reason was entertained during this process, poetic / artistic licence prevailed.
The replacement port wing tip received some special treatment. Before the Olive Drab had dried I used a cue-tip, soaked in thinners to open up areas of the paint to reveal the bare metal underneath. This was done in conjunction with the supplied decal and judicious use of a blade! The lower portion was similarly treated.
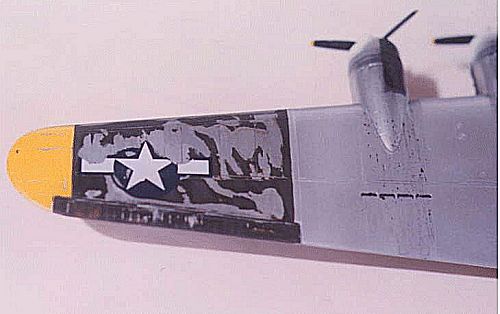
Figure 5 Upper surface of Port replacement wing
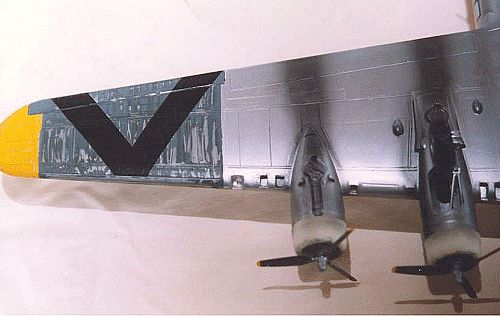
Figure 6 Lower surface of Port replacement wing
Once the decals were applied the aircraft was sprayed with a coat of clear to fix them in position. No problems with crinkling for the most part.
The final stage was the fixing of all windows not cemented, and subsequently masked for painting, attaching small aerials and other external bits. The forward chin turret was super-glued to the bombardier's seat and the ball turret was pushed up into it's receptacle.
Aerial's were made from clear sprue, stretched after heating and painted silver. The attach point, just forward of the single machine gun aft of the turret, was effected using a small drill.
All in all this was the most challenging aircraft I have built to date from the viewpoint of detail and research into the aircraft. I think the final product is worth the effort, you be the judge.
A word of caution, despite the hours put into this kit I still look at it and think how I can improve the effects. Leave it alone and go and buy another kit.