Tamiya 1/48 P-47D Thunderbolt
|
KIT # |
61090 |
|
PRICE: |
$41.00 MSRP |
|
DECALS: |
see review |
|
REVIEWER: |
|
|
NOTES: |
Superscale, Ultracast and True Details used. |
|
HISTORY |
 I read this article, Lee hit right on the head how I
like to approach the subjects that I build. Now don’t get me wrong, the
aircraft of Gentile, Preddy, Hartmann, etc. are VERY cool but there are
about a bazillion models of them out there (of course here’s calling
the kettle black - I have the markings for every one of their mounts
mentioned here). Yes eventually there will be a “Shangri-la” and
“Cripes-a- Mighty” and more than one Bf-109 which will include Hartmann
on my shelf but for the most part, I like to build the oddball or not so
famous.
I read this article, Lee hit right on the head how I
like to approach the subjects that I build. Now don’t get me wrong, the
aircraft of Gentile, Preddy, Hartmann, etc. are VERY cool but there are
about a bazillion models of them out there (of course here’s calling
the kettle black - I have the markings for every one of their mounts
mentioned here). Yes eventually there will be a “Shangri-la” and
“Cripes-a- Mighty” and more than one Bf-109 which will include Hartmann
on my shelf but for the most part, I like to build the oddball or not so
famous.
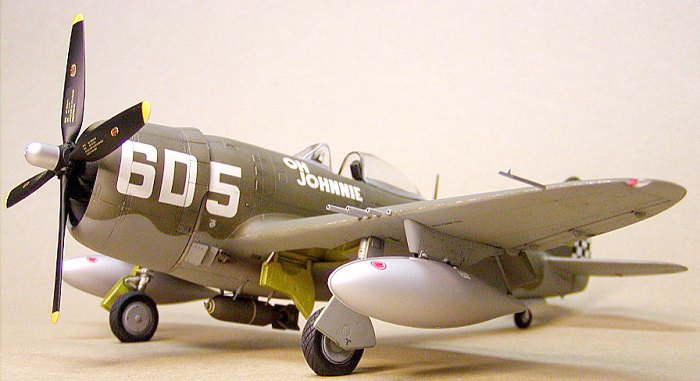
So where does this blathering lead? A few years back, I was looking through one of my favorite books "Republic's P-47 Thunderbolt/From Seversky to Victory" and saw a color profile for a P-47D flown by Lt. Raymond L. Knight. The markings for his aircraft struck my fancy (you can never go wrong with checkerboard in any way shape or form IMHO) so I decided I would eventually build his aircraft. Having never heard of Lt. Knight (I’m sure some of you aircraft aficionados have), I started my quest for information about this pilot.
History
Raymond Knight enlisted in the Army Air Corps on Oct 12, 1942. His flight training took place in his home state of Texas and upon completion, he was commissioned as a 2nd Lt. in May 1944. He served at various duty stations within the U.S. before being shipped overseas and assigned to the 350th FG/346th FS operating in Italy around November of 1944. During his assignment with the 346th FS he flew 82 combat missions where he earned various air medals including the DFC. Unfortunately, now 1st Lt. Raymond lost his life in April 25, 1945 while returning from a series of missions he personally led over a two-day period. Such a shame since the end of the war was only a couple of weeks away. For his actions and selflessness, Lt. Knight was awarded the Congressional Medal of Honor (CMH) posthumously. Rather than try to explain how Lt. Knight earned his CMH, I’ll let the citation describe his feats:
“He piloted a fighter-bomber aircraft in a series of
low-level strafing missions, destroying 14 grounded enemy aircraft and
leading attacks which wrecked 10 others during a critical period of the
Allied drive in northern Italy. On the morning of 24 April, he
volunteered to lead 2 other aircraft against the strongly defended enemy
airdrome at Ghedi. Ordering his fellow pilots to remain aloft, he skimmed
the ground through a deadly curtain of antiaircraft fire to reconnoiter
the field, locating 8 German aircraft hidden beneath heavy camouflage. He
rejoined his flight, briefed them by radio, and then led them with
consummate skill through the hail of enemy fire in a low-level attack,
destroying 5 aircraft, while his flight accounted for 2 others. Returning
to his base, he volunteered to lead 3 other aircraft in reconnaissance of
Bergamo airfield, an enemy base
 near Ghedi and known to be equally well
defended. Again ordering his flight to remain out of range of
antiaircraft fire, 1st Lt. Knight flew through an exceptionally intense
barrage, which heavily damaged his Thunderbolt, to observe the field at
minimum altitude. He discovered a squadron of enemy aircraft under heavy
camouflage and led his flight to the assault. Returning alone after this
strafing, he made 10 deliberate passes against the field despite being
hit by antiaircraft fire twice more, destroying 6 fully loaded enemy
twin-engine aircraft and 2 fighters. His skillfully led attack enabled
his flight to destroy 4 other twin-engine aircraft and a fighter plane.
He then returned to his base in his seriously damaged plane. Early the
next morning, when he again attacked Bergamo, he sighted an enemy plane
on the runway. Again he led 3 other American pilots in a blistering
low-level sweep through vicious antiaircraft fire that damaged his plane
so severely that it was virtually nonflyable. Three of the few remaining
enemy twin-engine aircraft at that base were destroyed. Realizing the
critical need for aircraft in his unit, he declined to parachute to
safety over friendly territory and unhesitatingly attempted to return his
shattered plane to his home field. With great skill and strength, he flew
homeward until caught by treacherous air conditions in the Appennines
Mountains, where he crashed and was killed. The gallant action of 1st Lt.
Knight eliminated the German aircraft which were poised to wreak havoc on
Allied forces pressing to establish the first firm bridgehead across the
Po River; his fearless daring and voluntary self-sacrifice averted
possible heavy casualties among ground forces and the resultant slowing
on the German drive culminated in the collapse of enemy resistance in
Italy.”
near Ghedi and known to be equally well
defended. Again ordering his flight to remain out of range of
antiaircraft fire, 1st Lt. Knight flew through an exceptionally intense
barrage, which heavily damaged his Thunderbolt, to observe the field at
minimum altitude. He discovered a squadron of enemy aircraft under heavy
camouflage and led his flight to the assault. Returning alone after this
strafing, he made 10 deliberate passes against the field despite being
hit by antiaircraft fire twice more, destroying 6 fully loaded enemy
twin-engine aircraft and 2 fighters. His skillfully led attack enabled
his flight to destroy 4 other twin-engine aircraft and a fighter plane.
He then returned to his base in his seriously damaged plane. Early the
next morning, when he again attacked Bergamo, he sighted an enemy plane
on the runway. Again he led 3 other American pilots in a blistering
low-level sweep through vicious antiaircraft fire that damaged his plane
so severely that it was virtually nonflyable. Three of the few remaining
enemy twin-engine aircraft at that base were destroyed. Realizing the
critical need for aircraft in his unit, he declined to parachute to
safety over friendly territory and unhesitatingly attempted to return his
shattered plane to his home field. With great skill and strength, he flew
homeward until caught by treacherous air conditions in the Appennines
Mountains, where he crashed and was killed. The gallant action of 1st Lt.
Knight eliminated the German aircraft which were poised to wreak havoc on
Allied forces pressing to establish the first firm bridgehead across the
Po River; his fearless daring and voluntary self-sacrifice averted
possible heavy casualties among ground forces and the resultant slowing
on the German drive culminated in the collapse of enemy resistance in
Italy.”
How could I not build a model of this aircraft as a tribute to the man and the machine?
|
THE KIT |
Since I'msure the kit has been reviewed/discussed ump-teen million times here and other sites, I’ll just say “Tamiya P-47D Bubbletop.” Need I say more? Can we say N-O-P-E? I think we can.
|
CONSTRUCTION |
My friends who know me know that I have this
addiction to every little resin goody I can lay my hands on when it comes
to building, if it’s not made then I’ll scratch build it. I blame this on
my early days as a 3-4 year old kid working on my very first
 model kit
(circa 1968-69) and getting that first whiff of Testor’s tube glue
(Thanks Dad!). So before I bought the kit I was thinking, “What resin
goodies do I need for it?” When I finally broke down and bought one, I
was able to answer that question with “Not much.” The kit started off
with the usual research but I wanted to keep this build as simple as
possible while at the same time doing justice to Lt. Knight’s aircraft.
model kit
(circa 1968-69) and getting that first whiff of Testor’s tube glue
(Thanks Dad!). So before I bought the kit I was thinking, “What resin
goodies do I need for it?” When I finally broke down and bought one, I
was able to answer that question with “Not much.” The kit started off
with the usual research but I wanted to keep this build as simple as
possible while at the same time doing justice to Lt. Knight’s aircraft.
First things first, breaking out that lovely color
of Testors Chromate Yellow (the kind that comes in the small ¼ ounce
bottle) adding a few drops of Flat Black and spraying the appropriate
parts. These were then dry brushed with a slightly lighter shade of
chromate yellow to bring out the highlights. My gear doors suffered from
some ejector pin sink marks but nothing a little Mr. Surfacer 500 and
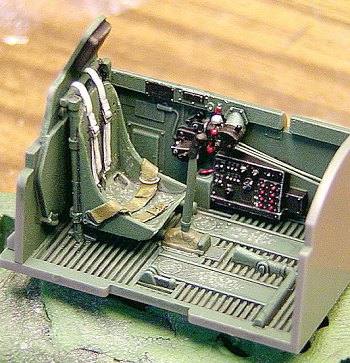
careful sanding to keep the rivet detail. Cockpit was painted Euro 1 Dark
Green (a sincere Thank you to my friend Tom Cleaver for pointing me in
the right direction) (you can also use Humbrol #88 if you can't
find Euro 1 green. Ed) with all the detail painting/weathering added.
If you want to detail your cockpit to the “Nth degree,” go for it. In
reality there isn’t a whole lot you need to add unless you want to go
really nutso. I was VERY impressed how well the kit decal for the
instrument panel worked out. I placed the decal and hit it with some Mr.
Mark Softer then left it dry. After that, Testors Dullcoat and some
Future on the instrument faces did the trick, no need for after market
there. I did replace the kit seat with one from Ultrcast, thus starting
the satisfaction of adding resin goodies. I modified the kit gun sight
since the reflector glass is a tad thick for me. Broke out the Dremel,
carefully ground out the reflector glass leaving the mounts and replaced
it with some .005 clear acetate. Lastly I added the linkage for the
throttle quadrant and the associated wiring to the back of the instrument
panel, not all of it, just some of it. Again I blame all of this on a bad
case of AMS that I really am trying to cure.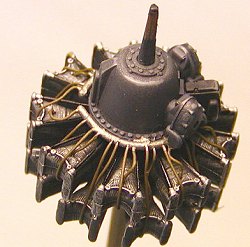
Other modifications to the kit included going wacky
on the R-2800 and drilling out all the lovely little holes in the kit
ignition harness (molded with the front engine case) as well as
the cylinders with a #79 drill so I could roughly simulate the associated
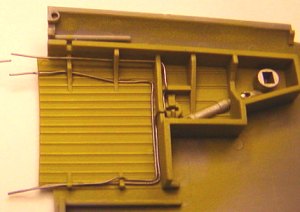
plug wires. I then decided to get real wacky and add most of the major
plumbing to the wheel wells (I’m now wondering what happened to the
“keep it simple” thought?). I also added brake lines to the main
gear, this was accomplished by drilling out .010 rod with a #79 drill bit
then cutting these into small sections to represent the attach points for
the brake lines. I used the same .010 lead fishing line I used for the
ignition harness for the engine. Canopy and windscreen were dipped in
Future, masked and the front windscreen was glued place. As for the
options of the drop tanks, I just loved the look of those 165-gallon
behemoths sitting under the
 wings. The other thing that persuaded me was
looking at pictures of T-bolts serving in the MTO with these tanks
attached. The only real thing I had to scratch build concerning the drop
tanks was the aft stabilization bar associated with the wing pylons.
These are molded as part of the pylon but I wanted to show these extended
to stabilize the drop tanks. These were made with .010 styrene rod and
sheet, even though not 100% accurate in shape and a touch large for
scale, they look close enough. The fuel lines to the drop tanks were also
added. I did replace the kit tires with True Details wheels (OOOH more
resin) but I ended up breaking out the BAF (my bud Steve Mesner’s
loving nickname for a Big A** File) and filing
down the over stated bulges. After this was completed, I sanded this all
down with 600 grit wet/dry sandpaper to blend it all in.
wings. The other thing that persuaded me was
looking at pictures of T-bolts serving in the MTO with these tanks
attached. The only real thing I had to scratch build concerning the drop
tanks was the aft stabilization bar associated with the wing pylons.
These are molded as part of the pylon but I wanted to show these extended
to stabilize the drop tanks. These were made with .010 styrene rod and
sheet, even though not 100% accurate in shape and a touch large for
scale, they look close enough. The fuel lines to the drop tanks were also
added. I did replace the kit tires with True Details wheels (OOOH more
resin) but I ended up breaking out the BAF (my bud Steve Mesner’s
loving nickname for a Big A** File) and filing
down the over stated bulges. After this was completed, I sanded this all
down with 600 grit wet/dry sandpaper to blend it all in.
|
CAMOUFLAGE & MARKINGS |
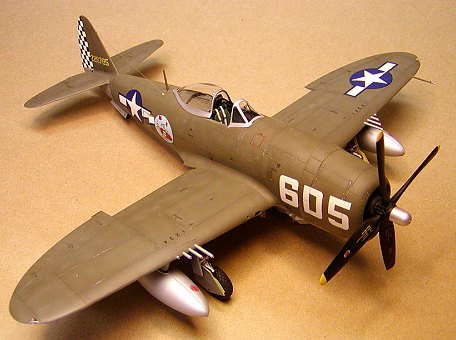
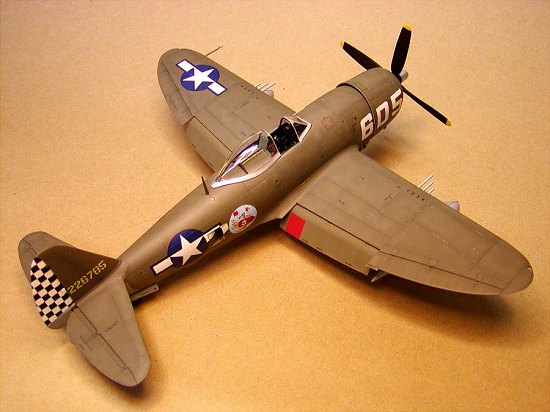
With the cockpit masked off, the aircraft was
pre-shaded with Flat Black along the panel lines on the bottom and Army
Helo Drab on the top. The bottom of the aircraft was then sprayed with
some of my last remaining enamel Floquil Neutral Gray (I will cry when
that bottle runs out) with the top sprayed in MM Olive Drab. Since
this aircraft was one that was negotiated back from the Forca Aerea
Brasileira (FAB) which was stationed on the same airfield as the
350th FG, I wanted to have the Olive Drab lighter than Dark Olive Drab.
I’d seen pictures of Brazilian P-47’s that were as dark as the standard
AAF P-47’s and I’ve seen them lighter than the standard paint scheme. I
went with the lighter look since IMHO I think it’s adds a tad bit
 more
character to the project. To get a weathered look on my aircraft, after
the Olive Drab was sprayed, I took some additional OD, added some white
to it and then added the lightened OD to give her a slightly
faded/weathered look.
more
character to the project. To get a weathered look on my aircraft, after
the Olive Drab was sprayed, I took some additional OD, added some white
to it and then added the lightened OD to give her a slightly
faded/weathered look.
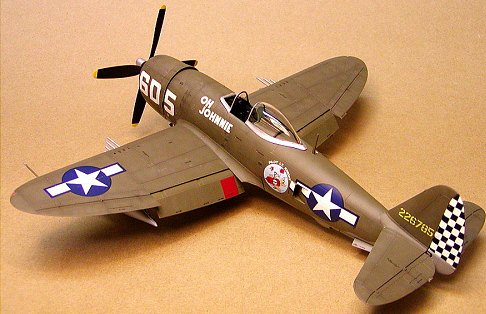
As for the color of the drop tanks, looking at my various references boy did I have a choice. I found pictures of them in NMF, Neutral Grey, and Olive Drab. A few black and white pictures would almost tend you to think some tanks were either Dark Olive or even Black. Since I wanted color to break up the OD/NG painting of the kit, I decided to go with NMF. I initially went through the whole process of painting the tanks gloss black and then painting them Alcald II Aluminum. These looked to polished/bright for me so I stripped the tanks back down and painted them Floquil Old Silver. This looked much better for this application but now I’m totally excited about doing a NMF a/c since I seem to have this Alclad II thing licked (Hmmmm, Monogram F-80?).
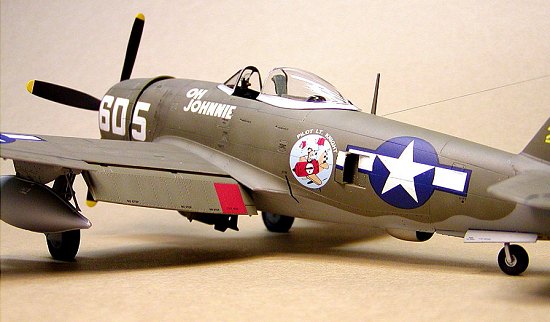
As for the markings, I had never seen any after market producers make the markings for Lt. Knight (hadn’t really looked either) and I was figuring on having custom transfers made. To make a long story short, the hero of the day, one Mr. Scott Van Aken, pointed me in the right direction advising me that not only did Superscale make these markings, but at the time they were on sale on Squadron’s website. Thanks Scott! A call to Squadron, $3.92 and some other goodies later and I had Lt. Knight’s markings headed my way. You know, sometimes things just seem to fall into place. The decals were applied in your standard fashion using Testors Gloss Coat as the base and using Micro Sol/Set and at times Mr. Mark Softer for the decals. I was able to find two actual pictures of Lt. Knights aircraft, the aircraft for the most part showed slight chipping and some varied fading so that is the way I wanted to present this kit.
|
FINAL CONSTRUCTION |
 After painting/decals and minor weathering, all of
the extra goodies were added such as the gear/gear doors, drop tanks,
etc. I did run into a little bit of a minor disaster when in the moment
of painting some details I managed to drop the kit and have the left
horizontal stab break off as well as 2 of the belly sway braces. I can't
repeat what was said but I'm sure that most of you can relate, add your
own adjectives in the space provided here (*******). I glued the stab
back on and replaced all 4 sway braces with streched sprue and .005
styrene punched out with my Waldron Punch & Die set. Antenna wire was
made from 7x tippet (for all you fly fishing types out there) that
was then painted steel and “POOF” she was done.
After painting/decals and minor weathering, all of
the extra goodies were added such as the gear/gear doors, drop tanks,
etc. I did run into a little bit of a minor disaster when in the moment
of painting some details I managed to drop the kit and have the left
horizontal stab break off as well as 2 of the belly sway braces. I can't
repeat what was said but I'm sure that most of you can relate, add your
own adjectives in the space provided here (*******). I glued the stab
back on and replaced all 4 sway braces with streched sprue and .005
styrene punched out with my Waldron Punch & Die set. Antenna wire was
made from 7x tippet (for all you fly fishing types out there) that
was then painted steel and “POOF” she was done.
|
CONCLUSIONS |
So what did I think of the project when she was completed? First, I think I’m one of the few people who can take a shake and bake kit like this and spend a couple of months on it with only modest additions to her (to many other things to do get done like fishing). Second, it was nice to FINALLY have an AAF bird sitting on the shelf, as I was telling Steve, I don’t even have a P-51, P-38, or P-40 sitting on my shelf (GASP!). Third, having never heard of Lt. Knight and his exploits before doing a little research, I have a tribute in my own little way to a pilot and his machine that like many others, had made the ultimate sacrifice for his country. Thanks for letting me stop by but it’s time to get back to fishing. There’s still some Kings and Silvers out there with my name on ‘em not to mention winter run Steelhead are right around the corner! Be good to each other and we’ll see ya’ll on the river.
|
REFERENCES |
Detail and Scale Vol. 54 P-47 Thunderbolt by Bert Kinzey
Squadron Walk Around #11 P-47 Thunderbolt
Republic's P-47 Thunderbolt/From Seversky to Victory by Warren M. Bode
November 2003
Copyright ModelingMadness.com If you would like your product reviewed fairly and
fairly quickly, please contact
the editor or see other details in the Note to
Contributors.