Special Hobby 1/72 Vultee Vengeance
|
KIT # |
72034 |
|
PRICE: |
£ |
|
DECALS: |
3 options |
|
REVIEWER: |
|
|
NOTES: |
Short run with nudie bits....... |
|
HISTORY |
 Designed under the
designation V-72 and inspired by the success of the Ju 87 Stuka, the
aircraft that would eventually be named Vengeance by the British was
developed as a dive bomber by the Vultee Corporation. One of few U.S.
military aircraft who's initial development was not aided by government
finance, the V-72 was intended for sale to export markets. Large numbers
(for the time) were sold to Brazil, China, Turkey, and the USSR. In 1940 the British purchased 700 V-72s (400 of
which were manufactured by Northrop), and with the introduction of
lend-lease in 1941, the U.S. ordered 300 more examples for the British
under the designation A-31. The majority of British Vengeances served in
Burma, where they enjoyed considerable success. When the U.S. entered the
war, it commandeered 243 of the aircraft meant for Britain, and later had
even more Vengeances manufactured for the USAAF under the designation
A-35.
Designed under the
designation V-72 and inspired by the success of the Ju 87 Stuka, the
aircraft that would eventually be named Vengeance by the British was
developed as a dive bomber by the Vultee Corporation. One of few U.S.
military aircraft who's initial development was not aided by government
finance, the V-72 was intended for sale to export markets. Large numbers
(for the time) were sold to Brazil, China, Turkey, and the USSR. In 1940 the British purchased 700 V-72s (400 of
which were manufactured by Northrop), and with the introduction of
lend-lease in 1941, the U.S. ordered 300 more examples for the British
under the designation A-31. The majority of British Vengeances served in
Burma, where they enjoyed considerable success. When the U.S. entered the
war, it commandeered 243 of the aircraft meant for Britain, and later had
even more Vengeances manufactured for the USAAF under the designation
A-35.
The most successful user the of the Vengeance was the RAAF who used the aircraft extensively throughout SEA during the war. In all 342 Aircraft served with the RAAF including Dive bombers, trainers and target tugs.
|
THE KIT |
 Special
Hobby’s Vultee Vengeance Mk I/II is a mixed media construction kit with
some 20 well moulded injection plastic pieces and 14 finely detailed
resin parts. The detail on the wings and fuselage would equal anything
that came out of the Tamigawa stable being fine and crisp.
Special
Hobby’s Vultee Vengeance Mk I/II is a mixed media construction kit with
some 20 well moulded injection plastic pieces and 14 finely detailed
resin parts. The detail on the wings and fuselage would equal anything
that came out of the Tamigawa stable being fine and crisp.
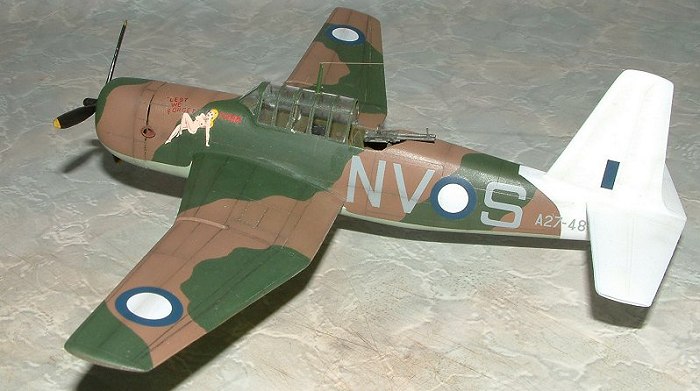
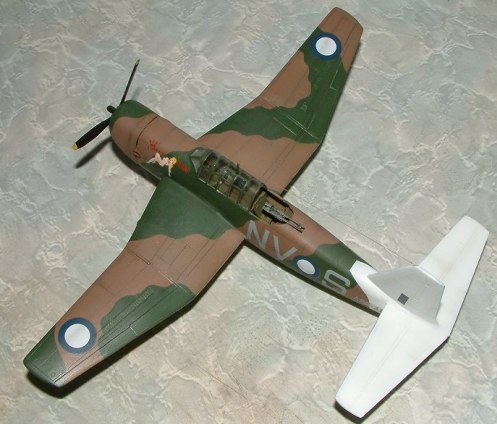
Instructions consist of several sheets, most of these taken up with camouflage and painting instructions for the three different sets of marking that come with the kit. Speaking of marking you get a MkI Vengeance from RAAF AB Cooktown 1943, a Mk II RAF in India 1943 with the “saint” nose art and the R18 “Lest we forget” another Mk I RAAF 23th Squadron AB Nadzab 1944. This particular aircraft is the one depicted on the box art with a rather lovely lady adorning the nose.
The only errors I could find was the kit only supplied one 50’ cal machine gun whereas most of the RAAF aircraft where fitted with two. Separate nosecones are supplied for both the Mk I and Mk II.
|
CONSTRUCTION |
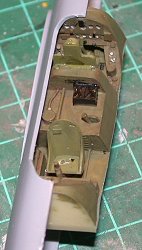 The
resin cockpit is a work of art in it’s self, never have I seen so much
crammed into so little! The heart of the cockpit is a one piece resin
plug that needs no other work other than painting add to that the finely
detailed resin seats and you have a cockpit as good as anything from that
48th scale.
The
resin cockpit is a work of art in it’s self, never have I seen so much
crammed into so little! The heart of the cockpit is a one piece resin
plug that needs no other work other than painting add to that the finely
detailed resin seats and you have a cockpit as good as anything from that
48th scale.
The finished cockpit was superglued into the fuselage half without any trimming being needed at all, before closing up the fuselage though DON’T forget to put in the rear tailwheel support like I did , it makes for a tricky time latter when you try to glue the tailwheel into a cavernous hole.
Through away your filler for this baby, all the was needed to hide the join lines was a quick swish of the wet-n-dry (wet, shaken but not stirred ) and onto the wings.
 Errr
now we come to a slight error in the plans, according to the instructions
if you followed them to the letter would have you glue the wings on
backwards, umm wait a minute, the instructions are right, it’s the plane
with the wings around the wrong way! Yes well, for modelers not familiar
with the Vengeance I assure you the wings do have a forward crank to
them, fit was again excellent with only a touch of sanding needed along
the leading edge to eliminate the join line. One point to note is the
wings butt join to the fuselage with no tabs, so it’s up to you to get
the alignment correct.
Errr
now we come to a slight error in the plans, according to the instructions
if you followed them to the letter would have you glue the wings on
backwards, umm wait a minute, the instructions are right, it’s the plane
with the wings around the wrong way! Yes well, for modelers not familiar
with the Vengeance I assure you the wings do have a forward crank to
them, fit was again excellent with only a touch of sanding needed along
the leading edge to eliminate the join line. One point to note is the
wings butt join to the fuselage with no tabs, so it’s up to you to get
the alignment correct.
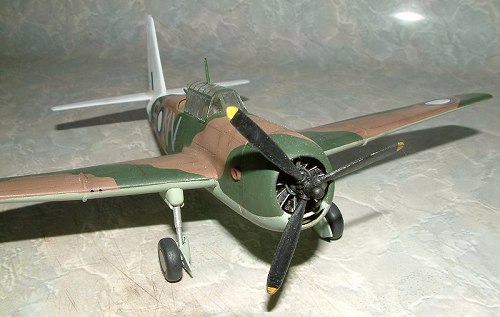
The only fit problems encountered with the kit was the assembly of the nose cowling, the cowling comes in three pieces enabling you to make both the Mk I and the Mk II (The Mk II has two intakes the to Mk I’s one) filler wasn’t needed but a lot of sanding was required to smooth the three pieces together around the nicely detailed resin engine.
The exhausts come as separate resin pieces and you will have to trim the cowling exhaust holes just slightly to get them to fit properly, but they look very real once in place.
The undercarriage presented a challenge due to the fact that I had forgot to put the rear tailwheel plug in and had nothing but a very large hole to anchor the wheel in, in the end I managed to insert a length of shaved down sprue and get it stuck in a position that would allow me to add the tailwheel, a lot of frustration that could have been avoided if I had just done one last final check of the plans before closing up the fuselage.
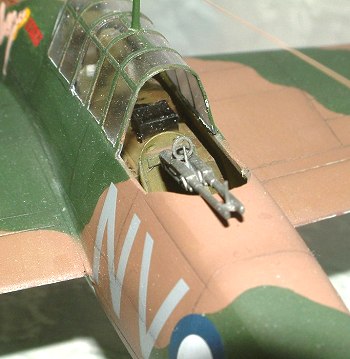
Last construction steps consisted of assembling the propeller using the resin hub and the separate plastic blades, looks a little daunting to start with but with a little bit of patience it goes together alright, with the addition of the Vacuformed canopy that I cut down to show the rear gunners position and the addition of two 50’s from a Hasegawa B17 with scratchbuilt sights the main construction was done.
|
CAMOUFLAGE & MARKINGS |
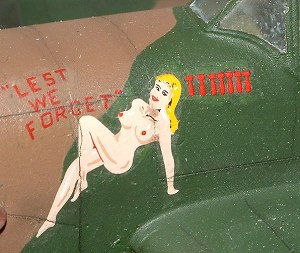 This
particular version of the Vengeance is a “Nose Art” release with all
three versions of the decals having nose art, as soon as this kit arrived
from FBN/MM I knew which version it would be, the “ lest we forget” Mk I
Vengeance from No 23 Squadron RAAF with the naked bird across one third
of the nose! This particular plane was painted the standard RAAF scheme
of Foliage green/Earth Brown/Sky with a white tail.
This
particular version of the Vengeance is a “Nose Art” release with all
three versions of the decals having nose art, as soon as this kit arrived
from FBN/MM I knew which version it would be, the “ lest we forget” Mk I
Vengeance from No 23 Squadron RAAF with the naked bird across one third
of the nose! This particular plane was painted the standard RAAF scheme
of Foliage green/Earth Brown/Sky with a white tail.
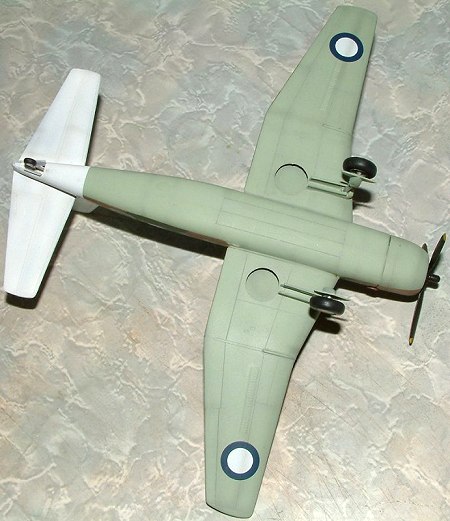
The
first color to be applied was the Sky underside, once dry it was masked
off and the Earth brown airbrushed on. The camouflage pattern was then
masked up using masking tape that has been “de-stikied” by running it
across the edge of a table top, this removes a little bit of the stick
and is a quick fix when you have run out of Drafting tape. The brown was
masked off and the Foliage Green sprayed on and left to harden for a few
days.
With the main painting done it was time to do the white tail, now most
of the time you would paint the white tail first then move onto the
camouflage, due to the rather tight and complex curve of the line it was
easier to mask off the camouflage colors as there is more room to
position the tape. Humbrol Matt white made short work of the Brown and
Green overspray anyway and only two coats where needed to get a good
coverage of white.
 With
the painting out of the way it was time to get to the good bit, the bit I
had been waiting for on this model, the Decals and in particular the
“lady”. Once the surface had been prepped with Future it was time to R18
her.
With
the painting out of the way it was time to get to the good bit, the bit I
had been waiting for on this model, the Decals and in particular the
“lady”. Once the surface had been prepped with Future it was time to R18
her.
The decals are very very thin and care is needed in applying them, the Lady silvered slightly around the writing despite my best efforts to stop it so when she was dry a little bit of careful hand painting touched up the slivered bits with all the decaling done a coat of Future was applied to seal the decals and then it was off to the paint shop again for the final coat of Matt varnish and the weathering.
I decided to do a bit of post shading with Tamiya smoke on this on just to se how it stacked up against the usual method I use of pastels. The end result was about the same so I will use both methods in the future depending on my motivation, if I cant be bothered with cranking up the airbrush then I will just use pastels.
|
CONCLUSIONS |
Very easy Kit to do along mainstream in fit and quality of engineering apart from the lack of locating pins and tabs for the wings, well detailed and fitting, apart from the cowling and user (idiot) errors, I would recommend this kit to a novice that is wanting to try their hand at their first multimedia kit as the resin in this kit is just so easy to work with. Pity about the wings being on backwards though J
My thanks to FBN/MM for the review sample.
|
REFERENCES |
Fighting Aircraft Of WW II
Vultee Vengeance Profile Series
November 2003
Copyright ModelingMadness.com
If you would like your product reviewed fairly and fairly quickly, please contact the editor or see other details in the Note to Contributors.