Airfix 1/72 SBD Dauntless
|
KIT # |
? |
|
PRICE: |
£ |
|
DECALS: |
See review |
|
REVIEWER: |
|
|
NOTES: |
Second hand kit |
|
HISTORY |
Rather than repeating history, may I suggest that you go here and have a look at the history of this particular aircraft in RNZAF service
|
THE KIT |
 The Dauntless was
one of three “bagged” kits I picked up from Trademe (A NZ ebay clone) for
$10 that where complete but minus boxes, instructions and decals.
The Dauntless was
one of three “bagged” kits I picked up from Trademe (A NZ ebay clone) for
$10 that where complete but minus boxes, instructions and decals.
The Dauntless is typical Airfix, love or loath them with heavy rivets and raised panel lines, minimal cockpit (read zip) which can’t be seen under the rather thick canopy anyway. I can’t comment on the instruction or decal sheets as there wasn’t any, but I usually have no problems with Airfix decals “if” they are in register.
Two type of cowling are supplied with the kit along with the generic bomb found on most other Airfix kits.
|
CONSTRUCTION |
 Early on in the
piece I decided to really punish myself with this one and drop-n-drill
the dive brakes Yikes! So the first order of the day was to remove the
dive brakes from the wings using the pin in a vice scoring method. After
numerous passes the dive brakes separated from the wings and then the fun
really began after cleaning up the panels, drilling all those sodding
holes, where’s the photo etch companies when you need them, oh that’s
right they think that modeling starts at 1/48th scale
J.
Airfix thoughtfully provide deep indents for the holes so it was an easy
job with the motor tool to drill out the 100 odd holes, not hard but time
consuming.
Early on in the
piece I decided to really punish myself with this one and drop-n-drill
the dive brakes Yikes! So the first order of the day was to remove the
dive brakes from the wings using the pin in a vice scoring method. After
numerous passes the dive brakes separated from the wings and then the fun
really began after cleaning up the panels, drilling all those sodding
holes, where’s the photo etch companies when you need them, oh that’s
right they think that modeling starts at 1/48th scale
J.
Airfix thoughtfully provide deep indents for the holes so it was an easy
job with the motor tool to drill out the 100 odd holes, not hard but time
consuming.
Once the dive brakes were finished the rest of the plane was sanded down to remove the rivets and raised panel lines. Using drawings and plans found on the internet the panel lines were rescribed and rivets added using a pin chucked in the end of an old modeling knife. I took this opportunity to thin the trailing edges as well as this is the single biggest difference between the “sharpness” of Tamigawa and the older kits like Frog and Airfix, it’s amazing how just thinning the trailing edges of the plane can make a huge difference to the overall look of the kit.
Now the prep work
was out of the way the assembly could begin with the cockpit using the
“generic” home cast hot glue gun panels and bits of plastic card and
wire. The whole l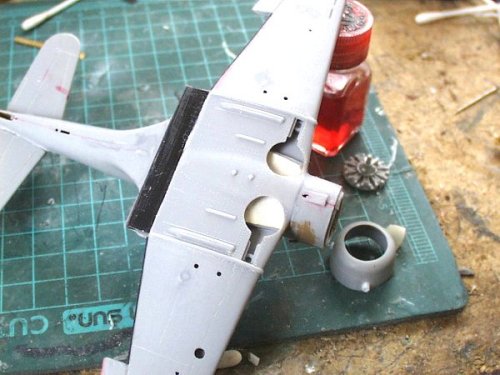 ot
was then painted up, dry brushed and the fuselage slapped together. The
fit was very good with no filler being needed.
ot
was then painted up, dry brushed and the fuselage slapped together. The
fit was very good with no filler being needed.
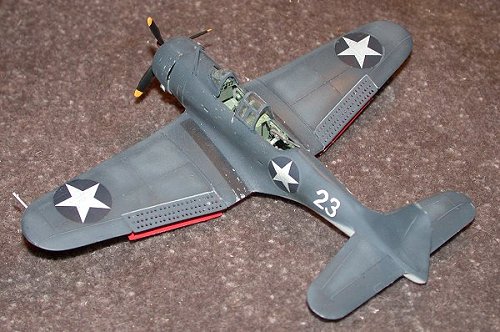
Wings were then mated up to the fuselage with the resulting gap filled with a little of what I like to call my “Mrs filler” a sludge consisting of one part Tamiya filler and 3 parts nail polish remover giving the Tamiya filler the consistency of very thick paint. Just as good as Mr Filler and a lot cheaper and easier to get. 5 thou plastic card was used to blank off the see thru look in the wheel wells and the drive brakes cut from the lower wings.
The cowling came under some major work to remove the groves and lumps left over from worn molds, the trailing edges of the cowling were thinned right out and the cooling fins added exhausts were drilled out and stacks add using small pieces of cut down Q-tip stems that are just the right diameter for 1/72nd scale aircraft.
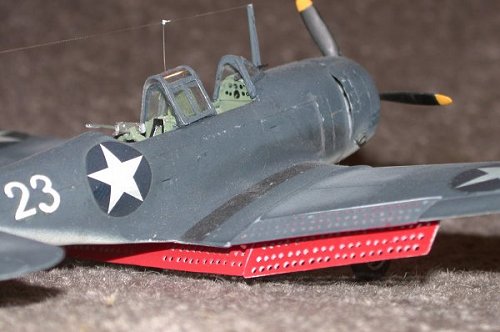
The canopies were Futured and masked up and once glued on a little white glue helped to blend the center section into the fuselage. The generic bomb was left off as this plane was only flown around Auckland and I doubt if she could have made off the deck with the extra weight!
|
CAMOUFLAGE & MARKINGS |
I wanted to do this
as a RNZAF bird right from the start but had run out of WWII RNZAF
roundels so after a bit of poking around found some color profiles
showing one of the first 25 clapped out old wrecks that were delivered to
Auckland on 31st July 1943.
4 of these aircraft were reputed to have
seen service at the battle of the Coral Sea and the initial battles for
Gua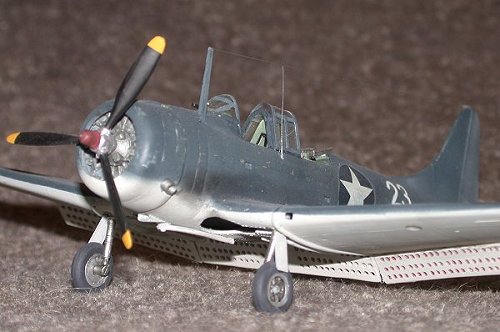 dalcanal. So as you can imagine they were pretty rough with badly
weathered paint and war worn engines.
dalcanal. So as you can imagine they were pretty rough with badly
weathered paint and war worn engines.
Before these planes were serviced and repainted they were pressed into training service with the original US markings with only a crudely hand painted number on the rear fuselage and nose to denote it entering Kiwi service.
The coloring consisted of the standard US blue-grey M-485 that was very worn and faded with many patch jobs in various shades underside were a M-495 Light grey badly in need of a steam clean.
I started out by using Tamiya medium blue and adding drops of light grey to it until I got a faded patchy look, various panels were then lightened and darkened. The underside started out a Tamiya light gray that was the dirtied up with pastels. Post shading and exhaust stains were done with pastels and paint chips added using a silver pen.
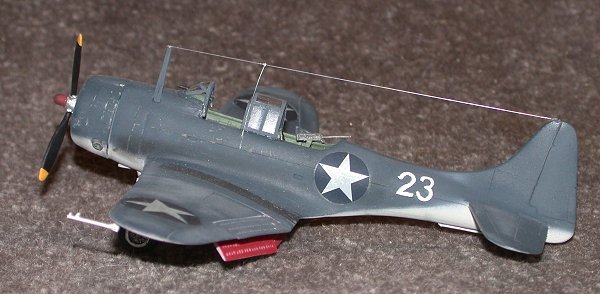
The insides of the dive brakes were painted Tamiya matt red and once dry added to the aircraft. Once the painting had been completed the plane was given a couple of coats of future and the decals (US stars) were cobbled together from various decal left over decal sheets. The “white 23” was hand painted using OO brush. The black wing walks were masked off and sprayed matt Black The plane was then given a couple of coats of Humbrol Matt Cote and the things like undercarriage and the prop were added to complete the build.
|
CONCLUSIONS |
 The Airfix Dauntless
is a model that most modelers will pass over because of the nicer
Hasegawa version (with RNZAF decals too) in the same scale, Okay the
Airfix one is crude with few parts and raised details but if your looking
at a model to practice your drilling skills on, grab one of these and
start hacking out the dive brakes, It will give you hours of fun. Also
suitable for a first model or as a desktop one on a stand as most of
Airfix’s undercarriage is usually pretty poor.
The Airfix Dauntless
is a model that most modelers will pass over because of the nicer
Hasegawa version (with RNZAF decals too) in the same scale, Okay the
Airfix one is crude with few parts and raised details but if your looking
at a model to practice your drilling skills on, grab one of these and
start hacking out the dive brakes, It will give you hours of fun. Also
suitable for a first model or as a desktop one on a stand as most of
Airfix’s undercarriage is usually pretty poor.
|
REFERENCES |
http://www.kithobbyist.com/rnzaf/sbdcol2.html
http://m2reviews.cnsi.net/scotts/allies/us/sbd.htm
http://www.kithobbyist.com/rnzaf/sbd1.html
Copyright ModelingMadness.com. All rights reserved. No reproduction in any form without express permission from the editor.
If you would like your product reviewed fairly and quickly, please contact the editor or see other details in the Note to Contributors.