
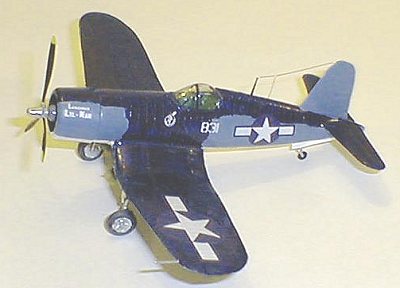
Airfix 1/72 F4U-1D
|
KIT # |
1 |
|
PRICE: |
$10.00 |
|
DECALS: |
two aircraft |
|
REVIEW : |
Mark Doremus |
|
NOTES: |
Kit includes paint, glue and brush. |
|
HISTORY |
The long nose and gull wings made Chance Vought’s F4U Corsair a sight to behold. They also made it difficult to land the plane on a pitching carrier deck. The Navy’s solution? Give it to the Marines.
The Marines, operating off of crushed seashell runways all over the Pacific, established the Corsair as a formidable adversary in the air and in support of ground troops. Japanese ground troops came to dread the sound of the “Whistling Death” as Corsairs dropped down to bomb and strafe their positions. Japanese pilots also found that the Corsair could match them any day. The Corsair flew on after the war in the Pacific and returned to combat again with the Marines over Korea.
|
THE KIT |
The premise that Airfix / Heller / Humbrol and the Smithsonian Institute were working from was to get kids hooked on history by getting them to build models. To make it simple on Mom and Dad, the kit came with 2 pots of Humbrol acrylic paint, gloss sea blue and white, a paintbrush and a tube of Humbrol cement. The kit also happens to include an old Airfix Corsair model. It is pretty much stock for an older kit. Plenty of large raised rivets, engine and cowling molded as one piece, large stumps on the sidewalls to hold a pilot’s seat, simple landing gear and few details. The parts are thick and simplified. There is some flash and one fuselage half in my sample was both bowed and twisted. You can see in the photos that the propeller was twisted.
My premise in buying this kit was to while away the hours on my favorite activity without spending a lot of money while I was spending a long weekend alone away from home. It didn’t quite work out that way. I spent nearly $20 more on supplies like knives, paint and sandpaper. I also didn’t manage to finish the kit on the long weekend. I did however decide to put together a traveling model building kit, but that’s a different story.
|
CONSTRUCTION |
 The
instructions consist of 4 exploded views. I followed the first three views
pretty much in order. Since there is no cockpit detail, you just glue in the
seat and the arrestor hook, then glue the fuselage halves together. Taking out
the twist and bow in the fuselage was a study in improvised tools. Since I was
working in a hotel room without any real tools, I ended up using the clips on a
couple of skirt hangers to clamp the fuselage in place as I tried to glue it
straight with tube glue. The fuselage needs a bit of filler, but I was
traveling without any. The wings mated OK, but again, some filler and sanding
would have helped. The elevators went on fine. I originally left the cowling
off so I could install the propeller after I painted the fuselage. However the
fit between the prop and the engine is so tight, the prop retainer really isn’t
necessary.
The
instructions consist of 4 exploded views. I followed the first three views
pretty much in order. Since there is no cockpit detail, you just glue in the
seat and the arrestor hook, then glue the fuselage halves together. Taking out
the twist and bow in the fuselage was a study in improvised tools. Since I was
working in a hotel room without any real tools, I ended up using the clips on a
couple of skirt hangers to clamp the fuselage in place as I tried to glue it
straight with tube glue. The fuselage needs a bit of filler, but I was
traveling without any. The wings mated OK, but again, some filler and sanding
would have helped. The elevators went on fine. I originally left the cowling
off so I could install the propeller after I painted the fuselage. However the
fit between the prop and the engine is so tight, the prop retainer really isn’t
necessary.
I left the rest of the fiddly bits and the canopy off until after I painted. When the painting was completed, I added the cowling, propeller, gear, bombs, antenna and pitot tube. I used 4 lb test fishing line for the aerial. Since the canopy is a lot smaller than the fuselage, I used two applications of Testors Clear Parts Cement to smooth it in. I had knocked a small chunk out of the canopy when I cut it off the sprue, the Testors filled it nicely. I touched up the dried white glue with a fine tip brush.
|
PAINT & DECALS |
Paint:
 The kit
comes with decals for an all blue or a tricolor version. I chose the tricolor
and hand brushed (traveling without airbrush) the supplied blue acrylic paint on
the upper surfaces. The supplied white paint was too thick to be any use, so I
hand brushed two coats of Testors flat white on the bottom. Model Master
intermediate blue was used for the vertical surfaces. I used a fine tip black
pen to highlight the wing fold seam.
The kit
comes with decals for an all blue or a tricolor version. I chose the tricolor
and hand brushed (traveling without airbrush) the supplied blue acrylic paint on
the upper surfaces. The supplied white paint was too thick to be any use, so I
hand brushed two coats of Testors flat white on the bottom. Model Master
intermediate blue was used for the vertical surfaces. I used a fine tip black
pen to highlight the wing fold seam.
Decals:
The kit came with markings for two aircraft. One was an all blue F4U from the 4th Marine Air Wing, service location unknown. The other was a tricolor plane from VMF 312. I chose the VMF 312 plane. The white text on the decals was hard to see and in at least one case I cut off part of the pilot’s name while trimming the excess carrier off of the decal. The decals were a bit stiff and required a good dose of Solvaset and thumb pressure to sit down over all the rivets. Only basic decals are provided, national insignia, squadron markings, personal markings and a “buzz” number were included. No bureau numbers or other type information was included.
|
CONCLUSIONS |
At a price around $10, Mom and Dad aren’t taking too large a risk getting this kit for their junior modeler. It looks like a Corsair, it’s not terribly hard to put together and the paints aren’t toxic. It might even get a few kids interested in history or modeling.
As a kit for the serious modeler, forget it. The canopy misfit alone would drive a grown modeler to tears. There are no details, the cowl is too thick to be thinned down to make realistic cowl flaps. I expect a few outline errors, but I didn’t compare it to any drawings. With much better kits in 1/72 and 1/48, this one isn’t worth the trouble.
As to my own personal quest, well, I finished it. Does that count? I failed in my mission to build it cheaply, $10 for the kit and at least $20 for supplies. Traveling with it got the arrestor hook broken off and lost before I finished. I proved to myself that if I wanted to model on the road, I needed to put together a real traveling tool kit and figure out how to deal with bulky items like a visor and air compressor when traveling.
Copyright ModelingMadness.com. All rights reserved. No reproduction in part or in whole without express permission.
If you would like your product reviewed fairly and fairly quickly, please contact the editor or see other details in the Note to Contributors.
Back to Reviews Page 2022