|
HISTORY |
Tamiya 1/48 Wildcat V
|
KIT # |
61034 |
|
PRICE: |
$26.00 |
|
DECALS: |
See review |
|
REVIEW : |
|
|
NOTES: |
Aires F4F-4 cockpit
and folding wings (4048 and 4053 respectively) |
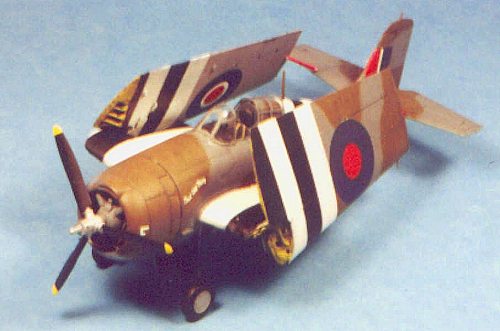
GENERAL MOTORS BUILDS A FIGHTER: CONVERTING THE TAMIYA F4F-4 WILDCAT TO AN FM-1
|
HISTORY |
In February 1942, the War Production Board decided that General Motors would convert its five east coast auto production plants to aircraft production by the newly-established Eastern Aircraft Division of GM. At the outset, Grumman thought the auto people would not be able to build something with the precision an airplane needed, while GM thought it would show the airplane people how to turn out airplanes. The two industries used vastly different production and management techniques.
The first project would be to move the Wildcat production from Bethpage to Linden N.J. to make room for the coming Hellcat production line. The GM factory required extensive demolition and renovation to change it from cars to aircraft, but this was accomplished by May 1942. Linden received all Grumman parts for its first two aircraft, with only one-eighth Grumman parts for the next six. After these 8, Eastern Aircraft were on their own. Their first all-GM Wildcat was accepted by the Navy in September 1942; by year's end they had delivered 21 aircraft.
 The first GM Wildcat was
little different from the Grumman F4F-4, other than it reverted to the 4 gun
armament of the earlier versions. Most Navy pilots had not liked the 6-gun
Wildcat, because while it did deliver a greater weight of fire, it had no more
ammunition than the 4-gun airplane, so that it delivered a smaller volume of
fire. This airplane was designated the FM-1 by the Navy.
The first GM Wildcat was
little different from the Grumman F4F-4, other than it reverted to the 4 gun
armament of the earlier versions. Most Navy pilots had not liked the 6-gun
Wildcat, because while it did deliver a greater weight of fire, it had no more
ammunition than the 4-gun airplane, so that it delivered a smaller volume of
fire. This airplane was designated the FM-1 by the Navy.
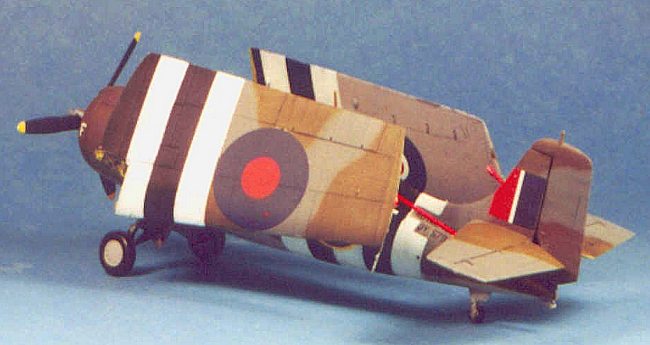
The Royal Navy received 311 FM-1s, which were originally designated Martlet Vs, commencing in December 1943. The name was changed to Wildcat V in February 1944, when the decision was made to use the U.S. name for all U.S. aircraft used by the British forces, rather than the separate British names.
881 and 892 squadrons, aboard H.M.S. "Pursuer" were the first to take the new fighter into combat on February 12, 1944 when four Wildcat Vs intercepted a mixed formation of Fw-200s and He-177s armed with glide bombs. One Fw-200 and one He-177 were shot down. "Pursuer" and her Wildcat Vs also participated in Operation Tungsten on April 3, 1944, in which two fleet carriers and four CVEs with 160 aircraft attacked the German battleship "Tirpitz", the Wildcats flying flak suppression strikes.
That August, 881 and 892 squadrons, still aboard "Pursuer," participated in "the other D-Day," the invasion of Southern France. By this time 881 had the first Wildcat VIs to enter combat, though 892 was still using the Wildcat V. They saw no air combat during this operation and devoted their attention to strike and ground support missions.
|
THE KIT |
I've said it before, the Tamiya Wildcat kit is one of the best available. My only complaint is that Tamiya has only seen fit to produce and market the F4F-4.
|
CONSTRUCTION |
 While the kit cockpit is
more than acceptable, those modelers who persist in wanting to "gold the lily"
will be pleased with the Aires resin cockpit, which is nice and sharp, and
provides the centerline gas tank. Personally, once the cockpit is installed in
the fuselage, I do not believe you see so much of it as to justify a cost that
is 50 percent of the cost of the original kit, but mine was a review sample, so
I put it to good use. The cockpit goes together well, everything looks good.
While the kit cockpit is
more than acceptable, those modelers who persist in wanting to "gold the lily"
will be pleased with the Aires resin cockpit, which is nice and sharp, and
provides the centerline gas tank. Personally, once the cockpit is installed in
the fuselage, I do not believe you see so much of it as to justify a cost that
is 50 percent of the cost of the original kit, but mine was a review sample, so
I put it to good use. The cockpit goes together well, everything looks good.
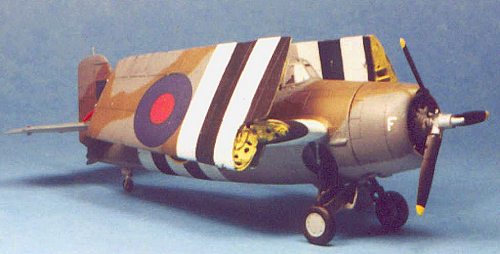
Do remember that if you are making a General Motors-build Wildcat, the cockpit is Interior Green overall. Grumman-built Wildcats were Dull Dark Green or Bronze Green. I used Gunze-Sanyo Interior Green and picked out the detail per the color photos of the F4F-4 cockpit in the Wildcat "Detail and Scale" book.
Folding and Modifying The Wing:
 The Aires conversion came
out several years before the recently-released Dangerboy Hobbies Wildcat
wingfold, which will soon be released by Lone Star Models, who bought Dangerboy
this past July. The Dangerboy conversion is as easy as the Hellcat and Avenger
sets, and so far better that if you have the Aires conversion I would forget it
and get the Dangerboy set, which is so easy to do and end up with a
perfect-looking model. Had I not already been halfway through this conversion, I
do not know that I would have continued.
The Aires conversion came
out several years before the recently-released Dangerboy Hobbies Wildcat
wingfold, which will soon be released by Lone Star Models, who bought Dangerboy
this past July. The Dangerboy conversion is as easy as the Hellcat and Avenger
sets, and so far better that if you have the Aires conversion I would forget it
and get the Dangerboy set, which is so easy to do and end up with a
perfect-looking model. Had I not already been halfway through this conversion, I
do not know that I would have continued.
That said, the end result of the Aires conversion looks good, even if it is so weak that you had best not ever touch the wings once attached.
Following the instructions, you have to cut the kit wing on the wingfold, then thin it down, attach the resin parts, and assemble the wing. I ended up using some wire glued in the wing center section to steady the outer section, but I still consider it very weak. The instructions in the Aires set are clear and easy to follow, so you will have no trouble doing this.
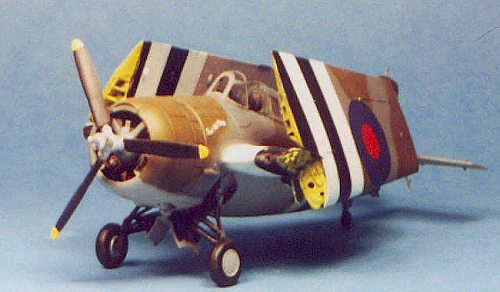
To do an FM-1, you have to get rid of the outer gun bay, but upper and lower. This means sanding off the gun bay door on the upper wing and the ammo door on the lower wing, filling in the engraving, and sanding smooth. It also means you are going to take off all that nice surface detail. One thing you want to do is sand only the area that needs it, to limit the destruction of the surface detail.
Once you have the outer wings filled in and sanded smooth, restoring the detail is not that hard. I rescribed the panel lines, then used a ruler to re-establish the rivet lines. These are countersunk, so it's easy. I used the tip of a brand new #11 X-acto blade and tapped it along the penciled line. The result looked OK and I knew it would look fine under a coat of paint.
The rest of the model was assembled per kit instructions and prepared for painting.
|
PAINT & DECALS |
Painting:
The first thing to be aware of is that the Wildcat V was not painted in standard FAA colors of Dark Sea Grey, Dark Slate Grey and Sky. Grumman had used paints matched to the British specifications for their Wildcats, but GM used the "equivalent colors." These are: Dark Grey for Dark Sea Grey, Olive Drab for Dark Slate Grey, and Sky Grey for Sky. These colors have been confirmed by FAA researchers, and a color photo of a Corsair II in this camouflage can bee seen at the FAA SIG page (www.faasig.org). The same is true for GM-built Avengers for the FAA.
I first pre-shaded the model with flat black over all panel lines, and did the black stripes of the invasion stripes. I then did the white stripes, and masked these off.
The camouflage pattern was freehanded, using the painting guides of the Eagle Strike decal sheet. I used Gunze Sanyo Olive Drab, Tamiya Dark Sea Grey, and Tamiya Sky Grey.
When this was completed I painted the interior structure of the wingfold area yellow zinc chromate.
Decals:
 I first saw a picture of
a Wildcat in invasion stripes on the cover of an old Model Airplane News when I
was a kid, and thought it looked very cool. The Aeromaster decal sheet "U.S.
Aircraft in FAA Service provides decals for "F" Freddie of 892 Squadron (which
is mis-identified on the sheet) "This Old Thing" which flew in the invasion of
southern France in August 1944. The national insignias on this sheet are
incorrect for GM-built Wildcats, so I used the national markings for the Wildcat
V on the Eagle Strike sheet, "Grumman Martlets 1941-1944."
I first saw a picture of
a Wildcat in invasion stripes on the cover of an old Model Airplane News when I
was a kid, and thought it looked very cool. The Aeromaster decal sheet "U.S.
Aircraft in FAA Service provides decals for "F" Freddie of 892 Squadron (which
is mis-identified on the sheet) "This Old Thing" which flew in the invasion of
southern France in August 1944. The national insignias on this sheet are
incorrect for GM-built Wildcats, so I used the national markings for the Wildcat
V on the Eagle Strike sheet, "Grumman Martlets 1941-1944."
Final assembly:
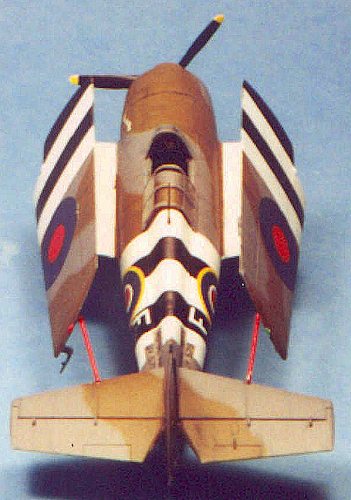
I attached the landing gear and cockpit canopy and prop, then attached each wing. There is no positive location for this, so study the photos in Detail & Scale closely to see the proper angle of wing cant and fold-back. I used cyanoacrylate and hit it with accelerator, and used some additional glue in the rear of the wingfold hinge, which cannot be readily seen when viewing the model. I had made positive attachment holes in both the horizontal stabilizer and wingtip to attach the bracing struts for some additional strength. Even with all that, I consider this a very fragile model.
I used Tamiya "Smoke" for the exhaust stains.
|
CONCLUSIONS |
Hey, it's a Wildcat in invasion stripes with its wings folded. People give it a second look! The conversion is not as hard as you might think, though I would recommend anyone considering this particular conversion have some previous kitbashing experience.
Review sets courtesy of Aires Hobby Products.
Model kit compliments of my billfold.
Copyright ModelingMadness.com
If you would like your product reviewed fairly and fairly quickly, please contact the editor or see other details in the Note to Contributors.
Back to Reviews Page 2017