Accurate Miniatures 1/48 SBD-5 Dauntless
|
KIT # |
3422 |
|
PRICE: |
$35.98 |
|
DECALS: |
Two aircraft from VB-16, 1943 |
|
REVIEW & |
|
|
NOTES: |
|
HISTORY |
The Douglas Dauntless was arguably one of the most significant aircraft of the Second World War, and by far the most successful dive bomber used by any air force during that conflict. In 1942, the Dauntless was primarily responsible for blunting the power of the Japanese Navy in the Pacific War, when Dauntlesses from the "Lexington" and "Yorktown" inflicted such damage on the Japanese carriers "Shokaku" and "Zuikaku" at the Battle of the Coral Sea that these two veteran carriers were unable to participate in the upcoming Battle of Midway, where their presence might well have decisively changed history. At Midway, Dauntlesses from the "Yorktown" and "Enterprise" smashed the heart of Japanese naval aviation by sinking the "Akagi," "Kaga," "Soryu" and "Hiryu." The aircraft formed the heart of U.S. naval strike forces in all four of the carrier battles fought in 1942, as well as providing the defensive punch at Guadalcanal that kept the Tokyo Express from being able to land enough Japanese military forces to dislodge the Marines in the most decisive land battle of the Pacific War.
All of these accomplishments were the work of the SBD-3 Dauntless, the version that went into production just before the outbreak of the Pacific War. It had been expected that the SBD-3 would be replaced in the fleet by the Curtiss SB2C Helldiver, but the prolonged gestation of this aircraft meant that the SBD-4 and SBD-5 would be produced to "fill the gap" in the fleet strike force.
 By the time the SBD-5
Dauntless entered production at the Douglas El Segundo factory in February 1943,
the great battles the Dauntless would participate in were almost all history.
The SBD-5 equipped all the dive bomber squadrons of the first "Essex" class
carriers at the beginning of the Central Pacific Offensive in the fall of 1943,
except for VB-17 aboard the "Bunker Hill," which was equipped with the first
SB2C Helldivers to enter combat. The SBD-5 was the primary fleet dive bomber
during the Gilberts campaign, but by the time of the Marshalls Campaign in
February 1944, the Helldiver had replaced it in several fleet squadrons. By the
time of the fifth great carrier battle of the war - the First Battle of the
Philippine Sea in June 1944 - the Dauntless equipped only VB-16 aboard the new
"Lexington."
By the time the SBD-5
Dauntless entered production at the Douglas El Segundo factory in February 1943,
the great battles the Dauntless would participate in were almost all history.
The SBD-5 equipped all the dive bomber squadrons of the first "Essex" class
carriers at the beginning of the Central Pacific Offensive in the fall of 1943,
except for VB-17 aboard the "Bunker Hill," which was equipped with the first
SB2C Helldivers to enter combat. The SBD-5 was the primary fleet dive bomber
during the Gilberts campaign, but by the time of the Marshalls Campaign in
February 1944, the Helldiver had replaced it in several fleet squadrons. By the
time of the fifth great carrier battle of the war - the First Battle of the
Philippine Sea in June 1944 - the Dauntless equipped only VB-16 aboard the new
"Lexington."
The SBD-5 was equipped with a more powerful R-1820-60 engine, and had an increased fuel capacity of 370 gallons. The aircraft also carried ASB surface-search radar, operated by the radioman-gunner. Before production ceased in April, 1944, 2,965 SBD-5s were built, making it the most numerous sub-type. It first entered combat in the late Spring of 1943, as the Solomons campaign began with the invasion of New Georgia and Rendova. The Solomons would be one of the two major campaigns in which the SBD-5 would see service.
After the main islands of the Gilberts and Marshalls were taken by U.S. forces, it was decided that the remaining Japanese-held islands in these chains would be bypassed, while the Central Pacific Offensive moved on to the more strategically-useful Marianas. The Japanese forces on these bypassed islands could be reinforced, however, which meant that an air campaign would be necessary to interdict such re-supply operations, much as was now being done with Rabaul. Marine Air Wing 4 had responsibility for the Central Pacific operations, operating ten squadrons - four of which were equipped with the SBD-5: VMSB-151 and VMSB-241 in Marine Air Group 13, and VMSB-231 and VMSB-341 in Marine Air Group 31. They began operations from Tarawa in December 1943, moving on to Kwajalein in March 1944. The Japanese forces on Wotje, Maloelap, Mili and Jaluit - though almost totally lacking in defensive air power - maintained a stubborn failure to give up. Marine attacks on these islands, while they did not have to risk air combat, were far from easy. Japanese AAA knocked down 30 aircraft in the first six months of the campaign.
 One of the best-known
Marine squadrons in the Central Pacific was VMSB-231, whose "Ace of Spades"
insignia dated back to DH-4s used in Haiti and Nicaragua after the First World
War. The unit was commanded by MAJ Elmer Glidden, who had been squadron XO
during the Guadalcanal campaign. With his radioman-gunner, MSGT James Boyle,
"Iron Man" Glidden made 77 combat dives, in addition to his 27 combat dives at
Guadalcanal. Glidden's 104 combat dives was the American record.
One of the best-known
Marine squadrons in the Central Pacific was VMSB-231, whose "Ace of Spades"
insignia dated back to DH-4s used in Haiti and Nicaragua after the First World
War. The unit was commanded by MAJ Elmer Glidden, who had been squadron XO
during the Guadalcanal campaign. With his radioman-gunner, MSGT James Boyle,
"Iron Man" Glidden made 77 combat dives, in addition to his 27 combat dives at
Guadalcanal. Glidden's 104 combat dives was the American record.
As the war moved on to the west, the Marines became more and more proficient in dive bombing. Eventually, VMSB-231 would join VMSB-142, 133, 235, 243, 244 and 341 in the Philippines in December 1944, where the Dauntlesses provided close air support to the First Cavalry Division in its headlong 100 mile sprint to Manila that often saw the Marines make pinpoint attacks within 300 yards of U.S. ground forces. The Marines were so effective that Japanese prisoners confessed that many gun crews were afraid to open fire for fear of retaliation by the SBDs.
|
THE KIT |
 The late lamented Accurate Miniatures produced the SBD-1, SBD-3 and SBD-5
versions of the Dauntless, with their first (delayed) release being the SBD-5 in
the summer of 1997 followed by the others later that year. These were primarily
distinguished by differences in the cowling and forward fuselage, with the SBD-5
kit also being equipped with a two-gun rear turret. The kits are highly
accurate, and come with one of the best and most detailed cockpits ever produced
in an injection-molded kit. No resin aftermarket sets were ever made for these
SBDs, because of the quality of the original kit.
The late lamented Accurate Miniatures produced the SBD-1, SBD-3 and SBD-5
versions of the Dauntless, with their first (delayed) release being the SBD-5 in
the summer of 1997 followed by the others later that year. These were primarily
distinguished by differences in the cowling and forward fuselage, with the SBD-5
kit also being equipped with a two-gun rear turret. The kits are highly
accurate, and come with one of the best and most detailed cockpits ever produced
in an injection-molded kit. No resin aftermarket sets were ever made for these
SBDs, because of the quality of the original kit.
The kits have now been out of production for nearly a year, and Accurate Miniatures has been defunct for nearly as long. However, several hobby dealers picked up these kits from the final sale of company property in late 1998, so the kits are still available. If you have not purchased one before, I strongly suggest you do so now, because the problems associated with the demise of Accurate Miniatures have ensured that it will be awhile before any of these great kits appear in another company's box.
|
CONSTRUCTION |
If you take your time with these kits, you will find that the only area where you will need any extra effort will be to cover over the centerline seam of the fuselage, which is easily dealt with using Mr. Surfacer.
With this kit, construction begins with the cockpit. Once everything has been painted Interior Green and the instrument panels have been painted, with other details picked out in the list of parts, assembly is straightforward, though the attachment of the foot guides for the pilot's rudder pedals is a bit fiddly. If you take your time, everything goes together easily. Once you look at the completed cockpit before you close up the fuselage, you will see why no resin cockpit has ever been made for this kit. As with any Accurate Miniatures kit, their advice to "read and heed" the instruction sheet is very good advice indeed. Doing so, along with test-fitting parts, will ensure everything goes together with a minimum of problems.
 Once the fuselage has
been glued together, the next item is the wing. Do not assemble the wing as a
sub-assembly before attaching it to the fuselage! Instead, glue the upper wings
in position, being sure to glue them to the spars. Then attach the lower wing:
careful attachment of the rear section of the center of the wing to the fuselage
will insure that this - the only "fiddly" part of the assembly - will only need
some Mr. Surfacer on the join line to fit perfectly. Once the central section
of the wing is attached fore and aft to the fuselage, glue the upper parts to
the lower. DO NOT attempt to glue the lower wing to the spars - it is not meant
to be attached that way! If you do so, it will deform the wing and result in a
decidedly odd-looking model upon completion. Next, attach the horizontal
tailplanes in position.
Once the fuselage has
been glued together, the next item is the wing. Do not assemble the wing as a
sub-assembly before attaching it to the fuselage! Instead, glue the upper wings
in position, being sure to glue them to the spars. Then attach the lower wing:
careful attachment of the rear section of the center of the wing to the fuselage
will insure that this - the only "fiddly" part of the assembly - will only need
some Mr. Surfacer on the join line to fit perfectly. Once the central section
of the wing is attached fore and aft to the fuselage, glue the upper parts to
the lower. DO NOT attempt to glue the lower wing to the spars - it is not meant
to be attached that way! If you do so, it will deform the wing and result in a
decidedly odd-looking model upon completion. Next, attach the horizontal
tailplanes in position.
Now attach the upper forward fuselage part, followed by the side parts of the forward fuselage. Careful fitting here will result in there being no seams needing filling or sanding. This is followed by the engine and cowling.
After any necessary sanding of the centerline seam of the fuselage, the model is ready for the paint shop.
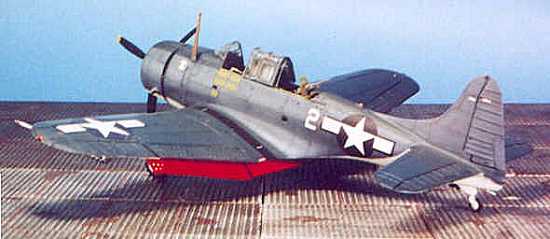
Since I was going to make a land-based SBD-5, I cut off the small tailwheel used for carrier operation and replaced it with a larger tailwheel from the parts box.
|
PAINT & DECALS |
Painting:
I masked the separate canopy parts at this time. They were first painted Interior Green, and were then painted the upper camouflage color of non-specular Sea Blue when it came time to paint the rest of the model that color.
I pre-shaded the model with Tamiya semi-gloss black. When that was dry, I painted the lower surfaces with Gunze-Sanyo H-316 "Gloss White" (FS17875), which is not as bright as flat white and looks better once dry. The upper camouflage was applied using Gunze-Sanyo H-56 "Intermediate Blue" and H-54 "Navy Blue" which is good as non-specular Sea Blue. In both cases, once the primary coat was applied, I lightened the paint with some of the H-316 white, and faded the scheme.
When all was dry, I shot the entire model with Future and it was ready for the decals.
Decals:
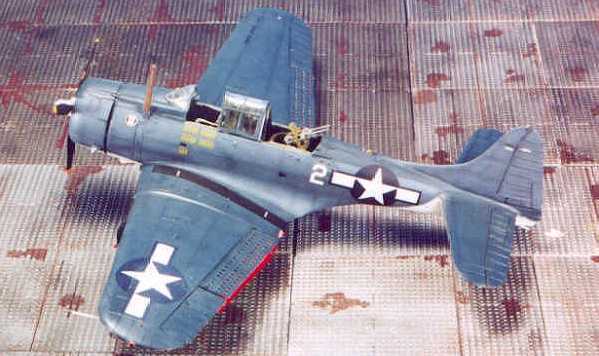
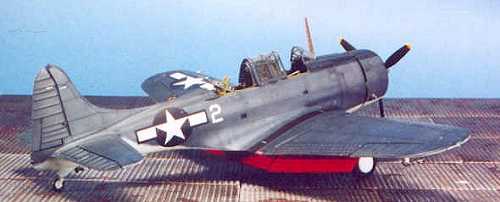
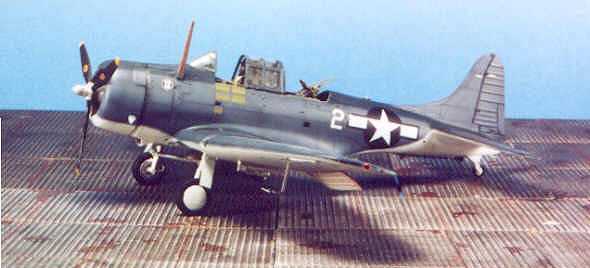
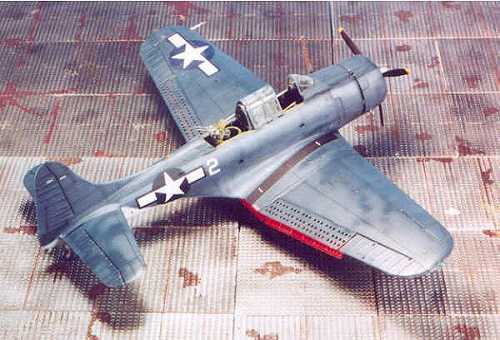
I decided to do an airplane of VMSB-241, since I had the "Ace of Spades" insignia from an old MicroScale decal sheet for the Dauntless. I based the model on a well-known wartime photograph of a VMSB-241 Dauntless flying over Task Force 58 in Ulithi. I used national insignia from the decal dungeon, with white numbers from an old Micro-Scale sheet, and the bomb mission markings from the Tamiya decal sheet for the F4U-1A. I used the stencils from the AM decal sheet. Another coat of Future after the decals had set up and the model had been washed left me ready for final finish and assembly.
 Final
Finish and Assembly:
Final
Finish and Assembly:
The airplane in the photo is surprisingly well-maintained for where it was operating and how it was being used, so I only put a few "dings" o the leading edges of flying surfaces, in the cockpit-entry steps, and around the edges of the two cockpits. I did a light exhaust stain with Tamiya Smoke, then gave the model a final finish of thinned Testor's Dullcote.
I then attached the landing gear, prop and rear machine guns. The canopy was assembled in the "stacked" open position. I suggest that before you glue these parts in position, you stack them on the workbench. If they do not sit down right, sand off a bit from the base of the inner glass parts, and then all will stack easily.
|
CONCLUSIONS |
I built my last Dauntless in 1998, and had forgotten just how good this kit is. Any modeler of average ability who is willing to take the time to assemble it carefully will end up with a really beautiful model of a very famous airplane. I personally think this may be the best-designed plastic model kit ever released to date.
Copyright ModelingMadness.com. All rights reserved. No reproduction in any form without express permission from the editor.
If you would like your product reviewed fairly and quickly, please contact the editor or see other details in the Note to Contributors.