This is not a "kit review." Tamiya's Corsair in its variations has been reviewed multiple times here at Modeling Madness. Over the years, I have seen modelers repeatedly ask such questions as "what color are the wheel wells on an F4U-1A?" "What color is the cockpit?" "How do you get the wings assembled right", etc., etc. This is an attempt to illustrate for most modelers the commonly-accepted knowledge regarding the colors of the "mid-range" Corsair, as well as assembly techniques that will allow a modeler to get the most out of one of the best-designed model kits in existence.
 In addition, this
is a lesson in research. My good friend Lee Kolosna says this airplane
(and other well-known airplanes) have been done so often they are now
"modeling cliches." Yes indeed, Ike Kepford's Corsair is a very
well-known aircraft, one for which aftermarket decals have been made for
at least the past 25 years that I know of. However, much of the markings
information provided by the "experts" about this allegedly "well-known"
airplane is wrong - this despite the fact the information is there for
anyone whose eye nerves connect to their frontal lobes to see! I've
chosen this model because most of you will have books that have the
photographs of the real thing that I will refer to here, so you can look
at the pictures and see for yourself what the truth is.
In addition, this
is a lesson in research. My good friend Lee Kolosna says this airplane
(and other well-known airplanes) have been done so often they are now
"modeling cliches." Yes indeed, Ike Kepford's Corsair is a very
well-known aircraft, one for which aftermarket decals have been made for
at least the past 25 years that I know of. However, much of the markings
information provided by the "experts" about this allegedly "well-known"
airplane is wrong - this despite the fact the information is there for
anyone whose eye nerves connect to their frontal lobes to see! I've
chosen this model because most of you will have books that have the
photographs of the real thing that I will refer to here, so you can look
at the pictures and see for yourself what the truth is.
There are plenty of photos here to illustrate what I'm going to show you about modeling the Corsair. Let's get going.
|
THE KIT |
 Tamiya's Corsairs
were first introduced in 1995, with the F4U-1 "Birdcage" Corsair,
followed in 1998 by the F4U-1D, and in 1999 by the F4U-1A. The kits are,
to my mind, the definitive kits of the early Corsair. Other than a
misplaced step in the right inner flap (a purely post-war phenomenon),
the kits are very accurate; only a "resin junkie" needs to get a
replacement aftermarket cockpit for any of these three. The most one
needs from the aftermarket are seatbelts.
Tamiya's Corsairs
were first introduced in 1995, with the F4U-1 "Birdcage" Corsair,
followed in 1998 by the F4U-1D, and in 1999 by the F4U-1A. The kits are,
to my mind, the definitive kits of the early Corsair. Other than a
misplaced step in the right inner flap (a purely post-war phenomenon),
the kits are very accurate; only a "resin junkie" needs to get a
replacement aftermarket cockpit for any of these three. The most one
needs from the aftermarket are seatbelts.
As far as I am concerned, the Tamiya Corsair is, along with the Tamiya Swordfish and P-47 Thunderbolt, and the Accurate Miniatures SBD Dauntless and TBF Avenger series of kits, the best-designed, most accurate kits out of the box released to date. One sees few aftermarket items for these kits other than decals, because there are none needed. A modeler of average abilities can - assuming they are willing to commit the radical act of actually following the kit instructions - come up with a nicely-detailed, accurate kit, in which the main challenge is to paint it correctly.
|
CONSTRUCTION |
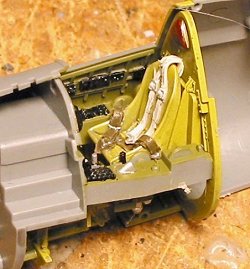
Construction for this Corsair kit begins with painting the interior details while the parts are still on the sprues. Doing it this way will make everything far easier as one proceeds, and doing it all at once will make for a much more rapid project in terms of construction.
The F4U-1A uses quite a bit of yellow zinc chromate at this stage. I think the most accurate color for this is Tamiya's "Zinc Chromate". If you're still using oil-base enamels, you're on your own for recommendations here; I moved to Tamiya and Gunze-Sangyo acrylics 14 years ago and have never looked back.
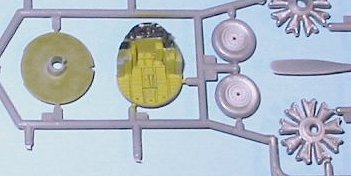 The following items are
painted yellow zinc chromate:
The following items are
painted yellow zinc chromate:
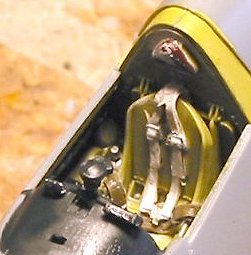
1. The interior of the engine cowling and cooling flaps.
2. All parts for the wheel wells, including the tail wheel well, and the inner surfaces of all the gear doors.
3. The fuselage
interior of the cockpit, below the attachment line for the side consoles
and all of the area aft of the forward cockpit bulkhead; the front and
rear cockpit bulkheads; the seat; the control stick; the rudder pedals
and foot guides; the area below the instrument panel on the instrument
panel part; the 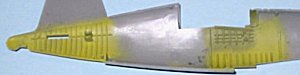 clear glass part that fits in the lower cockpit area (on
the F4U-1A, this is metal).
clear glass part that fits in the lower cockpit area (on
the F4U-1A, this is metal).
The following items are painted Interior Green: The cockpit sidewalls above the side panels; the side consoles. Note: some people say that the rear cockpit bulkhead and the seat were also painted Interior Green, and this could have been the case. There are not a lot of cockpit photographs to go by, and no contemporary cockpit shots in color. The call-outs I have made here are in line with the most reliable knowledge about F4U-1A Corsair colors.
The instrument panel, and the various small panels on the side consoles, the "black boxes" on the right hand cockpit wall, the throttle quadrant on the left cockpit wall should be painted semi-gloss black (though this will go flat eventually).
Additionally, I
painted the engine cylinders with Model Master Metalizer "Magnesium," and
hand painted the magneto lines semi-gloss black. The magnetos and engine
housing was painted with Tamiya "Sky Grey," but any light grey would be
fine.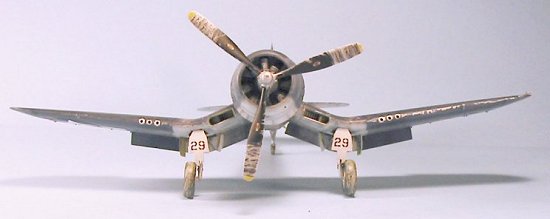
The landing gear parts were painted with Model Master Aluminum (non-buffing) metalizer and then sealed, including the wheel hubs. This looks like aluminum lacquer. Note: the landing gear on the F4U-1A Corsair came from the factory painted with aluminum lacquer; if the airplane was later repainted in the field, it was frequently the case that the wheel wells and landing gear might be painted white. However, most of the tri-color Corsairs only made it through one "lifetime," and it was highly unlikely this kind of repainting was done in the Solomons, where the F4U-1A saw its main service. Thus, unless you have photographic evidence to the contrary, you will be on strong ground if you do silver landing gear with yellow zinc chromate wheel wells and gear door interiors.
Once all this was dry, I did some extra work to bring up detail. I used to do a "wash" using black thinned with rubbing alcohol; however, this required a coat of something like Testor's Metalizer Sealer or Dullcote over the acrylic paint before applying the wash, so that the rubbing alcohol would not loosen up and thin the colors. I have recently discovered that using black thinned with Future will get the same result, while sealing the original colors in so doing. Once the wash is dry, I shoot a coat of Dullcote over everything to get rid of the glossiness of the Future.
 Now, we're ready to
proceed with construction, and that starts with the cockpit.
Now, we're ready to
proceed with construction, and that starts with the cockpit.
I used the kit
instrument panel decal, which goes down well with Micro-Sol and looks
accurate when completed. I drybrushed the other instrument panel areas
with Metalizer Aluminum to "pop out" detail, then did things like paint
the circuit breaker buttons red, some of the other buttons and switches
yellow and green, to add some color. I drybrushed the seat (very
lightly), the rudder pedals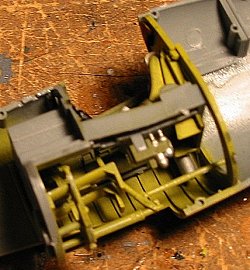 and the foot guides with aluminum, to
simulate wear from use. I then assembled the side consoles and seat to
the rear bulkhead, and the rudder pedals, foot guides, control stick and
instrument panel to the front bulkhead.
and the foot guides with aluminum, to
simulate wear from use. I then assembled the side consoles and seat to
the rear bulkhead, and the rudder pedals, foot guides, control stick and
instrument panel to the front bulkhead.
I used a set of Cutting Edge resin "posable" seat belts for this. I think these things end up looking more realistic lying against the seat back and in the pan than do photo-etch belts; however, if I hadn't had the set available at hand, I would have used a p-e set and not really given it a second thought.
 I had already
assembled the "cut out" parts to the fuselage halves and aligned them
from the inside before further assembly on the fuselage. I assembled the
two cockpit sub-assemblies, then glued the whole thing into the right
fuselage side. With a bit of care in attaching the left side of the
fuselage, one will not have to use any putty or Mr. Surfacer on the
centerline seam, and will only have to sand it smooth when it is fully
set up.
I had already
assembled the "cut out" parts to the fuselage halves and aligned them
from the inside before further assembly on the fuselage. I assembled the
two cockpit sub-assemblies, then glued the whole thing into the right
fuselage side. With a bit of care in attaching the left side of the
fuselage, one will not have to use any putty or Mr. Surfacer on the
centerline seam, and will only have to sand it smooth when it is fully
set up.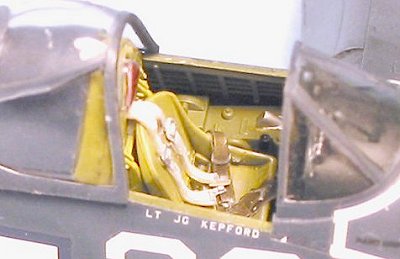
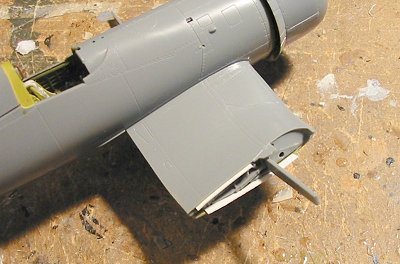
I then assembled the engine per instructions, and attached the engine and the cowling to the fuselage. I chose to use the open cooling flaps, which are more correct for an airplane sitting on the ground. This required painting the exhausts, since they can be seen with the cooling flaps open.
It was time for
the wing. I assembled the outer halves, with the inner bulkhead, and set
them aside. I then assembled the wing center section per instructions.
When this had set up, I took some .010 Evergreen sheet and cut some
reinforcements, which I glued inside the center
 section of the wing.
Using this will allow a greater attachment area when one glues the outer
wings to the center section in the "down" position; not doing something
like this results in a very weak joint that is easily broken by handling
the model.
section of the wing.
Using this will allow a greater attachment area when one glues the outer
wings to the center section in the "down" position; not doing something
like this results in a very weak joint that is easily broken by handling
the model.
While the wing set up, I assembled the flaps. I filled in the foothold on the right inner flap with cyanoacrylate glue, sanded it smooth, covered that with Mr. Surfacer, and eventually hid the offending mistake in the kit design. The wing sub-assembly fits easily to the fuselage. Following that, I attached the horizontal stabilizers. After setting up, the model was ready for the paint shop.
|
CAMOUFLAGE & MARKINGS |
Painting:
Painting a model
should follow some research. Ideally, you have found a photograph of the
particular airplane you want to model; while that will likely be
black-and-white and not tell you what specific color to use, you can
still find out a lot by studying the photo, such as whether
 or not the
paint is faded and if so, approximately how much, and where that is, any
scuffed or chipped areas in the paint, the amount of exhaust staining,
etc.
or not the
paint is faded and if so, approximately how much, and where that is, any
scuffed or chipped areas in the paint, the amount of exhaust staining,
etc.
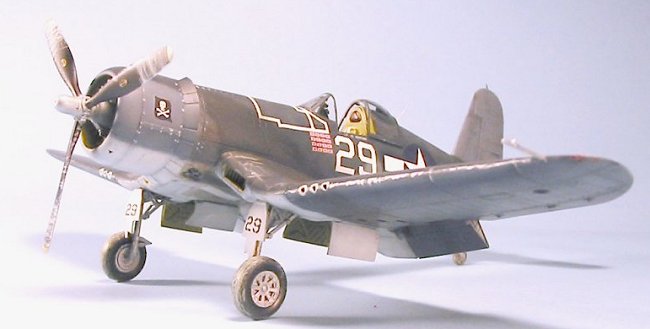
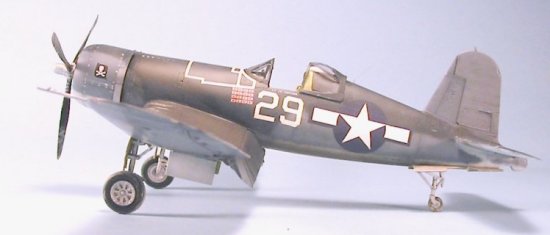
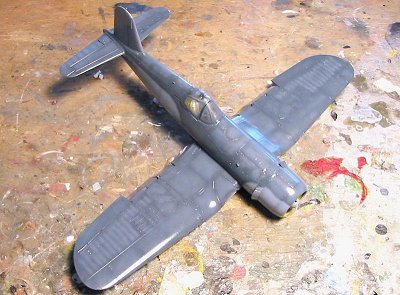
There are three good photos of Ike Kepford's Corsair, that have been published many times in many places. The three photos are a famous "solo" air-to-air portrait of the left side of the airplane, another air-to-air photo of three VF-17 Corsairs with Kepford's in the lead, and a ground shot taken from the right rear quarter. From the kills marked on the fuselage, the photos were likely taken in mid-February, 1944, after Kepford scored his 16th and final kill, toward the end of VF-17s combat tour in the Solomons.
One thing can be seen in all three photos: the airplane's camouflage is faded, but is not heavily sun-faded.
The "solo" air-to-air shot shows "scuffing" on the inner wing by the fuselage, with light "dings" along the leading edges of all the flying surfaces - which would have been the result of "sand-blasting" as the airplane took off of coral runways, paint chipping around the attachment-screw points of the engine cowling and accessory covers and heavy oil streaking of the forward fuselage aft of the engine cowling, which is to be expected of a radial engine.
 The ground shot
shows scuffing on the inner wing similar to that on the left side, and
also shows that almost all the paint on the outer third of the propeller
blades has been "sand-blasted" off.
The ground shot
shows scuffing on the inner wing similar to that on the left side, and
also shows that almost all the paint on the outer third of the propeller
blades has been "sand-blasted" off.
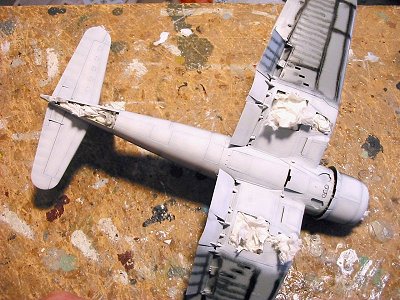
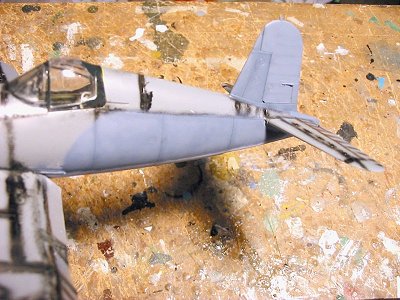
I started the
painting process by "pre-shading" all the panel lines with flat black.
After that, the easiest way to apply a camo paint scheme is to go from
lighter to darker.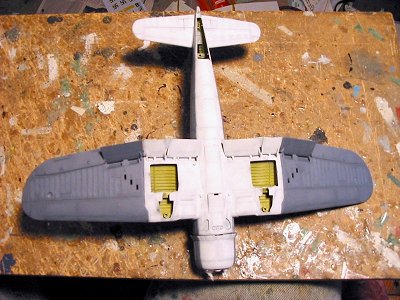
Thus, I started on the lower surfaces. I put a drop of grey into the flat white to tone it down. The paint was thinned 50-50 with rubbing alcohol, and was applied to the point that it covered the pre-shading, but didn't cover it up; i.e., you could still see indications of the darker color under the white.
I then moved on to
the Intermediate Blue. I used Gunze-Sangyo "Intermediate Blue" right out
of the bottle for the lower surfaces of the outer wings, since these were
the least-exposed to sun-fading. I applied a bit of white to the paint
after I applied the basic coat, and went over
 the fabric areas of the
wing and flap, and the aileron (which was wood), since they would have
different tonal qualities since different kinds of paint were used to
cover these.
the fabric areas of the
wing and flap, and the aileron (which was wood), since they would have
different tonal qualities since different kinds of paint were used to
cover these.
I then turned the
model over and painted the sides of the nose and fuselage and the
vertical fin and rudder, with the slightly-lightened Intermediate Blue as
the basecoat. I then mixed in some Sky Grey to this, since Intermediate
Blue under sun fading shifts toward the grey spectrum in the paint. I
applied a bit more white to do the vertical fin which was most exposed to
t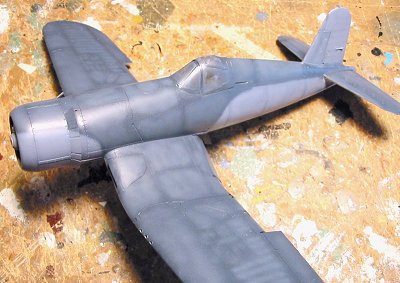 he sun, then applied a bit of Blue-Grey to the paint to do the
fabric-covered rudder, which again would have a different tonal quality
due to the different paint.
he sun, then applied a bit of Blue-Grey to the paint to do the
fabric-covered rudder, which again would have a different tonal quality
due to the different paint.
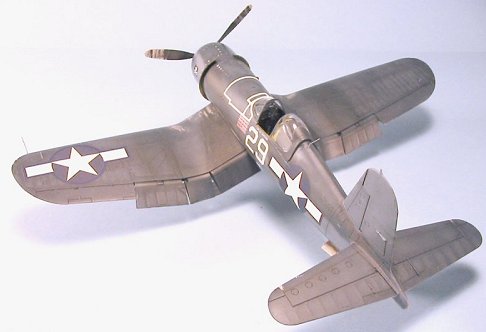
I used Gunze-Sangyo "Navy Blue" for the non-specular sea blue color. I applied it right out of the bottle, then went over the wings, horizonal stabilizers and upper area of the fuselage after applying a brushful of Sky Grey to the paint. I then applied a bit of white to the paint, and did the fabric areas of the wings, the flaps, and the elevators.
 At this point, the
basic colors were complete. I applied a coat of Future to seal
everything, and then let the model dry thoroughly.
At this point, the
basic colors were complete. I applied a coat of Future to seal
everything, and then let the model dry thoroughly.
Before applying
the decals, I weathered he paint scheme. This involved applying heavy
oil staining and exhaust staining to the lower surfaces and the forward
fuselage, using Tamiya "NATO Black" thinned with Future. A second coat
with Dark Grey in the mixture was then applied to the exhaust stains on
the lower surfaces, which was followed up with the addition of some
Red-Brown to the mixture for a final pass. The "solo" photo shows the
wings are heavily stained with gunpowder residue covering the entire area
behind the guns and over the gunbay c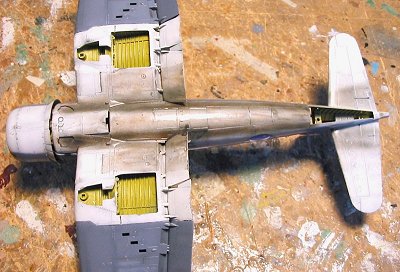 overs. I did this with Tamiya
Semi-gloss Black, thinned with Future and repeated coats applied until it
looked like it did in the photo. What was wanted was a "darkening" of the
area, not a full-on "black area," similar to that done with the oil
staining on the forward fuselage and upper surface of the wing center
section.
overs. I did this with Tamiya
Semi-gloss Black, thinned with Future and repeated coats applied until it
looked like it did in the photo. What was wanted was a "darkening" of the
area, not a full-on "black area," similar to that done with the oil
staining on the forward fuselage and upper surface of the wing center
section.
Markings:
Studying the available photos reveals two interesting items.
First, Kepford's airplane did not always have the white tape over the fuel tank. The "formation" shot shows his airplane without the, tape, though it has the tape in the "solo" shot and the ground shot. All three show the airplane with 16 kills, so a modeler could do the model with or without the tapes. Since it is in two out of three of the shots, I decided to use the tape.
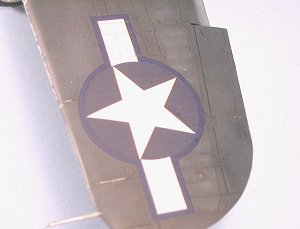 The other thing is
more important and involves the national insignia. Almost all
aftermarket decal sheets provide the national insignia in the blue/white
version that was used starting in September, 1943. However, VF-17 got
their airplanes when the national insignia had the red surround, in
August 1943, just before leaving the States aboard USS "Bunker Hill."
There are many photos of VF-17 Corsairs that show the red surround. It
is also well-known that, as the insignia changed, the red surround was
repainted in dark blue, when the ground crews got the time to do so. In
the case of VF-17, the only Corsair unit in the Solomons area of
operations to have individually-assigned aircraft, this time came when
the assigned pilot was on leave. Kepford went on leave in late December,
between VF-17's first and second combat tours, according to squadron C.O.
Tommy Blackburn's account in "Jolly Rogers," his history of VF-17. If
you look carefully at the "solo" photograph, you can see the repainted
dark blue surround to the insignia. I admit, I have looked at the photo
off and on for more than 30 years and only noticed it during this
project, so one needn't excoriate the decal makers for missing it. But
it is there to be seen. Another important item is that most of the
national insignias supplied on Corsair sheets are the later - smaller -
insignia associated with the F4U-1D. The F4U-1A used big insignias;
Tamiya got that right, so use their decal sheet to get the proper size
for aftermarket decals on the F4U-1A.
The other thing is
more important and involves the national insignia. Almost all
aftermarket decal sheets provide the national insignia in the blue/white
version that was used starting in September, 1943. However, VF-17 got
their airplanes when the national insignia had the red surround, in
August 1943, just before leaving the States aboard USS "Bunker Hill."
There are many photos of VF-17 Corsairs that show the red surround. It
is also well-known that, as the insignia changed, the red surround was
repainted in dark blue, when the ground crews got the time to do so. In
the case of VF-17, the only Corsair unit in the Solomons area of
operations to have individually-assigned aircraft, this time came when
the assigned pilot was on leave. Kepford went on leave in late December,
between VF-17's first and second combat tours, according to squadron C.O.
Tommy Blackburn's account in "Jolly Rogers," his history of VF-17. If
you look carefully at the "solo" photograph, you can see the repainted
dark blue surround to the insignia. I admit, I have looked at the photo
off and on for more than 30 years and only noticed it during this
project, so one needn't excoriate the decal makers for missing it. But
it is there to be seen. Another important item is that most of the
national insignias supplied on Corsair sheets are the later - smaller -
insignia associated with the F4U-1D. The F4U-1A used big insignias;
Tamiya got that right, so use their decal sheet to get the proper size
for aftermarket decals on the F4U-1A.
I was able to find
some "blue surround" national insignia in the decal dungeon, that were
the right size, and used them. Unfortunately, the center section was
much too light a s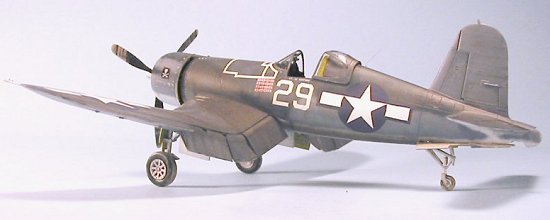 hade of blue. After looking at it for several days
after the model was finished, I finally decided to see what I could do. I
tried one circle-only insignia of the right size on the lower wing, and
discovered that when it was on, it was a different-enough shade that I
could see the dark blue surround! I then went and got the early
insignias that fit the rest of the markings and applied them. You may
not see it that clearly in the photos, because the difference is subtle,
but it's there to be seen in person.
hade of blue. After looking at it for several days
after the model was finished, I finally decided to see what I could do. I
tried one circle-only insignia of the right size on the lower wing, and
discovered that when it was on, it was a different-enough shade that I
could see the dark blue surround! I then went and got the early
insignias that fit the rest of the markings and applied them. You may
not see it that clearly in the photos, because the difference is subtle,
but it's there to be seen in person.
Another point is that the kill markings do not vertically align with the side number, as every aftermarket instruction sheet tells you to do. These kill markings were stickers applied to the airplane. The ground crew used the panel line of the fuel tank to align the stickers horizontally. Seen from the side in all three photos, they are at a 90 degree angle to the panel line, but do not exactly align with the side number.
|
CONCLUSIONS |
So, here you have
it: an F4U-1A done as accurately as contemporary information can let us
determine. As I said earlier, if you follow these color call-outs, and
modify the camouflage as regards sun-fading and other weathering per a
photo you're 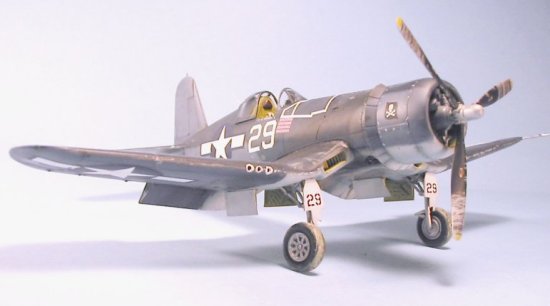 using, you'll be on "strong ground" as regards accuracy, if
you build an F4U-1A this way.
using, you'll be on "strong ground" as regards accuracy, if
you build an F4U-1A this way.
One last thing: many people have mentioned in recent years that Corsairs used a color called "Salmon," and some people have said it was used to paint the wheel wells. It was used, on all Corsairs, not just the early ones - but I don't think it would be a visible color. The reason for that is, this "Salmon" paint (it's called that because that's exactly the shade - salmon reddish-orange) was used as an initial primer on aluminum surfaces, to avoid oxidization. It is a thin paint (I have seen it on out-of-the-way surfaces of Corsairs undergoing restoration that have never been taken down to bare metal since initial construction), and the zinc chromate paint primer is applied over it. The Salmon paint would never give a sufficiently-thick coat of paint to provide sole protection against salt-water corrosion. That's not to say a factory painter might have missed some spots in a wheel well, and someone might have seen areas of "Salmon" showing through. But I really don't think it would have ever shown up as the sole paint in a wheel well of an operational airplane in a marine environment.
Model on - it's nice that the Tamiya kit is so good, the only real problems are deciding what to paint it.
Kit and Decals courtesy of my wallet.
May 2003